Configuring Data Retention
- The Data Retention page can be accessed from the platform's left navigation menu by navigating to Data Management > Data Retention.
- This will navigate you to the landing page where all existing data retention policies are listed.
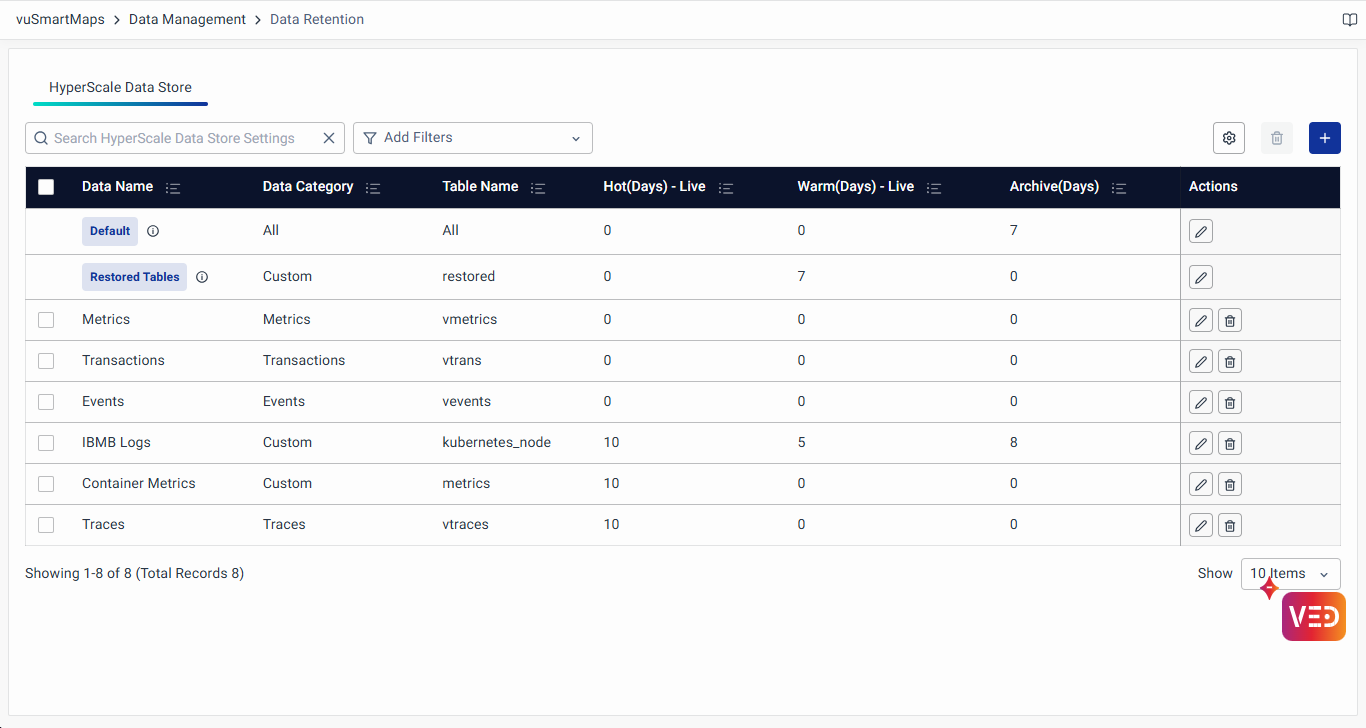
Data Retention Settings: Listing Page
Upon accessing the Data Retention page, you will land on the default tab for HyperScale Data Store Retention Settings. The landing page lists, the following details for the configured data retention policies:
-
Data Name: Displays the name of the data associated with the retention policy.
-
Data Category: Indicates the category to which the data belongs, providing insights into its nature and relevance. It supports seven distinct data categories, enabling users to choose and configure their preferred data sets: Traces, RUM, Logs, Metrics, Events, Transactions, and an optional Custom category for data that does not fit into the available predefined categories.
-
Table Name: Specifies the name of the table associated with the data retention policy.
It is to be noted that the policies will apply to tables with specific prefixes as outlined below:Category Table Name Prefix Traces vtracesRUM vrumLogs vlogsMetrics vmetricsEvents veventsTransactions vtransnoteFor proper data retention in vuSmartMaps, tables must include a mandatory timestamp column.
-
Hot (Days) - Live: Reflects the retention period for Hot Storage in days, defining the duration for immediate and frequent access.
-
Warm (Days) - Live: Specifies the retention period for Warm Storage in days, governing intermediate storage for less frequently accessed but still relevant data.
-
Archive (Days): Illustrates the retention period for Archived Storage, outlining the duration for long-term archival and storage of historical or rarely accessed data.
-
Actions: Provides quick access to perform actions on the data retention policy.
- Edit: Enables administrators to modify the existing policy by adjusting retention periods.
- Delete: Allows deletion of user-defined policies when they are no longer needed, ensuring efficient data management.
Default Data Retention Settings
As an administrator in vuSmartMaps, you have the capability to efficiently manage the Default data retention policy. This allows you to optimize storage usage and enhance performance across different storage storages, including Hot, Warm, and Archived. The Default policy is applicable for all data if there is no user-defined policy configured.
There are two default retention policies:
- Default Retention Policy for All Tables: This policy applies to all data tables by default.
- Default Retention Policy for Restored Tables: This policy is specifically applied to tables that have been restored from the Archived storage state. These tables have a prefix
restoredand follow default retention settings unless explicitly modified by an administrator.
It is to be noted that initially, default retention periods will be set as 15, 5, and 10 days for the Hot, Warm, and Archived data storages.
Editing Default Policy
- To edit the default retention policy, Click on the Edit icon under Actions column for Default policy row.
- Modify retention period values for Hot, Warm, and Archived storages as needed.
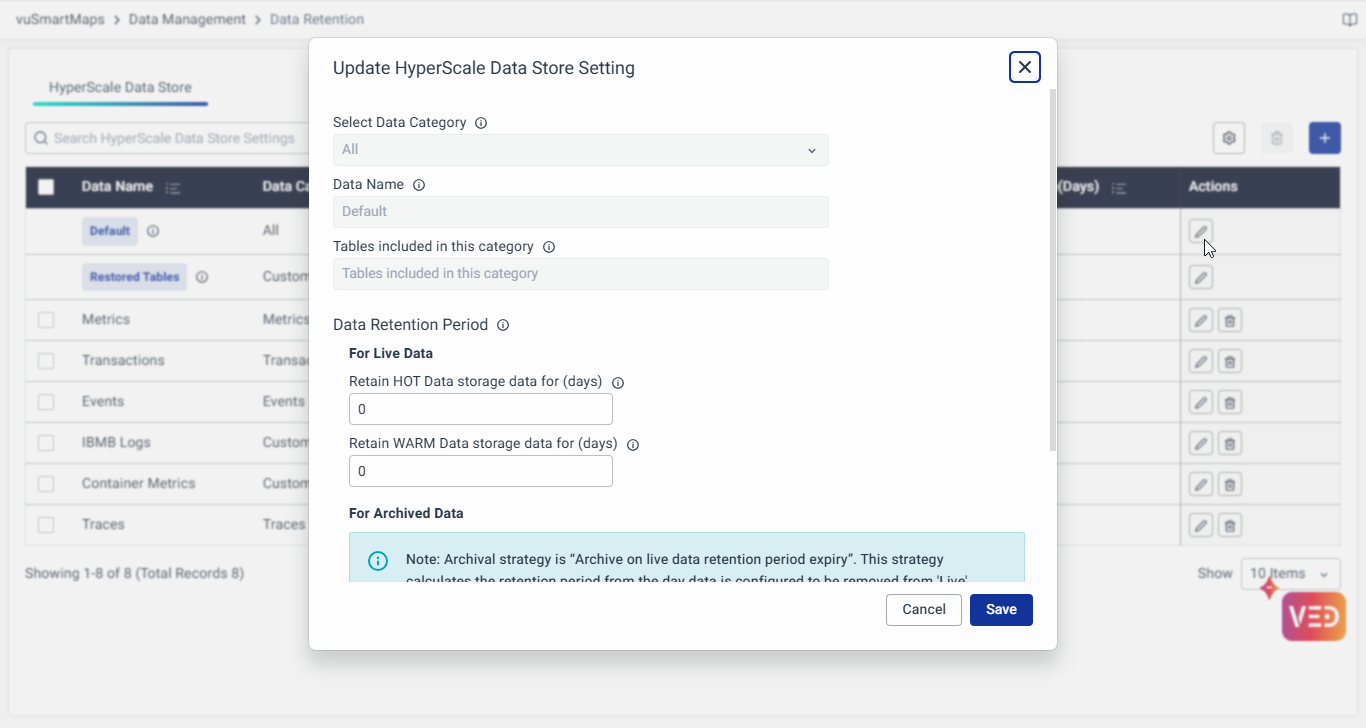
- Click Save to apply the updated values.
Deletion of the Default policy is not permitted.

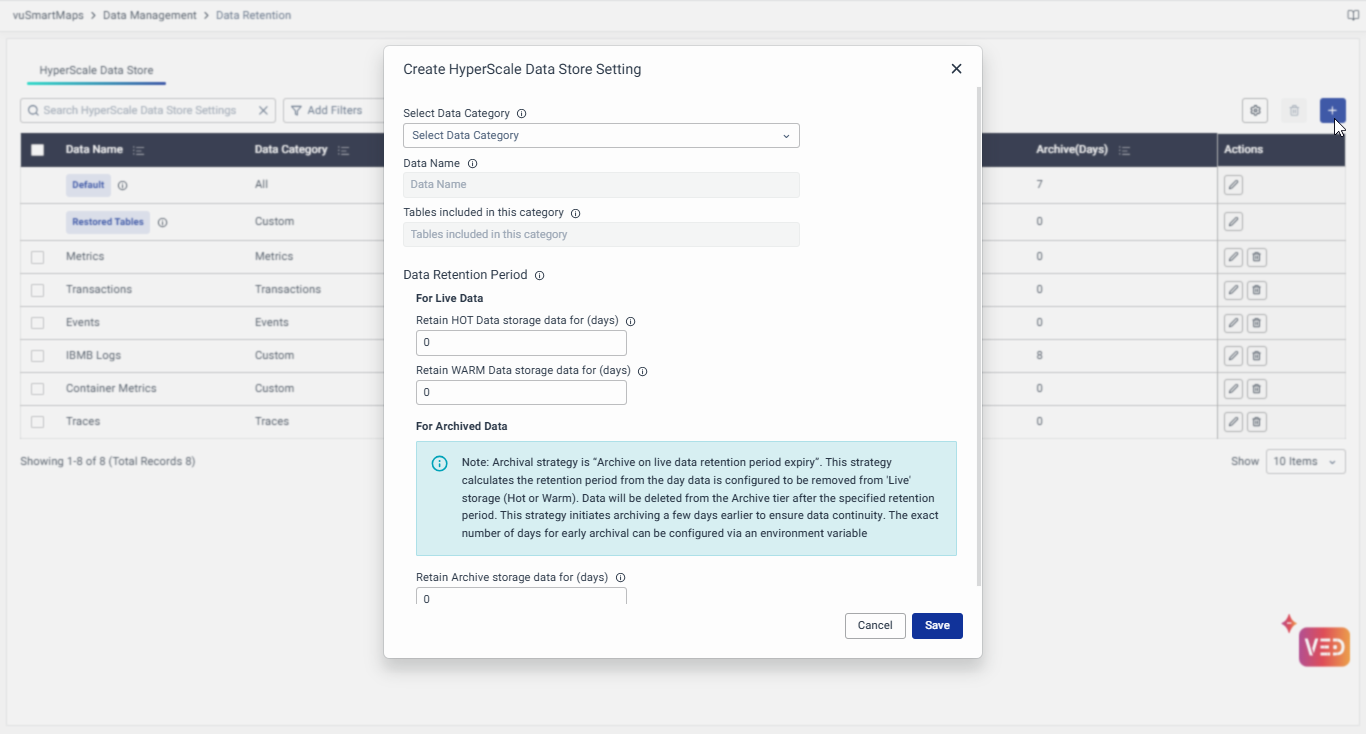
Creating New Data Retention Setting
-
To create a new Data Retention setting, click on the + button located in the top right corner of the table.
-
Complete the form with the following details:
- Select Data Category: Category of the data for which this Data Retention is applicable. It supports seven distinct data set categories, enabling users to choose and configure their preferred data sets: Traces, RUM, Logs, Metrics, Events, Transactions, and Custom.
noteWhen creating a new Data Retention setting, note that data category options for which retention is not already configured will be the only ones available in the drop-down menu.
- Data Name: The system assigns default names after selecting the category. For custom categories, data names can be provided.
- Tables included in this category: The system assigns table names after selecting the category. For custom categories, table names can be selected from the dropdown listing all the distributed tables in the HyperScale Data Store.

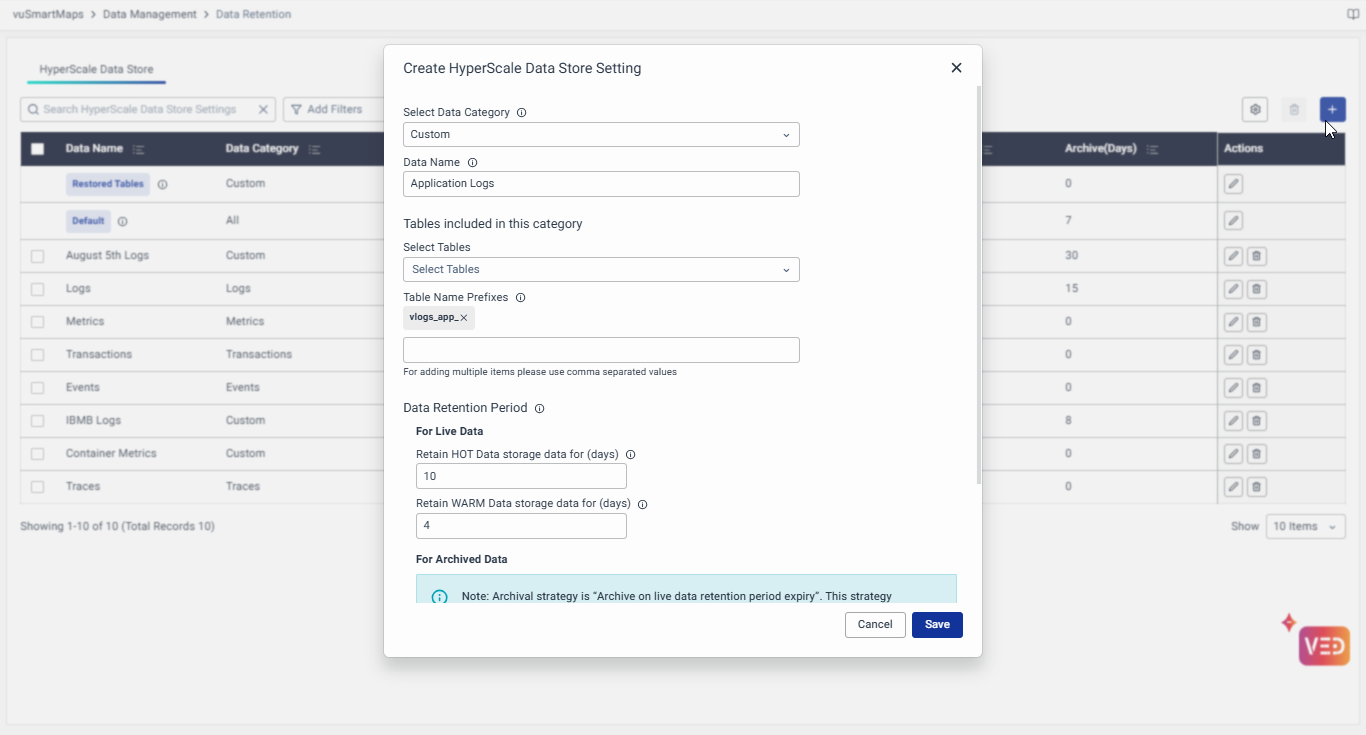
For a custom data category, an optional field to select "Table Name Wildcards" will be available. In this field, you can specify prefixes for the table names. To add multiple items, use comma-separated values. The prefix can include numbers, hyphens, and asterisks, but must include at least one alphabet character.
-
Data Retention Period:
- For Live Data:
- Retain HOT Data storage data for (days): Configure the number of days for which data in tables matching the criteria in this policy will be kept in Hot storage. Data in Hot storage resides in high-speed disks (like SSD) which allows for quick live searches and data analytics. After the configured number of days, data will be moved to the Warm storage or will be deleted from the hot storage as per the Warm storage data retention configuration.
- Retain WARM Data storage data for (days): Configure the number of days for which data in tables matching the criteria in this policy will be kept in Warm storage. Data in the Warm storage is available for live queries with lower speed than data in the Hot storage. After the configured number of days, data will be deleted from the Warm storage.
- For Archived Data:
- Retain Archive storage data for (days): Configure the number of days for which data in tables matching the criteria in this policy will be kept in the Archived storage. Data in the Archived storage is not available for live queries. At any point, data in the Archived storage can be brought back to the live storage using the restore option on the data storage page. After the configured number of days, data will be deleted from the Archived storage.
- For Live Data:
-
Click Save to enable and apply this retention setting.
Example Use Case: Implementing Custom Data Retention Policies
Objective: Configuring Custom Log Retention Policies
We aim to create tailored retention policies for logs based on their importance and usage. Initially, all logs follow a standard policy (default), but adjustments are required for specific categories.
Implementation Steps
-
Defining the Initial Log Retention Policy:
- The Logs category is configured with Hot: 7 days, Warm: 3 days, Archive: 15 days.
- This ensures logs remain accessible for a defined period before deletion.

-
Adjusting Retention for Specific Logs:
- A specific log table requires longer retention for debugging.
- A policy with a Custom data category is created, selecting
vlogs_log_analytics_replicated_dist_Aug5in the field Select Tables. - Retention is updated to Hot: 5 days, Warm: 2 days, Archive: 30 days.

-
Applying a Wildcard-Based Policy for Application Logs:
- To dynamically handle application logs, another Custom policy is introduced.
- Using the wildcard prefix
vlogs_app_(Table Name Prefixes), retention is set to Hot: 10 days, Warm: 4 days, Archive: 20 days. - Any new log tables created with
vlogs_app_automatically inherit this retention policy.
Impact and Outcomes
- The general log policy supports routine operational needs while optimizing storage.
- The specific logs policy ensures extended retention for debugging purposes.
- The wildcard-based policy streamlines the management of application logs dynamically.
Priority Handling for Data Retention Policies
- If the table name does not find a pattern match in the Data Retention settings, it will use the default retention settings.
- When there are multiple entries in the Data Retention table with the same table name or a similar table prefix pattern, the setting with the longest prefix match will be applied, and other entries will be ignored.
- Example: If the table name is
logs-heartbeat-dailyand the data retention patterns available arelogs-*andlogs-heartbeat*, then the latter patternlogs-heartbeat*will be considered because it has the longest matching prefix.
- Example: If the table name is
- This ensures that the most specific data retention policy is applied, reducing ambiguity and preventing unexpected retention behaviors. The system prioritizes the more granular policy, allowing administrators to maintain finer control over their data retention configurations.
Managing Data Retention Policies
To edit or delete a specific data retention policy in vuSmartMaps, follow these simple steps:
- Edit and Delete Individual Policies:
- Locate the particular data retention policy in the table.
- Utilize the Edit and Delete icons located under the Actions Column to make individual adjustments.
- Delete Multiple Policies:
- To delete multiple policies simultaneously, select them using the checkboxes.
- Use the delete icon located at the top of the table to perform a batch deletion.
Deletion of the Default policy is not permitted. This policy serves as a baseline and cannot be removed to maintain the integrity of data management.
By using these features, administrators can efficiently manage data retention policies, ensuring a streamlined and organized approach to data management within vuSmartMaps.
