Browser RUM Deployment & Configuration V2
Browser RUM V2 Deployment Workflow
The following high-level workflow summarizes the steps required to deploy and configure Browser RUM V2:
- Enable the Browser RUM O11ySource in vuSmartMaps.
- Create a new Browser RUM V2 Data Source and configure the required parameters.
- Configure Allowed Origins, Allowed Headers, SSL, and Sampling Settings.
- Download the Browser RUM V2 Instrumentation Package.
- Configure the Proxy Server and OpenTelemetry (OTEL) Collector connectivity.
- Add the Browser RUM JavaScript Agent to the target Web Application.
- Deploy or redeploy the application with the Browser RUM Instrumentation.
- Verify that Telemetry Data is reaching the OpenTelemetry (OTEL) Collector.
- Validate that Browser RUM Data is visible within vuSmartMaps.
- Begin monitoring Application Performance, User Activity, Session Data, and Frontend Errors through Browser RUM Dashboards and Analysis Views.
Deployment and Configuration
Browser RUM V2 is deployed by integrating the Browser RUM V2 JavaScript Agent into the target web application and configuring the required Browser RUM V2 data source within vuSmartMaps. Once configured, the agent captures real user telemetry and forwards it to the vuSmartMaps observability platform for analysis, monitoring, and troubleshooting.
The Browser RUM V2 deployment process consists of the following key steps:
-
Configuring vuSmartMaps for Browser RUM V2: To enable Browser RUM V2 in vuSmartMaps, activate the Browser RUM V2 O11ySource, configure data sources, and download the client instrumentation package to begin monitoring user sessions and application performance in real time.
-
Client-Side Instrumentation: Add the Browser RUM JavaScript Agent to the target application. The process varies based on the deployment environment:
- Host/VM: Add the VuNet RUM script directly to your application’s codebase and configure the telemetry receiver endpoint.
- Container:Include the Browser RUM script in the container image and rebuild it to enable monitoring within containerized applications.
- Kubernetes: Deploy the updated container with the embedded RUM script to your cluster for end-to-end session monitoring.
-
Additional Configuration Details: To support secure and scalable Browser RUM telemetry collection, configure a reverse proxy server between end-user browsers and the OpenTelemetry (OTEL) Collector. This setup enables SSL termination, CORS handling, API key authentication, and safe forwarding of data to the OpenTelemetry (OTEL) Collector. The section below outlines all prerequisites, NGINX configurations, and proxy sizing recommendations required for seamless integration.
Following these steps, Browser RUM V2 is successfully integrated, allowing continuous tracking of user experience, performance trends, and potential issues for enhanced web application observability.
vuSmartMaps Configuration: Enabling Browser RUM V2
Enabling Browser RUM V2 O11ySource
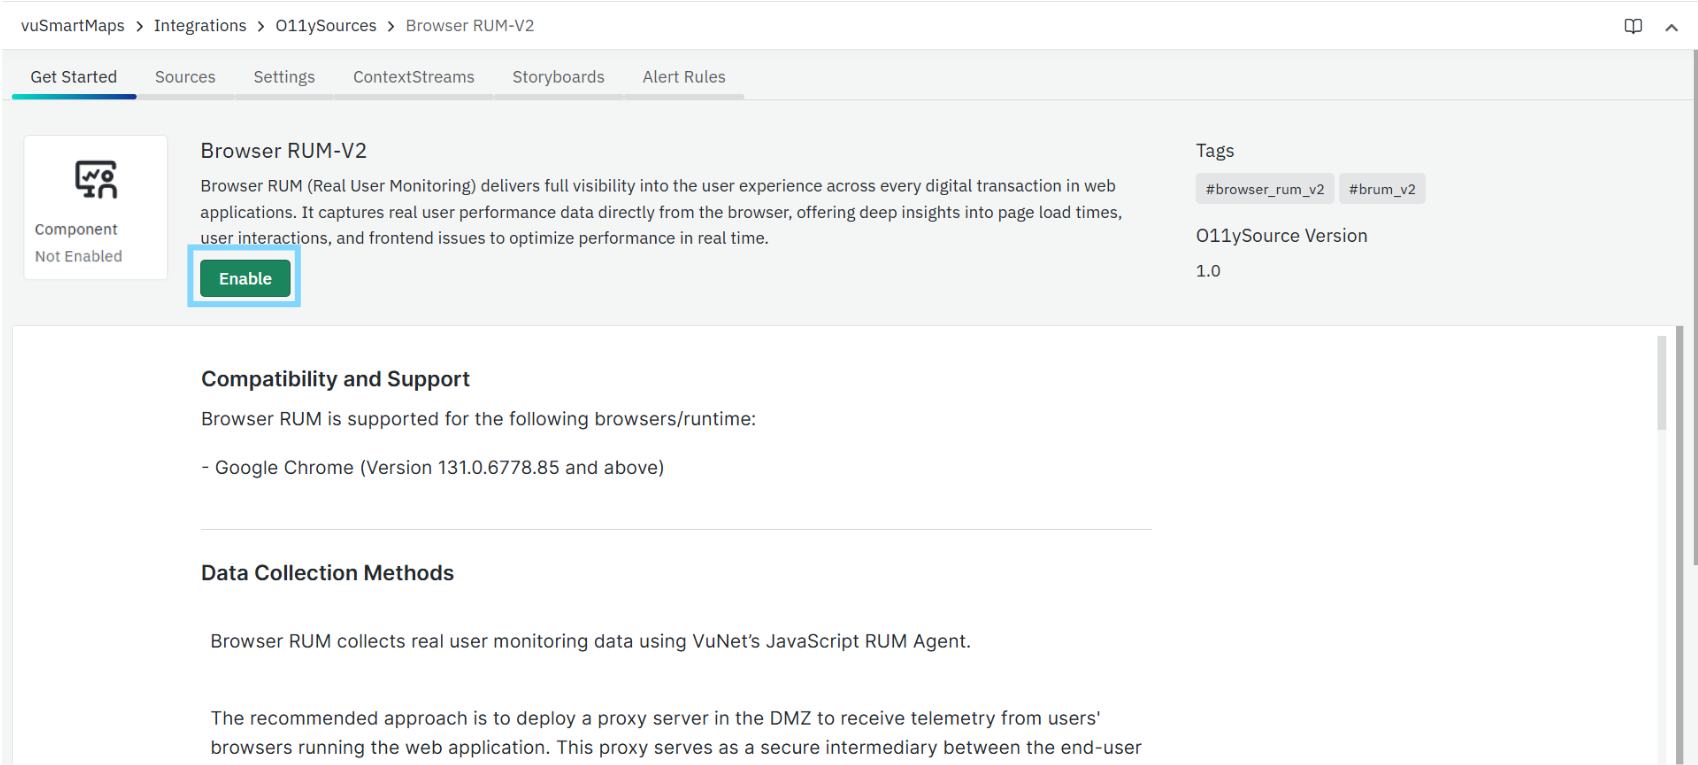
- Navigate to O11ySources:
- vuSmartMaps O11ySources can be accessed by navigating from the left navigation menu (Integrations > O11ySources).
- Locate Browser RUM V2 O11ySource on the landing page.

- Enable Browser RUM V2 O11ySources:
- Click the Enable button to activate Browser RUM V2 O11ySource.
Configuring Data Sources
To add and configure a new Browser RUM V2 data source:
- Navigate to the Sources tab within the Browser RUM V2 O11ySource.
- Click Source (top-right) > Configure New.

- This opens the Configure New Data Source(s) wizard, which includes:
Step 1: Add Data Source
In this step, you provide the basic details required for Browser RUM V2.

Fill in the following:
- Source ID (Optional): Enter a unique identifier for the Browser RUM V2 data source. If left blank, vuSmartMaps automatically generates a Source ID.
- SSL Required: Select Yes to enable TLS communication for Browser RUM data ingestion. Select No if TLS encryption is not required.
- Traces Sampling Percentage: Specify the percentage of trace data to be collected by the Browser RUM V2 agent. A lower percentage reduces telemetry volume, while a higher percentage provides greater visibility into application performance.
- Session Replay Sampling Percentage: Specify the percentage of user sessions to be captured for session replay. Higher values capture more sessions for analysis, while lower values reduce storage and processing overhead.
- Allowed Origins (Optional): Enter a comma-separated list of origins permitted to access the OpenTelemetry (OTEL) Collector. If left blank, all origins (
*) are allowed. - Allowed Headers (Optional): Enter a comma-separated list of HTTP headers permitted in CORS requests. If left blank, all headers (
*) are allowed. - Service: Enter the name of the service to be monitored. This value is used to identify the service in Browser RUM V2 dashboards, traces, and analytics.
- Application (Optional): Enter the name of the application associated with the monitored service. This value is used to logically group telemetry across Browser RUM V2 dashboards and analytics.
- CDN Options: Select Enable to load the Browser RUM V2 JavaScript Agent from the VuNet CDN. Select Disable if the Browser RUM SDK will be hosted locally by the application.
- SDK Version (Optional): Select the Browser RUM V2 SDK version to be used for instrumentation. You can choose the Latest Version or a specific supported SDK version, depending on your deployment requirements.
- Collection URL Override (Optional): Select Enable to specify a custom telemetry collection endpoint. Select Disable to use the default Browser RUM V2 collection endpoint configured by vuSmartMaps.
- Custom Collection URL (Optional): If Collection URL Override is enabled, enter the custom telemetry collection URL that the Browser RUM V2 JavaScript Agent should use to send telemetry data.
Step 2: Configuration Setup
In this step, you define how the data source will be managed by the platform. The table lists the data source you added and shows:
- Host / Group Name – The application name or identifier you entered.
- Dataset – Set automatically to Browser RUM V2.
- Managed By – Indicates how data collection for the source is managed. Based on the O11ySource type, one or more management modes may be available. Only the modes supported by the selected source are shown.
- You must download the required package or configuration files.
- Deployment is done manually on your application.
- Data collection starts once instrumentation is integrated and live.
- Click Proceed to continue to the review stage.
- You must download the required package or configuration files.
When you select Manual mode,users should download the instrumentation package and integrate the Browser RUM JavaScript Agent into the target application.
Management Modes:
- OmniAgent Managed – Data collection is handled automatically by OmniAgent. Once the agent is discovered on the host, data collection starts. Until discovery, the source remains in a Pending state.
- Manually Managed – The user manages data collection manually by downloading and deploying the required agent package or configuration files.
- You must download the required package or configuration files.
- Deployment is done manually on your application.
- Data collection starts once instrumentation is integrated and live.
- Refer to the Download Source section for setup details.
- Remote Collection – Data is collected remotely without installing OmniAgent on the host. The platform connects using configured credentials, making it suitable for external or third-party systems.
After selecting the applicable management mode, click Proceed to continue.
Step 3: Review
The Review step shows a summary of the configuration before completing the data source setup. This helps you verify that the correct settings and management type are applied.
- Application and dataset details
- Sampling configurations
- Selected management mode
- Number of sources being added
When you select Manual mode,users should download the instrumentation package and integrate the Browser RUM JavaScript Agent into the target application.
It also provides guidance based on the management type:
- Manually Managed – Download and deploy the required binaries or configuration files after setup.
- Remote Collection – Data collection starts automatically once the configuration is applied.
- OmniAgent Managed – Data collection begins when OmniAgent is detected; until then, the source remains Pending.
After entering all details, click Save and Continue to download the Browser RUM JavaScript instrumentation package. Once downloaded, click Finish.
Download Source
If the data source uses Manually Managed mode, you must download the required package. To download:
- Go to the Sources table.
- Click the Download icon in the Actions column.
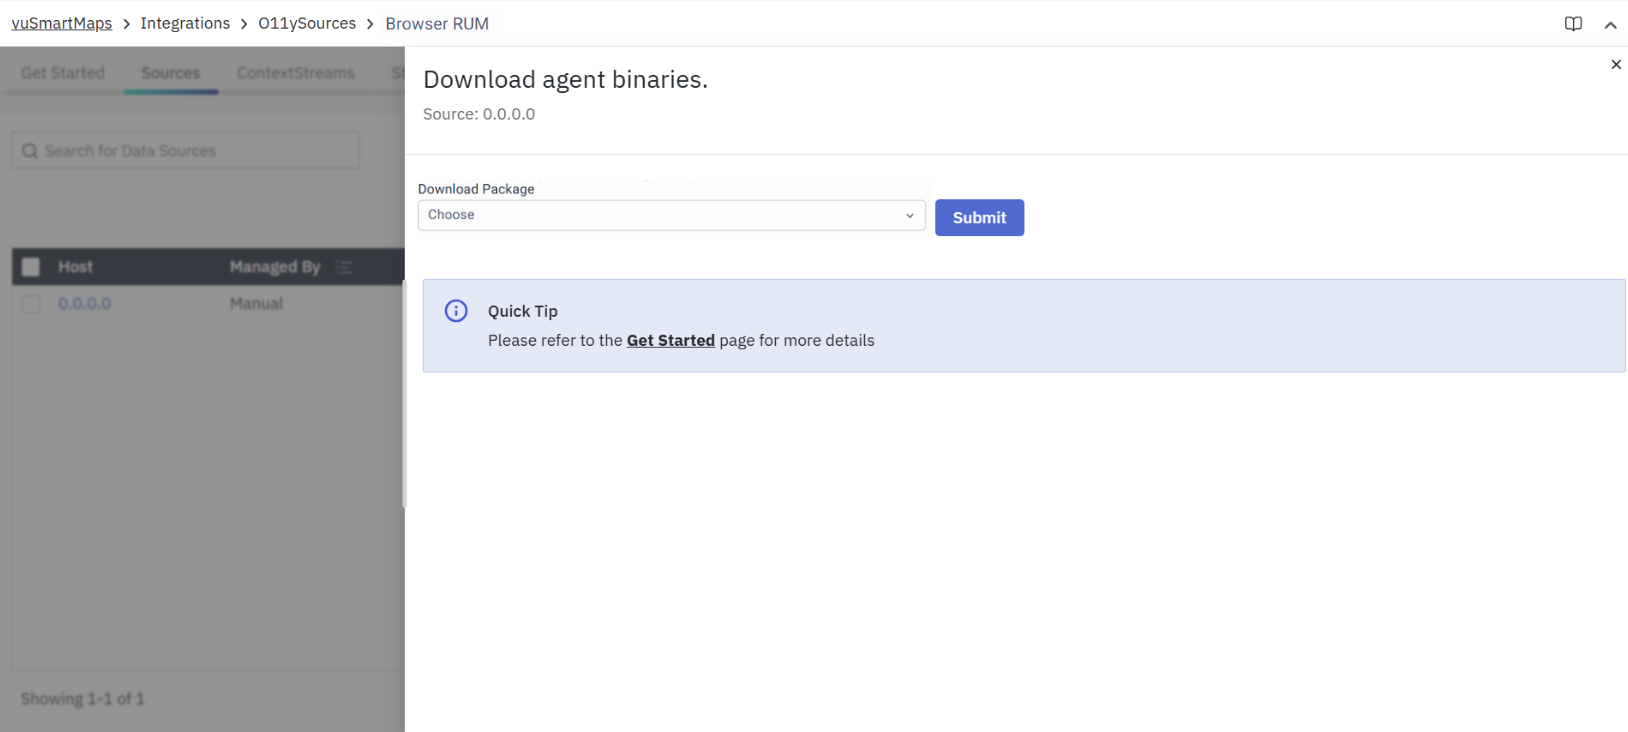
- Select the required configuration.
- Click Submit.
This downloads the Browser RUM V2 instrumentation package and related configuration files required for manual deployment.
Follow the instructions provided in the Client Side Browser RUM Instrumentation section.
Client Side Browser RUM Instrumentation
Instrumenting JavaScript Applications
This section explains how to instrument JavaScript applications using the Browser RUM V2 JavaScript Agent.
Prerequisites
Before you begin, ensure the following:
- Configure a reverse proxy server or dedicated telemetry proxy to receive Browser RUM V2 telemetry and securely forward it to the OpenTelemetry (OTEL) Collector.
- The Browser RUM Agent should send telemetry to the proxy endpoint:
https://<proxy_address>/rum/v1/traces
- which forwards the data to the OpenTelemetry Collector:
https://<RUM-collector-host>:4329/v1/traces
- The instrumentation would require the JavaScript to be added to html pages by editing/updating the html pages and adding the <script> tag.
- The method of updating HTML files depends on the technology used by the application.
JavaScript-Based Applications (JavaScript, Angular, React)
- Single Page Applications (SPA): Update the primary application HTML file (typically
index.html) to include the Browser RUM script. - Multi-Page Applications (MPA): Add the Browser RUM script to all relevant HTML pages that participate in the application's user workflow.
Server-Side Rendered Applications (PHP, JSP, ASP.NET)
- Since HTML pages are generated dynamically by the server, integrate the Browser RUM script through the application's server-side templates or layout files (for example, index.html,
header.php,_Layout.cshtml, or equivalent template files).
Ensure that the application and environment allow externally loaded or inline scripts to be executed, since the RUM SDK is loaded as a script.
Host / Virtual Machine (VM)
Add the following Browser RUM script to the <head> section of your application's HTML page:
<script
id="vunet-rum"
async
crossorigin="anonymous"
src="https://your-cdn/vunet-rum-loader.ie.js"
data-collection-source-url="https://collector.example.com/rum"
data-service-name="my-service"
data-service-namespace="my-app"
></script>
The Browser RUM V2 script supports multiple configuration attributes that can be used to customize telemetry collection, session tracking, trace propagation, buffering behavior, error collection, and other monitoring capabilities. Refer to the Configuration Attributes Reference section for the complete list of supported attributes and their descriptions.
Configuration Attributes Reference
The Browser RUM V2 script supports the following configuration attributes:
| Data Attribute | Programmatic Option | Type | Required | Default |
|---|---|---|---|---|
| data-collection-source-url | collectionSourceUrl | string | Yes | - |
| data-decide-api-endpoint | decideApiEndpoint | string | No | /vuSmartMaps/api/rum/ |
| data-authorization-token | authorizationToken | string | No | - |
| data-service-name | serviceName | string | No | unknown |
| data-service-namespace | serviceNamespace | string | No | - |
| data-deployment-environment | deploymentEnvironment | string | No | - |
| data-default-attributes | defaultAttributes | Record<string, unknown> | No | |
| data-buffer-max-spans | bufferMaxSpans | number | No | 2048 |
| data-max-export-batch-size | maxExportBatchSize | number | No | 50 |
| data-buffer-timeout | bufferTimeout | number | No | 2000 |
| data-ignore-urls | ignoreUrls | (string | RegExp)[] | No |
| data-propagate-trace-header-cors-urls | propagateTraceHeaderCorsUrls | (string | RegExp)[] | No |
| data-collect-session-id | collectSessionId | boolean | No | true |
| data-collect-errors | collectErrors | boolean | No | true |
| data-drop-single-user-interaction-traces | dropSingleUserInteractionTraces | boolean | No | false |
| data-drop-short-traces-ms | dropShortTracesMs | number | No | 0 |
| data-user-interaction-element-name-limit | userInteractionElementNameLimit | number | No | 20 |
| data-user-interaction-event-names | userInteractionEventNames | string[] | No | Built-in list |
| - | getOverriddenServiceName | (span) => string | No | - |
| data-form | form | object | No | - |
| data-inject-into-iframe | injectIntoIframe | boolean | No | false |
| data-rum-logging | rumLogging | boolean | No | false |
Deployment
After adding the Browser RUM script:
- Rebuild and deploy the updated application.
- Verify that the Browser RUM V2 JavaScript Agent loads successfully and telemetry is being sent to the configured collection endpoint.
- Confirm that telemetry is being sent to the configured collection endpoint.
Ensure that the Content Security Policy (CSP) allows loading Browser RUM assets from the VuNet CDN:
https://cdn.vunet.ai/rum/vunet-rum-core-v3.1.0.js
Container
For containerized environments:
- Add the Browser RUM script to the application's page header.
- Rebuild the Docker image.
- Deploy the updated container.
Kubernetes
For Kubernetes environments:
- Add the Browser RUM script to the application's page header.
- Rebuild the container image.
- Redeploy the updated workload to the Kubernetes cluster.
Telemetry Configuration Refresh
If the OpenTelemetry Collector configuration is not updated automatically after Browser RUM configuration changes, log in to the Cairo (vuInterface) pod and run:
python3 mickey/manage.py load_telemetry_config
This command reloads the latest telemetry configuration and synchronizes it with the platform.
CORS Prerequisites
To ensure successful communication between the application and the proxy server, the following CORS-related requirements must be met:
- Allowed Origins
- Only trusted application domains should be allowed to send data.
- The proxy server must be configured to whitelist specific origins using the following headers:
Access-Control-Allow-Origin: https://<App-name.com>
Access-Control-Allow-Methods: POST, OPTIONS
Access-Control-Allow-Headers: Content-Type, Authorization, logcategory
- Replace
https://<App-name.com>with the actual domain(s) of your frontend application.
- Security Mechanism Compatibility
- If the application uses security mechanisms such as:
- CSP (Content Security Policy)
- Firewalls
- Then these must be configured to allow communication with the proxy.
- The CSP headers must permit the proxy domain in the
connect-srcdirective. For example:
Content-Security-Policy: script-src 'self'; connect-src 'self' https://<proxy_address>;
- Ensure the proxy’s hostname (e.g.,
https://otelproxy.com) is included in theconnect-srcdirective.
- Preflight Request Support
- Browsers automatically send OPTIONS (preflight) requests before
POSTrequests to check CORS permissions. - The proxy must correctly handle these preflight requests.
- Ensure your NGINX or proxy server is configured to return appropriate CORS headers for
OPTIONSrequests.
Additional Configuration Details
RUM Proxy Server Configuration Guide
This section outlines the prerequisites and configuration guidelines for setting up a Reverse Proxy for Real User Monitoring (RUM) data, in alignment with organizational standards. While NGINX is used as an example in this guide, it is recommended to use the proxy server approved by your organization.
The configuration includes support for:
- SSL termination
- Cross-Origin Resource Sharing (CORS)
- API key authentication
- Backend proxying to an internal RUM collector
Prerequisites
- A Linux-based server with NGINX installed
- NGINX version >= 1.18
- SSL certificate and key (PEM format)
- Domain/subdomain pointing to your NGINX proxy server
- Allowed Origins configured for Browser RUM CORS access
- Firewall rules allowing port 443 (HTTPS) (External Port)
- Firewall rules allowing communication from the Proxy Server to the OpenTelemetry (OTEL) Collector on port 4329.
Configuration Summary
SSL Configuration
- Ensure your NGINX server has a valid SSL certificate.
- Place your certificate and key files in the appropriate directory, typically:
/etc/ssl/certs/proxy-cert.crt
/etc/ssl/private/proxy-key.key
CORS Mapping
- Allows requests only from configured Allowed Origins.
- Use the following configuration for handling CORS:
# For handling Cors
map $http_origin $cors_allow_origin {
    default "";
    "~^https?://myapp\.domain\.com$" "$http_origin";
    "~^https?://192.\.168\.1\.1$" "$http_origin";
}
- Add the following line inside the specific
locationblock:
add_header 'Access-Control-Allow-Origin' "$cors_allow_origin" always;
API Key Mapping
- Maps a valid
Authorizationheader to a flag used for access control. - Add the following configuration:
map $http_authorization $is_valid_api_key {
    default 0;
    "ef7ae8b1fa097092a66a56882fd8366cfbdb1b6848ae0d529a21a68a94e245020" 1;
}
- To generate the key using
openssl:
$ openssl rand -hex 32
ef7ae8b1fa097092a66a56882fd8366cfbdb1b6848ae0d529a21a68a94e245020
HTTPS Server Block
Handles SSL, routes requests, and enforces security headers.
server {
    listen 443 ssl;

    # Replace with actual domain or IP address
    server_name myproxydomain.com;

    ssl_certificate     /etc/ssl/certs/proxy-cert.crt;
    ssl_certificate_key /etc/ssl/private/proxy-key.key;
    ssl_protocols       TLSv1.2 TLSv1.3;
    ssl_ciphers         HIGH:!aNULL:!MD5;
    ssl_prefer_server_ciphers on;

    add_header Strict-Transport-Security "max-age=63072000; includeSubDomains" always;
    add_header X-Frame-Options "SAMEORIGIN" always;
    add_header X-Content-Type-Options "nosniff" always;
    add_header Referrer-Policy "strict-origin-when-cross-origin" always;

    location /vuSmartMaps/api/rum {
        proxy_pass https://vuSmartMapsIP;
        proxy_set_header Host vuSmartMapsIP;
    }

    location /rum/ {

        if ($request_method = 'OPTIONS') {
            add_header 'Access-Control-Allow-Origin' "$cors_allow_origin" always;
            add_header 'Access-Control-Allow-Credentials' 'true' always;
            add_header 'Access-Control-Allow-Methods' 'GET, POST, OPTIONS' always;
            add_header 'Access-Control-Allow-Headers' 'Content-Type, Authorization, logcategory' always;
            return 204;
        }

        if ($is_valid_api_key = 0) {
            return 401 "Unauthorized";
        }

        add_header 'Access-Control-Allow-Origin' "$cors_allow_origin" always;
        add_header 'Access-Control-Allow-Credentials' 'true' always;
        add_header 'Access-Control-Allow-Methods' 'GET, POST, OPTIONS' always;
        add_header 'Access-Control-Allow-Headers' 'Content-Type, Authorization, logcategory' always;

        proxy_pass http://rum-backend/;
        proxy_set_header Host $host;
        proxy_set_header X-Real-IP $remote_addr;
        proxy_set_header X-Forwarded-For $proxy_add_x_forwarded_for;
        proxy_set_header X-Forwarded-Proto $scheme;
        proxy_buffering off;
    }
}
HTTP Redirect Block
Redirects HTTP to HTTPS.
server {
    listen 80;
    server_name otelcollector.com;
    return 301 https://$host$request_uri;
}
Upstream Block
Defines backend servers for the RUM collector.
upstream rum-backend {
    # server 172.16.124.188:4322;  # Example sandbox backend
}
Consolidated NGINX Configuration
Create the below configuration under:
/etc/nginx/conf.d/rumsslproxy.conf
This file will define reverse proxy and CORS logic for RUM service integration. Replace all highlighted placeholders with appropriate values to be updated as per the end state environment
# =========================
# Map CORS-Allowed Origins
# =========================
# This maps the Origin header to itself only if it matches approved domains,
# which are then used in the 'Access-Control-Allow-Origin' header.

map $http_origin $cors_allow_origin {
    default "";
    "~^https?://<ALLOWED_ORIGIN>$"  "$http_origin";
    #######EXAMPLE####################################
    ##"~^https?://myapp\.com$"        "$http_origin";
    ##"~^https?://192\.168\.1\.1$"    "$http_origin";
}

# =============================
# Map Authorization API Key
# =============================
# This maps the incoming Authorization header to a flag (1 if valid, 0 otherwise),
# enabling simple conditional checks in the server block.

map $http_authorization $is_valid_api_key {
    default 0;
    "ef7ae8b1fa097092a66a56882fd8366cfbdb1b6848ae0d529a21a68a94e245020" 1;
}

# ===========================
# HTTPS Server for RUM Proxy
# ===========================
server {
    listen 443 ssl;
    # --------------------------
    # Domain name of the proxy for example rum.vunetsystems.com
    # --------------------------
    Server_name <SERVER_NAME>;

    # SSL certificate and private key
    ssl_certificate     <SSL_CERT_PATH>;
    ssl_certificate_key <SSL_CERT_KEY_PATH>;

    ###EXAMPLE##########################################
    # ssl_certificate     /etc/ssl/certs/vusmartmaps.crt;
    # ssl_certificate_key /etc/ssl/private/vusmartmaps.key;

    # Enforce modern TLS protocols and secure cipher suites
    ssl_protocols       TLSv1.2 TLSv1.3;
    ssl_ciphers         HIGH:!aNULL:!MD5;
    ssl_prefer_server_ciphers on;

    # Security headers for HTTPS best practices
    add_header Strict-Transport-Security "max-age=63072000; includeSubDomains" always;
    add_header X-Frame-Options "SAMEORIGIN" always;
    add_header X-Content-Type-Options "nosniff" always;
    add_header Referrer-Policy "strict-origin-when-cross-origin" always;

    # ============================================================
    # Proxy to vuSmartMaps decide API EndPoint. Specify vuSmartMapsIP
    # ============================================================
    # Basic reverse proxy for internal API calls
    location /vuSmartMaps/api/rum {
        proxy_pass https://vuSmartMapsIP;
        proxy_set_header Host vuSmartMapsIP;
    }

    # ===============================
    # Main RUM Beacon Proxy Endpoint
    # ===============================
    location /rum/ {

        # --------------------------
        # Handle CORS Preflight
        # --------------------------
        # If this is an OPTIONS request, return allowed headers & methods
        if ($request_method = 'OPTIONS') {
            add_header 'Access-Control-Allow-Origin'      "$cors_allow_origin" always;
            add_header 'Access-Control-Allow-Credentials' 'true' always;
            add_header 'Access-Control-Allow-Methods'     'GET, POST, OPTIONS' always;
            add_header 'Access-Control-Allow-Headers'     'Content-Type, Authorization, logcategory' always;
            return 204;
        }

        # --------------------------
        # Enforce API Key Auth
        # --------------------------
        # If API key is not valid, reject the request
        if ($is_valid_api_key = 0) {
            return 401 "Unauthorized";
        }

        # --------------------------
        # Add CORS headers to real requests
        # --------------------------
        add_header 'Access-Control-Allow-Origin'      "$cors_allow_origin" always;
        add_header 'Access-Control-Allow-Credentials' 'true' always;
        add_header 'Access-Control-Allow-Methods'     'GET, POST, OPTIONS' always;
        add_header 'Access-Control-Allow-Headers'     'Content-Type, Authorization, logcategory' always;

        # --------------------------
        # Proxy to internal RUM collector use http or https based on requirement
        # --------------------------

        ###for http://
        proxy_pass http://rum-backend/;
        ### for https://
        #proxy_pass https://rum-backend/;

        # Optional SSL configuration for backend (commented out)
        # proxy_ssl_name rum.vunetsystems.com;
        # proxy_ssl_server_name on;
        # proxy_ssl_verify on;
        # proxy_ssl_verify_depth 2;
        # proxy_ssl_trusted_certificate /etc/nginx/certs/ca_chain.pem;

        # Forward client headers to backend
        proxy_set_header Host                $host;
        proxy_set_header X-Real-IP           $remote_addr;
        proxy_set_header X-Forwarded-For     $proxy_add_x_forwarded_for;
        proxy_set_header X-Forwarded-Proto   $scheme;

        # Disable buffering for low-latency small POSTs
        proxy_buffering off;
    }
}

# ================================
# Redirect HTTP to HTTPS
# ================================
server {
    listen 80;
    server_name otelcollector.com;

    # Redirect all HTTP requests to HTTPS
    return 301 https://$host$request_uri;
}

# ================================
# Define Backend RUM Collector
# ================================
# You can define one or more backend servers here.
# Useful for load balancing or failover.
upstream rum-backend {
    # Example backend:
    # Replace this with RUM Otel Collector IP
    server <OTEL_COLL_IP>:4322;
     ### EXAMPLE
    ##server 172.16.124.188:4322;
 }
Validate and Restart NGINX: Use the following commands to validate the NGINX configuration and restart the server:
$ sudo nginx -t
nginx: the configuration file /etc/nginx/nginx.conf syntax is ok
nginx: configuration file /etc/nginx/nginx.conf test is successful

$ sudo service nginx restart
Proxy Sizing
To handle 40,000 RUM events per second with 2 KB payloads through an NGINX proxy, a single well-tuned node with 8 vCPU, 16 GB RAM, 100 GB SSD (if logging is enabled) would be required. For high availability and redundancy, deploy 2 such nodes behind an external load balancer.
Input Parameters
- Events per Second (EPS): 40,000
- Payload Size per Event: 2 KB
Per Node Sizing Recommendation
| Resource | Size |
|---|---|
| vCPU | 8 |
| RAM | 16 |
| Disk SSD | 100 GB if logging is enabled |
FAQs
What are the main steps to deploy Browser RUM V2?
The deployment workflow includes enabling the Browser RUM V2 O11ySource, creating and configuring a data source, configuring CORS, SSL, and sampling settings, downloading the instrumentation package, configuring the proxy and OTEL Collector connectivity, instrumenting the web application, deploying it, and verifying that telemetry and Browser RUM data are reaching vuSmartMaps.
What management modes are supported for Browser RUM V2 data sources?
Browser RUM V2 supports OmniAgent Managed, Manually Managed, and Remote Collection modes. OmniAgent Managed uses OmniAgent for data collection, Manually Managed requires users to download and deploy the instrumentation package, and Remote Collection collects data remotely without installing OmniAgent on the host.
How do I download the Browser RUM V2 instrumentation package?
For a Manually Managed data source, go to the Sources table, click the Download icon in the Actions column, select the required configuration, and click Submit. The instrumentation package and related configuration files are then downloaded for manual deployment.
How do I instrument a JavaScript application for Browser RUM V2?
Add the Browser RUM V2 JavaScript Agent to the application's HTML pages using the appropriate integration method. For SPAs, add the script to the primary HTML file, while MPAs require the script on all relevant HTML pages. Server-side rendered applications can integrate the script through server-side templates or layout files.
What are the key configuration attributes for the Browser RUM V2 JavaScript Agent?
Key attributes include the collection source URL, authorization token, service name and namespace, deployment environment, buffer settings, ignored URLs, trace-header propagation URLs, session ID and error collection settings, and other user interaction and RUM logging options.
What CORS configuration is required for Browser RUM V2?
The proxy must whitelist the required application origins and allow the required headers and methods. The application's CSP and firewall must also permit communication with the proxy, and the proxy must correctly handle browser OPTIONS preflight requests with the appropriate CORS headers.
How should the RUM proxy server be configured?
The RUM proxy should support SSL termination, CORS, API key authentication, and backend proxying to the internal RUM collector. The guide provides NGINX configuration examples for HTTPS, CORS, API key validation, request forwarding, HTTP-to-HTTPS redirection, and the RUM collector backend.
