Naming
Instrumented Service Naming Rules
- The Instrumented Service Naming Rules page allows you to control how instrumented services are identified and displayed in APM.
- These rules determine the final service name that appears in traces, service maps, dashboards, and other observability views.
- By default, APM provides pre-built rules that resolve service names using standard OpenTelemetry and runtime-based detection methods.
- You can create custom rules to override this default behavior and assign more meaningful, business-aligned names to services.
- Custom rules are evaluated before pre-built rules, and the first matching rule is applied. This ensures that custom naming logic takes precedence over system defaults.
Custom and Pre-built Rules
The page provides two views:
- Custom – Displays user-defined naming rules that override default service naming behavior.
- Pre-built – Displays system-provided rules used by APM when no matching custom rule is applied.
Custom Rules
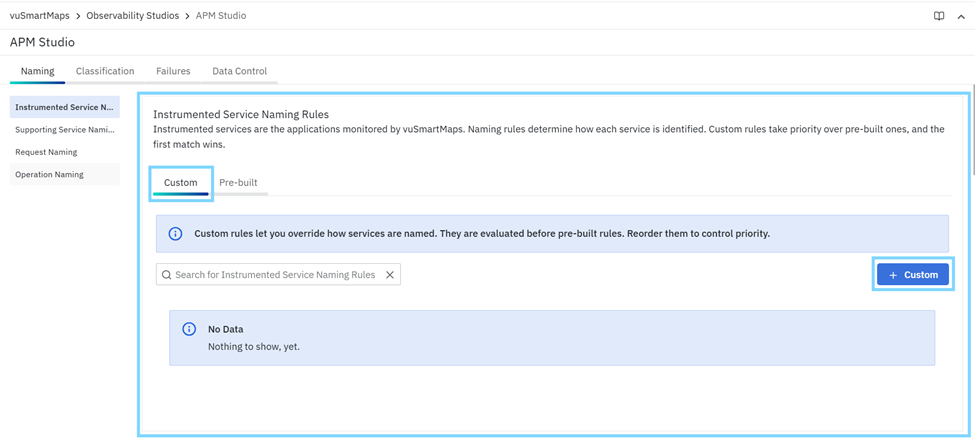
Use the Custom tab to:
- create new naming rules
- search existing rules
- edit or delete rules
- enable or disable rules
- Reorder rules to change evaluation priority
If no custom rules are configured, the page displays an empty state indicating that no data is currently available.
Pre-built Rules

Use the Pre-built tab to view the default service naming logic provided by APM. These rules are read-only and are applied only when no matching custom rule is found. Pre-built rules follow a priority order and typically resolve service names using:
- application-defined service names
- web/server container context
- environment variables
- runtime or framework-specific detectors
- infrastructure/resource detectors
- fallback naming such as
unknown_service:<runtime>when no other source is available
Adding a Custom Instrumented Service Naming Rule
To create a custom service naming rule, click + Custom on the Instrumented Service Naming Rules page. The Add Custom Instrumented Service Naming Rule wizard opens and guides you through the rule configuration flow.
The rule creation flow contains the following steps:
General Info
Use this step to define the basic details of the rule.
Fields
- Name – Enter a unique name for the rule.
This field is mandatory. - Description – Enter an optional description to explain the purpose of the rule.
Use this field to document when and why the rule should be applied.

Guidelines
- Rule names must be unique.
- Use a clear and descriptive name so the rule can be easily identified later.
- Keep descriptions concise but meaningful.
Example
- Name:
Prefix Service with Environment - Description:
Adds the deployment environment as a prefix to the service name for easier environment separation.
The system validates the rule name and moves to the next step when the required information is provided.
Conditions
Use this step to define the OTTL condition(s) that determine when the rule should be applied. A custom instrumented service naming rule is evaluated only when the specified condition returns true for the incoming span/resource.

What to enter
Enter one or more valid OTTL expressions using resource attributes.
Important behavior
- Conditions for instrumented service naming are based on resource attributes.
- Only valid OTTL syntax is accepted.
- The rule is considered for evaluation only when the condition matches.
- During runtime, rules are evaluated in priority order, and the first matching custom rule wins.
Supported OTTL Expressions
- The Condition and Service Name Template fields support a predefined subset of the OpenTelemetry Transformation Language (OTTL). Use only the supported functions, operators, and field references when defining naming rules.
- For the complete list of supported OTTL functions, operators and supported fields, refer Supported OTTL Functions and Operators.
Example conditions
Example 1: Apply only when the environment is present
resource.attributes["deployment.environment"] != nil
Example 2: Apply only to Kubernetes-based services
resource.attributes["k8s.namespace.name"] != nil
Example 3: Apply only for a specific application
resource.attributes["service.name"] == "payment-service"
Example 4: Apply only to the production services
resource.attributes["deployment.environment"] == "prod"
Best practice
Use specific but stable resource attributes such as:
deployment.environmentservice.namek8s.namespace.namek8s.deployment.name
Avoid using volatile values that may change frequently across deployments.
Service Name Template
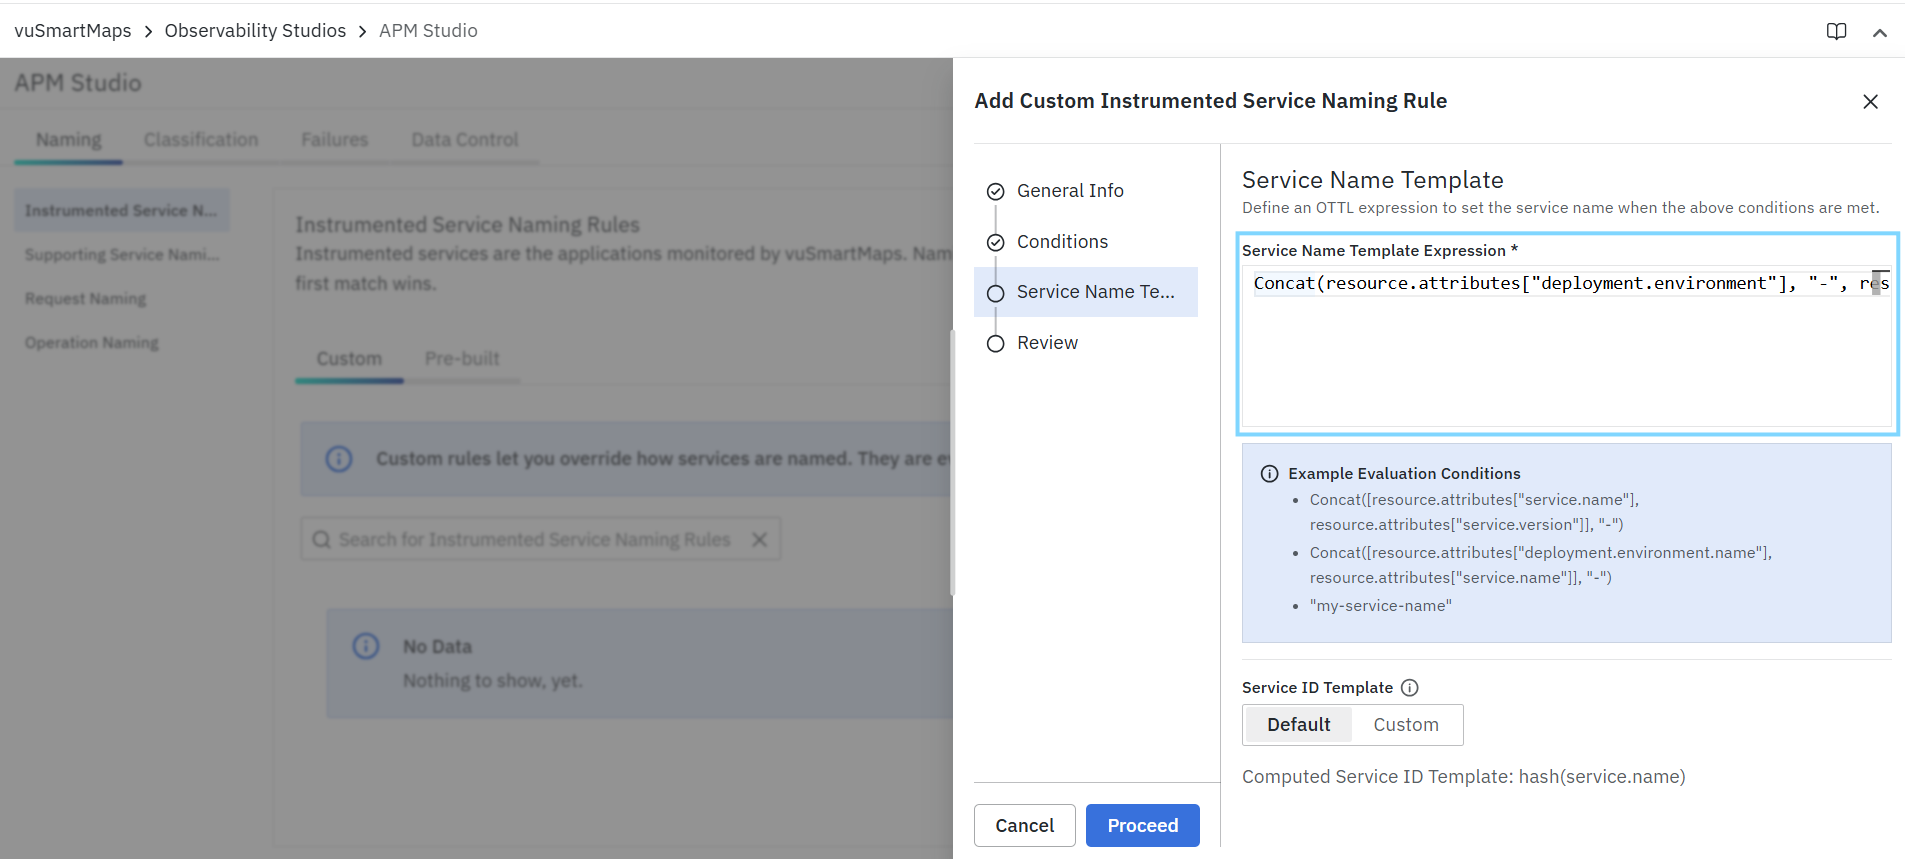
Use this step to define the OTTL expression that computes the final service name when the configured condition matches. This expression determines the name that APM will use for the instrumented service.
Fields

- Service Name Template Expression (Required) - Enter the OTTL expression that generates the final service name.
- Service ID Template
- Default – APM derives a stable service identifier automatically based on the computed service name.
- Custom – APM derives the service identifier using selected resource attributes.
- Resource Attributes – Required only when Custom is selected for Service ID Template. Select the resource attributes that should be used to generate a stable internal service identifier.
What is Service ID Template?
The Service ID Template controls how APM internally distinguishes services, even when multiple services may share the same display name.
- With Default, APM computes the service ID from the final service name.
- With Custom, APM computes the service ID using the selected resource attributes.
This is useful when:
- The same display name is reused across environments
- Multiple deployments share the same service name
- You want a stable internal grouping based on selected metadata
Service Name Template Examples
Example 1: Add environment prefix
Use this to separate the same service across environments.
Condition
resource.attributes["deployment.environment"] != nil
Service Name Template
Concat(resource.attributes["deployment.environment"], "-", resource.attributes["service.name"])
Result
prod-payment-serviceuat-payment-service
This is a recommended pattern when the same service exists in multiple environments.
Example 2: Build name from Kubernetes metadata
Use this to generate a more descriptive service name for Kubernetes workloads.
Condition
resource.attributes["k8s.namespace.name"] != nil
and
resource.attributes["k8s.deployment.name"] != nil
Service Name Template
Concat(resource.attributes["k8s.namespace.name"], "-", resource.attributes["k8s.deployment.name"])
Result
payments-payment-apiorders-checkout
Example 3: Use the application-defined service name directly
Use this when the service name is already set correctly, and you only want to preserve it.
Condition
resource.attributes["service.name"] != nil
Service Name Template
resource.attributes["service.name"]
Result
payment-service
Service ID Template Examples
Default Service ID

If Default is selected:
- Final Service Name:
prod-payment-service - Computed Service ID Format:
hash(prod-payment-service)
Custom Service ID
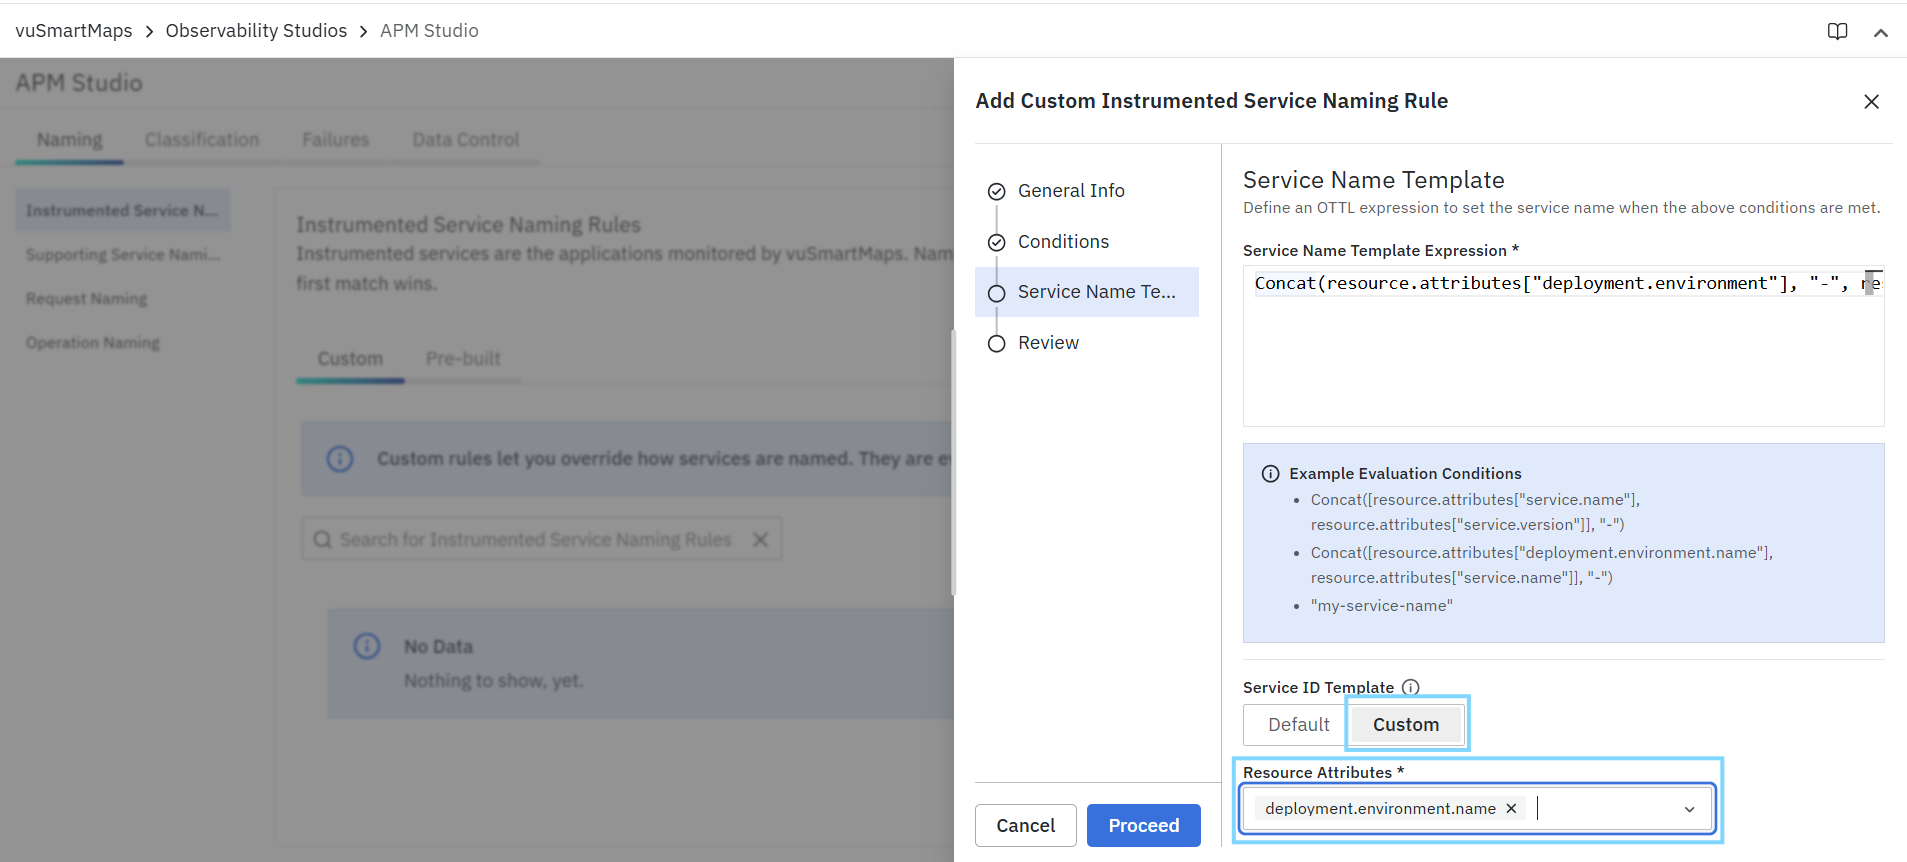
If Custom is selected and the following resource attributes are chosen:
deployment.environmentservice.name
Then APM computes the service ID from those attributes.
Example
- Selected Attributes:
deployment.environment,service.name - Computed Service ID Format:
hash(deployment.environment, service.name)
This helps keep services uniquely identified even if display names overlap.
Review
The Review step summarizes the configured rule before it is saved.
This page displays:
- the rule name
- the optional description
- the configured OTTL condition(s)
- the service name template
- the computed service ID template
- A test of this rule option
Use this step to confirm that the rule matches your intended naming behavior before saving. If required, return to a previous step to modify the configuration. The review page also helps you validate how the final service name and service ID will be derived when the rule matches.
Test This Rule
From the Review step, you can test the rule against a sample span payload before saving it. This allows you to preview whether the rule matches the computed service name or the computed service ID.
When to use it
Use Test this rule when:
- The rule uses multiple conditions
- The naming expression is dynamic
- You are using custom Service ID attributes
- You want to verify the result before saving
Saving the Rule
After reviewing the configuration, click Save to create the custom rule.
Once saved:
- The rule is added to the Custom list
- It is evaluated before the pre-built rules
- If multiple custom rules exist, the evaluation order is based on rule priority/order
- At runtime, the first matching rule is applied
This ensures deterministic and predictable service naming behavior across traces.
Supporting Service Naming Rules
- The Supporting Service Naming Rules page allows you to define how external or non-instrumented dependencies are named in APM. Supporting services represent the external components that your instrumented services communicate with, such as:
- Databases
- Messaging systems
- Third-party APIs
- External endpoints
- Other non-instrumented backend dependencies
- By default, APM derives supporting service names from client span attributes such as database type, messaging system, peer name, or peer IP. You can create custom rules to replace these technical values with clearer, business-aligned names that make traces and service maps easier to understand.
- Custom rules are evaluated before pre-built rules, and the first matching rule is applied.
Custom and Pre-built Rules
The page provides two views:
- Custom – Displays user-defined supporting service naming rules.
- Pre-built – Displays system-provided rules used by APM when no matching custom rule is found.
Custom Rules
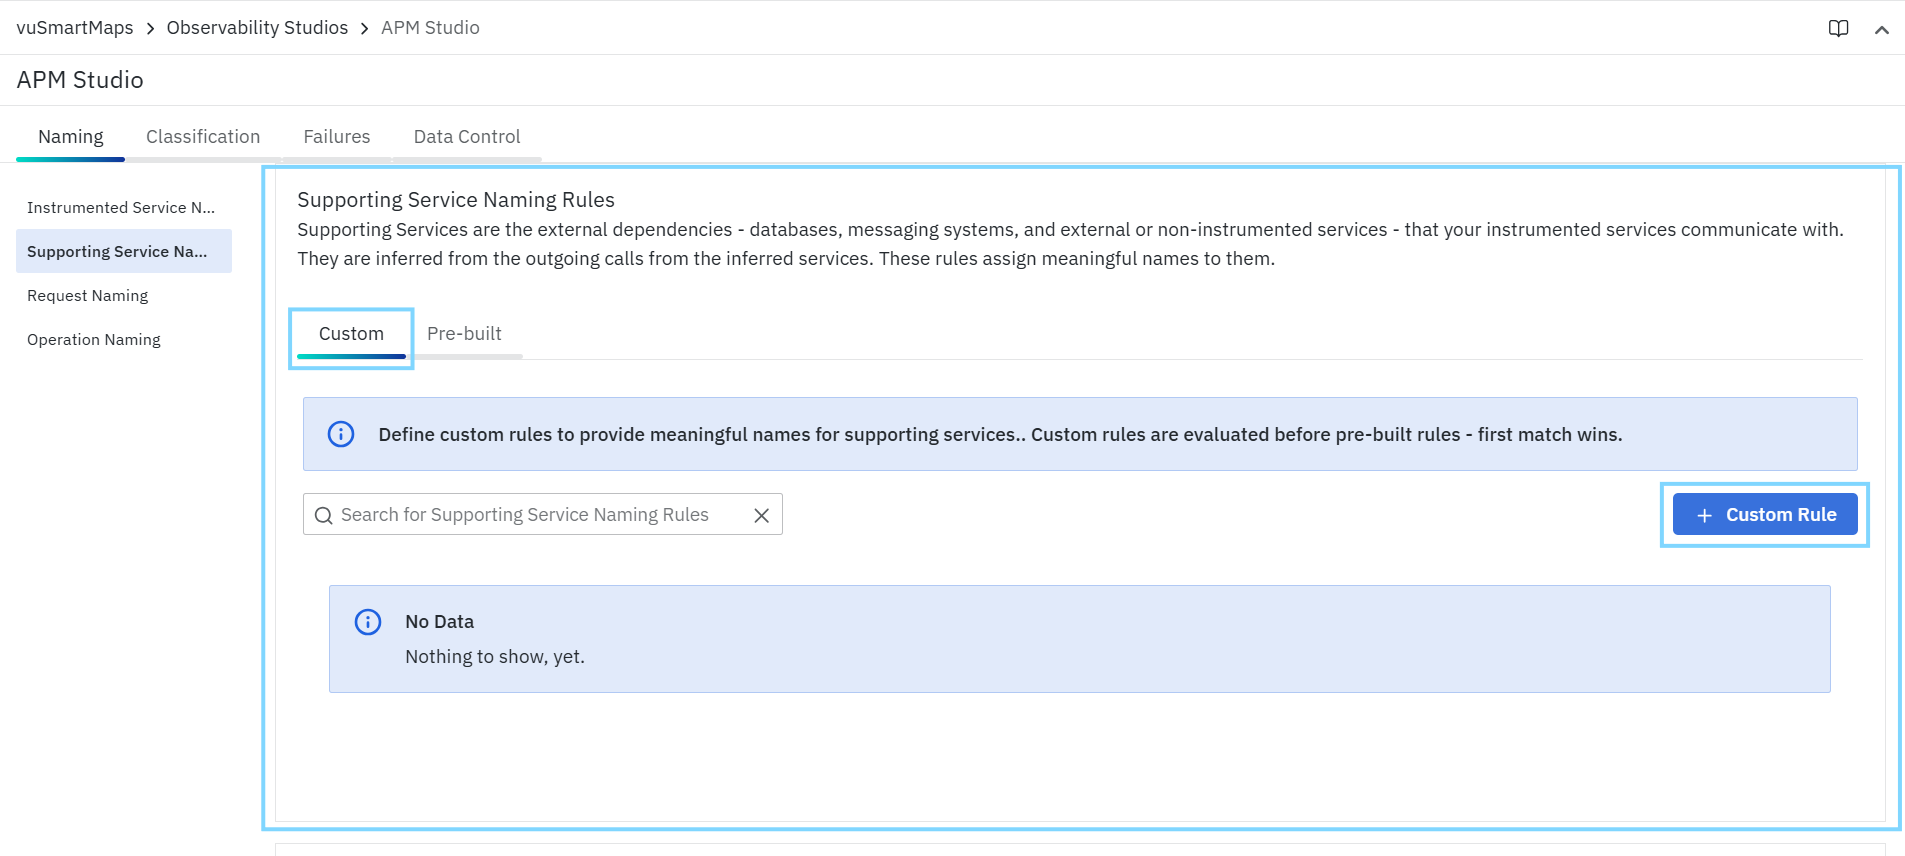
Use the Custom tab to:
- Create new rules
- Search existing rules
- Edit or delete rules
- Enable or disable rules
- Reorder rules to control evaluation priority
If no custom rules are available, the page displays an empty state.
Pre-built Rules

Use the Pre-built tab to review the default naming logic provided by APM. These rules automatically resolve supporting service names from common client span attributes in priority order. Typical built-in patterns include:
- DB Service from
db.system- Example:
mysql,mssql,oracle
- Example:
- Messaging Service from
messaging.system- Example:
kafka,RabbitMQ,ActiveMQ
- Example:
- Peer Name from
peer.name- Example:
api.example.com,cbs-svc
- Example:
- Peer IP from
peer.ip/ peer identifier- Example:
192.168.1.1,localhost
- Example:
These rules are system-provided and are applied only when no custom rule matches.
Adding a Supporting Service Naming Rule
To create a rule, click + Custom Rule on the Supporting Service Naming Rules page. The Add Supporting Service Naming Rule wizard opens and guides you through the configuration flow.
The rule creation flow contains the following steps:
General Info
Use this step to define the basic details of the rule.
Fields
- Name – Enter a unique name for the rule.
- This field is mandatory.
- Description – Enter an optional description to explain the purpose of the rule.
- Scope – Select where the rule should apply:
- Global – Applies across all applicable supporting service calls
- Service – Applies only to selected instrumented services
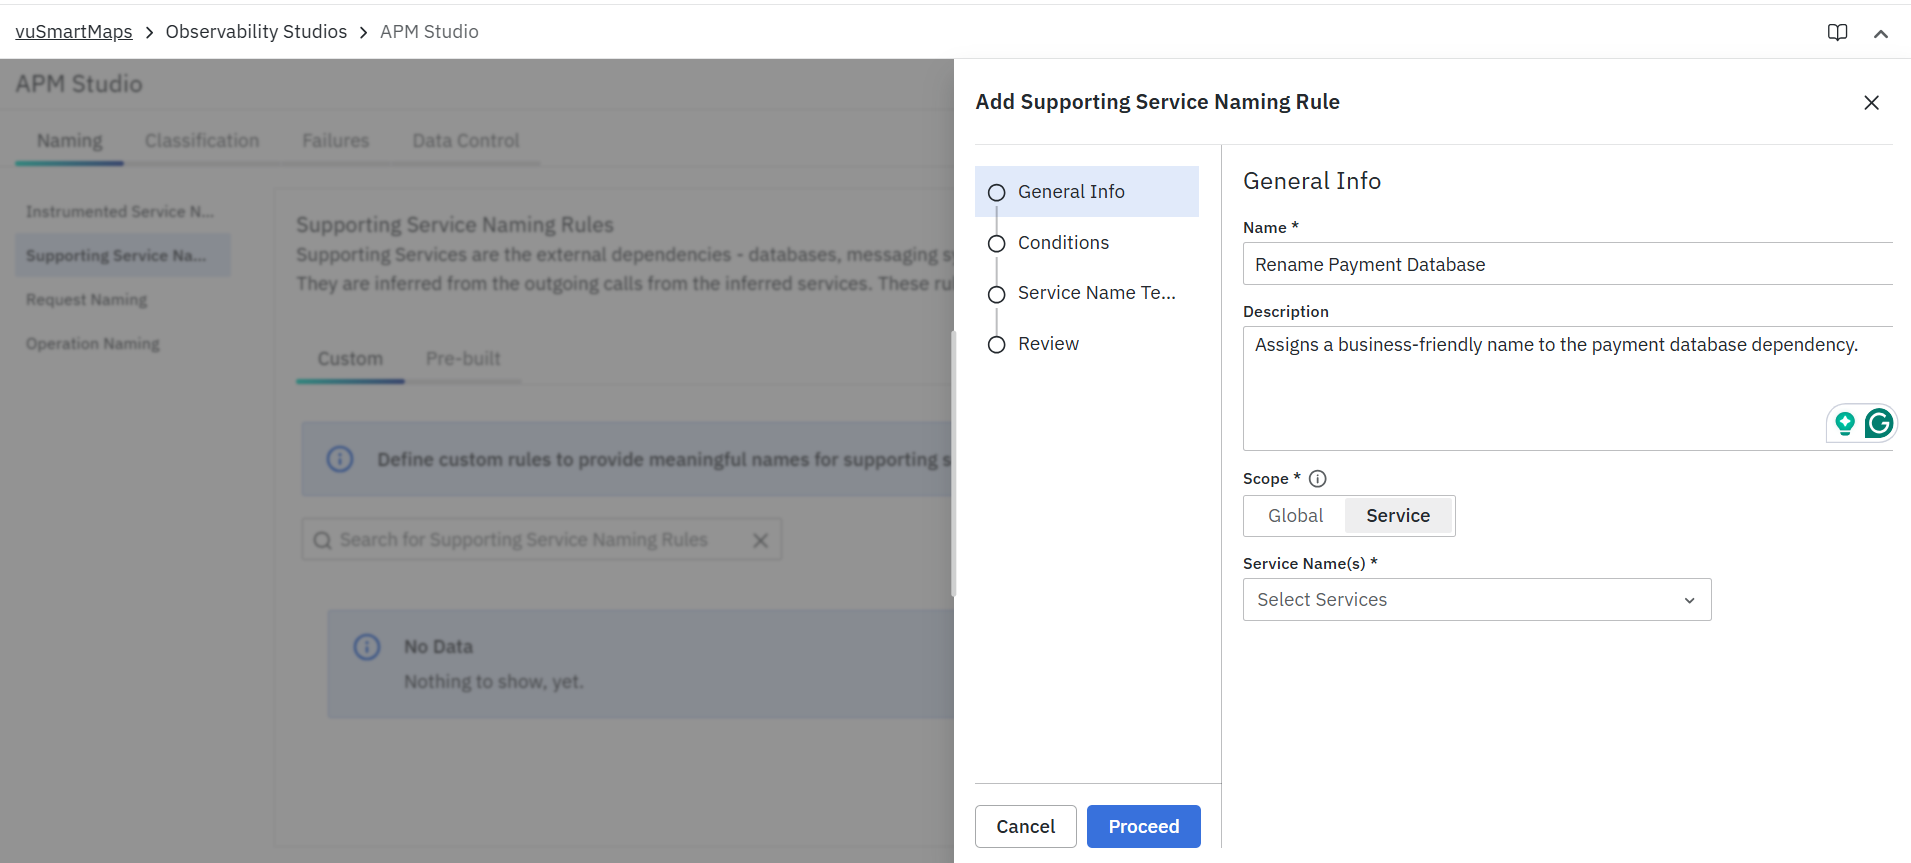
If Service is selected, the next step or configuration flow will require you to specify one or more target services.
Example
- Name:
Rename Payment Database - Description:
Assigns a business-friendly name to the payment database dependency. - Scope:
Service
Scope Behavior
The selected scope determines where the rule is evaluated.
Global
Use Global when the same naming rule should apply to all matching supporting service calls across the environment.
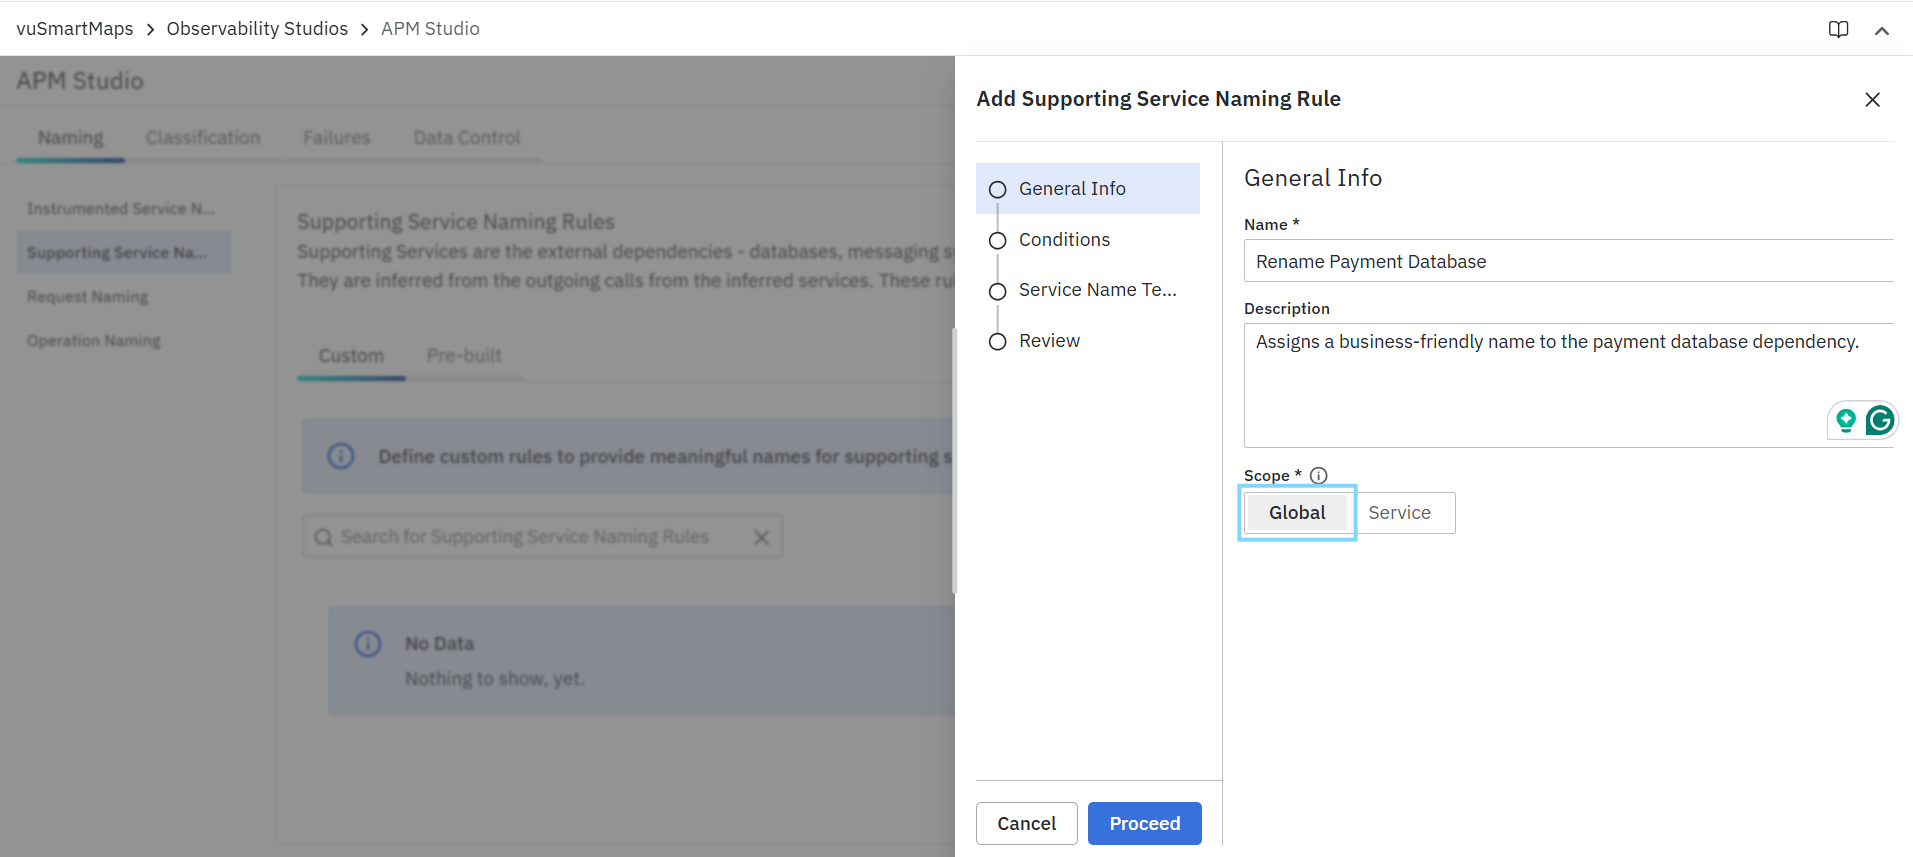
Example:
Any client span with db.system == "mysql" can be renamed to Customer Database across all services.
Service
Use Service when the rule should apply only to specific instrumented services. This is useful when the same external endpoint or database is used differently by different services.

Example:
- Rename a dependency as Customer Database only when it is called by the payment-service, while leaving the same dependency unchanged for other services.
Conditions
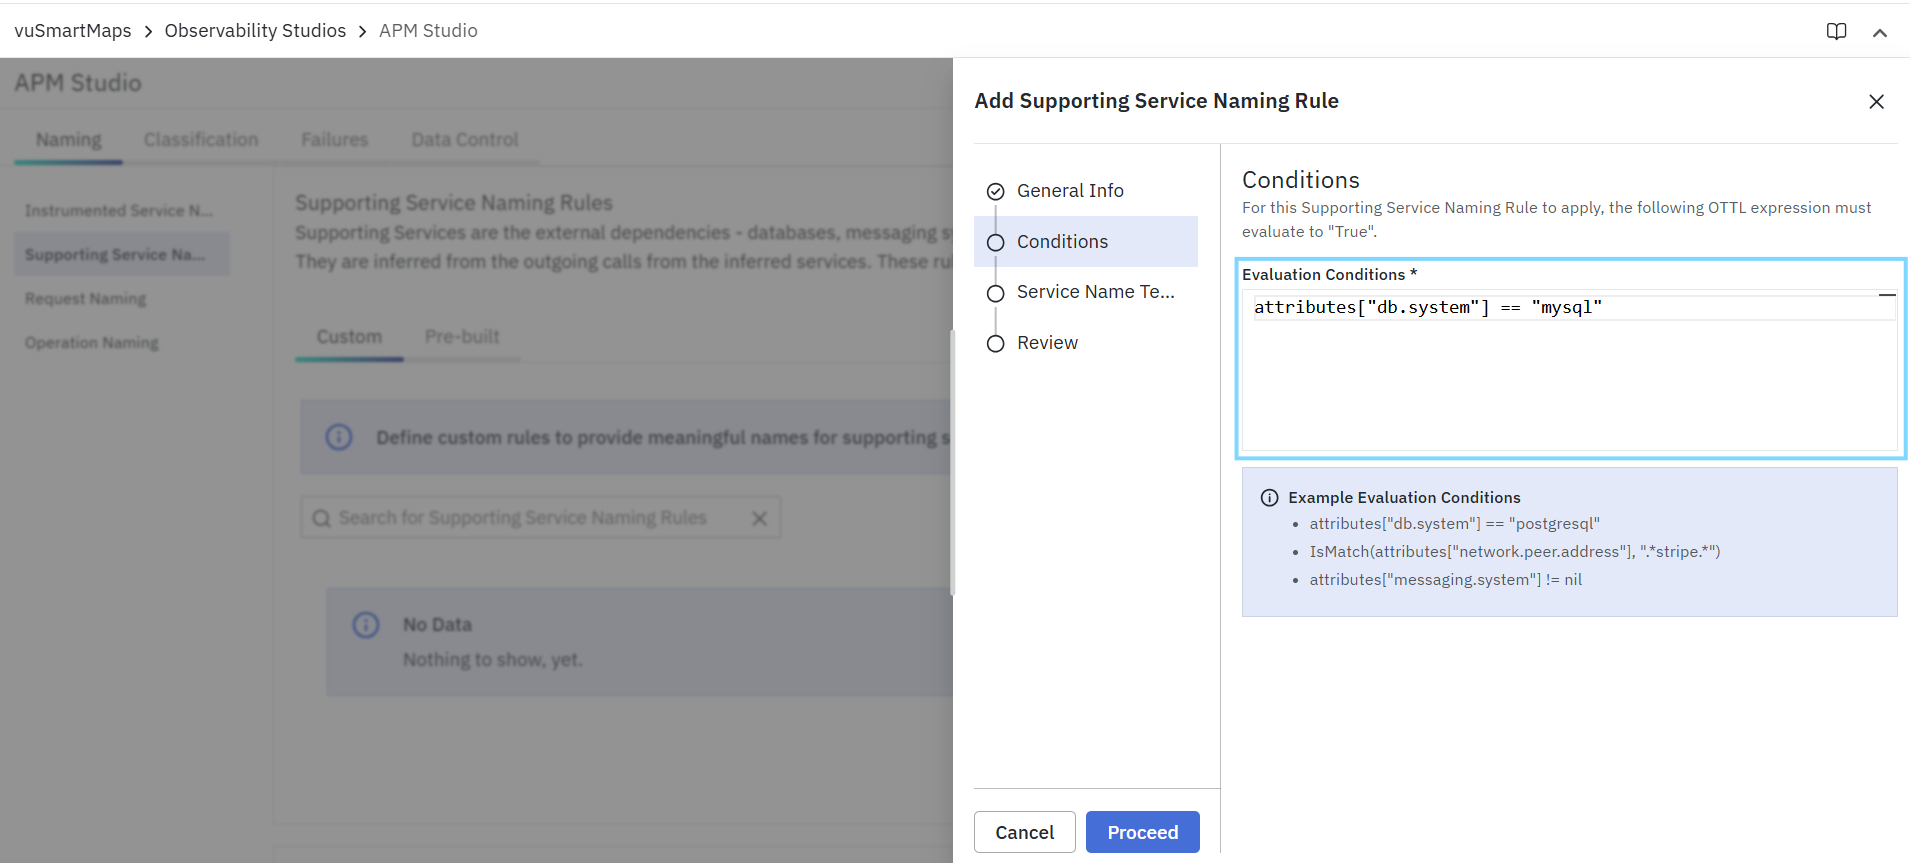
Use this step to define the OTTL condition(s) that determine when the rule should be applied. Supporting service naming rules are evaluated on client spans, because supporting services are inferred from outgoing calls made by instrumented services.
Important behavior
- Supporting service naming applies only to client spans
- The platform automatically filters the evaluation to:
kind == SPAN_KIND_CLIENT
- Your custom conditions are evaluated in addition to this built-in filter
- Rules are processed in priority order
- The first matching rule is applied
What to enter
Enter one or more valid OTTL expressions that identify the target supporting service call.
Common attributes used
Typical supporting service conditions use span attributes such as:
attributes["db.system"]attributes["messaging.system"]attributes["peer.name"]attributes["peer.ip"]attributes["http.url"]attributes["http.host"]
Supported OTTL Expressions
- Supporting Service Naming rules use OTTL expressions to evaluate conditions and generate supporting service names. Only the supported subset of OTTL is available for these fields.
- For the complete list of supported OTTL functions, operators and supported fields, refer Supported OTTL Functions and Operators.
Condition Examples
Example 1: Match MySQL database calls
attributes["db.system"] == "mysql"
Example 2: Match Kafka messaging calls
attributes["messaging.system"] == "kafka"
Example 3: Match a specific external API by peer name
attributes["peer.name"] == "api.payment-gateway.com"
Example 4: Match a specific host
attributes["http.host"] == "customer-db.internal"
Example 5: Apply only when called from a selected service
- If the rule scope is Service, APM automatically adds a service filter internally based on the selected service(s). You only need to define the dependency-matching condition in the UI.
- At runtime, the platform adds service filtering using the resolved service ID.
Service Name Template
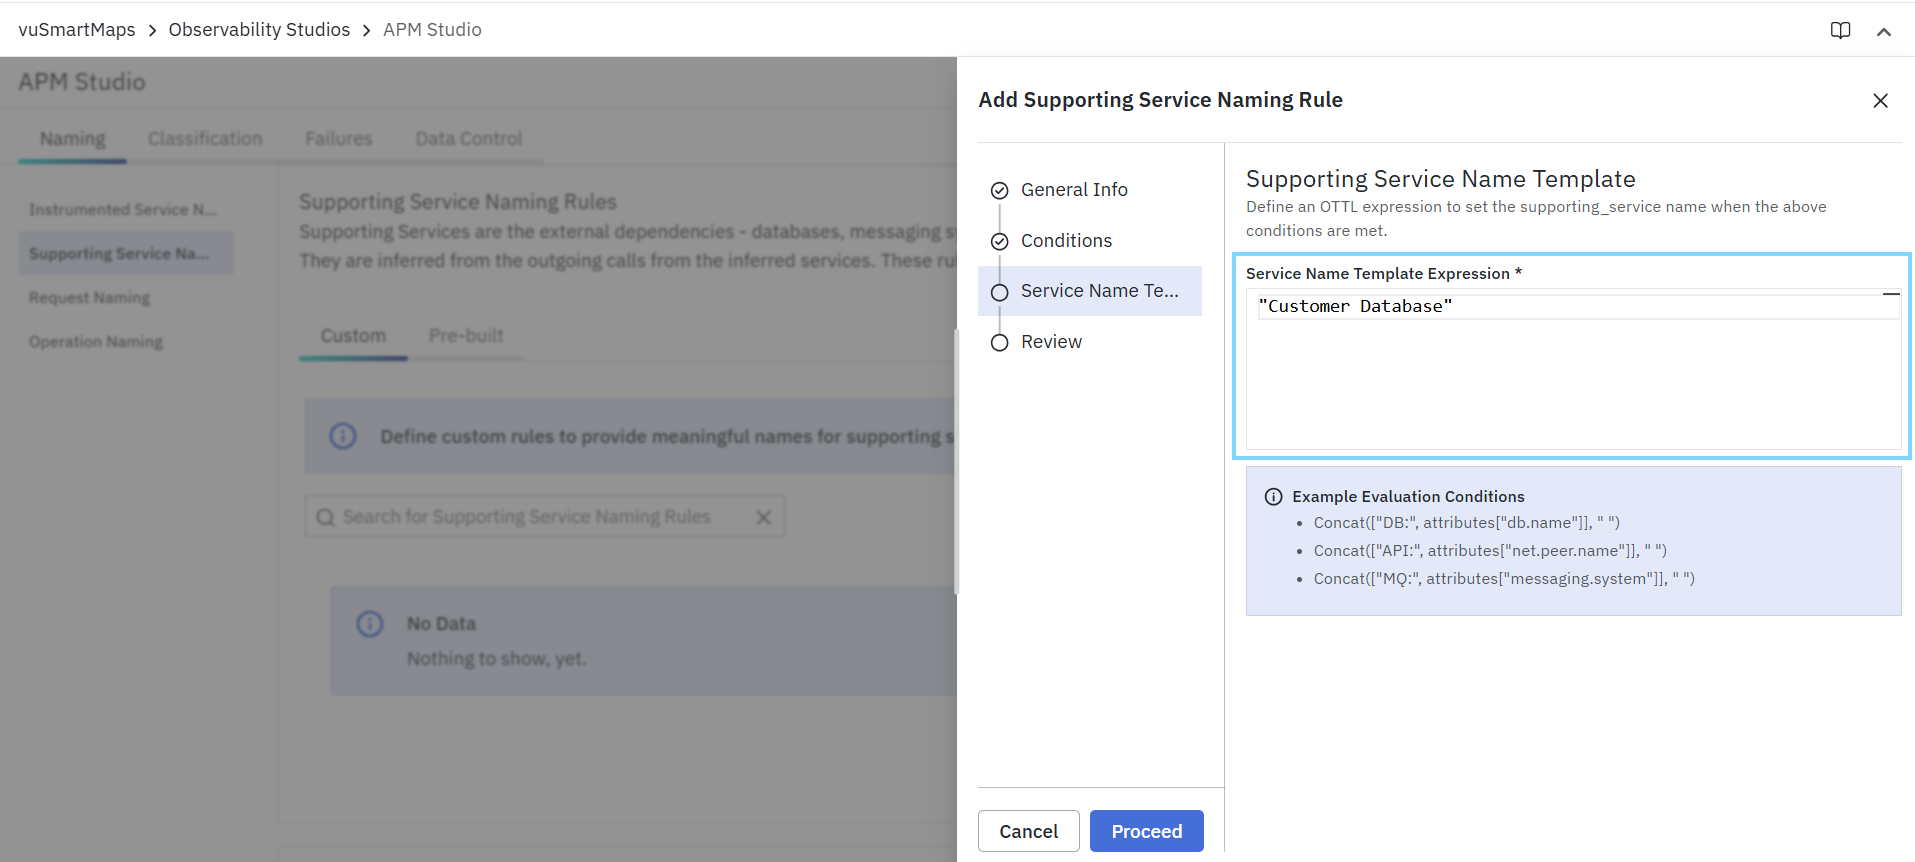
Use this step to define the OTTL expression that computes the final supporting service name when the condition matches.
This expression determines the name that APM displays for the inferred external dependency.
Field
- Supporting Service Name Template Expression(Required) - Enter the OTTL expression that generates the final supporting service name.
How it works
When the rule condition evaluates to true, the configured template is used to set the final value of the supporting service name.
The template can be:
- A fixed literal name
- A dynamic expression derived from span attributes
- A composed value built using multiple attributes
The template is entered as an OTTL expression and previewed before saving.
Service Name Template Examples
Example 1: Use a fixed business-friendly name
Use this when the dependency should always appear with a consistent label.
Condition
attributes["db.system"] == "mysql"
Supporting Service Name Template
"Customer Database"
Result
Customer Database
Example 2: Rename a Kafka dependency
Condition
attributes["messaging.system"] == "kafka"
Supporting Service Name Template
"Order Events Queue"
Result
Order Events Queue
Example 3: Use peer name dynamically
Condition
attributes["peer.name"] != nil
Supporting Service Name Template
attributes["peer.name"]
Result
api.payment-gateway.com
Example 4: Add a prefix for external APIs
Condition
attributes["peer.name"] != nil
Supporting Service Name Template
Concat("External API - ", attributes["peer.name"])
Result
External API - api.payment-gateway.com
Review
The Review step summarizes the rule configuration before it is saved.
This page displays:
- The rule name
- The optional description
- The selected scope
- The selected service(s), if applicable
- The configured OTTL condition(s)
- The supporting service name template
- The Test this rule option
Use this step to confirm that the rule matches the intended supporting service dependency and generates the correct display name before saving.
Test This Rule
From the Review step, you can use Test this rule to validate the rule against a sample span payload before saving it.
This allows you to preview:
- Whether the rule matches
- Whether the client's span qualifies. The final computed supporting service name
Saving the Rule
After reviewing the configuration, click Save to create the rule.
Once saved:
- The rule is added to the Custom list
- It is evaluated before the pre-built rules
- If multiple custom rules exist, they are processed in priority order
- The first matching rule is applied
At runtime, APM converts enabled rules into transformation logic in the collector pipeline, and the final supporting service name is applied to matching client spans before the trace continues downstream.
Request Naming
- The Request Naming Rules page allows you to control how requests are identified and displayed in APM.
- Requests represent the entry points of transactions into a service. Only server spans, consumer spans, and root spans are treated as requests. These request names are used across dashboards, alerts, analytics, and troubleshooting views.
- By default, APM applies pre-built rules to derive request names from available span attributes. You can create custom rules to replace technical or low-level request names with clearer, business-friendly names that better represent your application flows.
- Custom rules are evaluated before pre-built rules, and the first matching rule is applied.
Custom and Pre-built Rules
The page provides two views:
- Custom – Displays user-defined request naming rules.
- Pre-built – Displays the system-provided request naming logic used as a fallback when no custom rule matches.
Custom Rules
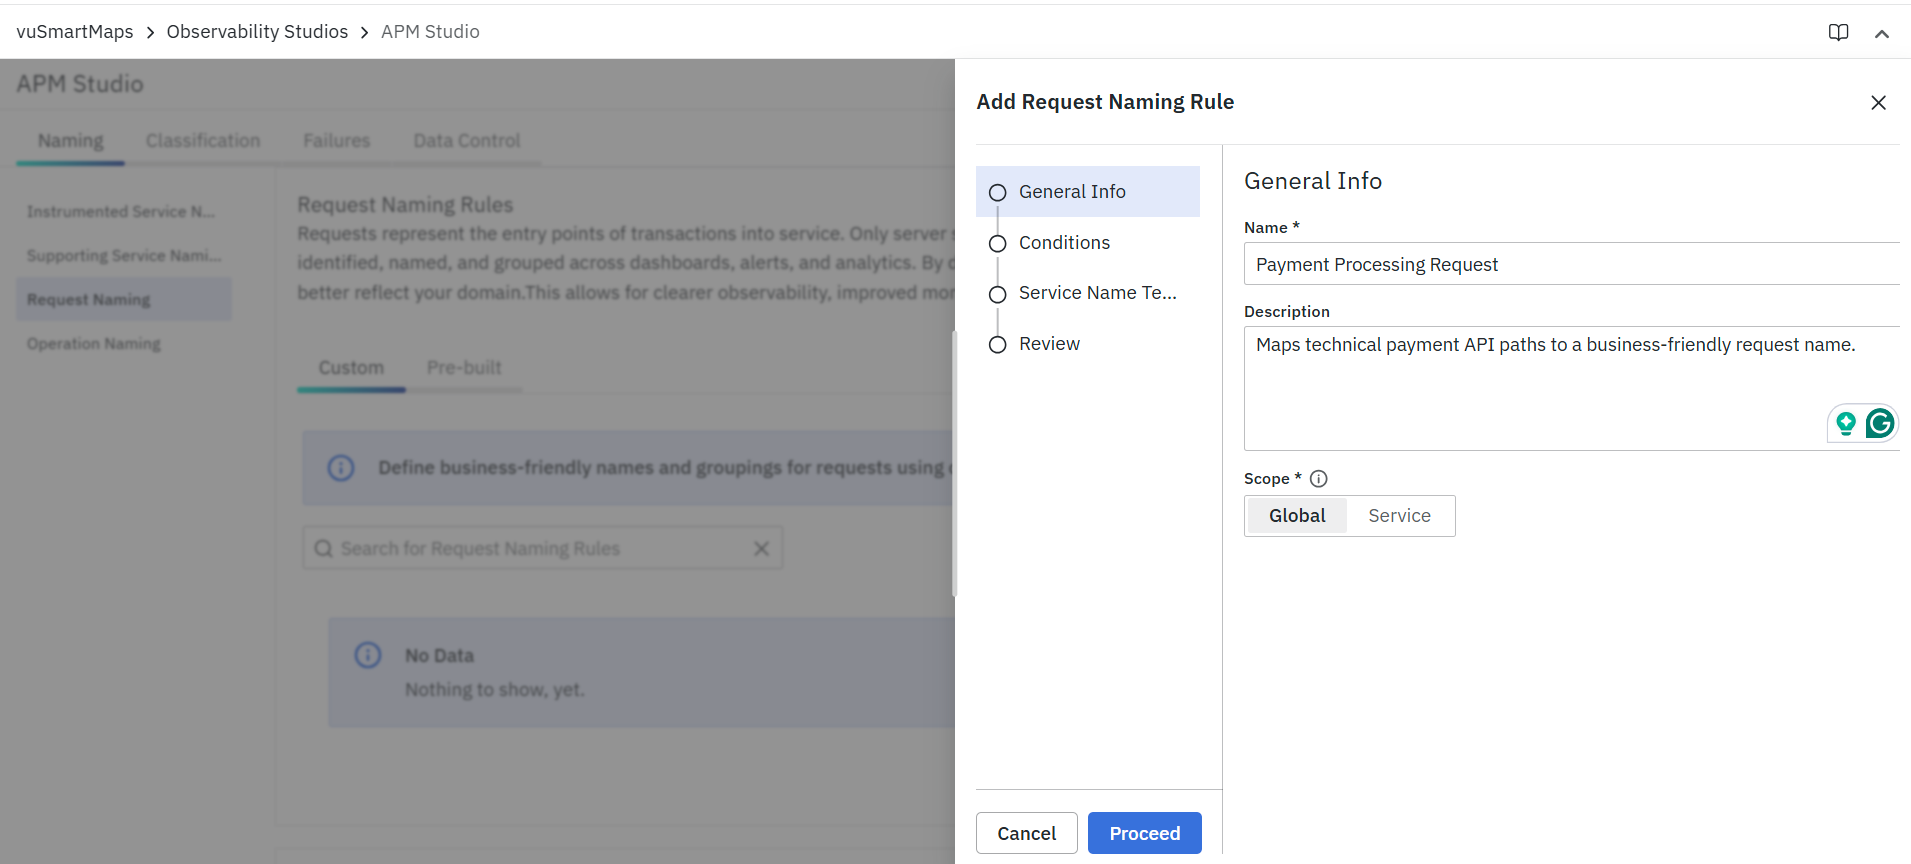
Use the Custom tab to:
- Create new request naming rules
- Search existing rules
- Edit or delete rules
- Enable or disable rules
- Reorder rules to control evaluation priority
- Test rules before finalizing naming logic
If no custom rules are configured, the page displays an empty state.
Pre-built Rules
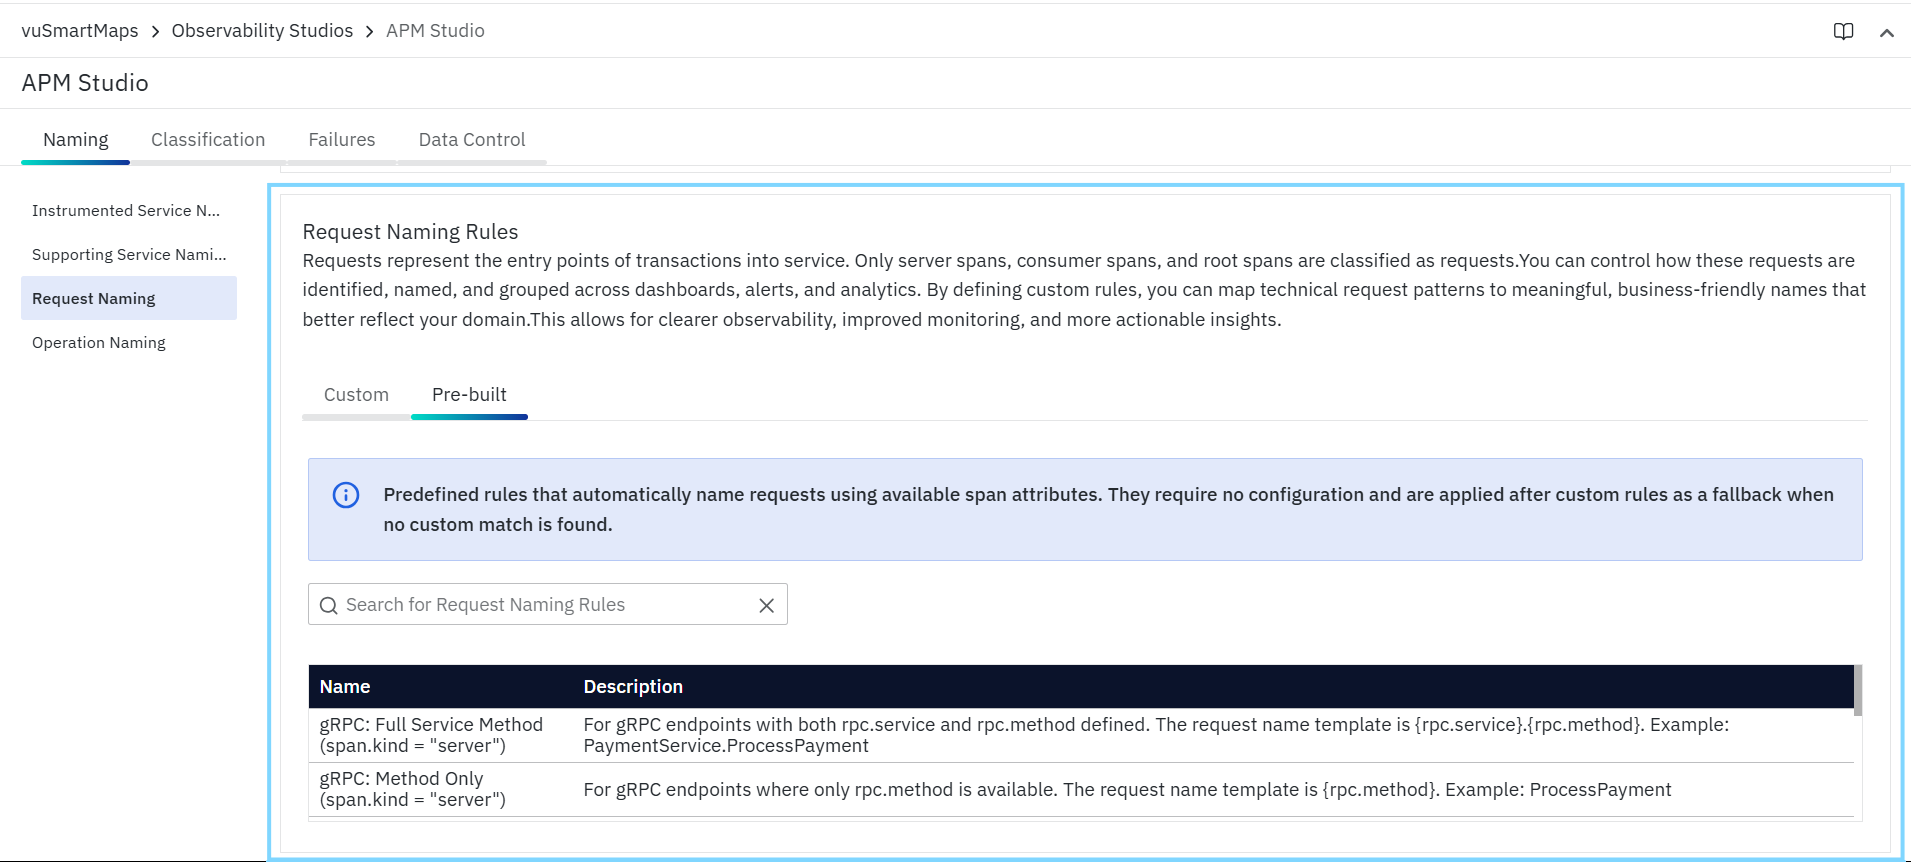
Use the Pre-built tab to review the default request naming logic applied by APM.
The pre-built includes the following common request naming patterns:
- gRPC: Full Service Method →
{rpc.service}.{rpc.method} - gRPC: Method Only →
{rpc.method} - HTTP: Truncated Path →
{http.request.method} {url.truncated_path} - HTTP: Route Template →
{http.request.method} {http.route} - HTTP: Method Fallback →
{http.request.method} /* - Server Span Name →
{span.name} - Consumer Span Name →
{span.name} - Root Span Name →
{span.name}
These built-in rules automatically detect request names using standard OpenTelemetry span attributes and are applied only when no custom rule matches.
Adding a Request Naming Rule
To create a rule, click + Custom Rule on the Request Naming Rules page. The Add Request Naming Rule wizard opens and guides you through the rule configuration flow.
The rule creation flow contains the following steps:
General Info
Use this step to define the basic details of the rule.
Fields
- Name – Enter a unique name for the rule.
- This field is mandatory.
- Description – Enter an optional description to explain the purpose of the rule.
- Scope – Select where the rule should apply:
- Global – Applies to all matching requests
- Service – Applies only to requests belonging to selected service(s)
If Service is selected, the rule is evaluated only for the chosen service context.
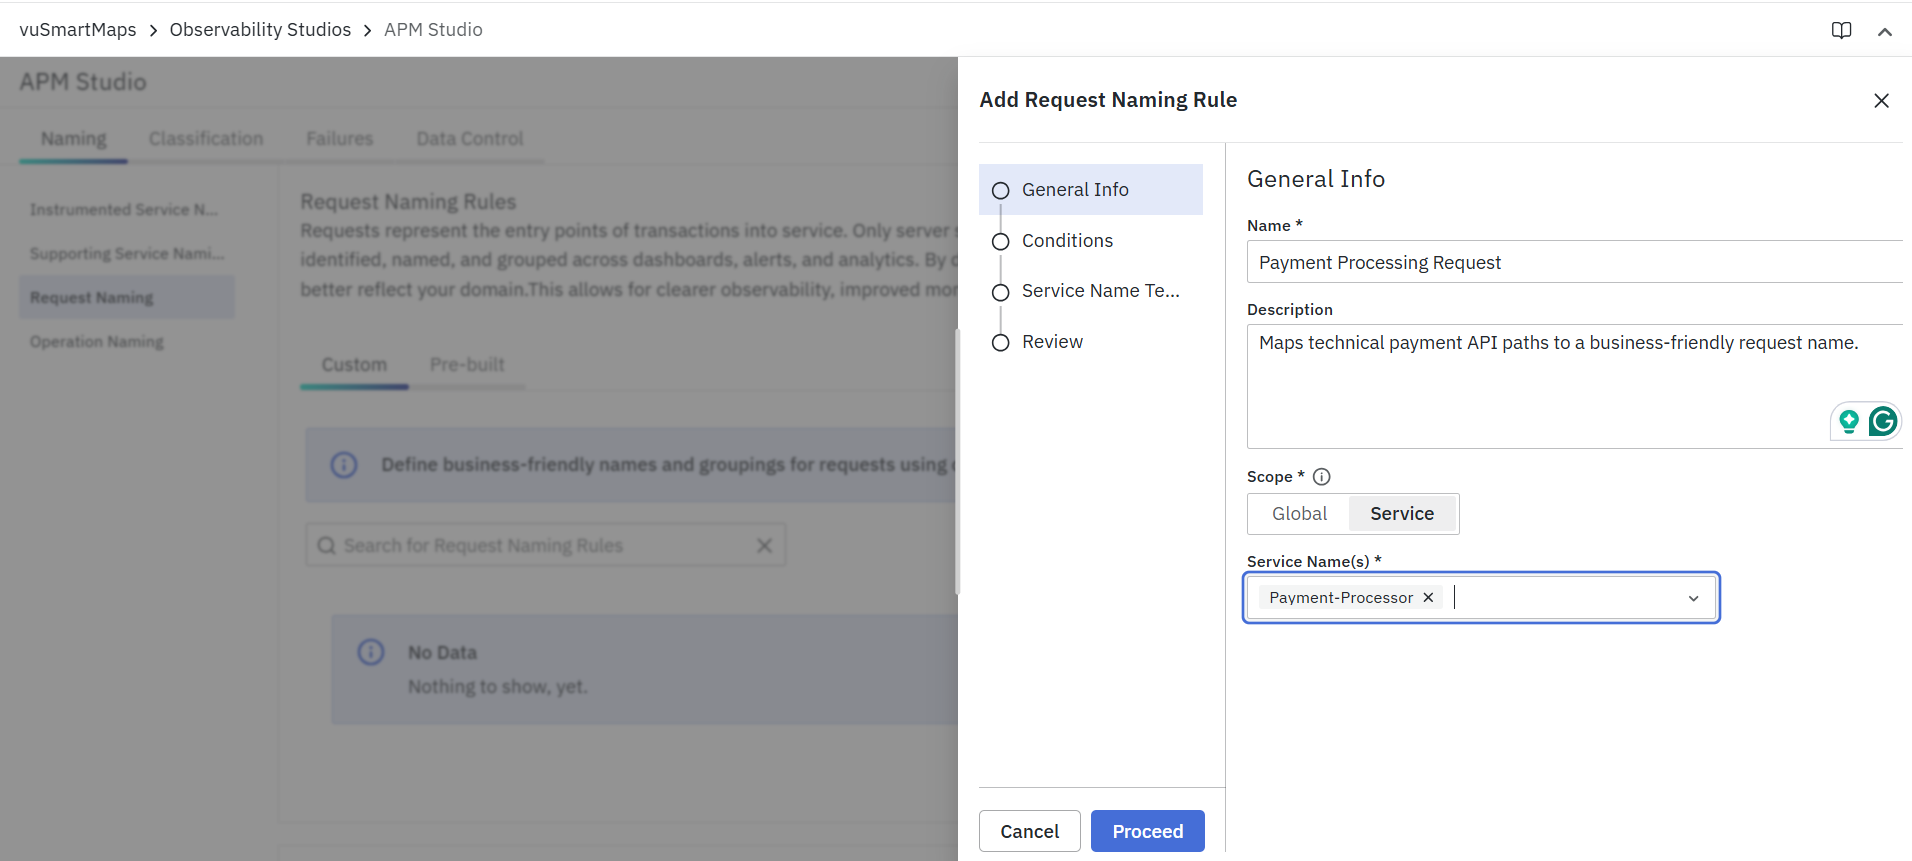
Example
- Name:
Payment Processing Request - Description:
Maps technical payment API paths to a business-friendly request name. - Scope:
Service
Scope Behavior
The selected scope determines where the rule is applied.
Global
Use Global when the same request naming rule should apply across all services.

Example:
Normalize health endpoints such as /health, /ready, and /live into a single request name like Internal Health Check across the environment.
Service
Use Service when the rule should apply only to a specific service or set of services.

Example:
Rename /api/payment/process to Process Customer Payment only for the payment-service, without affecting other services that may expose similar paths.
Conditions
Use this step to define the OTTL condition(s) that determine when the rule should be applied. The Evaluation Conditions, where the rule is applied only when the configured OTTL expression evaluates to true.
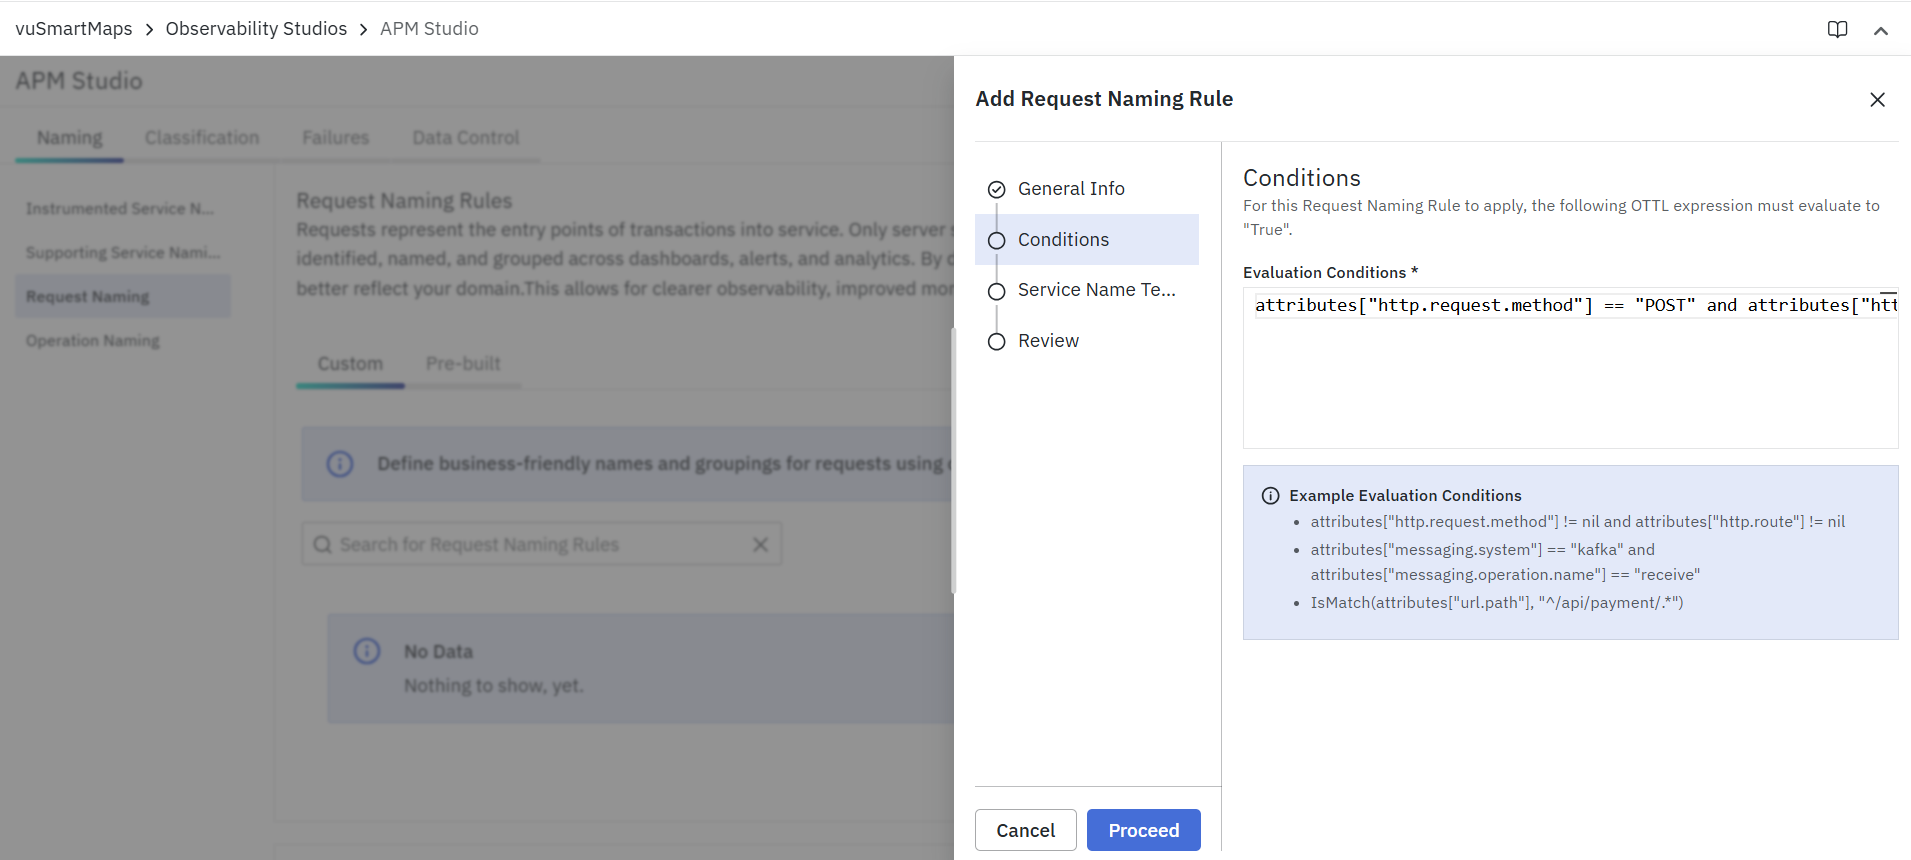
Important behavior
- Request naming applies only to request-type spans:
- server spans
- consumer spans
- root spans
- Custom rules are evaluated before pre-built rules
- If multiple custom rules exist, the first matching rule is applied
- Use conditions to target a specific endpoint pattern, RPC method, queue/topic consumer, or business flow
Common attributes used
Typical request naming conditions may use:
kindattributes["http.request.method"]attributes["http.route"]attributes["url.path"]or truncated path equivalentsattributes["rpc.service"]attributes["rpc.method"]attributes["messaging.destination"]attributes["span.name"]
Supported OTTL Expressions
- Request Naming rules allow you to evaluate incoming spans using OTTL conditions and generate meaningful request names through name templates. Only the supported OTTL syntax can be used when configuring these rules.
- For the complete list of supported OTTL functions, operators and supported fields, refer Supported OTTL Functions and Operators.
Condition Examples
Example 1: Match a specific payment API path
attributes["http.request.method"] == "POST" and attributes["http.route"] == "/api/payment/process"
Example 2: Match health endpoints
attributes["http.route"] in ["/health", "/ready", "/live"]
Example 3: Match gRPC payment processing
attributes["rpc.service"] == "payment.PaymentService" and attributes["rpc.method"] == "ProcessPayment"
Example 4: Match consumer spans for Kafka events
kind == SPAN_KIND_CONSUMER and attributes["messaging.system"] == "kafka"
Example 5: Match authentication flows
attributes["http.route"] in ["/login", "/logout", "/token/refresh", "/sso/callback"]
Request Name Template
Use this step to define the OTTL expression that computes the final request name when the condition matches. This expression determines the name that APM displays for the request across dashboards, analytics, and troubleshooting views.
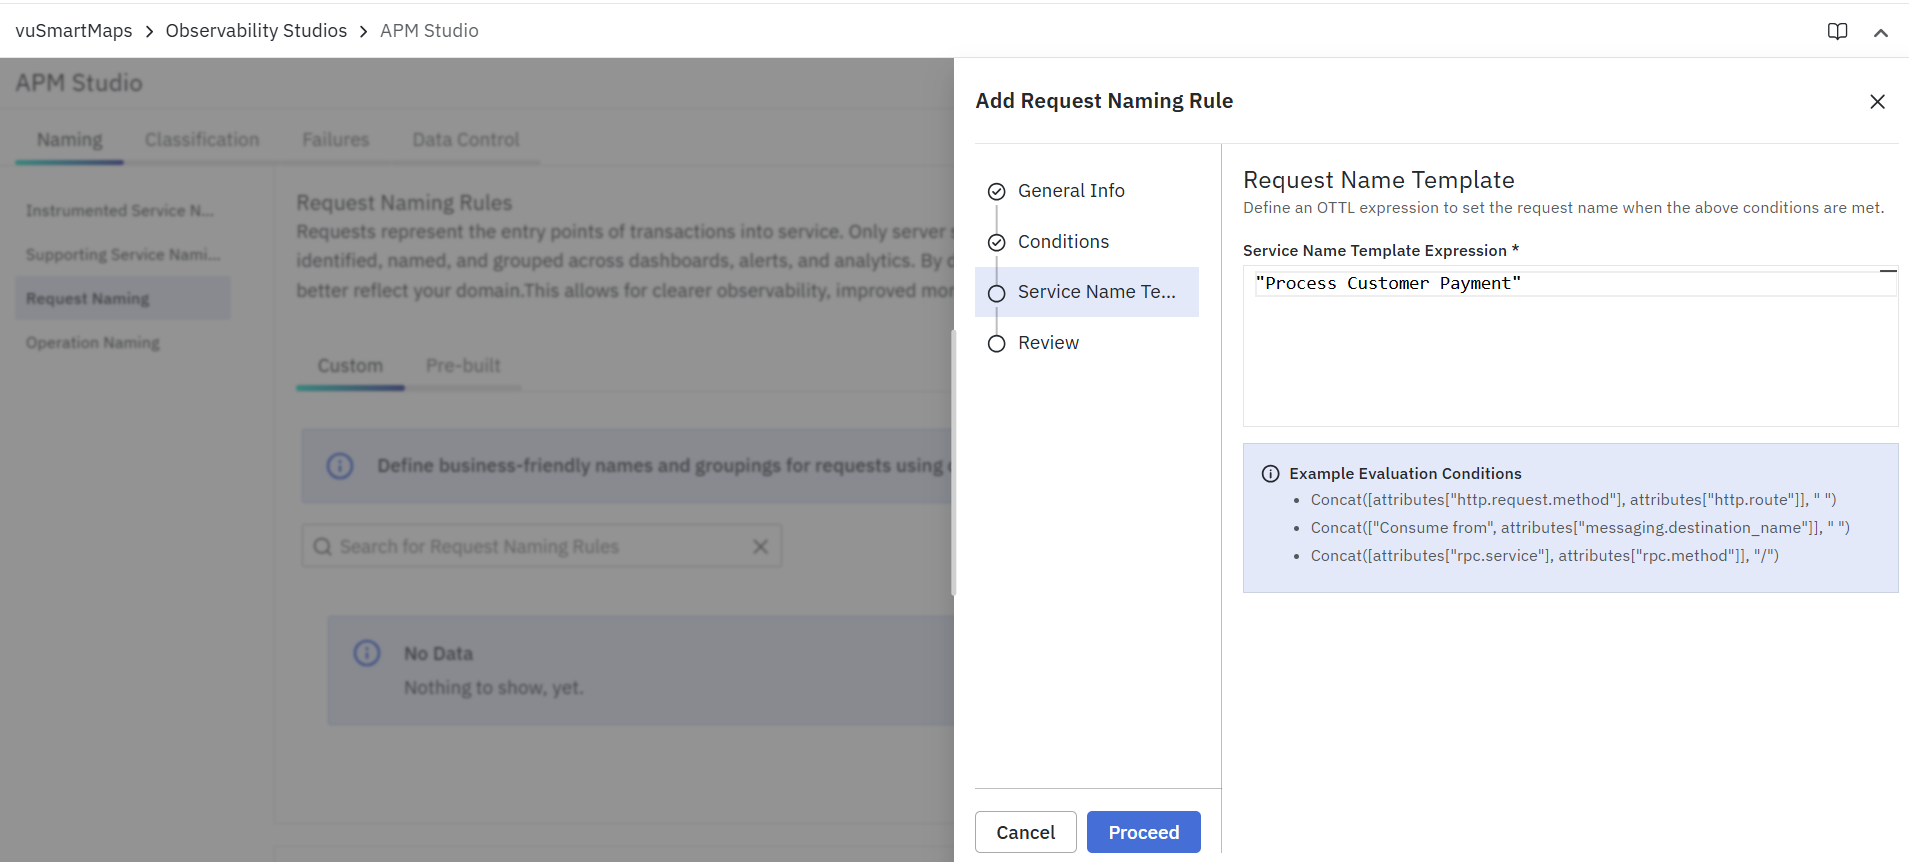
Field
- Request Name Template Expression (Required) - Enter the OTTL expression that generates the final request name.
How it works
The template can be:
- a fixed business-friendly name
- a dynamic name derived from span attributes
- a composed value built using multiple attributes
Request Name Template Examples
Example 1: Convert a payment API into a business name
Condition
attributes["http.request.method"] == "POST" and attributes["http.route"] == "/api/payment/process"
Request Name Template
"Process Customer Payment"
Result
Process Customer Payment
Example 2: Group multiple customer CRUD APIs
Condition
attributes["http.route"] in ["/api/customer", "/api/customer/{id}"]
Request Name Template
"Customer API Operations"
Result
Customer API Operations
Example 3: Simplify gRPC request names
Condition
attributes["rpc.service"] != nil and attributes["rpc.method"] != nil
Request Name Template
attributes["rpc.method"]
Result
ProcessPayment
Example 4: Normalize health probes
Condition
attributes["http.route"] in ["/health", "/ready", "/live"]
Request Name Template
"Internal Health Check"
Result
Internal Health Check
Example 5: Normalize search API versions
Condition
attributes["http.route"] in ["/api/v1/search", "/api/v2/search", "/api/v3/search"]
Request Name Template
"Search Query"
Result
Search Query
Example 6: Group authentication flows
Condition
attributes["http.route"] in ["/login", "/logout", "/token/refresh", "/sso/callback"]
Request Name Template
"Authentication"
Result
Authentication
Review
The Review step summarizes the rule configuration before it is saved.

This page displays:
- The rule name
- The optional description
- The selected scope
- The selected service(s), if applicable
- The configured OTTL condition(s)
- The computed request name template
- The Test this rule option
Test This Rule
From the Review step, you can use Test this rule to validate the rule against a sample span payload before saving it.
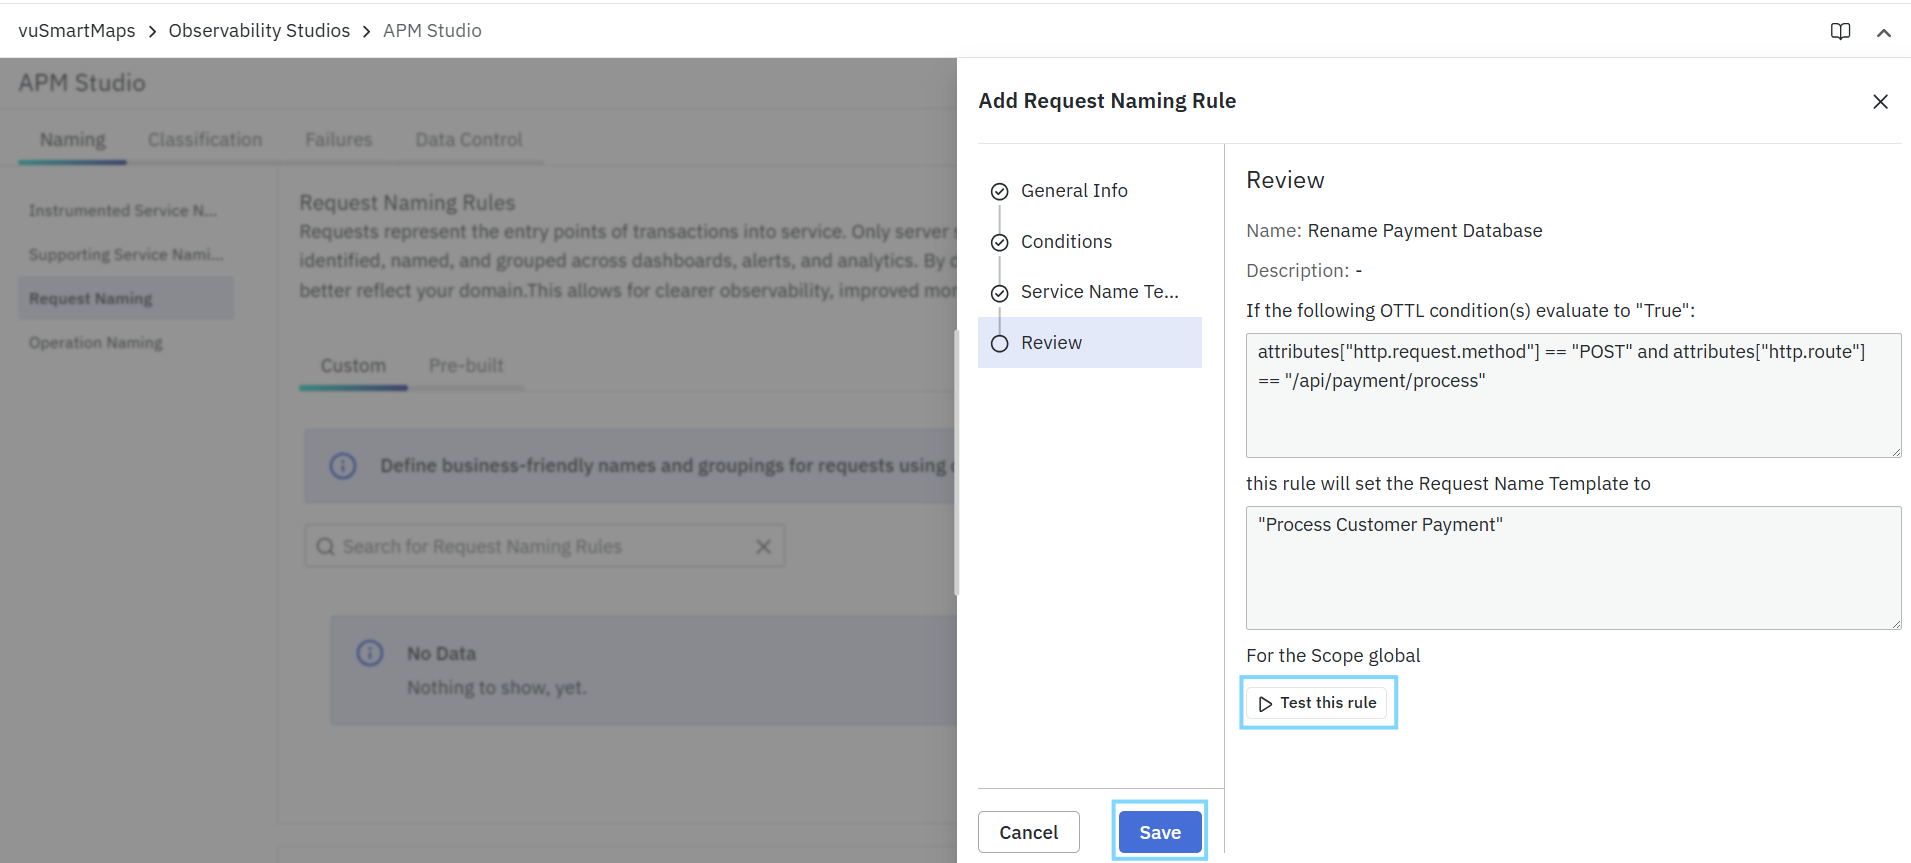
This allows you to preview:
- Whether the rule matches
- Which rule is triggered
- The detected request name
- The renamed request name
Saving the Rule
After reviewing the configuration, click Save to create the rule.
Once saved:
- The rule is added to the Custom list
- It is evaluated before the pre-built rules
- If multiple custom rules exist, they are processed in order
- The first matching rule is applied
This ensures that request naming remains deterministic and business-aligned across observability views.
Operation Naming
- The Operation Naming Rules page allows you to define how technical span names are transformed into meaningful, business-friendly operation labels.
- Operation naming helps standardize span names so that traces, analytics, dashboards, and troubleshooting views display consistent and understandable operation names instead of raw or highly technical span labels.
- The page description in the UI states that operation naming is used to:
- map technical span names to meaningful business operation labels
- evaluate rules in order
- Apply the first matching rule
- This means that when multiple rules exist, the system processes them in priority order and applies only the first rule whose condition matches.
Custom Rules
Unlike Request Naming and Supporting Service Naming, the current Operation Naming does not display a separate Pre-built tab.
Use the Operation Naming Rules page to:
- Create new operation naming rules
- search existing rules
- edit or delete rules
- enable or disable rules
- Reorder rules to control evaluation priority
- standardize noisy or inconsistent span names
If no rules are configured, the page displays an empty state.
Adding an Operation Naming Rule
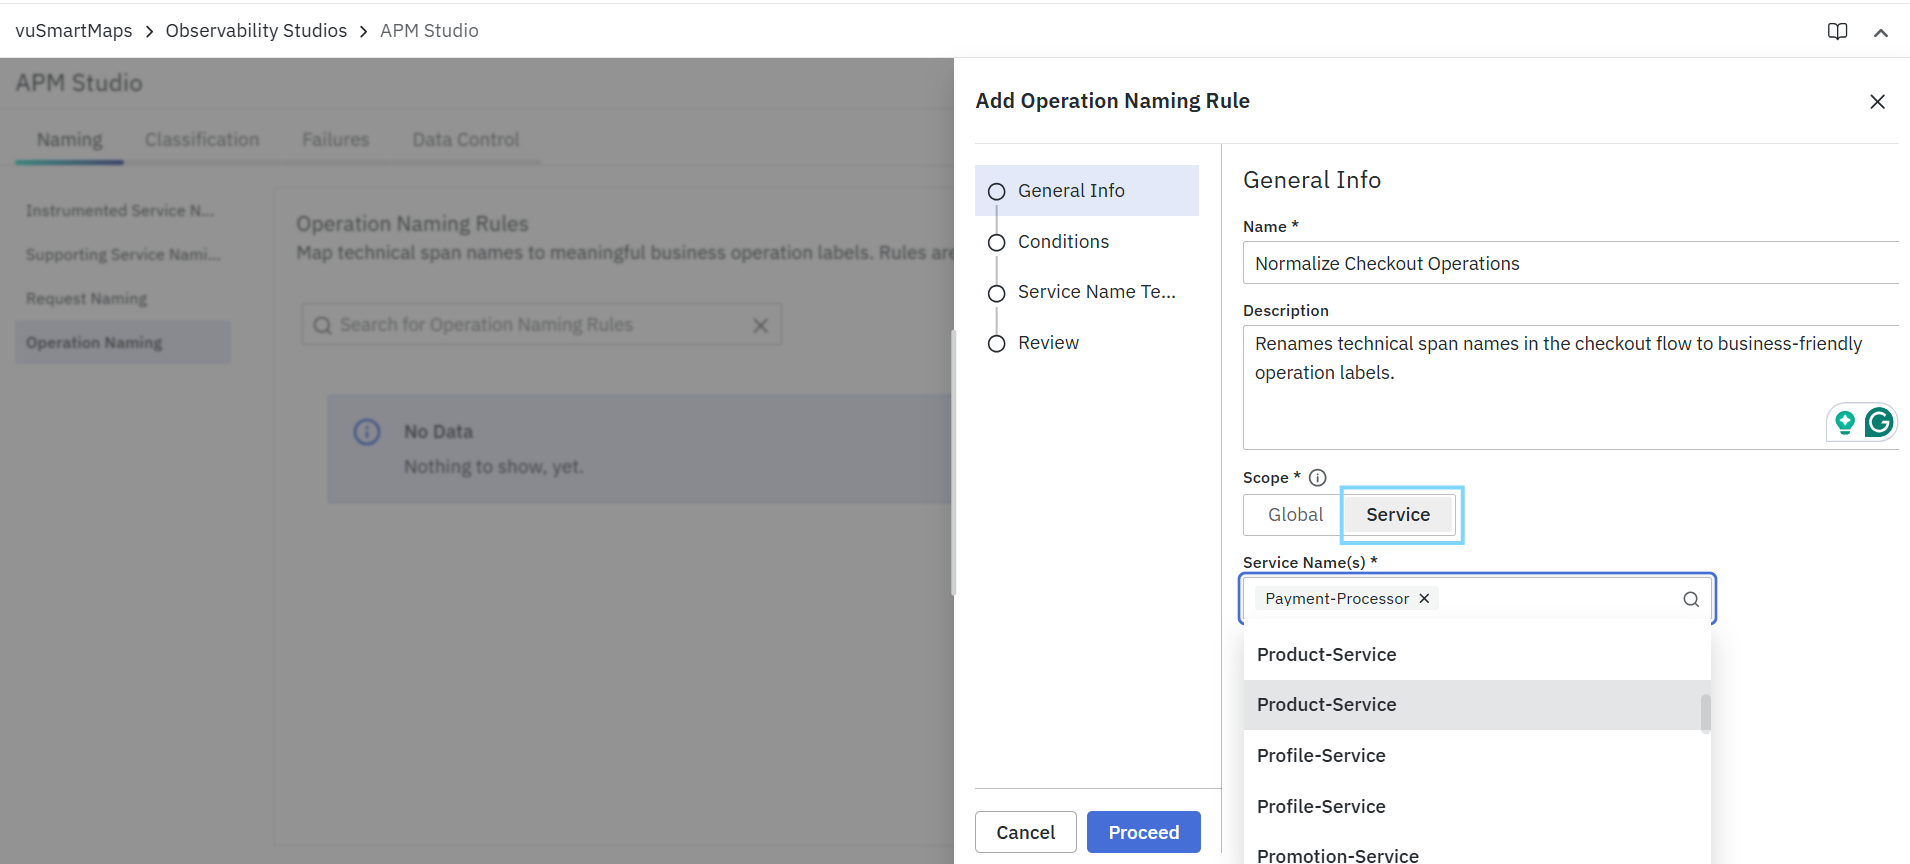
To create a rule, click + Custom Rule on the Operation Naming Rules page. The Add Operation Naming Rule wizard opens and guides you through the rule configuration flow.
The rule creation flow contains the following steps:
General Info
Use this step to define the basic details of the rule.
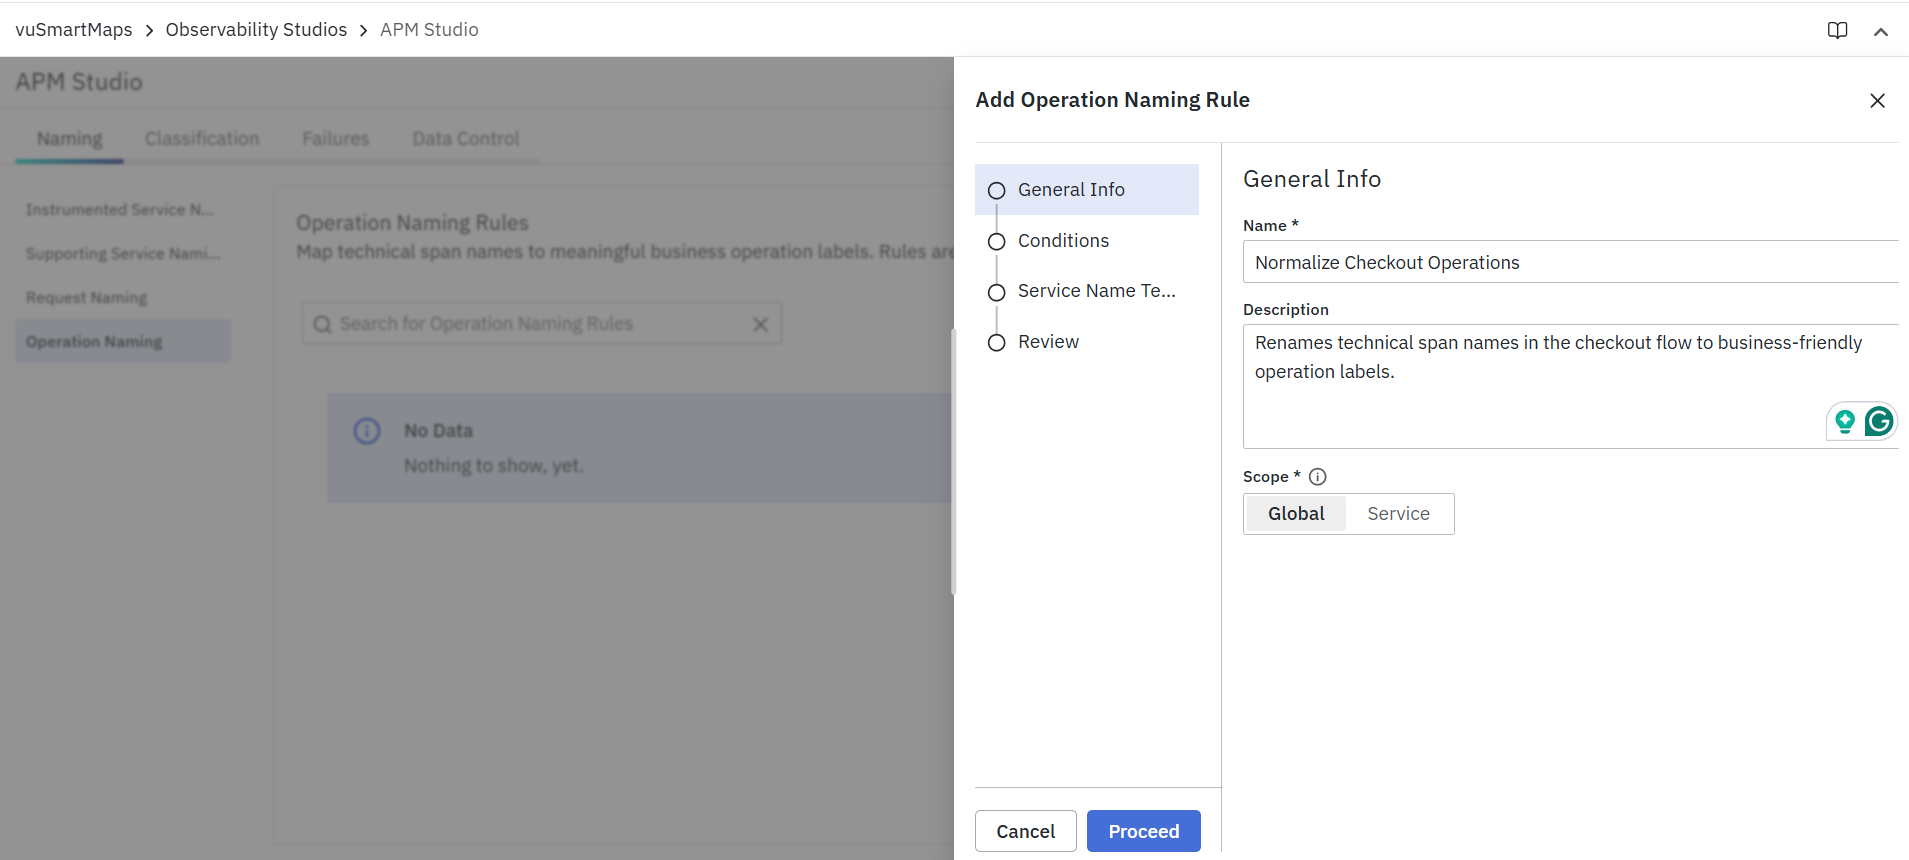
Fields
- Name – Enter a unique name for the rule.
- This field is mandatory.
- Description – Enter an optional description that explains what the rule does.
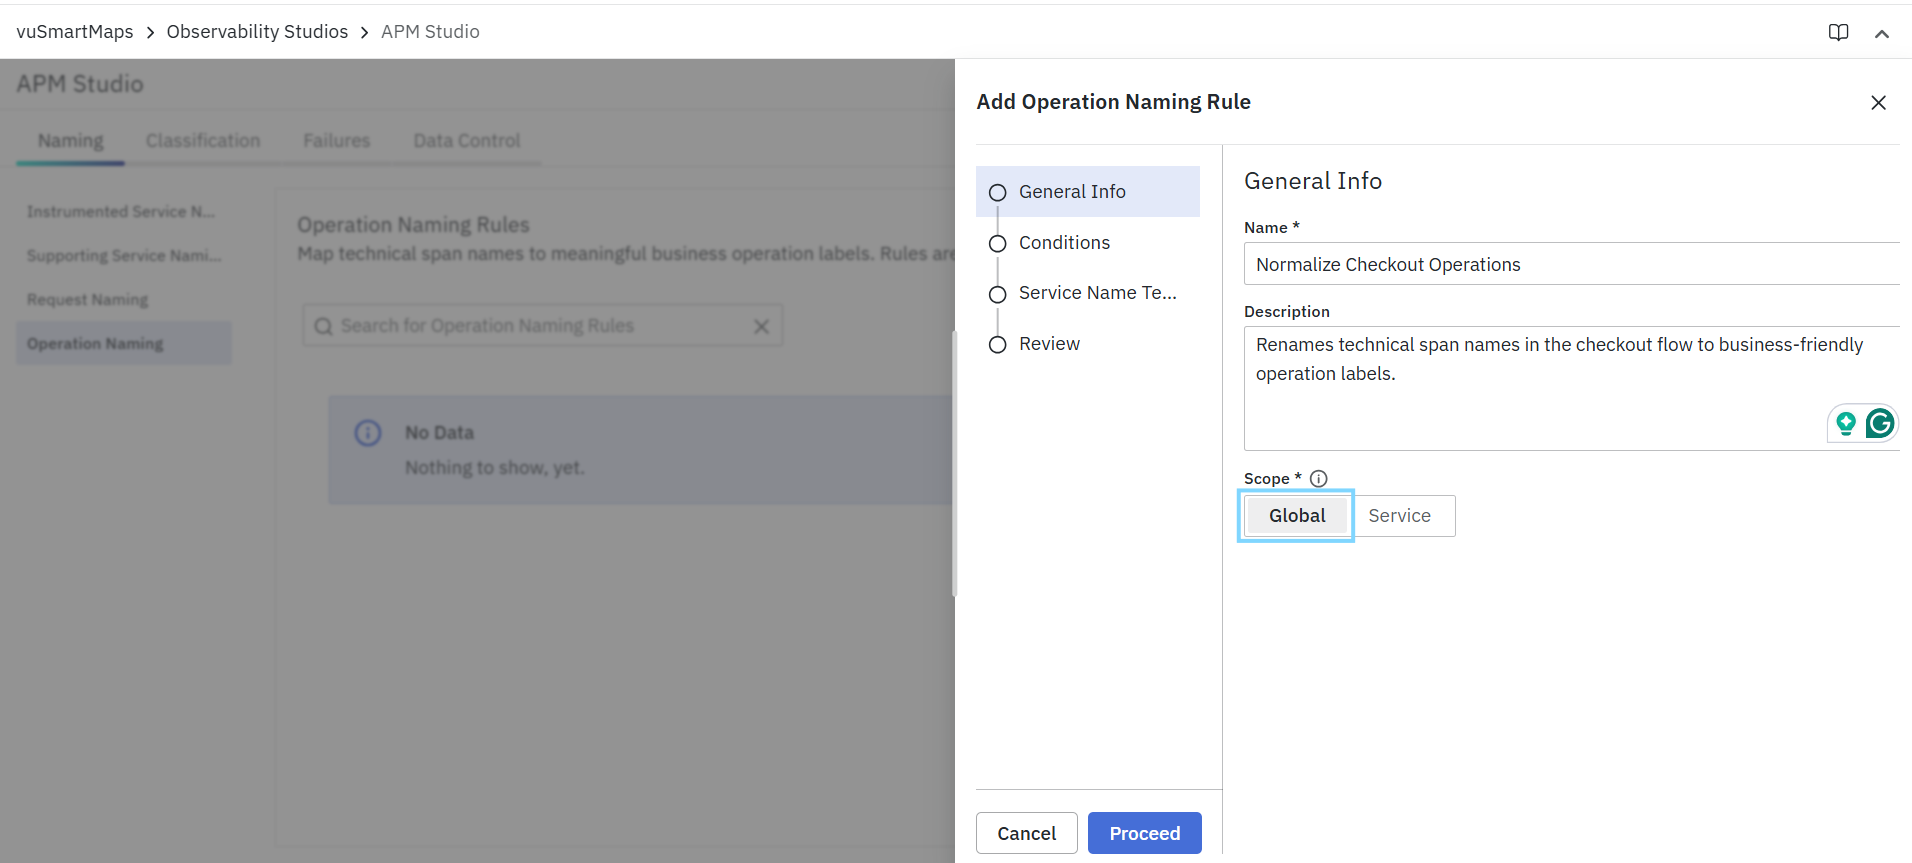
- Scope – Select where the rule should apply:
- Global – Applies to all matching spans
- Service – Applies only to selected service(s)
If Service is selected, the rule is evaluated only for spans belonging to the selected service context.
Example
- Name:
Normalize Checkout Operations - Description:
Renames technical span names in the checkout flow to business-friendly operation labels. - Scope:
Service
Scope Behavior
The selected scope determines where the rule is applied.
Global
Use Global when the same operation naming rule should apply across all services.
Example:
Rename generic health-check span names such as GET /health or health_probe to Internal Health Check across the environment.
Service
Use Service when the same technical span name should be interpreted differently depending on the service.
Example:
Rename POST /process to Process Customer Payment only for the payment-service, while another service may use the same technical path for a different purpose.
Conditions
Use this step to define the OTTL condition(s) that determine when the rule should be applied. This shows the step as Evaluation Conditions, where the rule is applied only if the configured OTTL expression evaluates to true.
Important behavior
- Operation naming rules are evaluated in order
- The first matching rule is applied
- Conditions are written as OTTL expressions
- If the rule scope is Service, the platform applies the selected service filter in addition to your condition
Common attributes used
Typical operation naming conditions may use:
kindnameorspan.nameattributes["http.request.method"]attributes["http.route"]attributes["rpc.service"]attributes["rpc.method"]attributes["db.operation"]attributes["messaging.operation"]attributes["messaging.destination"]
Supported OTTL Expressions
- Operation Naming rules use OTTL expressions to identify and assign meaningful names to application operations. Ensure that all conditions and templates use only the supported OTTL syntax.
- For the complete list of supported OTTL functions, operators and supported fields, refer Supported OTTL Functions and Operators.
Condition Examples
Example 1: Match a specific HTTP span
attributes["http.request.method"] == "POST" and attributes["http.route"] == "/api/payment/process"
Example 2: Match gRPC payment processing
attributes["rpc.service"] == "payment.PaymentService" and attributes["rpc.method"] == "ProcessPayment"
Example 3: Match database insert operations
attributes["db.operation"] == "INSERT"
Example 4: Match Kafka consumer processing
kind == SPAN_KIND_CONSUMER and attributes["messaging.system"] == "kafka"
Example 5: Match health-check spans
attributes["http.route"] in ["/health", "/ready", "/live"]
Operation Name Template
Use this step to define the OTTL expression that computes the final operation name when the condition matches. This expression determines the operation label displayed for matching spans in APM.
Field
- Operation Name Template Expression (Required) - Enter the OTTL expression that generates the final operation name.
How it works
The template can be:
- a fixed business-friendly label
- a dynamic value derived from span attributes
- a composed value built from multiple attributes
Operation Name Template Examples
Example 1: Rename a payment processing span
Condition
attributes["http.request.method"] == "POST" and attributes["http.route"] == "/api/payment/process"
Operation Name Template
"Process Customer Payment"
Result
Process Customer Payment
Example 2: Simplify gRPC operation names
Condition
attributes["rpc.service"] != nil and attributes["rpc.method"] != nil
Operation Name Template
attributes["rpc.method"]
Result
ProcessPayment
This is useful when fully qualified gRPC names are too long for dashboards.
Example 3: Normalize database writes
Condition
attributes["db.operation"] == "INSERT"
Operation Name Template
"Create Record"
Result
Create Record
Example 4: Normalize health probes
Condition
attributes["http.route"] in ["/health", "/ready", "/live"]
Operation Name Template
"Internal Health Check"
Result
Internal Health Check
Example 5: Build a dynamic HTTP operation name
Condition
attributes["http.request.method"] != nil and attributes["http.route"] != nil
Operation Name Template
Concat(attributes["http.request.method"], " ", attributes["http.route"])
Result
POST /api/payment/process
This is useful when you want a clean but still structured operation name.
Example 6: Normalize Kafka consumer operations
Condition
kind == SPAN_KIND_CONSUMER and attributes["messaging.destination"] == "payment-events"
Operation Name Template
"Consume Payment Event"
Result
Consume Payment Event
Review
The Review step summarizes the rule configuration before it is saved.

This page displays:
- The rule name
- The optional description
- The selected scope
- The selected service(s), if applicable
- The configured OTTL condition(s)
- The computed operation name template
- The Test this rule option
Test This Rule
From the Review step, you can use Test this rule to validate the rule against a sample span payload before saving it.

This helps you verify:
- whether the rule matches
- whether the selected span satisfies the OTTL condition
- the final computed operation name
- whether the naming logic is too broad or too narrow
Saving the Rule
After reviewing the configuration, click Save to create the rule.
Once saved:
- The rule is added to the Operation Naming Rules list
- It becomes part of the evaluation order
- If multiple rules exist, they are processed in priority order
- The first matching rule is applied
This ensures that operation naming remains deterministic and consistent.
FAQs
What is the purpose of Naming rules?
Naming rules standardize service, supporting service, request, and operation names so they appear consistently across APM.
Can I override the default naming behavior?
Yes. Custom naming rules take precedence over pre-built rules when their conditions match.
What happens if multiple custom rules match?
The rules are evaluated in priority order, and the first matching rule is applied.
Can I test a naming rule before saving it?
Yes. The Test this Rule option allows you to validate the rule against sample telemetry before saving it.
Where are the configured names reflected?
Configured names are displayed across Service Maps, dashboards, trace views, and other APM analysis pages.
