Working with O11ySources
Accessing O11ySources
-
You can access O11ySources from the left navigation menu by navigating to:
Integrations>O11ySources -
This section provides a centralized view for managing observability integrations and their configured endpoints within vuSmartMaps.
-
The O11ySources landing page contains the following tabs:
- O11ySources: Lists all supported integration types that define what kind of systems or technologies can be monitored in vuSmartMaps.
- Source Instances: Lists all configured endpoints that define where observability data is collected from and shows their configuration and collection status.
O11ySources
The O11ySources tab displays all supported O11ySources available in vuSmartMaps. Each O11ySource represents a specific integration or technology type and defines the capabilities required to onboard observability data.

- O11ySources may be Grouped or Non-Grouped, depending on how their Source Instances are organized and managed.
- Each O11ySource is displayed as a visual tile showing its current status, such as Enabled or Not Enabled, allowing you to quickly identify which integrations are active.
- By default, O11ySources are displayed in Grid View. You can switch to Table View to see a detailed, tabular representation.
Filtering and Sorting
You can use filters and sorting options to quickly locate specific O11ySources.
Filters
- Search Bar: Enter keywords to search for an O11ySource by name.
- Type Filter:
- All – Displays all O11ySources
- Component – Displays component-based O11ySources
- Logical – Displays logical or grouped O11ySources
- Status Filter
- Enabled – Displays active O11ySources
- Error – Displays O11ySources with configuration or data collection issues
- Not Enabled – Displays O11ySources that are not yet activated
- To apply filters, click + Filter, select the column and condition (such as Is, Is Not, or Contains), and click Apply.
- Multiple filters can be applied simultaneously to refine the results.
Table View
Click Table View in the top-right corner to switch from the tile layout to a table layout. The table provides detailed information about each O11ySource, including:
- Icon: Displays the icon associated with the O11ySource for quick identification.
- Name: The display name of the O11ySource. Clicking the name opens the O11ySource details page.
- Type: Indicates whether the O11ySource is a Component or a Logical (Grouped) O11ySource.
- Status: Shows whether the O11ySource is Enabled or Disabled.
- Version: Displays the current version of the O11ySource.
- Source Instances: Displays the total number of Source Instances configured under the O11ySource.
- Enabled Source Instances: Shows how many Source Instances are currently active and collecting data.
- Description: Provides a summary of what the O11ySource monitors or the type of data it supports.
Sorting
In Table View, columns can be sorted in ascending or descending order by clicking the column header. This allows quick organization of O11ySources by name, version, status, or Source Instance count.
Columns Customization
You can customize the table view to display only the columns relevant to your workflow.
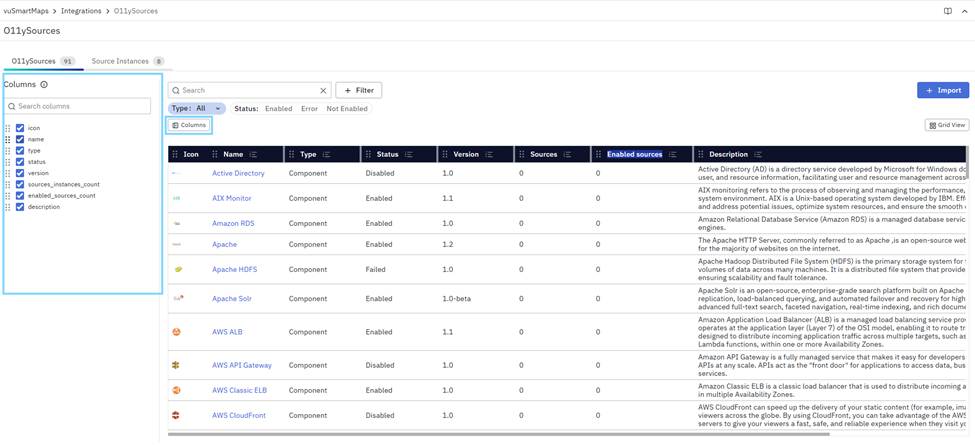
To customize columns:
- Click Columns at the top-left of the table.
- Search for specific columns.
- Show or hide columns using the checkboxes.
- Save the customized view.
This flexibility helps you focus on the most relevant O11ySource information while managing integrations efficiently.
Source Instances
The Source Instances tab provides a consolidated view of all Source Instances configured across different O11ySources. Each row in the table represents a single Source Instance and displays its configuration details and data collection status, allowing you to monitor and manage observability endpoints centrally.
Table Columns
The Source Instances table typically includes the following columns:
- Icon / O11ySource: Displays the icon and name of the O11ySource to which the Source Instance belongs.
- Source Instance: Displays the identifier of the Source Instance, such as an IP address, hostname, or user-defined alias.
- Type: Indicates whether the Source Instance belongs to a Component or a Logical O11ySource.
- Managed By: Indicates the method used to collect data from the Source Instance, such as OmniAgent-based collection, remote collection, or manual setup.
- Config Status: Displays the current configuration state of the Source Instance, for example: Configured, Pending, or Failed.
- Data Reception: Indicates whether the Source Instance is actively sending data, such as Receiving Data, Not Receiving, or Pending. This helps verify if data flow is functioning as expected.
- Application(s): Lists the applications associated with the Source Instance, such as Order Management, Payment Service, or Customer Portal.
- Environment: Displays the environment associated with the Source Instance, for example: Production, QA, or Staging.
Filtering and Sorting
You can use filtering and sorting options to quickly locate and organize Source Instances.
Filters
- Search Bar: Use the search bar at the top of the page to find a Source Instance by name or identifier.
- Advanced Filters: To apply filters:
- Click + Filter to open the filter panel.
- Select the column you want to filter (for example, O11ySource, Source Instance, or Config Status).
- Choose a condition such as Is, Is Not, Contains, or Starts With.
- Enter the filter value.
- Click Apply to view the filtered results.
Multiple filters can be applied simultaneously to refine the list further.
Sorting
- Click any column header to sort Source Instances in ascending or descending order.
- For example, you can sort by O11ySource, Config Status, or Data Reception to quickly identify issues or active instances.
Columns Customization
You can customize the Source Instances table to display only the columns relevant to your workflow.

To customize columns:
- Click Columns at the top-left of the table.
- Search for specific columns.
- Show or hide columns using the checkboxes.
- Save the customized view.
This flexibility helps you focus on the most relevant Source Instance information while managing observability at scale.
Enabling or Configuring O11ySources
To enable or configure an O11ySource:
- Click the O11ySource tile or name to open the Getting Started page.
- Click Enable to activate the selected O11ySource.
- Once enabled, the O11ySource becomes available for configuring Source Instances and initiating data collection.
- Before enabling a new O11ySource, ensure that OmniAgent is installed and running on the target host.
- Enabling an O11ySource only makes the integration available; data collection begins after Source Instances are configured.
- If OmniAgent is not yet discovered, you may encounter a “Pending” status error while configuring sources.
- This happens when the system is unable to communicate with the OmniAgent service on the host. To prevent this issue:
- Confirm that OmniAgent is properly installed on the target machine.
- Verify that the service is active and visible under OmniAgent Management Console.
- If OmniAgent is not installed, follow these steps to Download OmniAgent and follow the OmniAgent installation steps.
Importing O11ySources
The Import O11ySources feature allows users to upload new O11ySources or upgrade existing ones via a tar.gz file. This feature streamlines integrating new O11ySources or enhancing current ones, ensuring your observability framework remains up-to-date.
- Access the Import Feature: Navigate to the O11ySources landing page, and click the Import button.
- Upload the O11ySource File:
- A dialog box will appear prompting you to upload a tar.gz file.
- Select the tar.gz file of the O11ySource you wish to import (maximum file size: 0.29 MB).
- The Upload button will be enabled once a valid file is selected.
- Import Process:
- Click the Upload button to initiate the import.
- If the uploaded file is a new O11ySource, it will be added in a disabled state.
- If the file corresponds to an existing O11ySource, the current state (enabled/disabled) will be retained, and the upgrades will be applied.
- New O11ySource: Upon import, new O11ySources will be added in a disabled state. You need to enable them manually after ensuring all configurations are correctly set.
- Existing O11ySource: If importing an upgrade for an existing O11ySource, it will retain its current state (enabled or disabled).
- Sources Configuration Changes: If the upgrade involves changes in the Source configuration, the import may fail due to potential backward incompatibilities. In such cases, contact the VuNet support team to confirm whether the upgrade can be performed using the import button. If not, the upgrade will be done through a product release update.
