Exploring O11ySource Sections
Getting Started
The Get Started tab provides all the essential information required to understand and prepare an O11ySource before configuration. It helps users assess compatibility, understand how data is collected, review alerting capabilities, and verify that all prerequisites are met for successful data onboarding.
The Get Started tab typically includes the following sections:
O11ySource Version
Displays the current version of the O11ySource. This helps users identify supported capabilities and track updates across releases.
Tags
Shows the category or technology tags associated with the O11ySource, making it easier to identify the type of system or service being monitored and to quickly locate related sources.
Enable O11ySource
The Enable button allows users to activate the selected O11ySource. Enabling the O11ySource is a prerequisite to start configuring O11ySource instances and initiating data collection.
Compatibility
Describes the supported platforms, operating systems, environments, or versions where the O11ySource can be used. This allows users to verify whether the target system is supported before proceeding.
Prerequisites
Lists the requirements that must be met before setup, including:
- Firewall rules and required port openings
- Agent installation requirements (if applicable)
- Network connectivity and access prerequisites
- System permissions or dependencies needed for data collection
Reviewing these prerequisites helps ensure the environment is ready and avoids configuration issues during setup.
Data Collection Method
Explains how data is collected from the O11ySource, such as OmniAgent-based collection, remote collection, or manual configuration. This provides clarity on how metrics, logs, or events are gathered.
Configuring the Target
This section outlines the requirements and access needed on the target system from which data will be collected. It helps users verify that the necessary APIs, endpoints, permissions, and authentication mechanisms are available to successfully connect to and monitor the target environment.
Configuration Steps
Provides a guided, high-level flow for setting up the O11ySource. This includes adding a new source instance, entering required configuration details such as connection parameters and authentication, and saving the configuration to complete onboarding.
Golden Signals / Critical Metrics Collected
Lists the key metrics and signals collected by the O11ySource once enabled and configured. These metrics represent critical indicators of system health, performance, errors, and usage, and serve as the foundation for dashboards, analysis, and alerting.
Alert Rules
Provides information about the alert rules available for the O11ySource. This section indicates whether default alert rules are preconfigured and explains how alerts can be generated based on collected data to proactively notify users of issues or threshold breaches.
Sources
The Sources section provides a centralized interface for managing Source Instances associated with a selected O11ySource. From this section, users can view configuration details, monitor collection status, and perform management actions on Source Instances.
Depending on the O11ySource, Source Instances are presented in one of the following structures:
While the overall purpose of the Sources section remains the same, the table layout and navigation differ based on this structure.
Grouped O11ySources
For Grouped O11ySources, Source Instances are organized under a logical grouping. This grouping allows common configuration parameters to be applied collectively, while still providing visibility into individual Source Instances.
Normal View (Group-Level View)
By default, the Sources section opens in Normal View for grouped O11ySources.
In this view:
- Each row represents a group of Source Instances
- Configuration values shown apply to the entire group
- Actions performed at this level impact all Source Instances within the group
Common Columns in Normal View
The following columns are consistently displayed in Normal View for grouped O11ySources:
- Group Name: Displays the name of the logical group under which Source Instances are organized. Selecting the group allows access to detailed configuration and Source Instance views.
- No. of Retries: Indicates the retry count configured at the group level for data collection attempts.
- Timeout Duration: Displays the timeout value configured for data collection at the group level.
- Actions: Provides management options such as edit, clone, download (where applicable), or delete for the group. For more details, go through Source Actions.
Device View (Source Instance View)
For grouped O11ySources, users can switch from Normal View to Device View to see individual Source Instances within a selected group.

In Device View:
- Each row represents a single Source Instance
- Group-level configurations are inherited and reflected at the Source Instance level
- This view focuses on the visibility and status of individual targets
Common Columns in Device View
The following columns are consistently displayed in Device View:
- Target: Represents the endpoint associated with the Source Instance, such as an IP address, hostname, or service identifier.
- Managed By: Indicates how data is collected for the Source Instance, such as OmniAgent-based collection, Remote Collection, or Manual Setup.
- Config Status: Displays the current configuration state of the Source Instance, such as Configured, Pending, or Unknown.
Additional columns may appear based on the O11ySource type, but the columns listed above remain common across all grouped O11ySources in Device View.
Configuring New Source Instance(s) for Grouped O11ySources
- For Grouped O11ySources, Source Instances are organized under a logical group.
- Configuration is performed in a structured, multi-step workflow that allows you to define group-level parameters and associate multiple Source Instances under that group.
- This approach ensures consistent configuration while providing visibility and control at the individual Source Instance level.
Accessing the Configuration Flow
To configure new Source Instances for a grouped O11ySource:
- Navigate to the Sources tab of the selected O11ySource.
- Click Source in the top-right corner.
- Select + Configure New from the dropdown menu.
This opens the Configure New Source Instance(s) dialog, which guides you through a three-step process:
- Add Source Instance
- Configuration Setup
- Review
Step 1: Add Source Instance (Group Definition)
In this step, you define the group-level configuration and associate Source Instances with the group.

Group Configuration
You configure parameters that apply to all Source Instances within the group, such as:
- Group Name – Logical name used to identify the group
- Retry Parameters – Number of retry attempts for data collection
- Timeout Duration – Timeout value applied during data collection
These parameters are inherited by all Source Instances added to the group.
Adding Source Instances using Add Device
- For grouped O11ySources, Source Instances can be associated with a group only after they are added as devices.
- In addition to associating existing Source Instances, the configuration flow allows you to add new Source Instances directly using the Add Device option.
When to Use Add Device
Use Add Device when:
- The required Source Instance does not already exist
- You want to onboard a new target endpoint into the selected O11ySource group
- You need to define target-level details before associating them with the group
Add Device Workflow
- Within Add Source Instance, click Add Device to open the Add Device dialog.
- This dialog is used to create a new Source Instance by defining its target and access details. The fields in this dialog are common across grouped O11ySources and must be completed before the Source Instance can be added to the group.
Add Device – Required Details
The following details must be provided:
- Target: Specifies the endpoint from which data will be collected. This is typically an IP address or hostname.
- Credential: Selects the credential required to access the target endpoint. The available options depend on the O11ySource type and supported authentication mechanisms.
- Vendor: Identifies the vendor associated with the target endpoint. This information is used to determine compatibility and supported data collection logic.
- Model: Specifies the model or variant of the target endpoint. This helps align the Source Instance with the correct dataset and configuration.
- Application Mapping: Associates the Source Instance with one or more applications for contextual visibility and analysis.
After entering all required details, click Add to create the Source Instance.
Adding MIB Groups
- For grouped O11ySources that support SNMP-based data collection, MIB Groups define what metrics are collected from the associated Source Instances and how frequently they are polled.
- MIB Groups are configured at the group level and apply to all Source Instances associated with that group.

When to Configure MIB Groups
Configure MIB Groups when:
- The selected O11ySource supports SNMP-based collection
- You want to control the scope and frequency of metrics collected from Source Instances
- You need to customize polling behavior beyond default settings
If no custom configuration is required, the default MIB Group configuration can be used.
Add MIB Group Workflow
Within Add Source Instance, click Add MIB Group to open the Add MIB Groups dialog. In this dialog, provide the following details:
- MIB Group:
- Select the MIB Group that defines the set of metrics to be collected. Available options depend on the selected O11ySource.
- By default, ALL_SUPPORTED_MIB_GROUPS is selected
- Interval:
- Specifies the polling interval (in seconds) at which metrics from the selected MIB Group are collected.
- By default: Polling Interval is set to 360 seconds
Click Add to associate the selected MIB Group with the group configuration.
Step 2: Configuration Setup
The Configuration Setup step defines how data collection is performed for each Source Instance in the group.

In this view:
- Each row represents a Source Instance associated with the group
- The dataset associated with the O11ySource is displayed
- You select the management method for data collection
Managed By Options
Depending on the O11ySource type, only the supported management modes are displayed for selection. These may include:
- OmniAgent Managed: The source is managed automatically by OmniAgent, which handles probe installation, configuration, and lifecycle operations. Once OmniAgent is discovered on the target host, data collection starts automatically. If not yet detected, the source remains Pending until discovery.
- Manually Managed: The user manually handles configuration and data collection by downloading and deploying the agent package and configuration files on the host. This mode is used when automated management is not preferred or supported. If you have selected Manually Managed for a source, refer to the Download Source section. It explains how to download the necessary binaries and configuration files required for manual setup.
- Remote Collection: Used for remote data collection without deploying an agent manually or installing OmniAgent on the host. The platform connects using configured credentials to retrieve data directly, ideal for external or third-party systems.
After selecting the appropriate management method for each Source Instance, click Proceed.
Step 3: Review
The Review step provides a consolidated summary of the configuration before it is applied.
This summary includes:
- Total Source Instances being added
- Group-level configuration details
- Management method selected for each Source Instance
This step allows you to verify that:
- The correct Source Instances are associated with the group
- Group-level parameters are configured as expected
- Data collection methods are assigned correctly
Guidance for Each Management Type
- Manually Managed: Download the required agent binaries and configuration files from the Sources table Download Source icon after setup and deploy them manually on the target host.
- Remotely Managed: Data collection starts automatically once the configuration is applied successfully.
- OmniAgent Managed: Data collection starts automatically when OmniAgent is detected on the host. If the agent is not yet discovered, the Source Instance remains Pending until it reports back to the Management Console.
- If OmniAgent is not discovered, the Source Instance remains Pending until it reports back to the Management Console.
- To resolve this, verify that OmniAgent is visible under the OmniAgent Management Console.
- If OmniAgent is not installed, download OmniAgent and complete the installation as described in the OmniAgent Installation Guide.
Completing the Configuration
After reviewing the configuration:
- Click Finish to apply the configuration.
- The newly created group appears in the Sources table.
- Individual Source Instances can be viewed using Device View within the grouped O11ySource.
The configured Source Instances are now ready for monitoring and management.
Non-Grouped O11ySources
For Non-Grouped O11ySources, Source Instances are managed independently without any group-level abstraction.
In this structure:
- Each row in the Sources table represents a single Source Instance
- All configuration parameters apply directly to that Source Instance
- There is no Normal View or Device View toggle
Sources Table (Non-Grouped O11ySources)
The Sources table directly displays Source Instance-level details.
Common Columns
The following columns are consistently displayed for non-grouped O11ySources:
- Target: Displays the endpoint associated with the Source Instance, such as an IP address or FQDN.
- Managed By: Indicates the data collection method configured for the Source Instance.
- Config Status: Displays the configuration state of the Source Instance.
- Actions: Provides management options such as edit, clone, download (where applicable), or delete for the Source Instance. For more details, go through Source Actions.
Additional columns specific to the O11ySource may be displayed to capture configuration parameters relevant to that integration.
Configuring New Source Instance(s) for Non-Grouped O11ySources
- For Non-Grouped O11ySources, Source Instances are managed individually, without any group-level abstraction. Each Source Instance is configured, managed, and monitored independently, and all configuration parameters apply directly to that Source Instance.
- This configuration flow is simpler compared to grouped O11ySources and is commonly used for integrations where each target operates independently.
Accessing the Configuration Flow
To configure a new Source Instance for a non-grouped O11ySource:
- Navigate to the Sources tab of the selected O11ySource.
- Click Source in the top-right corner.
- Select + Configure New from the dropdown menu.
This opens the Configure New Source Instance(s) dialog, which follows a three-step workflow:
- Add Source Instance
- Configuration Setup
- Review
Step 1: Add Source Instance
In this step, you manually enter the source-specific information. The fields displayed in this form vary depending on the selected O11ySource type (for example, Apache, Linux Monitor, F5 Load Balancer, or SNMP Polling).
Steps
- Enter all the required configuration details as displayed in the form.
- Click Proceed to continue.
The source creation process differs for each O11ySource. Refer to the Getting Started tab of the respective O11ySource for detailed prerequisites and configuration requirements.
Step 2: Configuration Setup
The Configuration Setup step defines how the Source Instance is managed and how data collection is performed.
In this view:
- Each row represents a single Source Instance
- The dataset associated with the O11ySource is displayed
- Supported management modes are presented for selection
Depending on the O11ySource type, only the supported management modes are displayed for selection.
Management Modes:
- OmniAgent Managed: The source is managed automatically by OmniAgent, which handles probe installation, configuration, and lifecycle operations. Once OmniAgent is discovered on the target host, data collection starts automatically. If not yet detected, the source remains Pending until discovery.
- Manually Managed: The user manually handles configuration and data collection by downloading and deploying the agent package and configuration files on the host. This mode is used when automated management is not preferred or supported. If you have selected Manually Managed for a source, refer to the Download Source section. It explains how to download the necessary binaries and configuration files required for manual setup.
- Remote Collection: Used for remote data collection without deploying an agent manually or installing OmniAgent on the host. The platform connects using configured credentials to retrieve data directly, ideal for external or third-party systems.
After selecting the applicable management mode(s), click Proceed to continue
Step 3: Review
The Review step provides a final summary of the Source Instance configuration before it is applied.

The summary includes:
- Target details of the Source Instance
- Selected dataset
- Chosen management method
This step allows you to verify that all configuration and management selections are correct.
Guidance for Each Management Type
- Manually Managed: Download the required agent binaries and configuration files from the Sources table Download Source icon after setup and deploy them manually on the target host.
- Remotely Managed: Data collection starts automatically once the configuration is applied successfully.
- OmniAgent Managed: Data collection starts automatically when OmniAgent is detected on the host. If the agent is not yet discovered, the Source Instance remains Pending until it reports back to the Management Console.
- If OmniAgent is not discovered, the Source Instance remains Pending until it reports back to the Management Console.
- To resolve this, verify that OmniAgent is visible under the OmniAgent Management Console.
- If OmniAgent is not installed, download OmniAgent and complete the installation as described in the OmniAgent Installation Guide.
Completing the Configuration
After reviewing the summary:
- Click Finish to complete the configuration.
- The newly added Source Instance appears in the Sources table.
- The Source Instance is ready for monitoring and management based on the selected configuration.
Importing O11ySource Source Instances
The Import option allows users to add, update, or delete multiple source instances in bulk using a structured spreadsheet file. This enables consistent configuration management across environments and simplifies large-scale changes.
To access the Import option:
-
Navigate to:
Integrations → O11ySources → <Select O11ySource> → Sources tab -
Click the Source button at the top-right corner.
- Select Import from the dropdown menu.
This opens the Import Data Source(s) dialog.
Import Workflow
The import process consists of three steps:
- Upload Data
- Configuration Setup
- Review
Step 1: Upload Data
- You can drag and drop the file into the upload area or click Select file to browse and upload it manually.
- The file must be in
.xlsx & .xlsformat and with max size of 20.00 MB. - You can click Download sample template to download the correct template structure for that specific O11ySource.
- Once the file is uploaded, click Proceed to move to the next step.
Ensure that your file contains all the mandatory fields required for the respective O11ySource before uploading.
Import File Structure
- The structure of the import sheet depends on whether the O11ySource is:
- Non-Grouped
- Grouped
- The field names and column order must match the template provided for the selected O11ySource.
- All import sheets must include an Action column.
Refer to Download sample template to download the correct template structure for that specific O11ySource.

Importing Non-Grouped O11ySources
In Non-Grouped O11ySources:
- Each row represents one source instance.
- All configuration parameters for that instance must appear in the same row.
- Columns must match the exported or template structure.
- The Action column can be updated if required.
Sheet Requirements
The sheet must:
- Contain all mandatory fields required for that O11ySource.
- Use exact column names as defined in the template.
- Include the Action column for each row.
- Avoid duplicate entries for the same unique identifier.
- Maintain correct data types (for example, numeric fields, IP fields, text fields).
Each row will be processed independently during import.
Importing Grouped O11ySources
In Grouped O11ySources:
- Each row represents one device entry within a group.
- Group-level configuration fields must be repeated for each device row.
- Device-level fields must be specified per row.
- The Action column must be updated if required.

Sheet Requirements
The sheet must:
- Include both group-level and device-level fields.
- Maintain consistent group identifiers across related rows.
- Include the Action column for each row.
- Avoid structural mismatch between group entries.
- Avoid duplicate entries for the same unique identifier.
- Maintain correct data types (for example, numeric fields, IP fields, text fields).
- Follow the exact template structure for that O11ySource.
- If a group contains multiple devices, multiple rows must be included, one per device.
Action Column
The Action column determines what operation will be performed for each row during import.
Valid values:
no-actionaddupdatedelete
The value is case-sensitive and must match exactly as defined in the template.
no-action
- No changes will be made for that row.
- The row will be ignored during import.
- Useful when reusing export files without modifying certain entries.
add
- Creates a new source instance.
- If the source instance does not exist, it will be added.
- For Grouped sources:
- Adds new group or device entries to the existing group.
update
- Updates an existing source instance.
- If the source instance exists:
- The configuration values will be modified as per the file.
- If the source instance does not exist:
- It will be added as a new source instance.
- For Grouped sources:
- Updates matching group/device entries.
- If the device does not exist within the group, it will be created.
delete
- Deletes the specified source instance.
- If the instance exists:
- It will be removed.
- If the instance does not exist:
- It may be ignored or flagged during validation.
- For Grouped sources:
- Deletes the specific device entry or entire group based on identifiers.
Import Scenarios
-
Scenario: Partial Removal of Source Instances in Import Sheet
-
After exporting, consider that there are 10 existing source instances in the system. While preparing the import sheet, 5 source instances are completely removed from the sheet (not included at all), and the remaining 5 are marked with delete in the Action column.
-
During import, the system processes only the rows present in the sheet. The 5 source instances marked with delete will be removed. The other 5 source instances that were not included in the sheet will remain unchanged.
-
The import process does not compare the total number of existing records with the number of rows in the sheet. It does not treat missing rows as deletions. Only rows explicitly marked with delete are removed from the system.
-
-
Scenario: Handling Table-Type Fields in Import (Grouped and Non-Grouped)
-
Some O11ySources contain table-type fields. These are structured fields that allow multiple entries under a single source instance.
-
When such table-type fields are present, the import sheet represents them as separate columns for each table attribute. Each table entry must be provided as a separate row in the sheet.
-
For both Grouped and Non-Grouped O11ySources:
- All non-table fields must be repeated consistently for that source instance.
- Column values in a table define each table entry.
- The Action column applies at the row level.
- The system processes each row independently.
-
As shown in the screenshot below, Table-type fields such as mib_groups.mib_group and mib_groups.interval
-
-
Scenario: Invalid Data Type or Incorrect Field Value
- Each field in the import sheet expects a specific data type and format based on the O11ySource configuration.
- If an incorrect data type or invalid value is provided in any field (for example, an invalid numeric range, incorrect format, or improper conditional value), the system validates the file during the Upload Data step.
- If validation fails:
- An error banner appears in the Import dialog stating that errors were detected in the imported file.
- The system prevents proceeding to the next step.
-
A Download error file option becomes available.
-
When the error file is downloaded:
- It is generated in
.txtformat. - It clearly specifies the fields as shown in the screenshot below
- It is generated in
-
This allows you to identify exactly which row and which field caused the issue. The incorrect rows must be corrected in the sheet and re-imported.
-
Scenario: Incorrect Dropdown or Restricted Field Values
- Some fields correspond to predefined dropdown values in the UI. These fields accept only specific allowed values.
- If a value entered in the sheet does not exactly match one of the allowed options:
- The file upload will fail validation.
- The error banner will be displayed in the Import dialog.
- The Download error file option will be available.
- The downloaded error file will clearly mention:
- The source
- The field name
- The invalid value
- The expected constraint (if applicable)
- The system does not automatically correct dropdown mismatches. The values must be corrected in the sheet before re-importing.
-
Scenario: Incorrect Dropdown Values
- Some fields correspond to predefined dropdown options in the UI. These fields accept only specific allowed values.
- In the import sheet:
- The value must exactly match one of the allowed dropdown options.
- Values are typically case-sensitive and must match the template.
- To avoid such errors, it is recommended to use the Download sample template option and refer to valid dropdown values before preparing the import sheet.
-
Scenario: Using an update for a Non-Existing Source Instance
- After exporting, assume that source instances already exist in the system. In the import sheet, a row is marked with update, but the corresponding source instance does not exist in the system.
- What Happens During Import
- The source instance will be added as a new entry.
- Only the specific row is affected. Other rows are processed independently.
-
Scenario: Using add for an Already Existing Source Instance
- In the import sheet, a row is marked with add, but the same source instance already exists in the system.
- What Happens During Import
- The system validates whether the source instance already exists.
- If duplicates are not allowed, the row may fail validation.
- The existing source instance will not be overwritten.
- Other rows continue to process normally.
-
Scenario: Using delete for a Non-Existing Source Instance
- In the import sheet, a row is marked with delete, but the source instance does not exist in the system.
- What Happens During Import
- The system attempts to match the identifier.
- If no matching instance is found, the row may either be ignored or reported as a validation error.
- Only that row is affected.
-
Scenario: Missing Mandatory Field in a Row
- If a required field is missing or left blank:
- The system validates the sheet during upload.
- The import process stops at validation.
- An error banner is displayed.
- The error file identifies the specific row and column with missing required data.
- Only after correcting the missing values and re-uploading can the import proceed.
- If a required field is missing or left blank:
Step 2: Configuration Setup (Import Source Instance(s))
- The Configuration Setup step displays all Source Instances detected from the uploaded file.
- Each row in the table represents an individual Source Instance that will be created or updated as part of the import process.
- This step allows you to review and define how each Source Instance will be managed before finalizing the import.
Table Columns
The table displays the following common columns:
- Target: Identifies the endpoint associated with the Source Instance. This may represent an IP address, hostname, or logical identifier depending on the O11ySource type.
- Dataset: Displays the dataset associated with the selected O11ySource. This confirms which integration type the imported Source Instances belong to.
- Managed By: Indicates how each Source Instance will be managed for data collection. Depends on the selected O11ySource:
- OmniAgent
- Manual
- Remote Collection
Step 3: Review (Import Source Instance(s))
The Review step provides a consolidated summary of the imported Source Instances and their management distribution before completing the import process. This step allows you to validate the final configuration before applying it.
Source Instances Being Imported
Indicates the total number of Source Instances detected from the uploaded file.
Configuration Setup Distribution
Displays the number of Source Instances grouped by management mode:
- OmniAgent Managed: Configuration will be applied automatically once OmniAgent is discovered on the host.
- Manually Managed: Configuration requires manual deployment on the respective host.
If a Source Instance is set to Manually Managed, refer to the Download Source section to obtain the required binaries and configuration files. - Remote Collection: Configuration where data is collected remotely without requiring OmniAgent on the host.
Review Table
Below the summary, a detailed table displays:
- Target: Identifies the endpoint associated with the Source Instance.
- Dataset: Confirms the O11ySource type associated with the Source Instance.
- Managed By: Displays the selected management mode.
- Comments: Indicates the current discovery or configuration state, if applicable.
Comments and Pending State
The Comments column may display discovery-related information.
For example:
- If OmniAgent has not yet been discovered on a host, the Source Instance may remain in a Pending state until the agent reports back to the Management Console.
- If OmniAgent is not discovered, the Source Instance remains Pending until it reports back to the Management Console.
- To resolve this, verify that OmniAgent is visible under the OmniAgent Management Console.
- If OmniAgent is not installed, download and install OmniAgent as described in the OmniAgent Installation Guide.
Exporting O11ySource Source Instances
The O11ySources module allows users to export source instance configurations from the Sources tab. The export feature generates a spreadsheet file containing the configuration details of all source instances currently listed in the table. Source instances can now be exported either individually (selected rows) or in bulk (all listed instances).
To export source instances:
-
Navigate to: Integrations → O11ySources → <Select O11ySource> → Sources tab
-
Click the Export icon located at the top-right corner of the Sources table.
- A confirmation dialog appears.
- Click Yes to confirm.
- The system generates and downloads a spreadsheet file containing the source instance configurations.
Exported File Structure
- The exported file is generated in spreadsheet format.
- The structure of the exported sheet depends on whether the O11ySource is:
- Non-Grouped
- Grouped
The fields (columns) in the exported sheet vary depending on the selected O11ySource and its configuration schema.
Exporting Non-Grouped O11ySources
In Non-Grouped O11ySources, each source instance is configured independently and does not belong to any group.

When exporting a Non-Grouped O11ySource:
- Each row in the exported sheet represents one source instance.
- All configuration parameters defined for that source instance appear in the same row.
- The columns in the sheet depend on the selected O11ySource type. The field structure may vary accordingly.
- An Action column is included for bulk operation handling.
The exported file contains the complete configuration details of the selected source instances.
Exporting Grouped O11ySources
In Grouped O11ySources, configurations are defined at both group level and device level.
When exporting a Grouped O11ySource:
- Each row in the exported sheet represents one device entry within a group.
- Group-level configuration values appear along with device-level configuration values.
- If a group contains multiple devices, multiple rows will be generated for that group.
- The columns in the sheet depend on the selected O11ySource type. Field structure may vary accordingly.
- An Action column is included for bulk operation handling.
The exported file includes selected groups and their associated device entries.
Action Column in Exported File
The exported sheet contains an Action column with the following options:
no-actionaddupdatedelete
- The Action value determines what operation will be performed during import.
- For more details on action column functionality refer Importing O11ySources Source Instances
Sources Actions
Each Source Instance listed in the Sources table includes a set of quick management actions under the Actions column. These options allow you to efficiently edit, duplicate, download, or delete configurations.
Edit Source
- The Edit icon allows you to update details such as:
- Hostname or IP address
- Collection interval
- Other configuration parameters specific to the O11ySource
- After making the necessary changes, click Save to apply the updates.
Clone Source
- The Clone icon lets you duplicate an existing Source Instance configuration.
- This helps in quickly setting up multiple similar Source Instances without manually entering all parameters again.
Refresh Source
The Refresh option allows you to manually reload the Source Instances table to fetch the latest status and configuration updates.
Download Source
The Download action allows you to download the required agent binaries and configuration files for a selected Source Instance.
When you click the Download icon under the Actions column:
- A Download window appears, displaying the available configuration options.
- From the dropdown menu, select the configuration you wish to download.
- Click Submit to begin the download process.

- The Download option is available only for Source Instances configured as Manually Managed.
- For OmniAgent Managed or Remote Collection Source Instances, the platform handles deployment or data retrieval automatically, so no manual download is required.
Delete Source
The Delete icon permanently removes the selected Source Instance from the list.
- Once deleted, data collection from that target stops immediately.
- A confirmation prompt appears before deletion to prevent accidental removal.
Bulk Actions
The Bulk Delete option allows you to remove multiple Source Instances simultaneously.
- Select the checkboxes beside the Source Instances you want to delete.
- Open the Bulk Actions dropdown.
- Click Delete.
A confirmation message appears before deletion to prevent accidental removal. Once confirmed, all selected Source Instances are permanently deleted, and data collection from those targets stops immediately.
This action cannot be undone. Ensure the selected Source Instances are no longer required before proceeding with bulk deletion.
More Details
Clicking on the name of a Source Instance opens a detailed view, displaying additional configuration and operational information for that Source Instance.
ContextStreams
This tab enhances the O11ySource details page by offering users a visual representation of the data flow through various stages within an O11ySource. It showcases the journey of data, including its path through input streams, output streams, enrichments, connectors, and pipelines where applicable. This feature is designed to provide users with a comprehensive understanding of how data is processed and transformed within the O11ySource, ultimately aiding in troubleshooting, performance optimization, and gaining insights into the data processing pipeline.
It enables users to visualize the intricate data flow within an O11ySource. By presenting a clear overview of the relationships between different data sources, transformations, and destinations, it equips users to diagnose issues and gain valuable insights into their data processing pipeline. This comprehensive information offers detailed insights into the I/O streams, pipelines, enrichments, and connectors associated with each Source Instance in the O11ySource.
When are ContextStreams Created?
The ContextStreams definitions are packaged as part of the O11ySource.
- ContextStreams are provisioned when the O11ySource is enabled.
- Before enabling the O11ySource, the ContextStreams workflow is not active.
- Once enabled, the system automatically creates and activates the required streams, pipelines, enrichments, and connectors defined for that O11ySource.
If the O11ySource is uninstalled, the associated ContextStreams (including related streams, pipelines, enrichments, and connectors created as part of that O11ySource) are removed from the system.
Upon accessing the ContextStreams Workflow, you will encounter a visually engaging representation of your O11ySource’s data journey. Here's what you can expect:
- Input Streams: The agents send the data from the source to the Input Streams (Input Topic).
- Pipelines: Pipelines represent stages of data processing and transformation when applied.
- Output Streams: The processed or transformed data is then sent to the Output Streams (Output Topic).
- Enrichments: Enrichments are visualized, showing how additional context and information are added to the data.
- Connectors: Connectors reveal how data is sent to external systems or destinations.
Depending on the O11ySource configuration, data may flow directly through streams and connectors, or pass through pipelines when processing or transformation is applied.
Each element within the ContextStreams Workflow is clickable, allowing you to navigate to respective ContextStreams pages to access more details.
- Input Stream
Clicking on an Input Stream node will lead you to a dedicated page where you can explore in-depth information about the input stream, its configuration, and its performance. - Pipeline
Clicking on a Pipeline node will take you to a detailed view of that pipeline, including transformation logic, data processing speed, and any potential bottlenecks. - Output Stream
Clicking on an Output Stream node allows you to examine where the processed data is sent. You can access insights about the destination, data format, and transmission speed. - Enrichment
For Enrichments, clicking on these nodes reveals the specific enhancements applied to the data, helping you understand how additional context is injected. - Connector
Lastly, Connectors provide insights into how data is relayed to external systems. Clicking on a Connector node takes you to a dedicated page outlining the connection details and performance metrics.
Storyboards
Within the Storyboards section, you'll find a compilation of various storyboards tailored for your O11ySource. Each O11ySource comes with its dedicated set of dashboards, meticulously designed to address specific monitoring and observability requirements.
These dashboards offer optional filters, granting you the versatility to share the same dashboard across multiple O11ySources while enriching it with additional context. Delve into this assortment of storyboards to explore insightful visualizations, facilitating in-depth data analysis and aiding you in making informed decisions.
Filters enhance the flexibility of these storyboards, allowing you to adapt them to various O11ySources and their specific datasets. This feature promotes a unified and efficient approach to visualizing and analyzing data across your observability framework.
The dashboards can be accessed using the View button under the Actions column.
When Are Storyboards Created?
Storyboards are packaged as part of the O11ySource definition.
- Storyboards become available when the O11ySource is enabled.
- Before enabling the O11ySource, the associated storyboards are not active or visible.
- Once enabled, the predefined dashboards are automatically provisioned and available for use.
No manual creation is required for the default storyboards bundled with the O11ySource.
Default State of Storyboards
- Storyboards do not require separate enablement.
- Once the O11ySource is enabled, the dashboards are immediately accessible.
- Users may customize filters, clone dashboards, or create additional dashboards as needed.
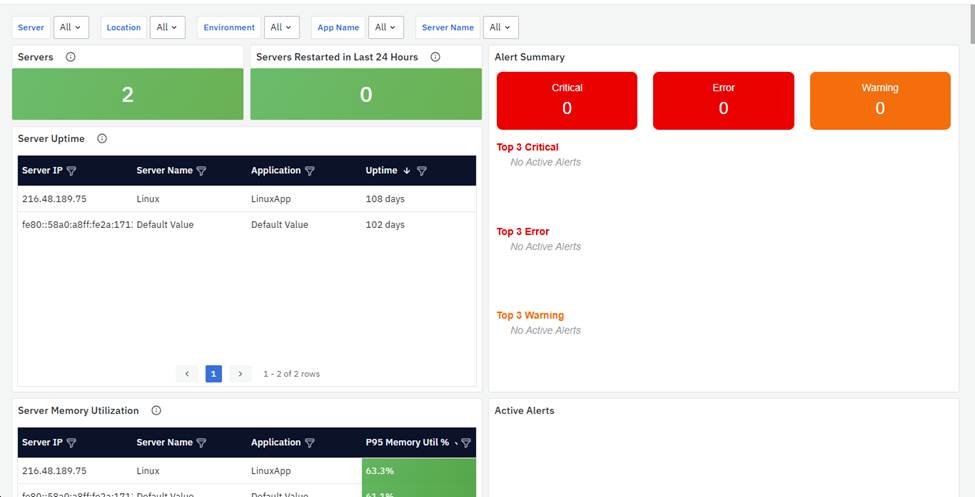
The dashboards can be accessed with the View button under the Actions column. An example of Linux Server Insights dashboard is shown below:
Alert Rules
In the Alert Rules section, you'll find a list of alert rules designed specifically for your O11ySource, similar to how storyboards are managed. This feature introduces a structured and centralized approach to alert management, parallel to the organization and management of visual elements through storyboards.
When Are Alert Rules Created?
Alert rule definitions are packaged as part of the O11ySource configuration.
- Alert rules are provisioned when the O11ySource is enabled.
- Before enabling the O11ySource, its associated alert rules are not active or available.
- Once enabled, the predefined alert rules become visible in the Alert Rules tab.
The Alert Rules feature empowers you to define, configure, and oversee your alerting requirements effectively. This structured approach ensures proactive issue resolution and promotes system stability and reliability. Aligning with the concept of storyboards, this section streamlines project management, enabling you to maintain control over real-time monitoring and issue resolution within your observability framework. For more information related to alerts, you can refer to the alerts user guide.
Fields
In the Fields section, you'll find an extensive list of data fields captured by your O11ySource. This repository of fields offers valuable insights into the available data, providing the foundation for in-depth analysis and customization.
Accessing this comprehensive list equips you with the knowledge required to tailor your O11ySource to meet your specific requirements and enhance its data processing capabilities.
When Are Fields Available?
Field definitions are packaged as part of the O11ySource configuration.
- Fields become available once the O11ySource is enabled.
- Before enabling the O11ySource, its associated field definitions are not active or visible.
- After enabling, the Fields section reflects the schema of the datasets defined for that O11ySource.
As data is ingested from configured Source Instances, the available fields correspond to the structure defined by the O11ySource.