Working with SNMP Definitions
Step-by-Step Instructions
View an OID Set
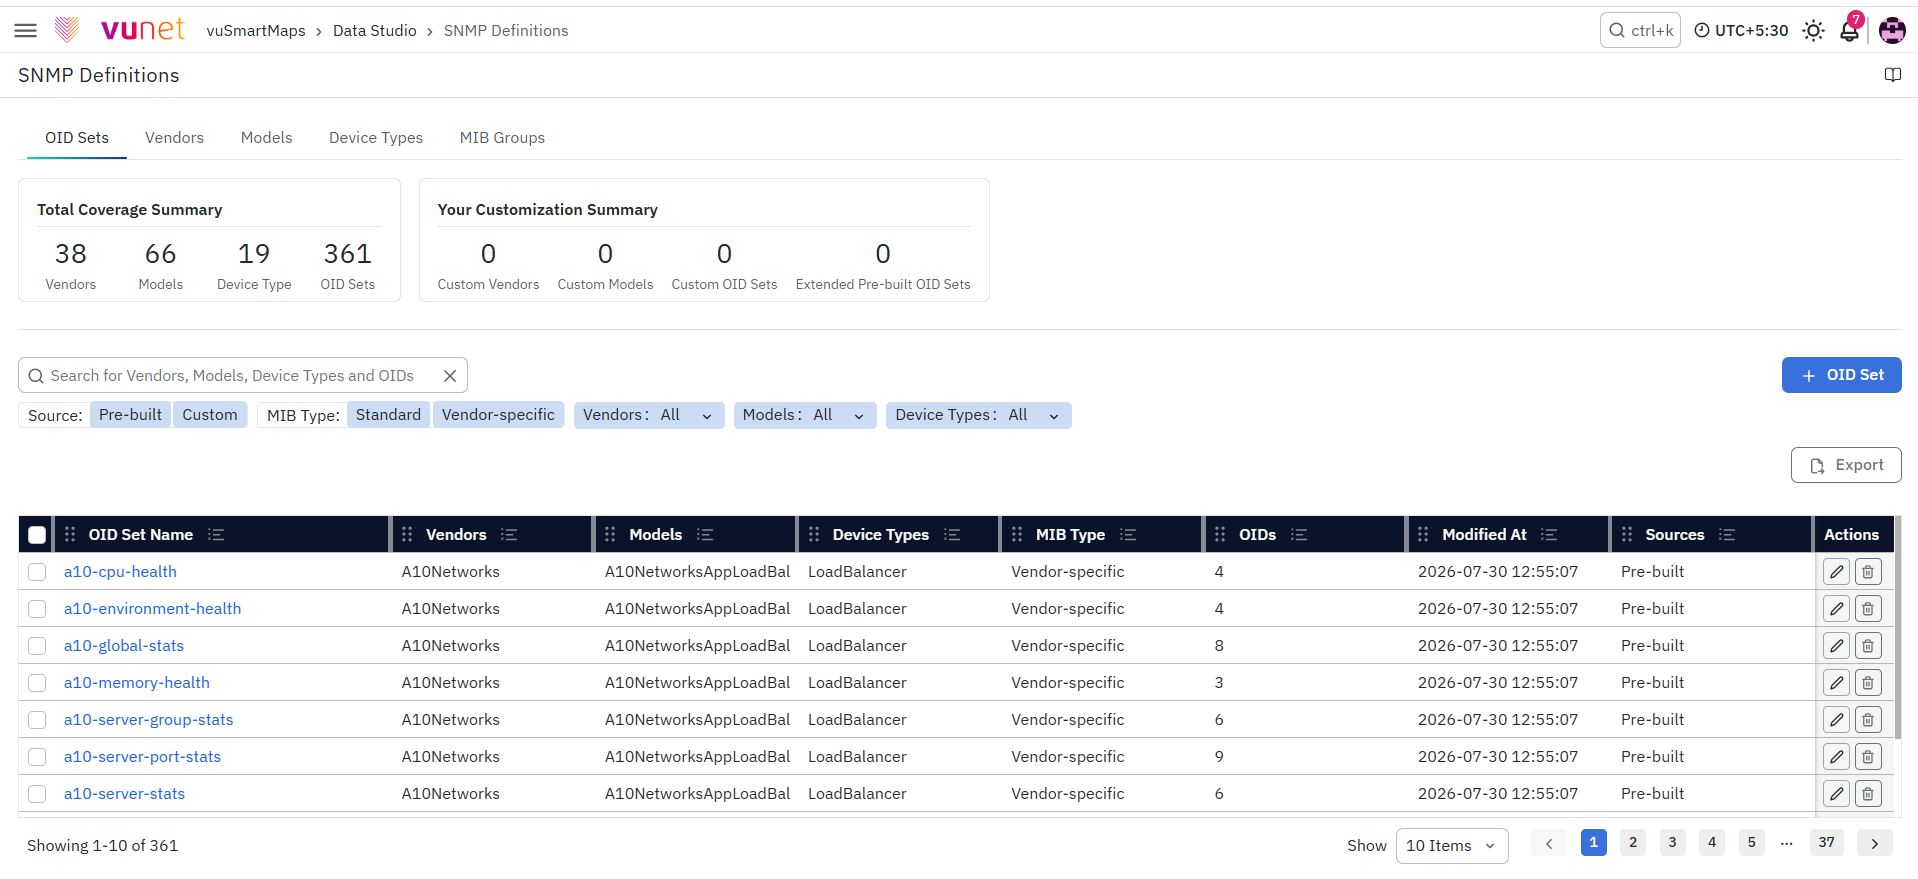
Use this option when you want to inspect an existing OID set before using or extending it.
-
Navigate to Data Studio → SNMP Definitions.
-
Open the OID Sets tab.
-
Use the search box or filters to locate the required OID set.
-
Click the OID Set name.
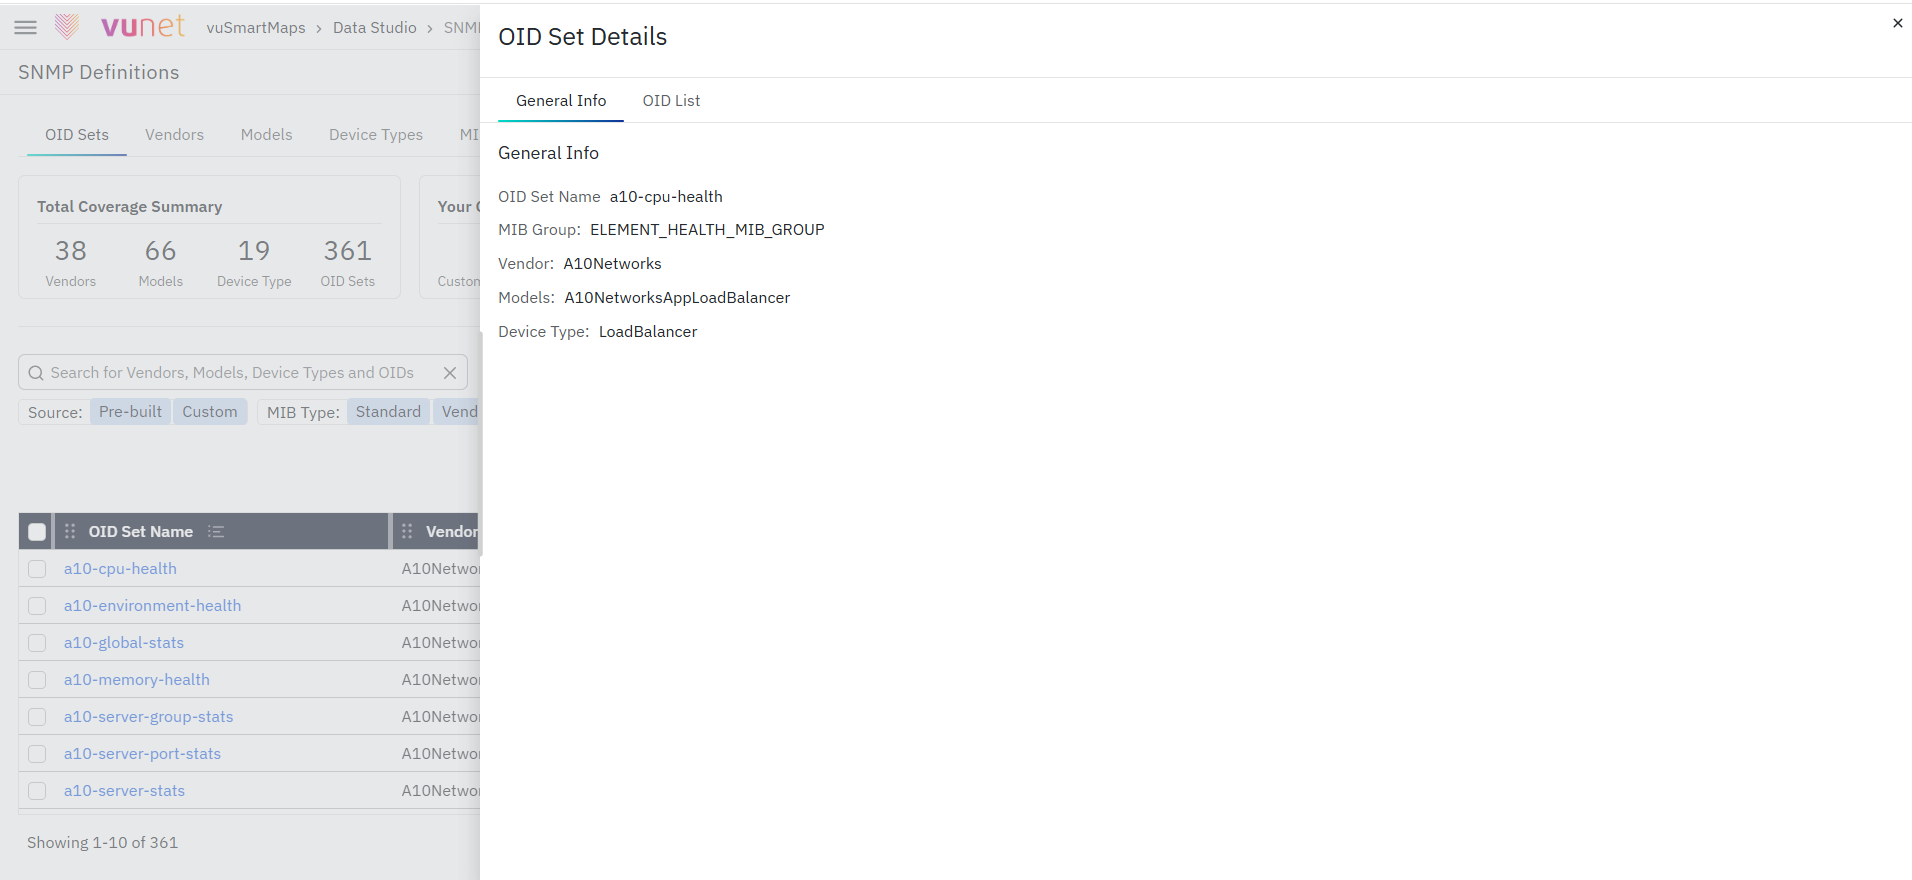
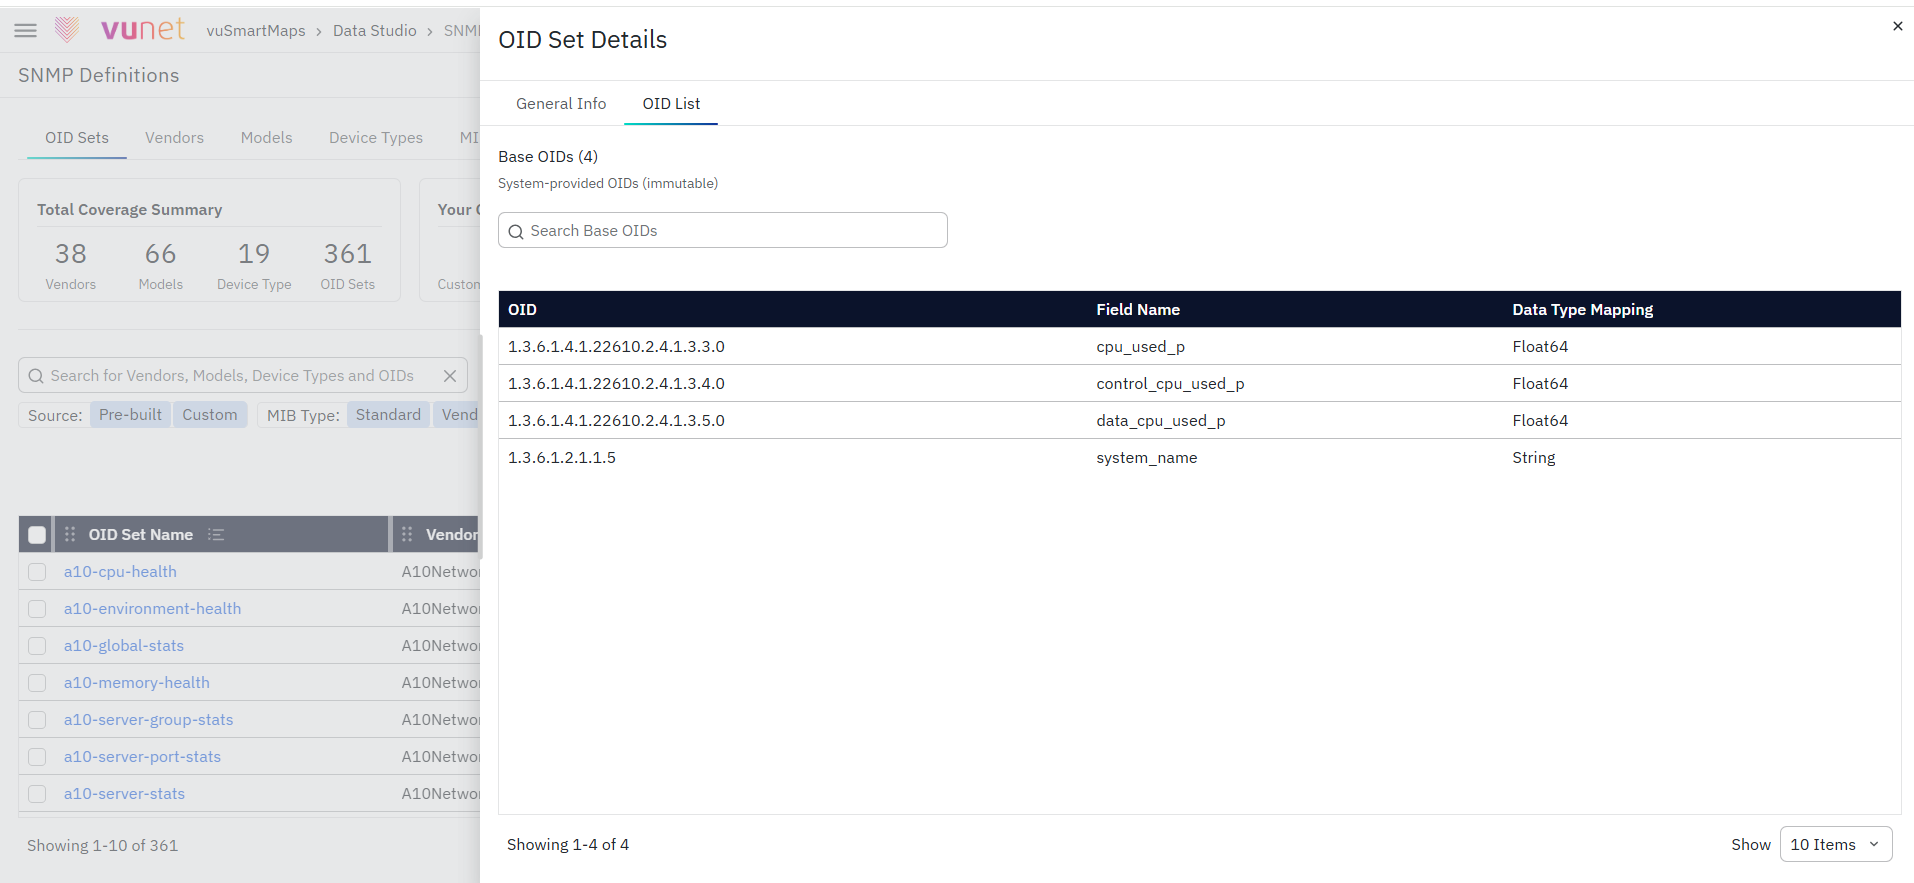
- Review the OID set details in the read-only view.
Creating a Standard OID Set
A Standard OID Set is used for general SNMP monitoring based on standard MIB structures. It does not require selecting a vendor or model and is typically used for collecting common metrics across devices.
Use this option when you want to create an OID set based on a standard MIB structure.
-
Navigate to Data Studio → SNMP Definitions.
-
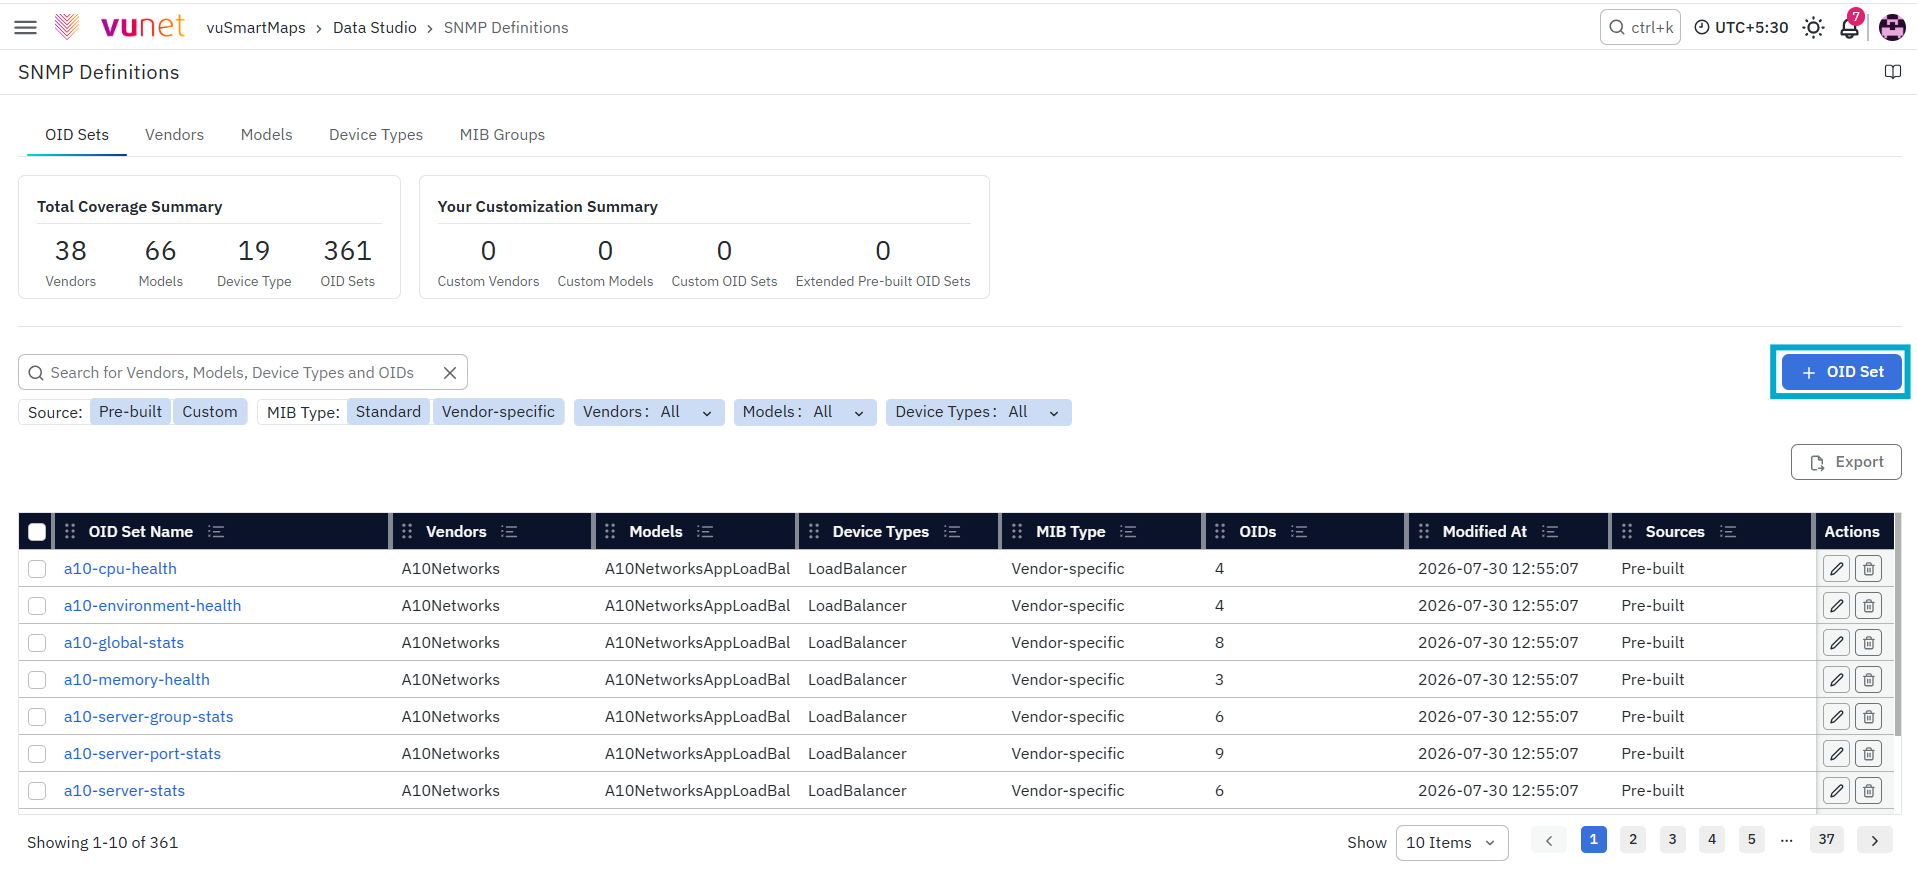
Open the OID Sets tab.
-
Click the + OID Set button.
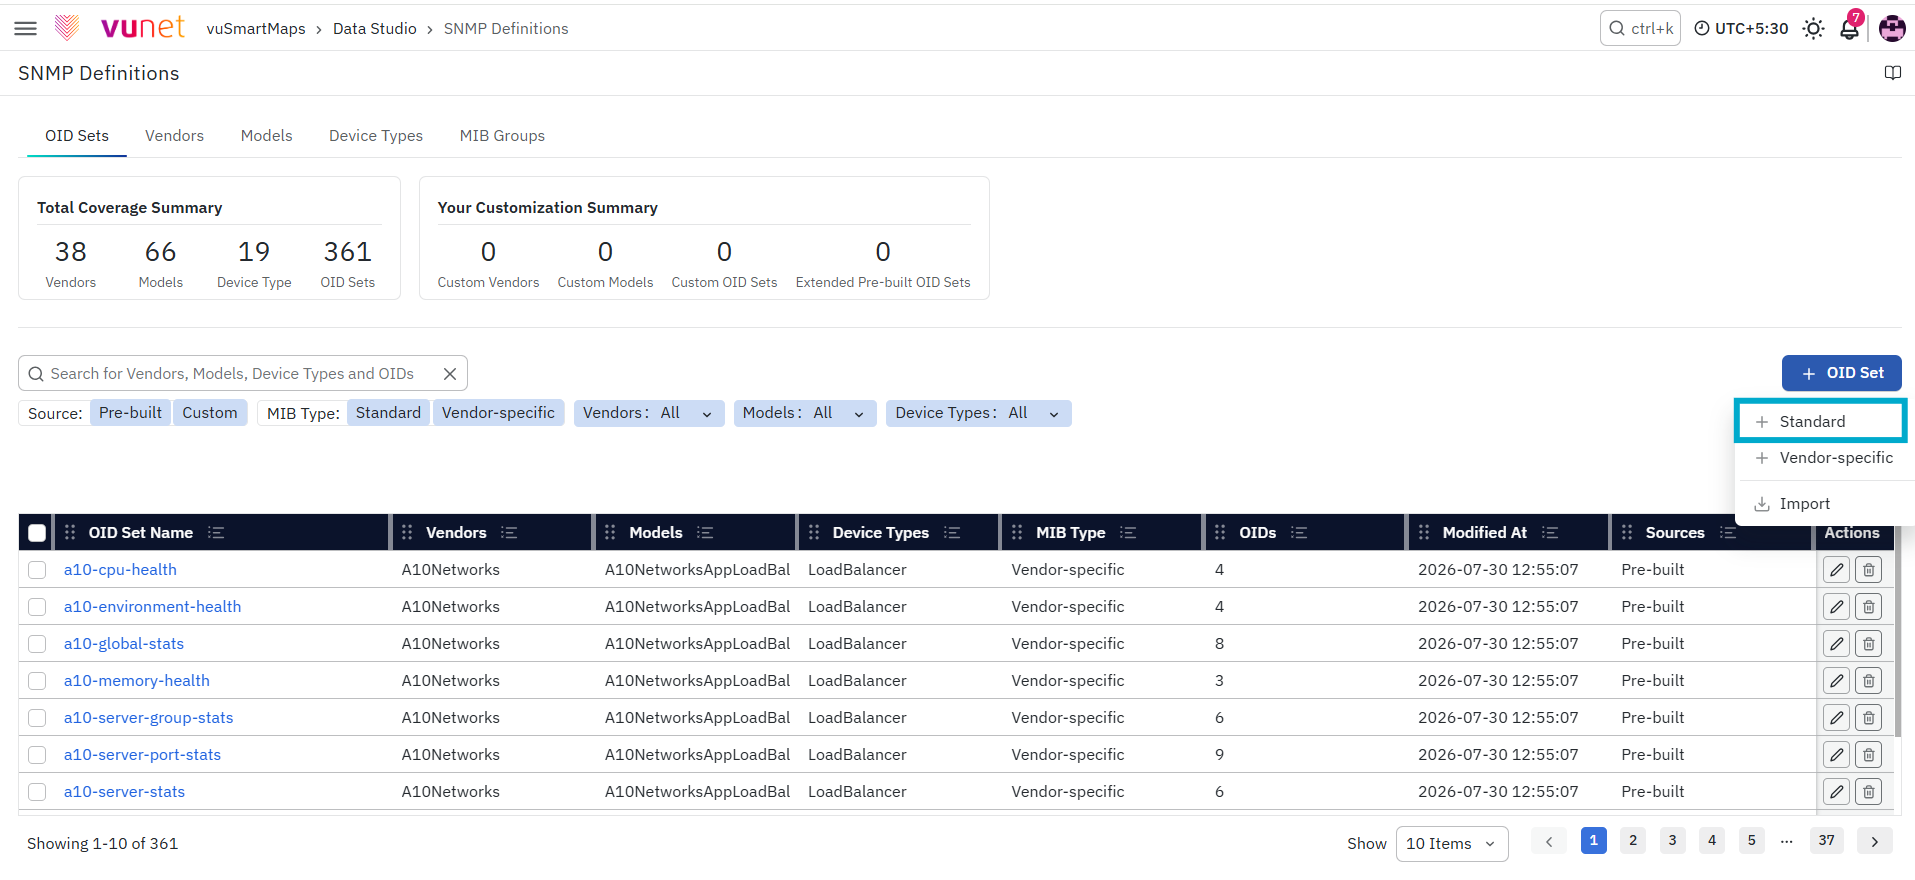
-
In the creation flow, select Standard as the MIB Type.
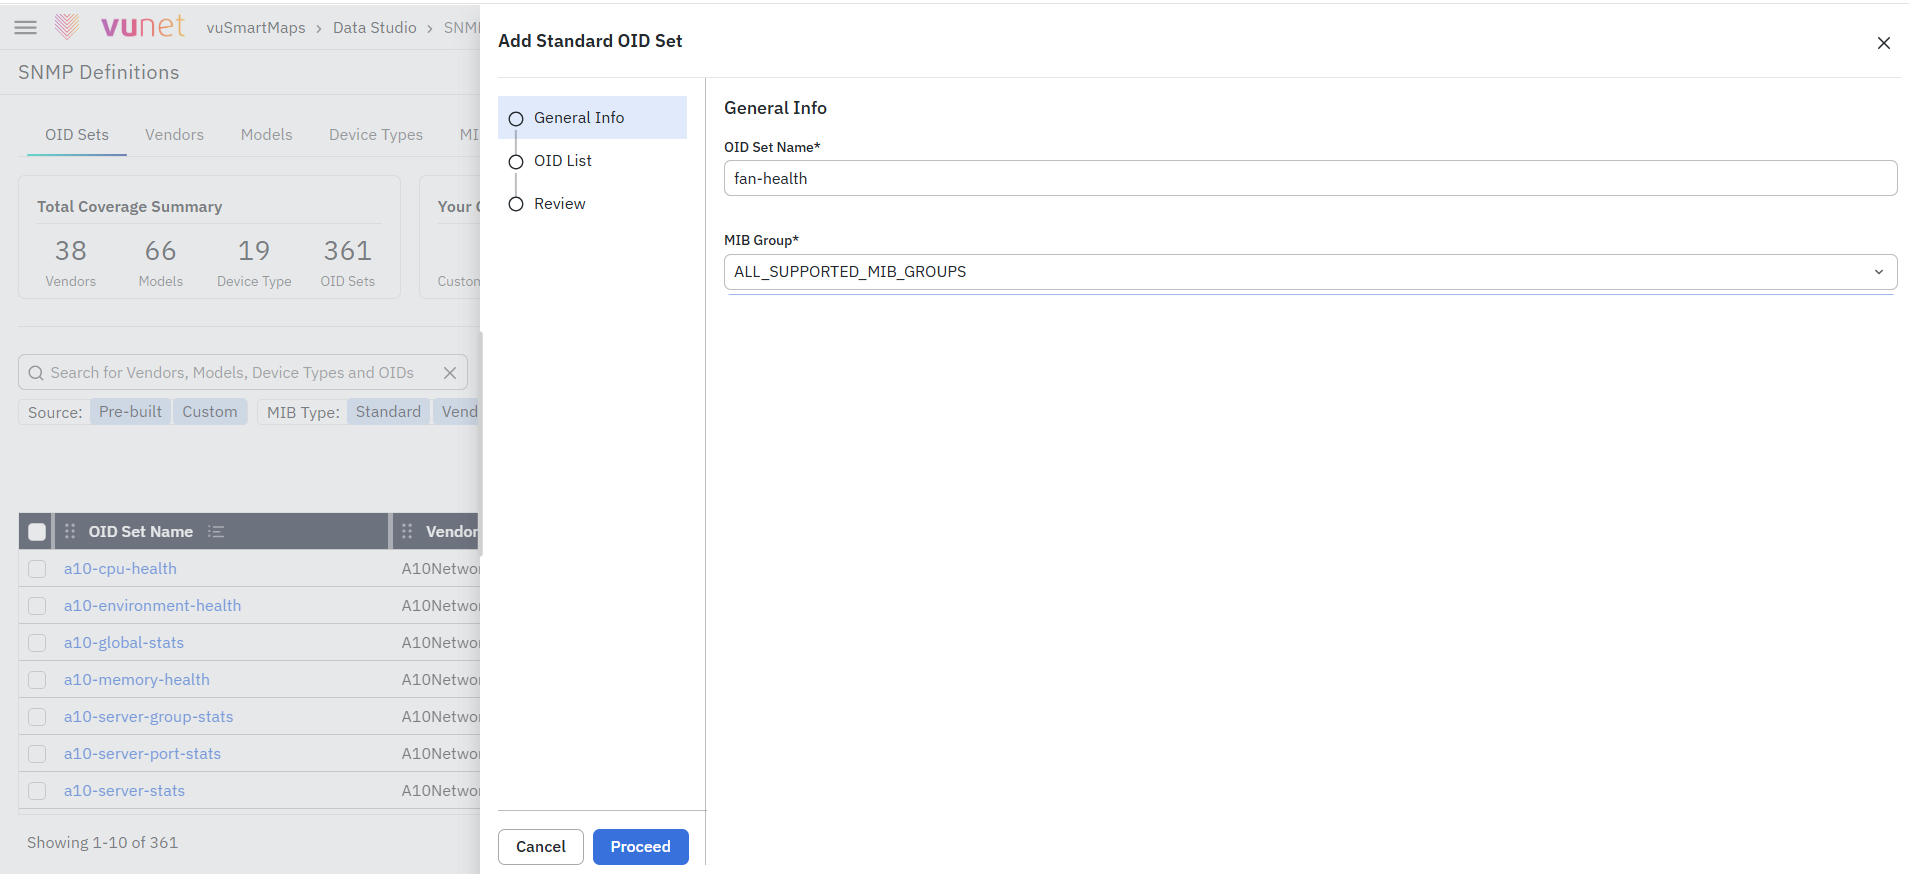
-
Enter the OID Set Name.
-
Select an existing MIB Group.
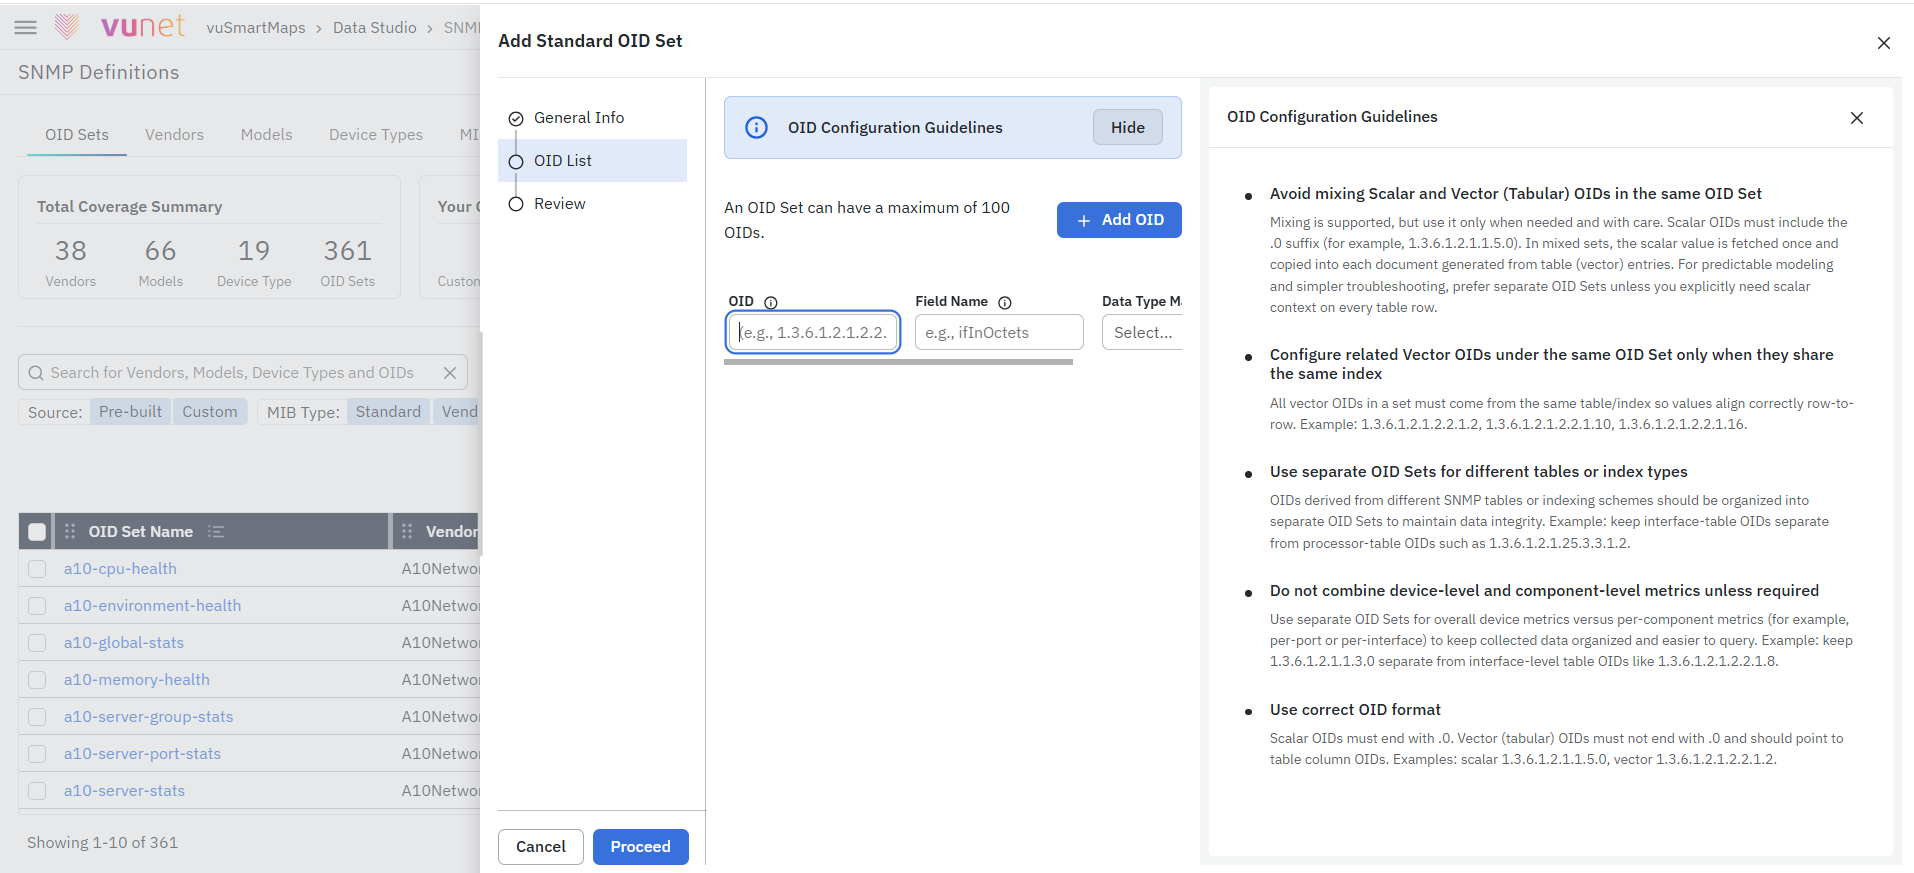
-
Add the required OID entries.
-
For each OID entry, provide the required mapping details such as OID, field name, and data type mapping.
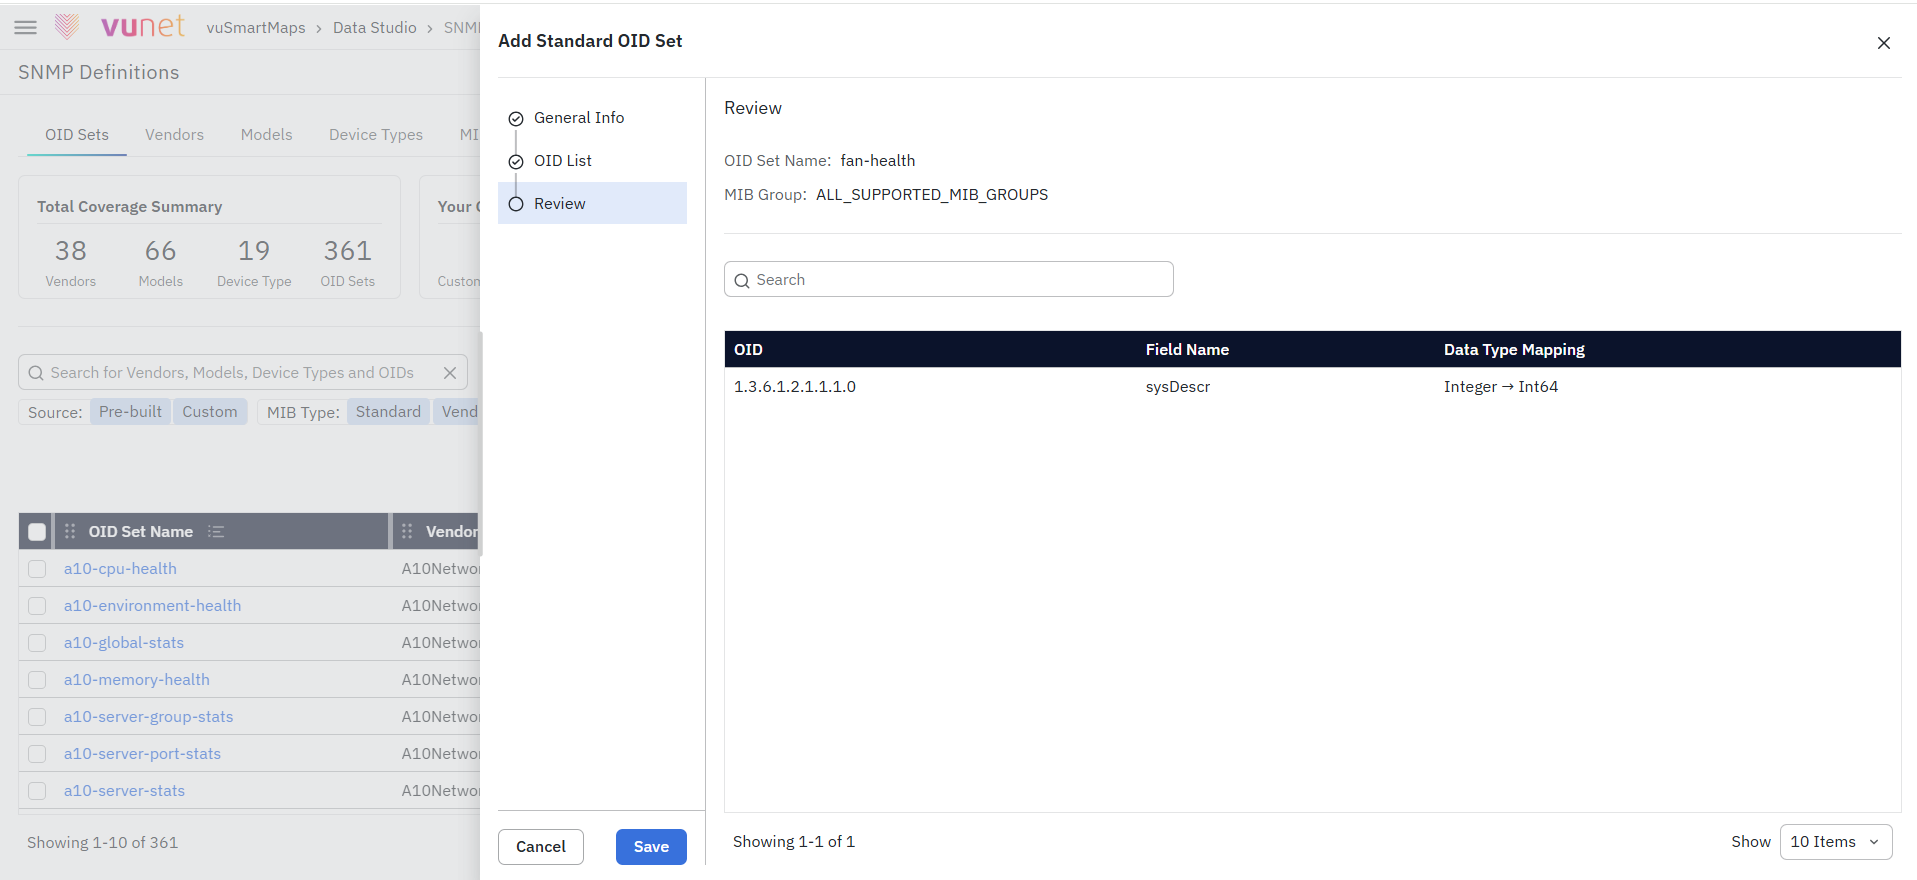
-
Review the configuration.
-
Click Save.
Once saved, the OID set will be available in the OID Sets listing.
Creating a Vendor-Specific OID Set
A Vendor-Specific OID Set is used when monitoring requires device-specific metrics. In this type, users must select a vendor and model, and the defined OIDs are applied to those specific device configurations.
Use this option when the OID set is specific to a vendor and model.
-
Navigate to Data Studio → SNMP Definitions.
-
Open the OID Sets tab.
-
Click the + OID Set button.
-
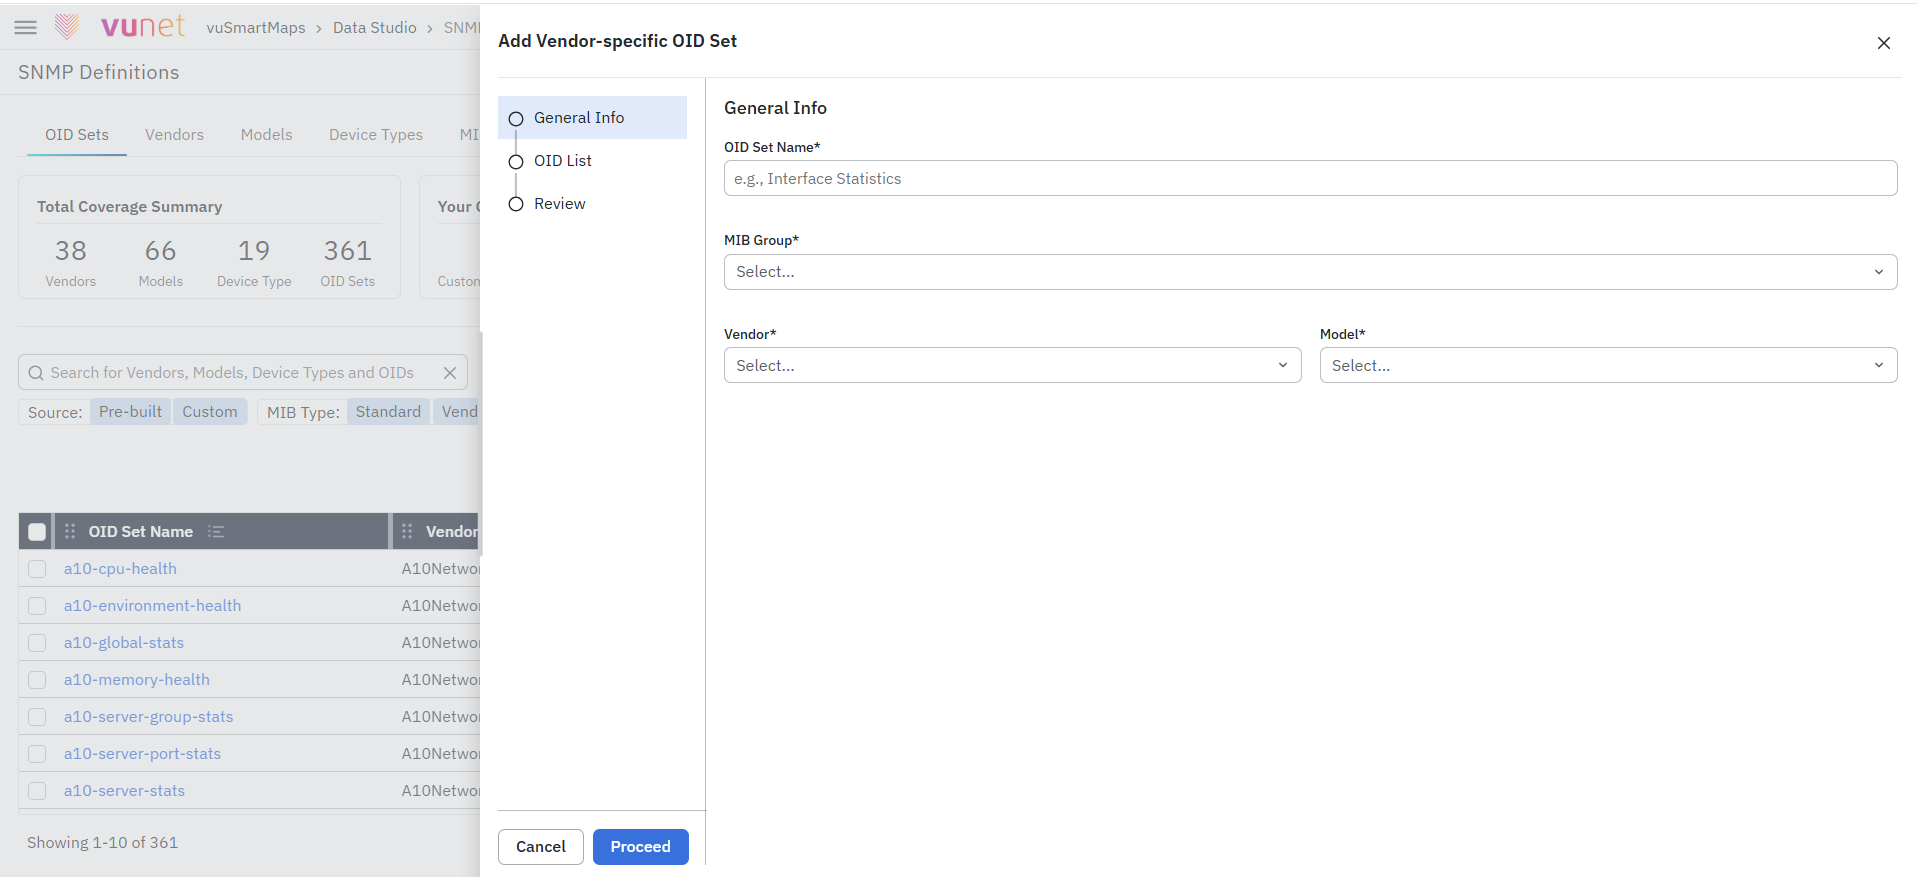
In the creation flow, select Vendor-specific as the MIB Type.
-
Enter the OID Set Name.
-
Select an existing MIB Group.
-
Select the required Vendor, and Model.
-
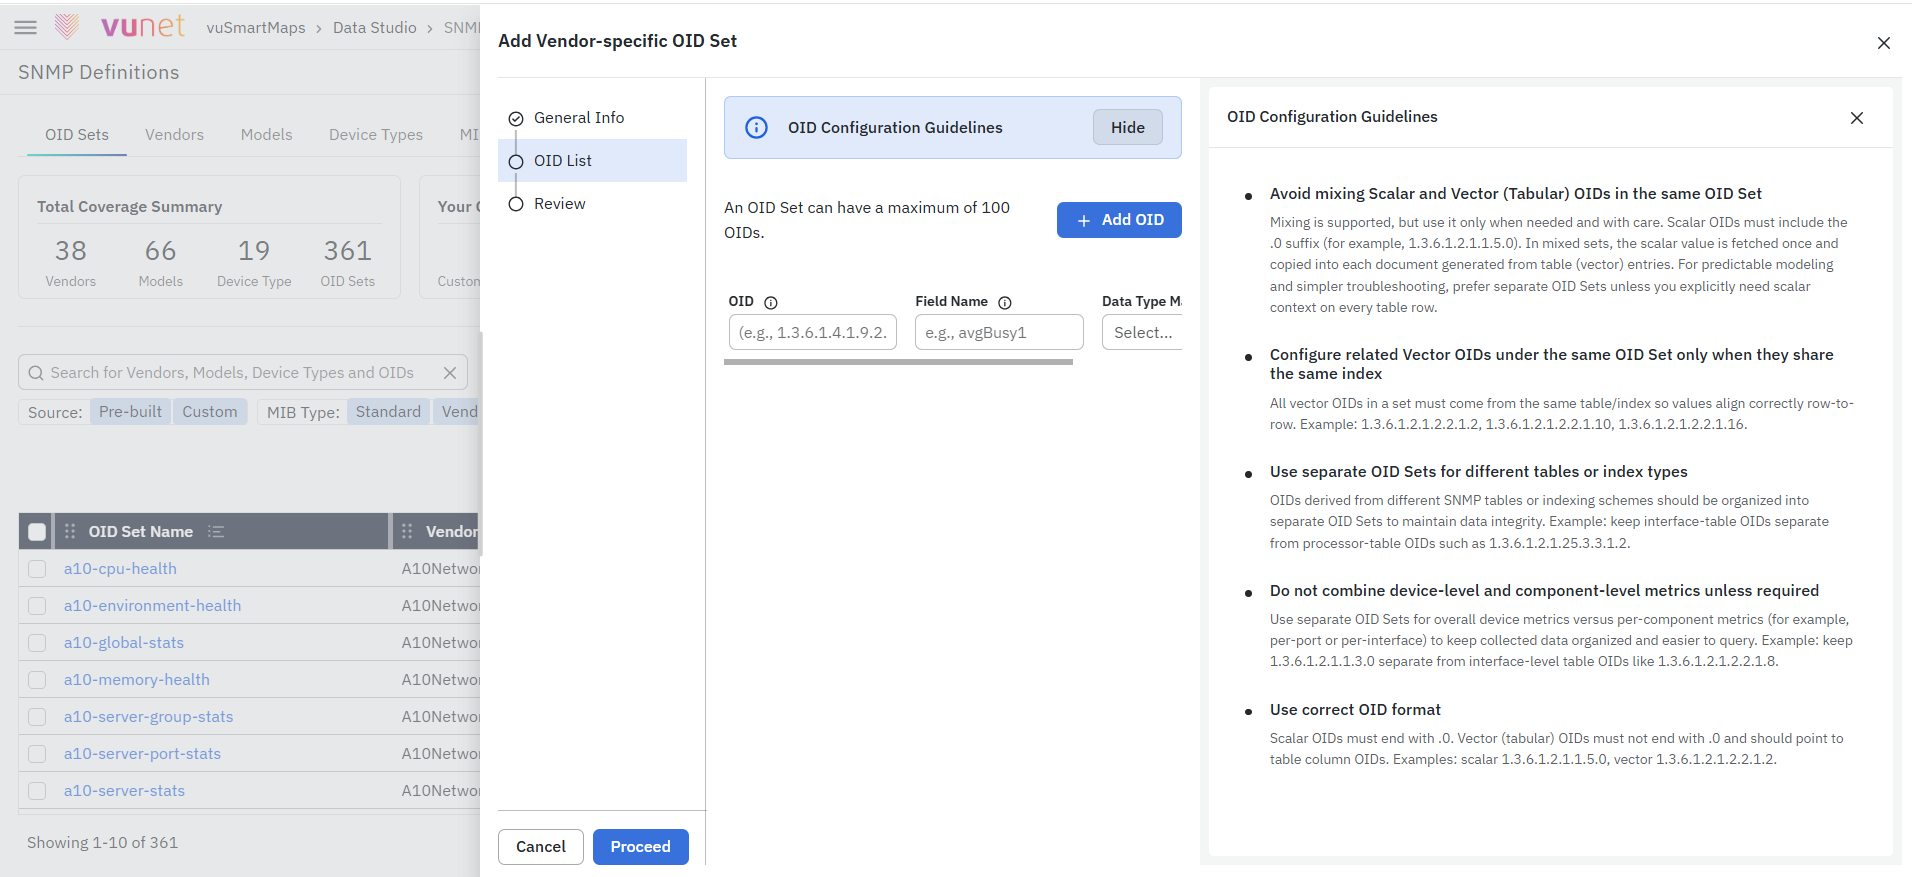
Add the required OID entries.
-
For each OID entry, provide the OID, field name, and data type mapping.
-
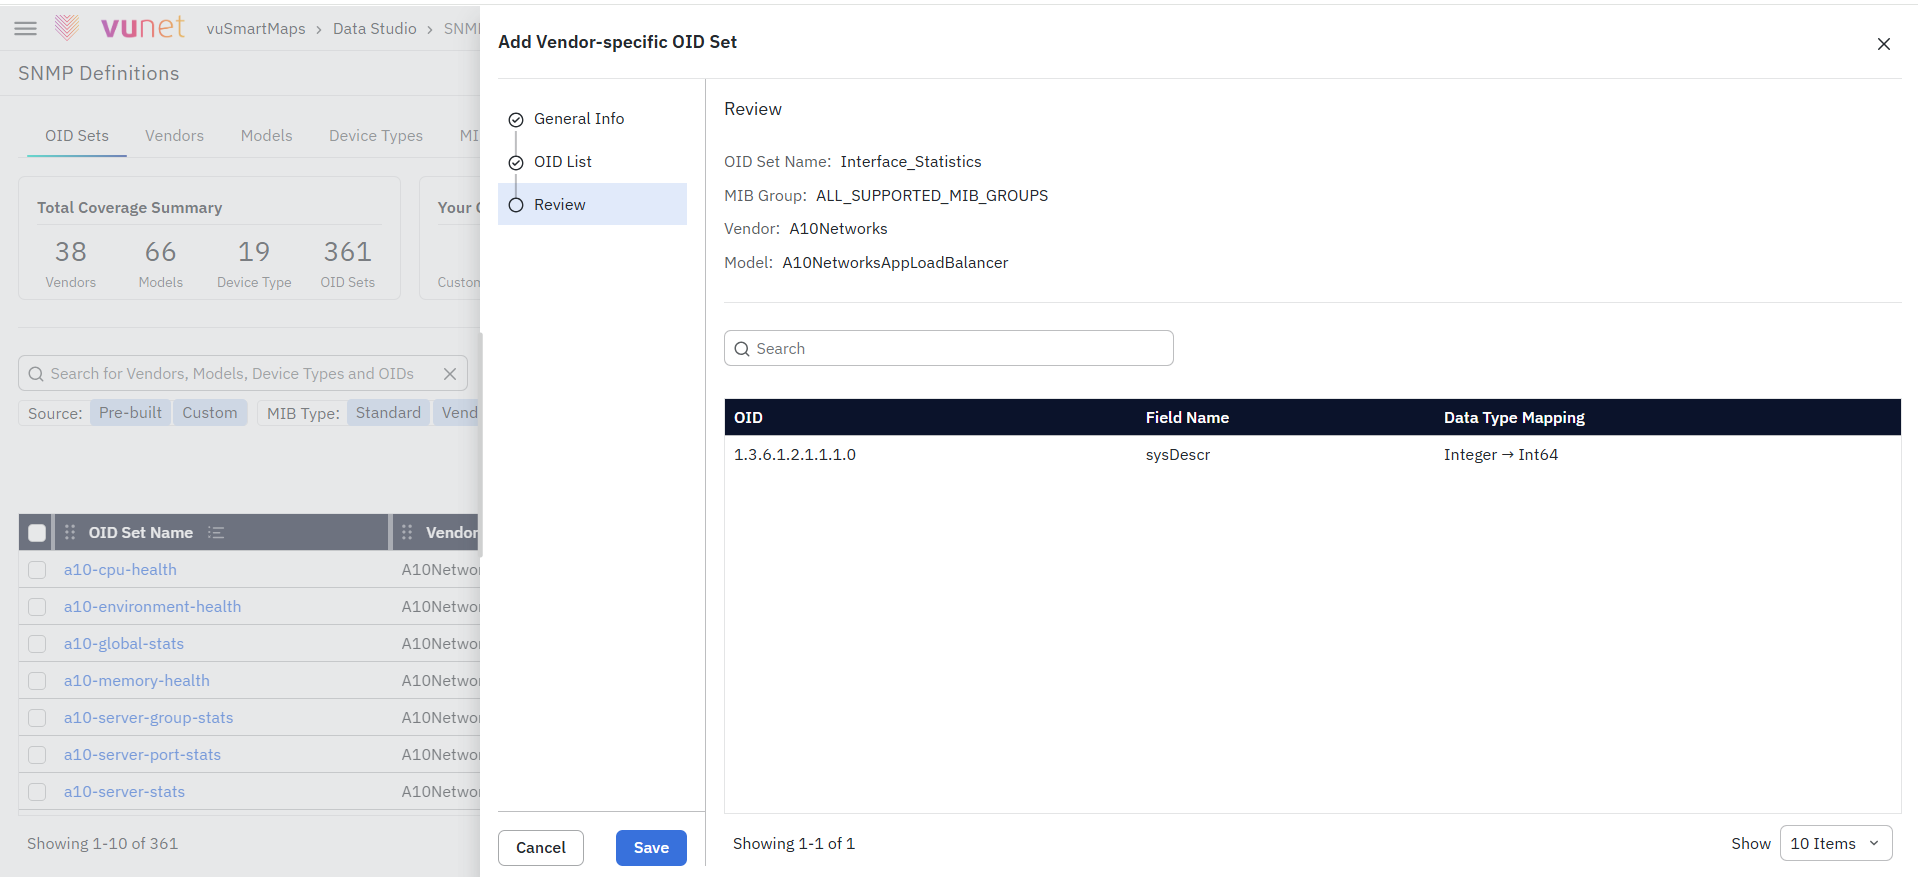
Review the configuration.
-
Click Save.
Once saved, the OID set will be available in the OID Sets listing.
Extending an Existing OID Set
Use this option when you want to add additional OIDs to an existing OID set.
-
Open the OID Sets tab.
-
Locate the required OID set from the listing table. Use search or filters if needed.
-
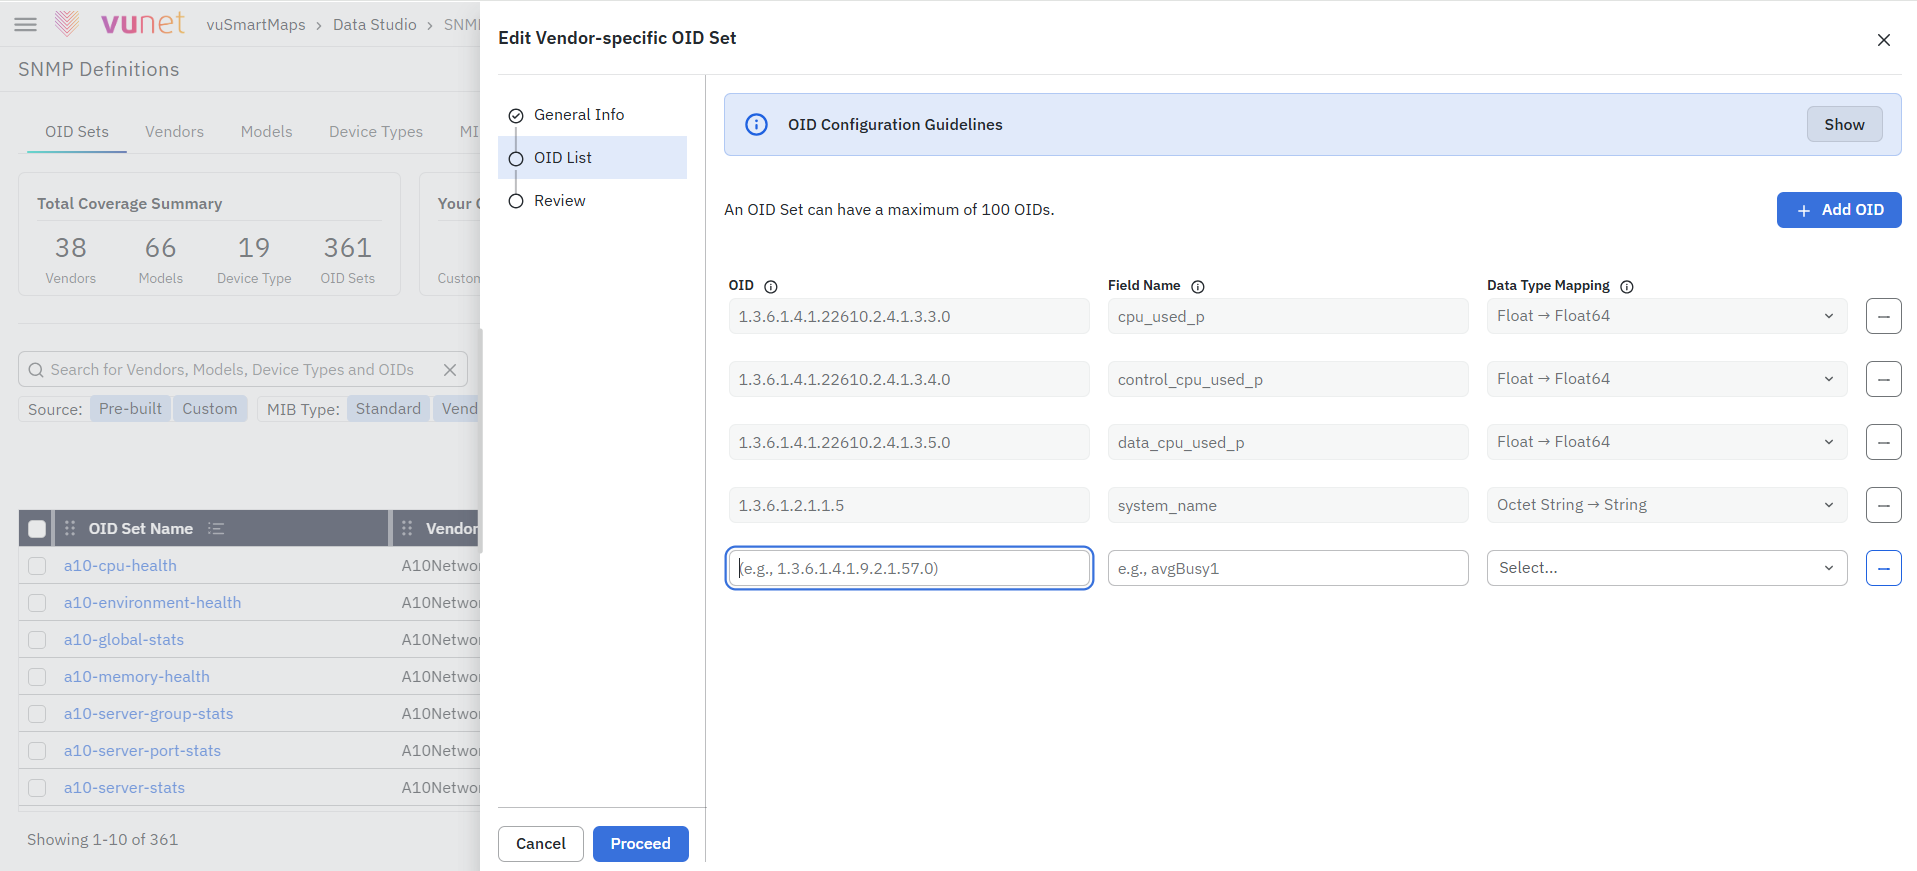
Click the Edit icon for the required OID set.
-
Review the existing OID entries.
-
Add the new OID entries that need to be included in the OID List page.
-
For each OID entry, provide the OID, field name, and data type mapping.
-
Review the configuration.
-
Click Save.
For pre-built OID sets, the existing OIDs cannot be modified. You can only add new OIDs as an extension.
Importing OID Sets
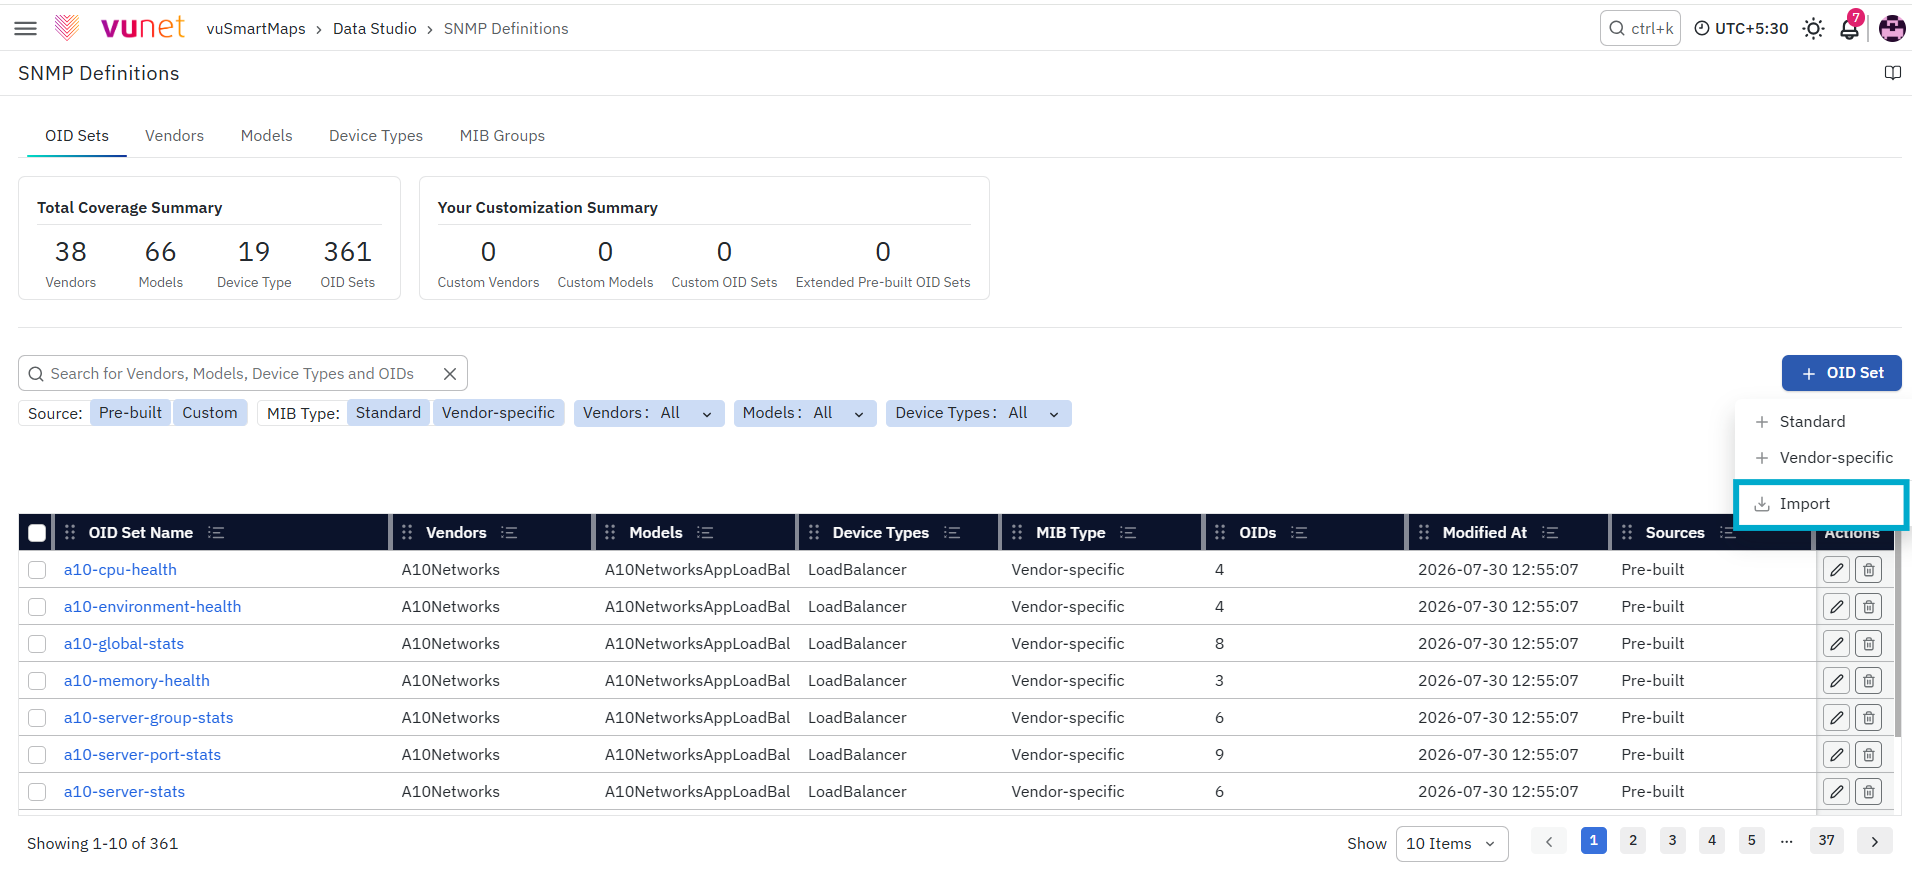
Use this option when you need to import multiple OIDs for a single OID set in bulk
- Open the OID Sets tab.
-
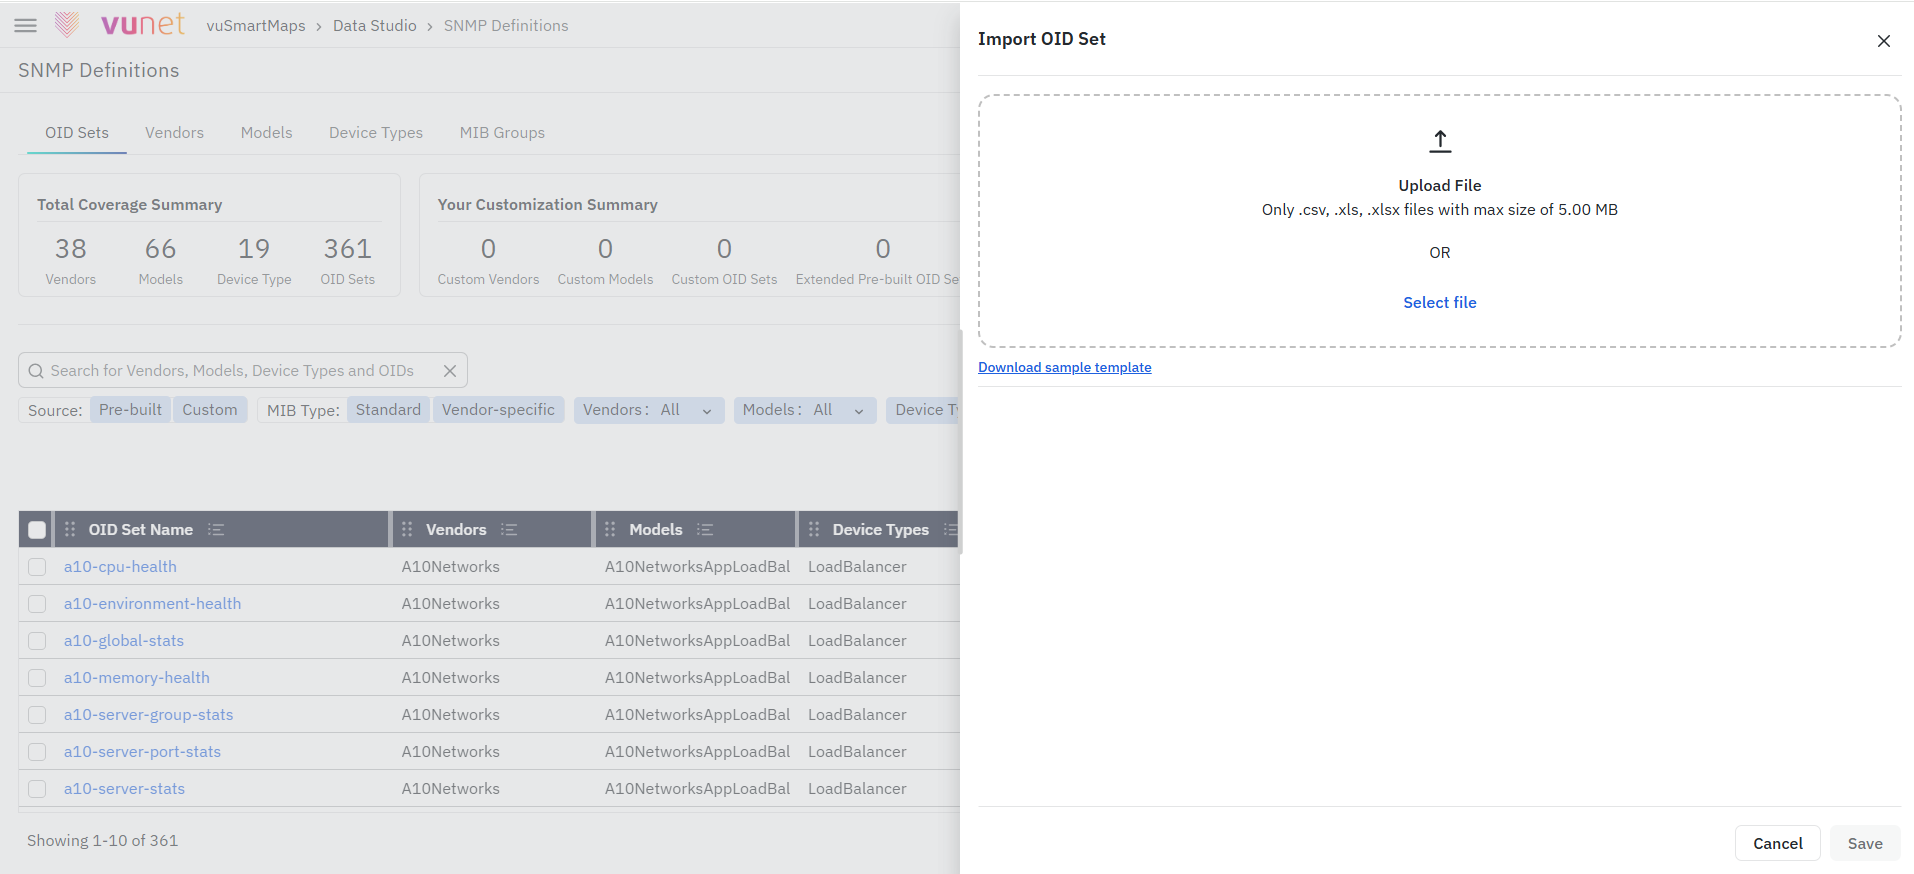
Click the Import button.
-
Upload the xls, xlsx, or csv file under 5 MB and containing only a single sheet.
-
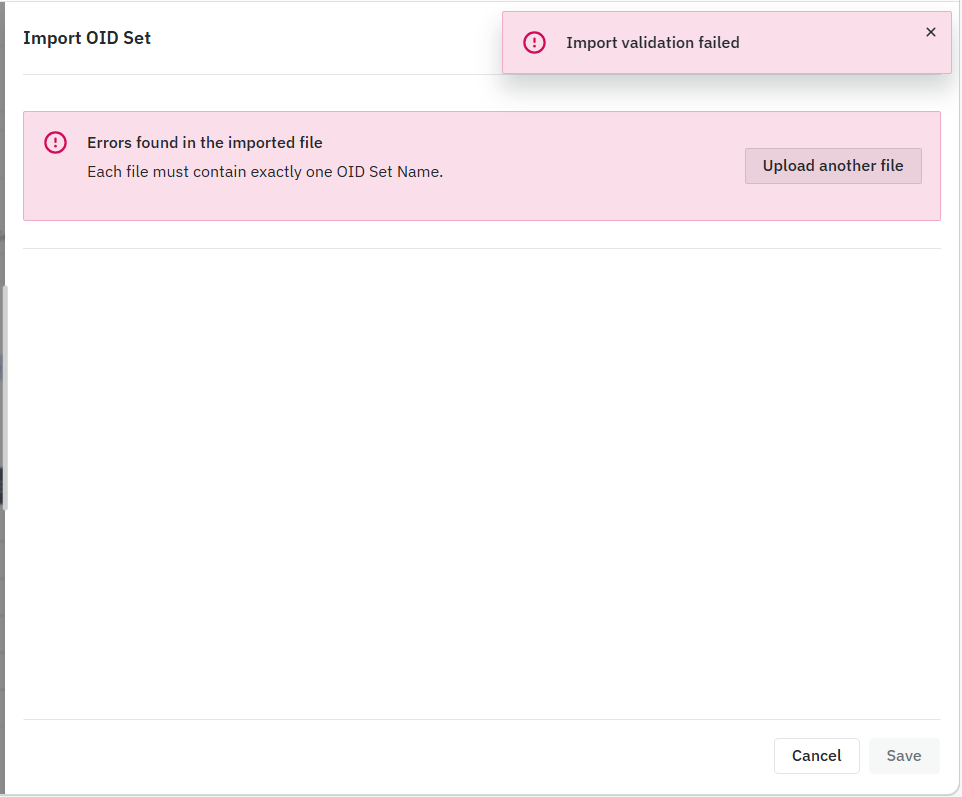
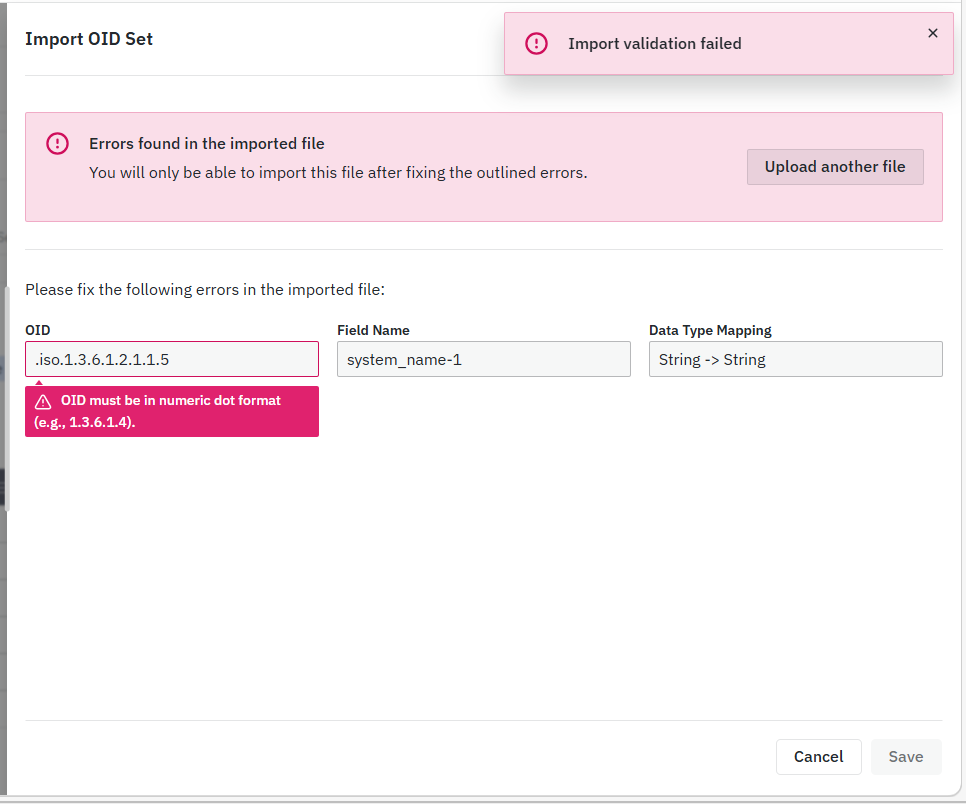
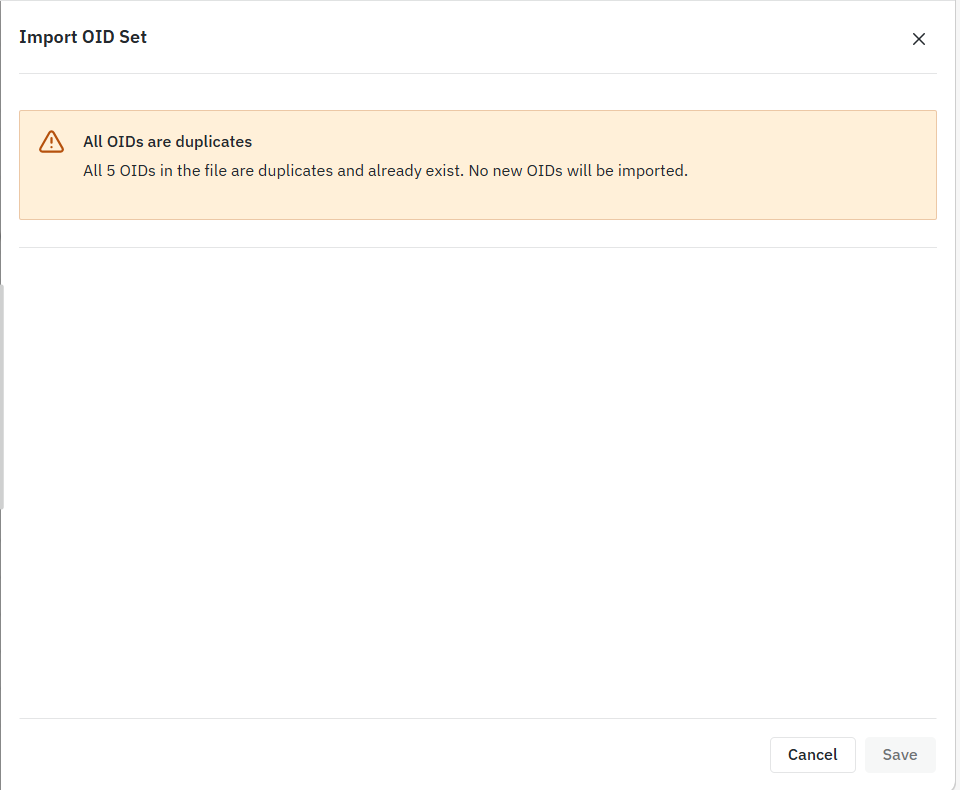
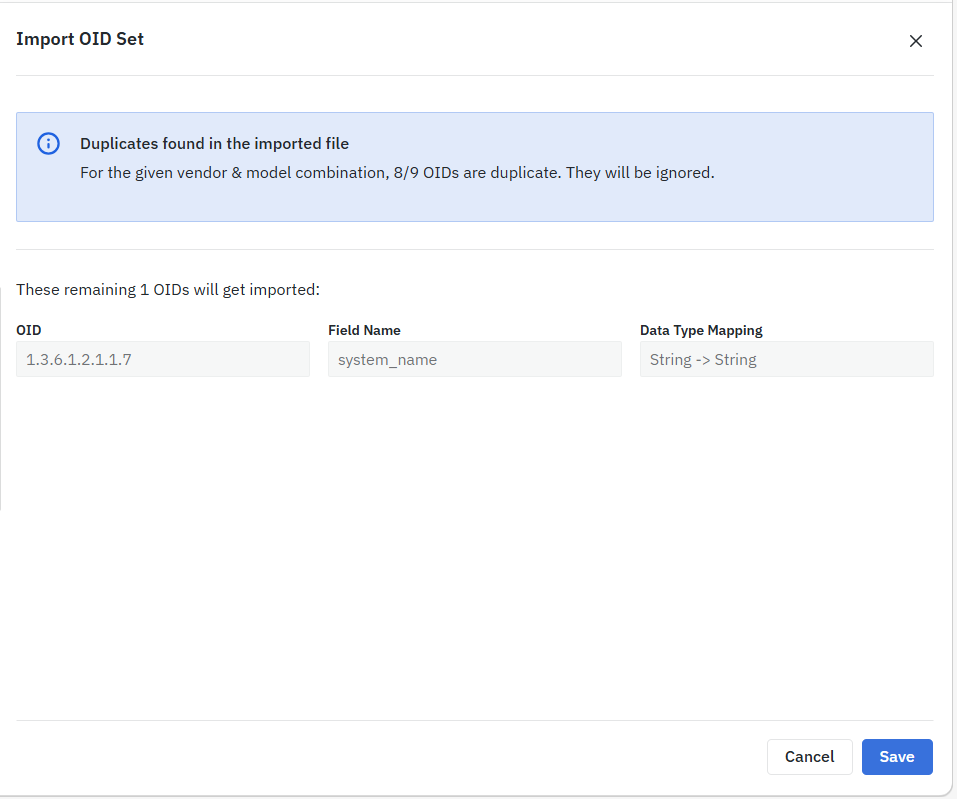
Review the validation results shown by the system.
-
Resolve any errors in the file if required.
-
Re-upload the corrected file if needed.
-
Complete the import process.
After a successful import, the imported OID sets will appear in the listing table.
- Each row in the file should represent one OID entry within an OID set.
- The file should include required fields such as Vendor, Model, Device Type, OID Set Name, MIB Group Name, OID, Field Name, Data Type (ClickHouse data type), and Is Built-in.
- The system performs validation during upload and displays detailed error messages to help identify issues in specific rows or fields.
- The import is processed only when the file is error-free; if any errors exist, the file will not be imported.
- You can download the sample template from the “Download sample template” option in the Import screen to structure the file correctly.
Exporting OID Sets
Use this option when you want to download OID set definitions for importing into another setup, review or backup.
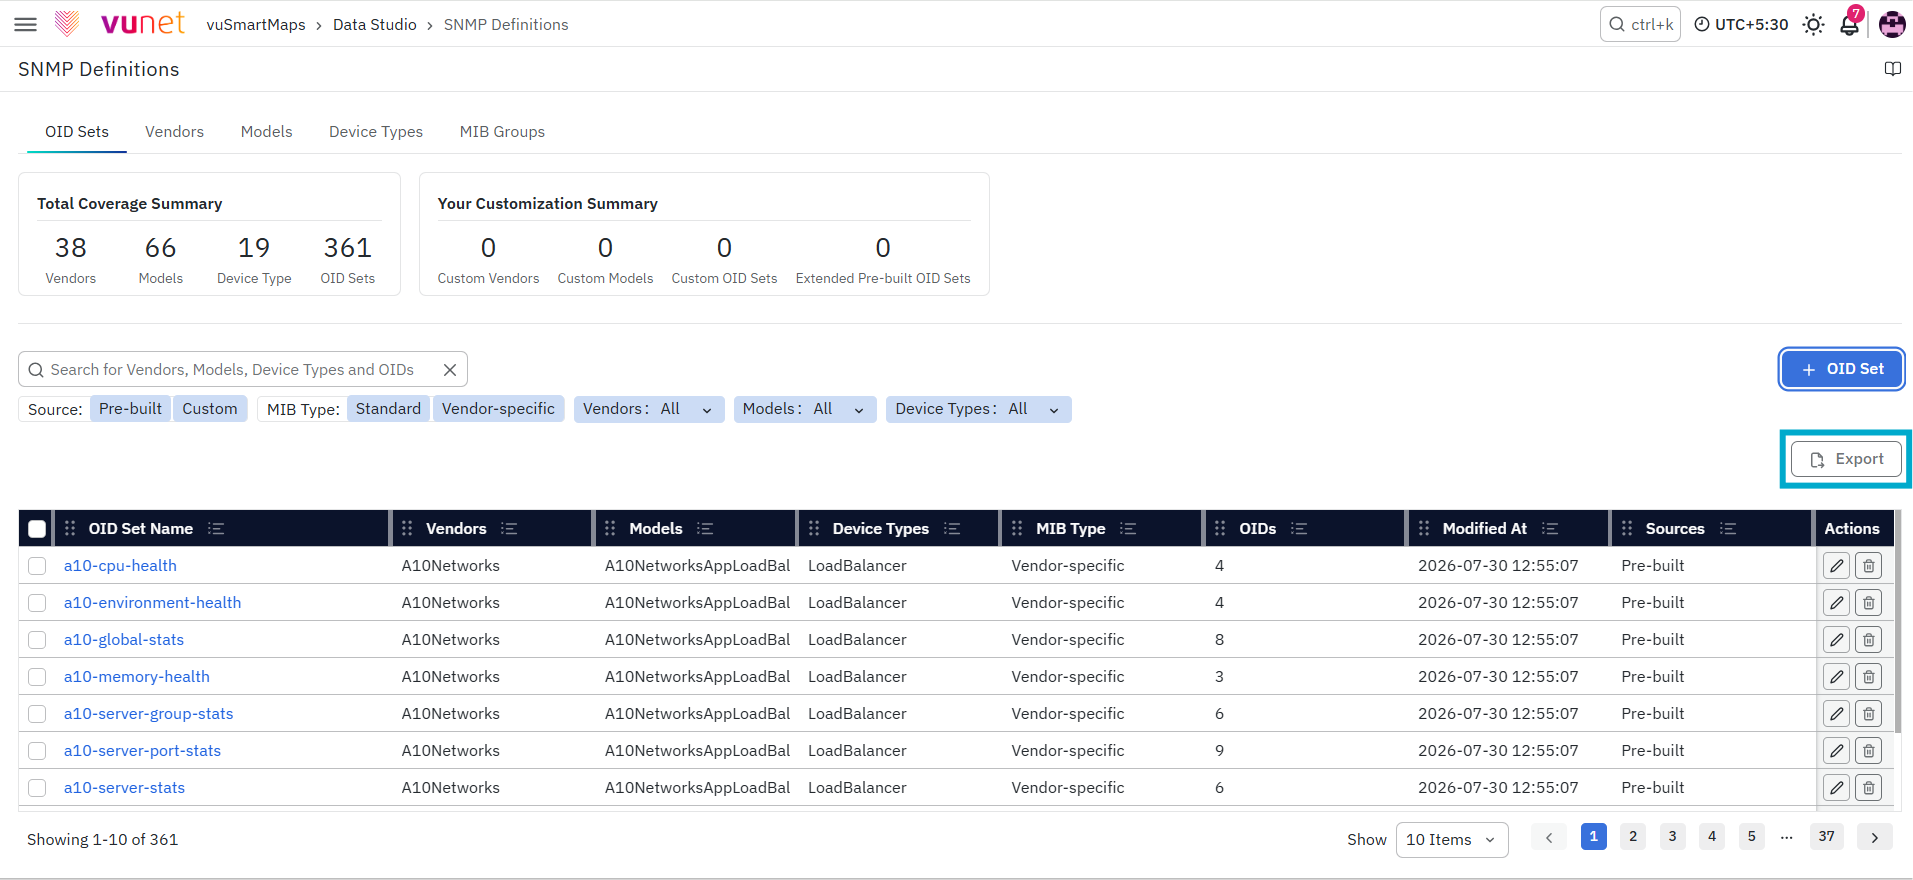
- Open the OID Sets tab.
-
Select one or more OID sets from the table.
-
Click the Export button.
-
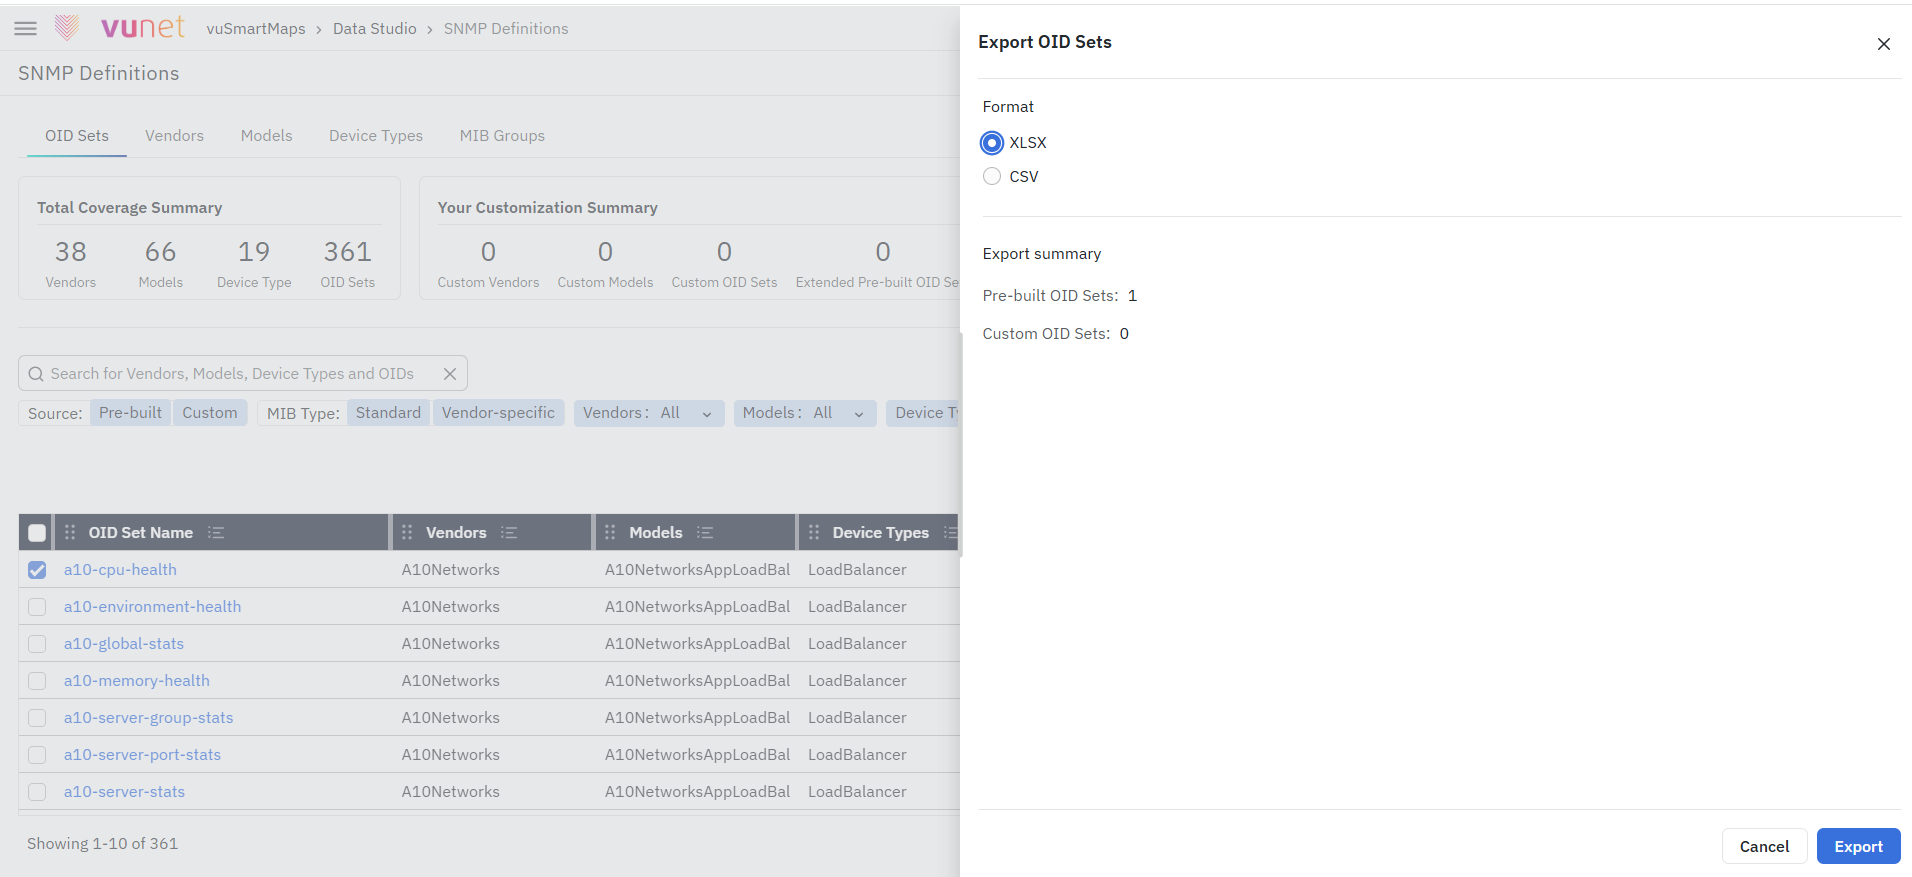
In the export screen, choose the required file format.
-
Download the exported file.
-
The exported file can be used for review, audit, or reuse across environments.
- Export is available only when one or more OID sets are selected.
- OID sets can be exported in XLSX or CSV format.
- In both formats, each row represents one OID value in an OID set.
- The exported file includes fields such as Vendor, Model, Device Type, OID Set Name, MIB Group Name, OID, Field Name, Data Type, and Is Built-in.
- If multiple OID sets are selected for export, the system provides a tarball (compressed file) containing separate files for each OID set.
Delete an OID Set
Use this option when a custom OID set is no longer required.
-
Navigate to Data Studio → SNMP Definitions.
-
Open the OID Sets tab.
-
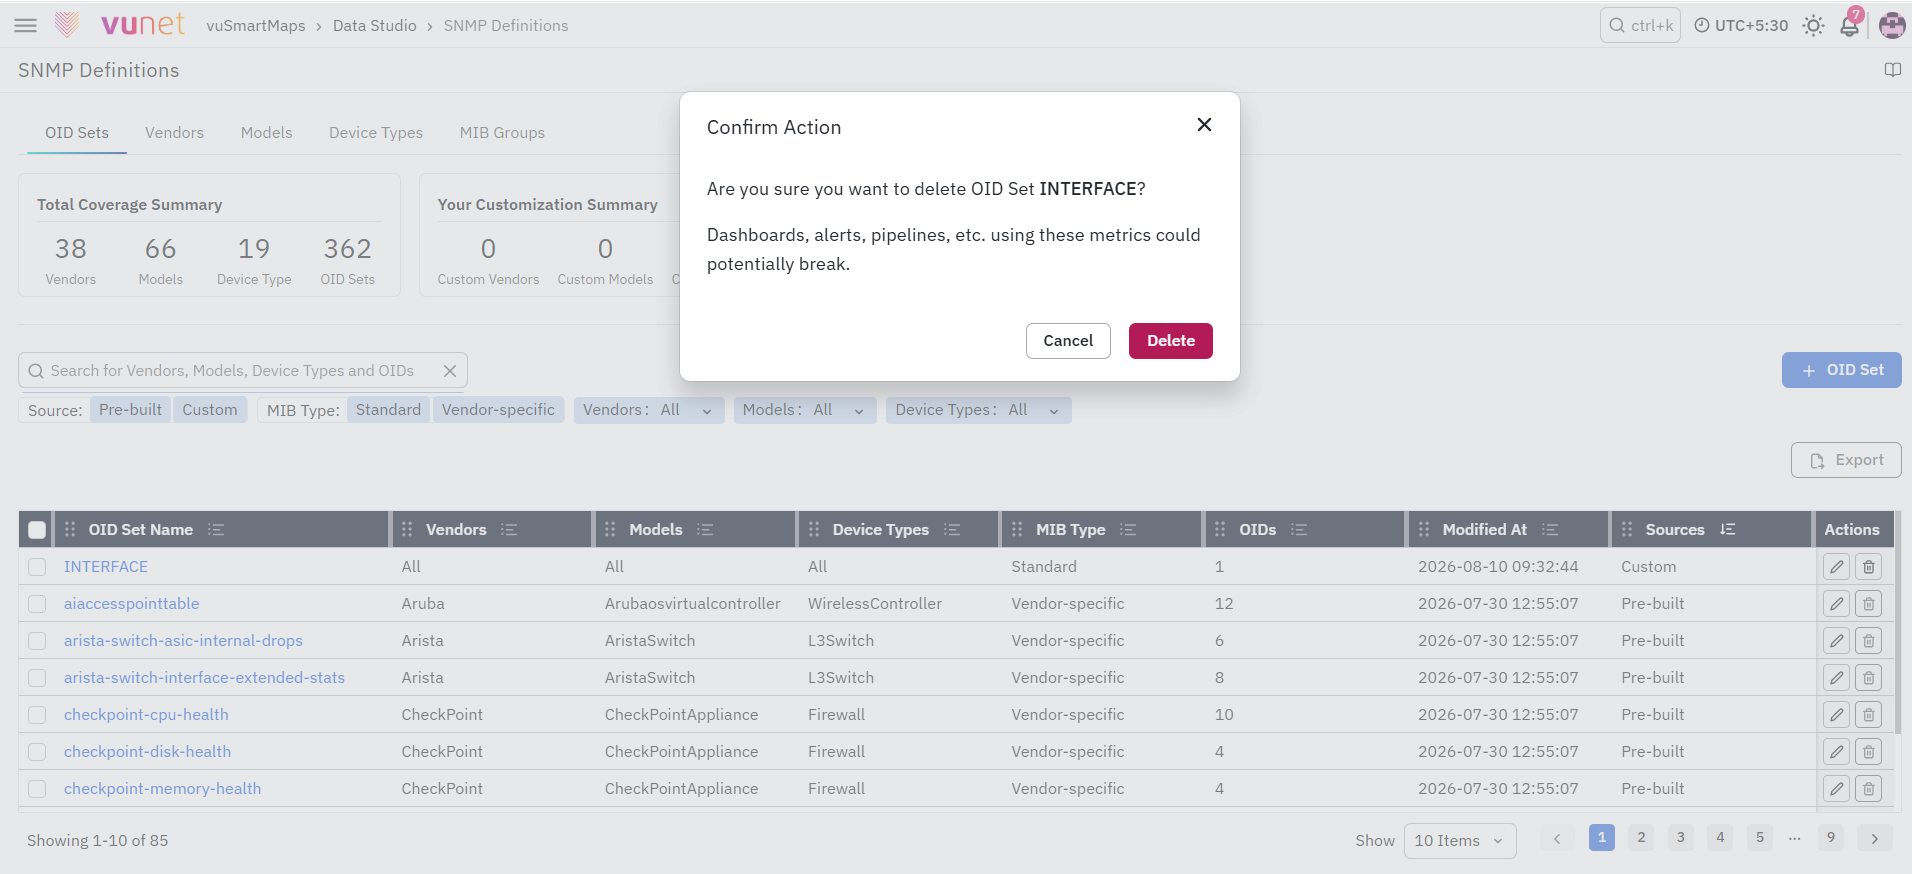
Locate the custom OID set you want to delete. You can use the search box to search by OID Set name, Vendor name, or Model name.
-
Click the Delete action for that row.
-
Review the warning message.
-
Confirm the deletion.
After successful deletion, the OID set is removed from the listing table.
- The Delete action is available only for Custom OID sets.
- Pre-built OID sets cannot be deleted.
- Bulk delete is not supported for OID sets.
- Before deleting an OID set, ensure it is not referenced by any source, as deletion can impact data collection and downstream configurations.
- The system displays a warning message to inform users that deleting an in-use OID set may potentially cause breakages.
Adding a New Vendor
Use this option when the required device vendor is not already available in the system.
-
Navigate to Data Studio → SNMP Definitions.
-
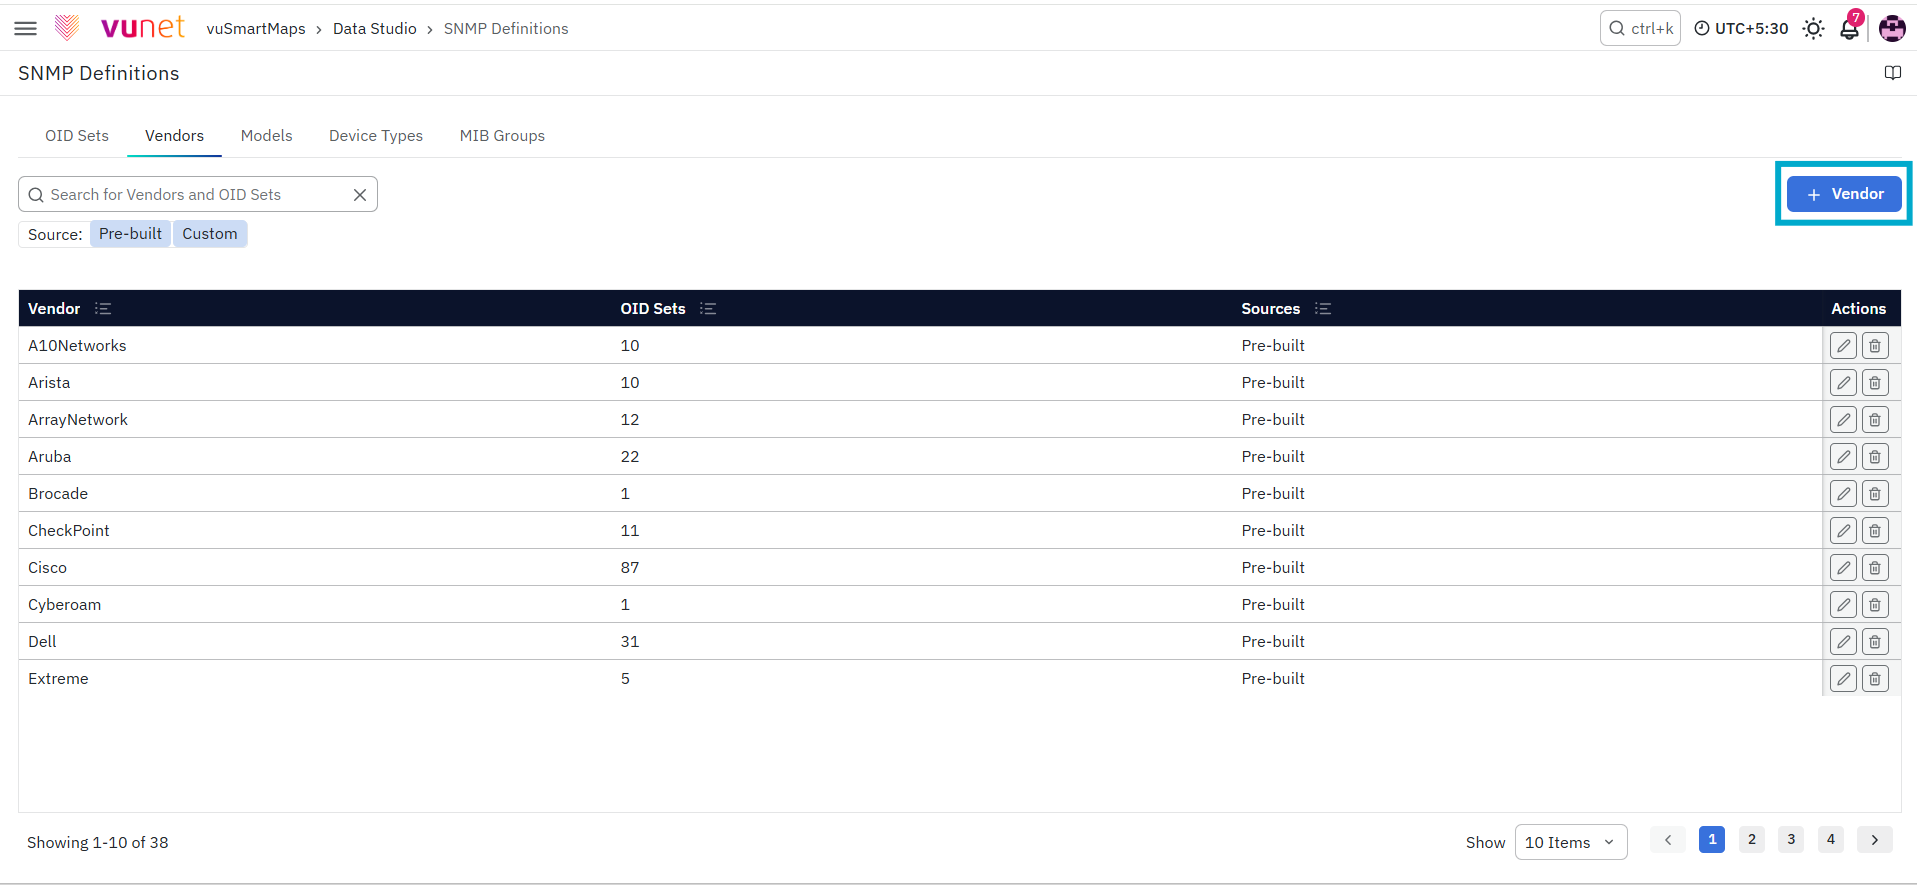
Open the Vendors tab.
-
Click the + Add Vendor button.
-
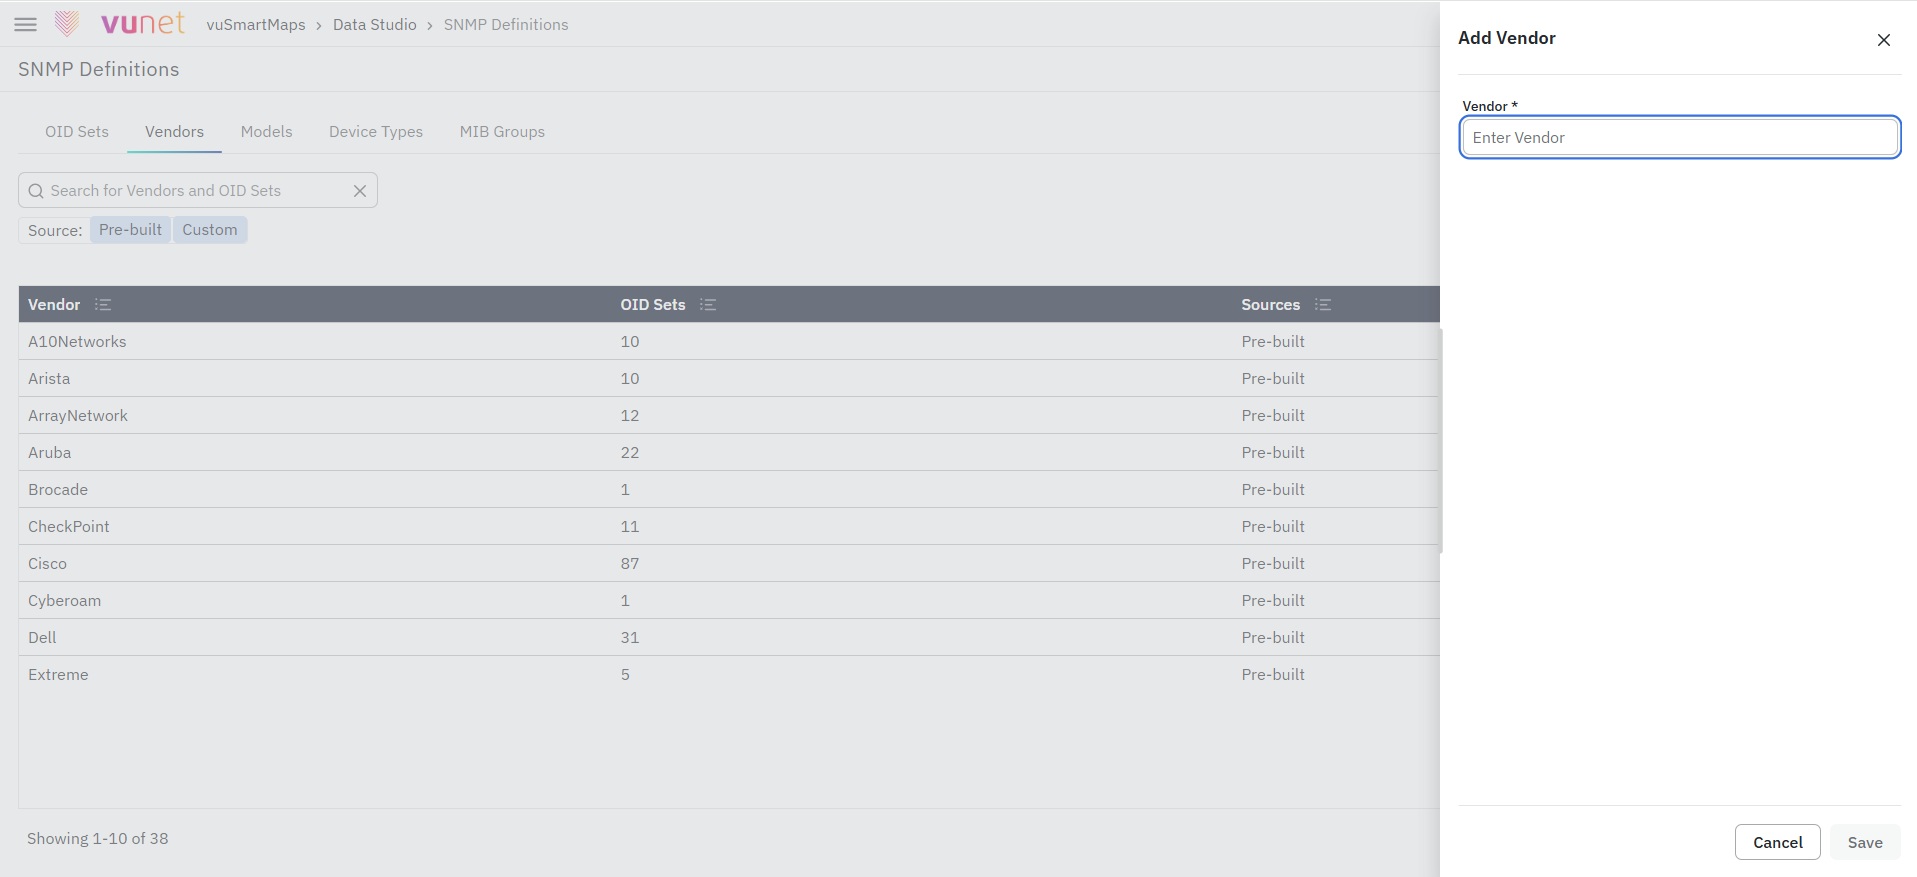
Enter the vendor name.
-
Review the value entered.
-
Click Save.
Once saved, the vendor will be available for selection while creating vendor-specific OID sets and models.
Edit a Vendor
-
Navigate to Data Studio → SNMP Definitions.
-
Open the Vendors tab.
-
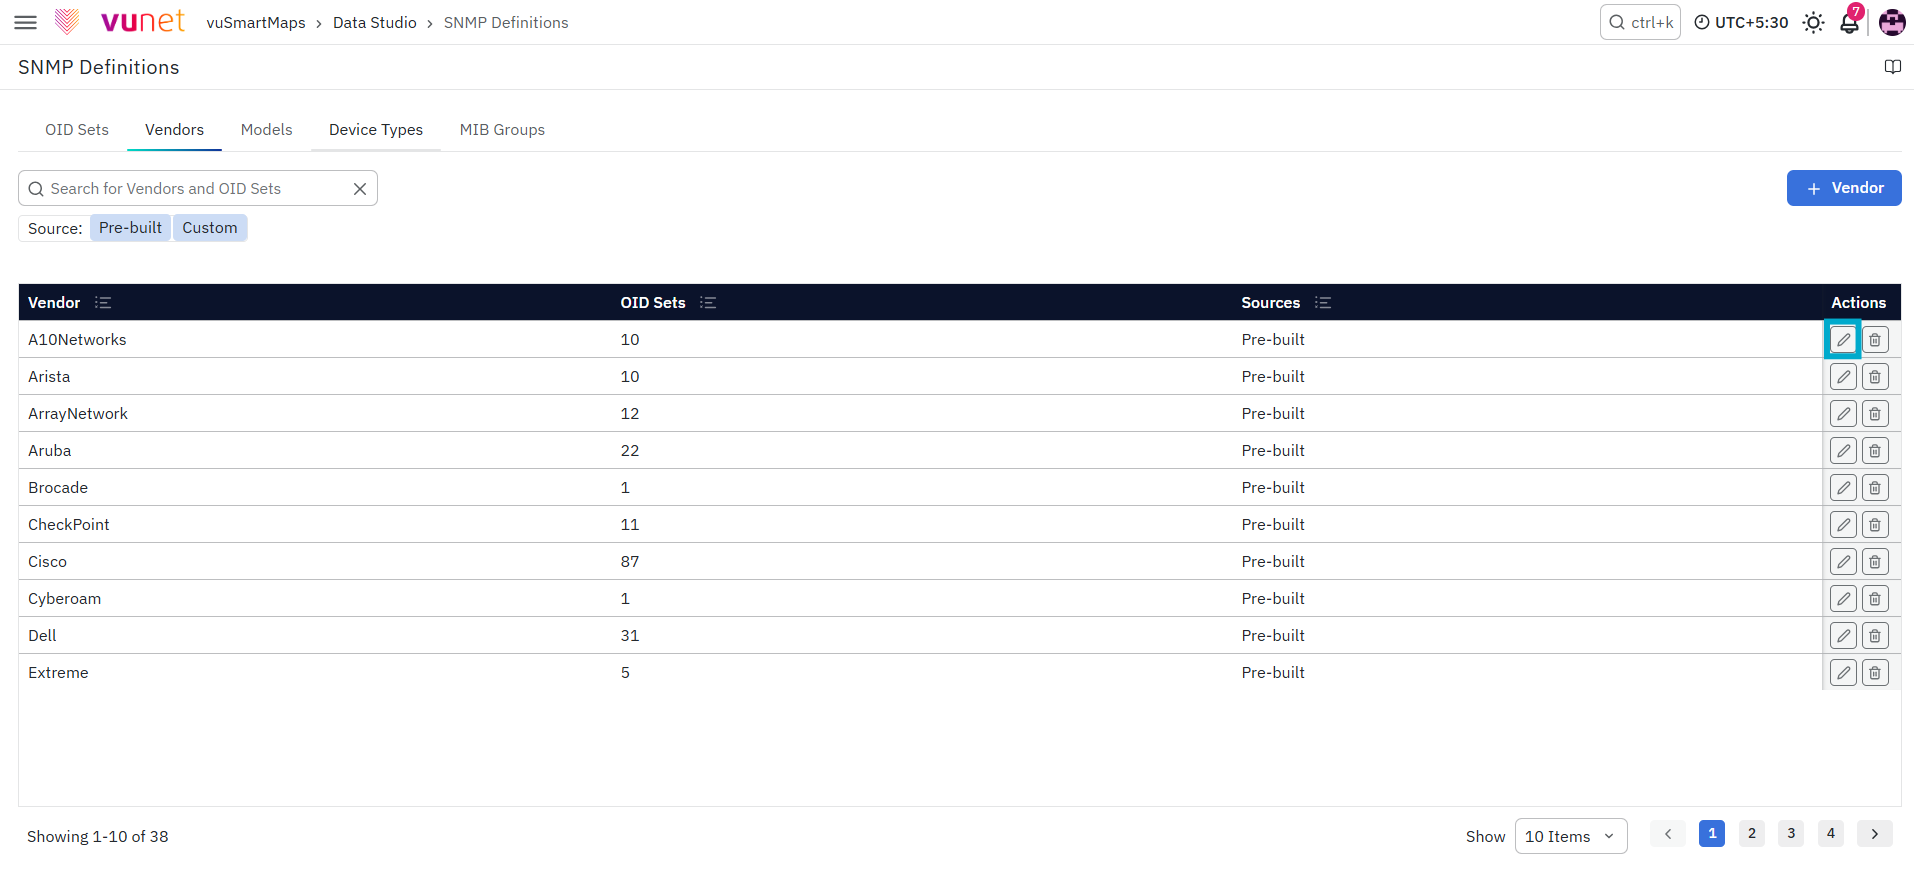
Locate the custom vendor you want to update.
-
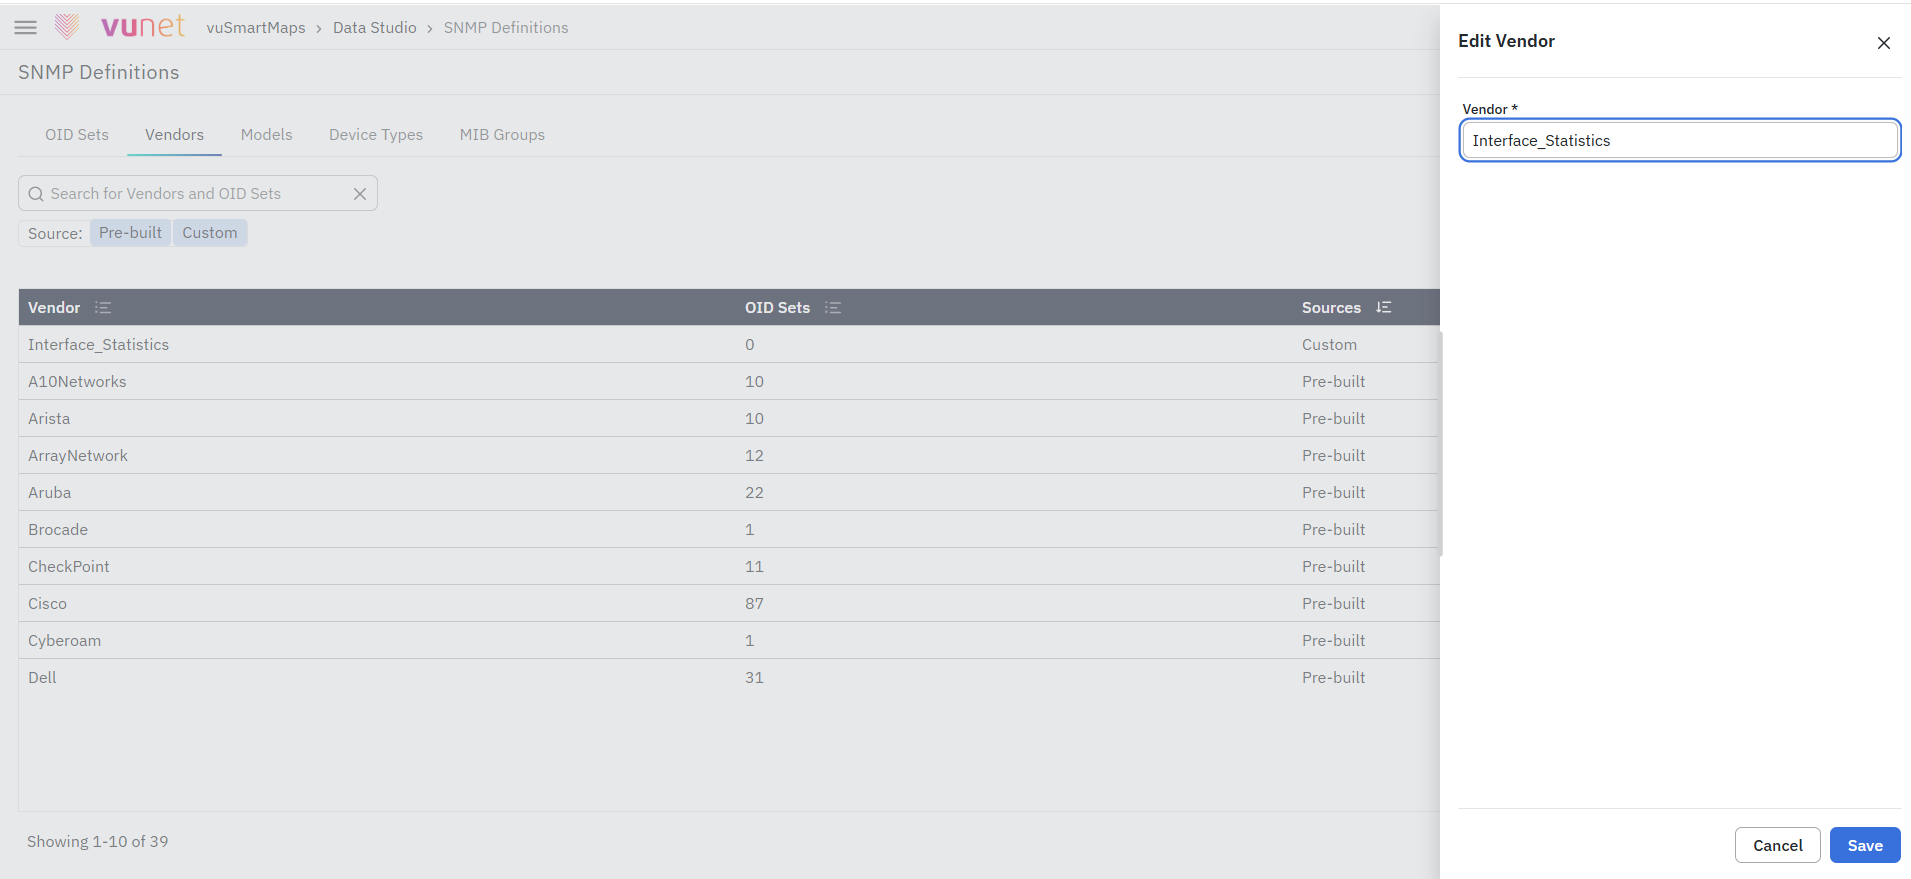
Click the Edit icon.
-
Update the vendor name.
-
Click Save.
Vendors that are part of pre-built OID sets cannot be edited, while vendors in custom OID sets can be edited.
Delete a Vendor
-
Navigate to Data Studio → SNMP Definitions.
-
Open the Vendors tab.
-
Locate the custom vendor you want to delete.
-
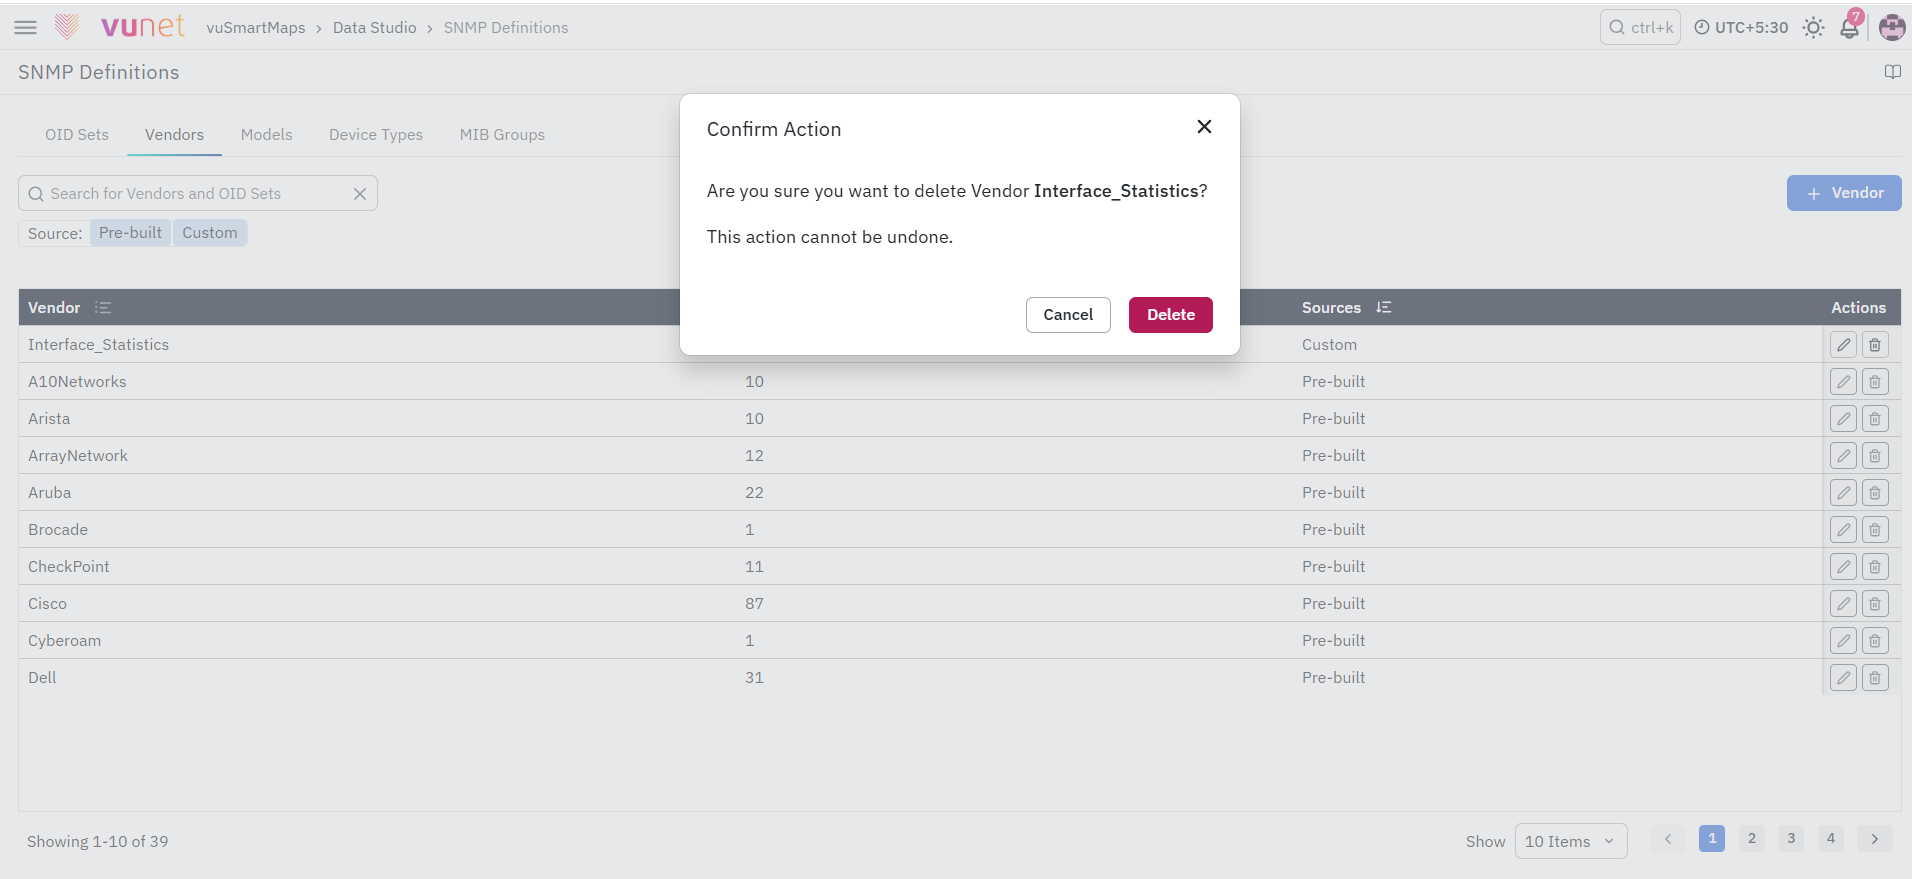
Click the Delete icon.
-
Review the warning message.
-
Confirm the deletion.
Vendors that are part of pre-built OID sets cannot be deleted, while vendors in custom OID sets can be deleted only if they are not being used by any OID set.
Adding a New Model
Use this option when the required device model is not already available under a vendor.
-
Navigate to Data Studio → SNMP Definitions.
-
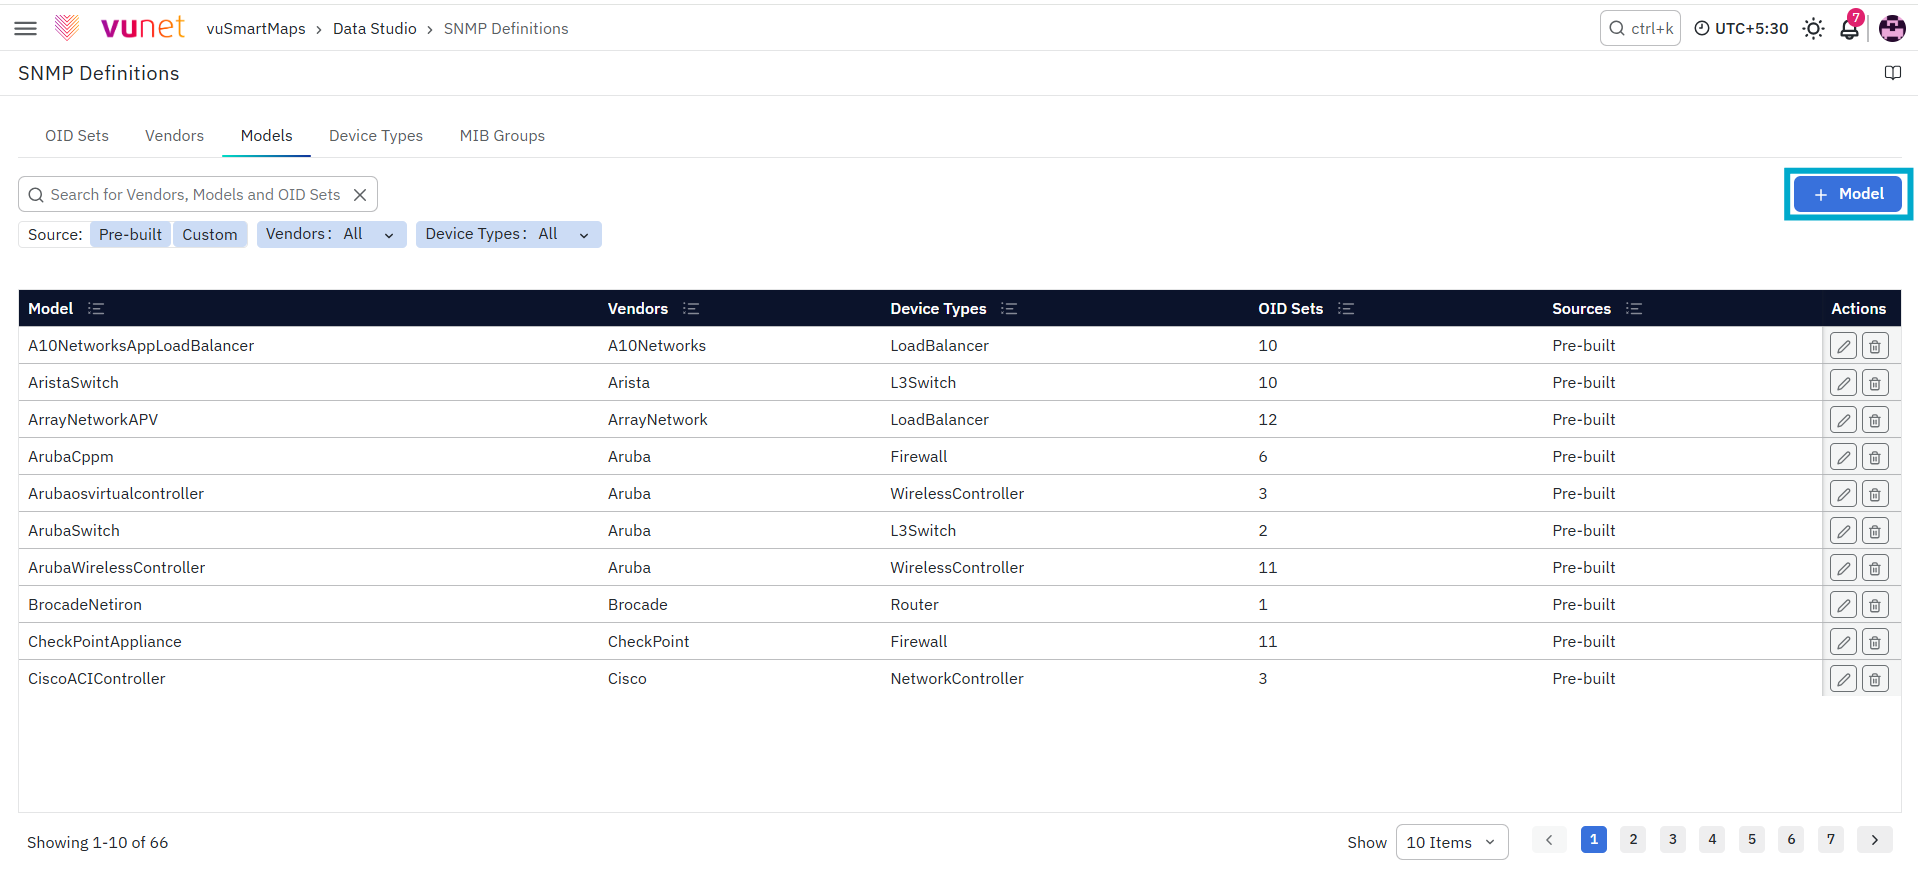
Open the Models tab.
-
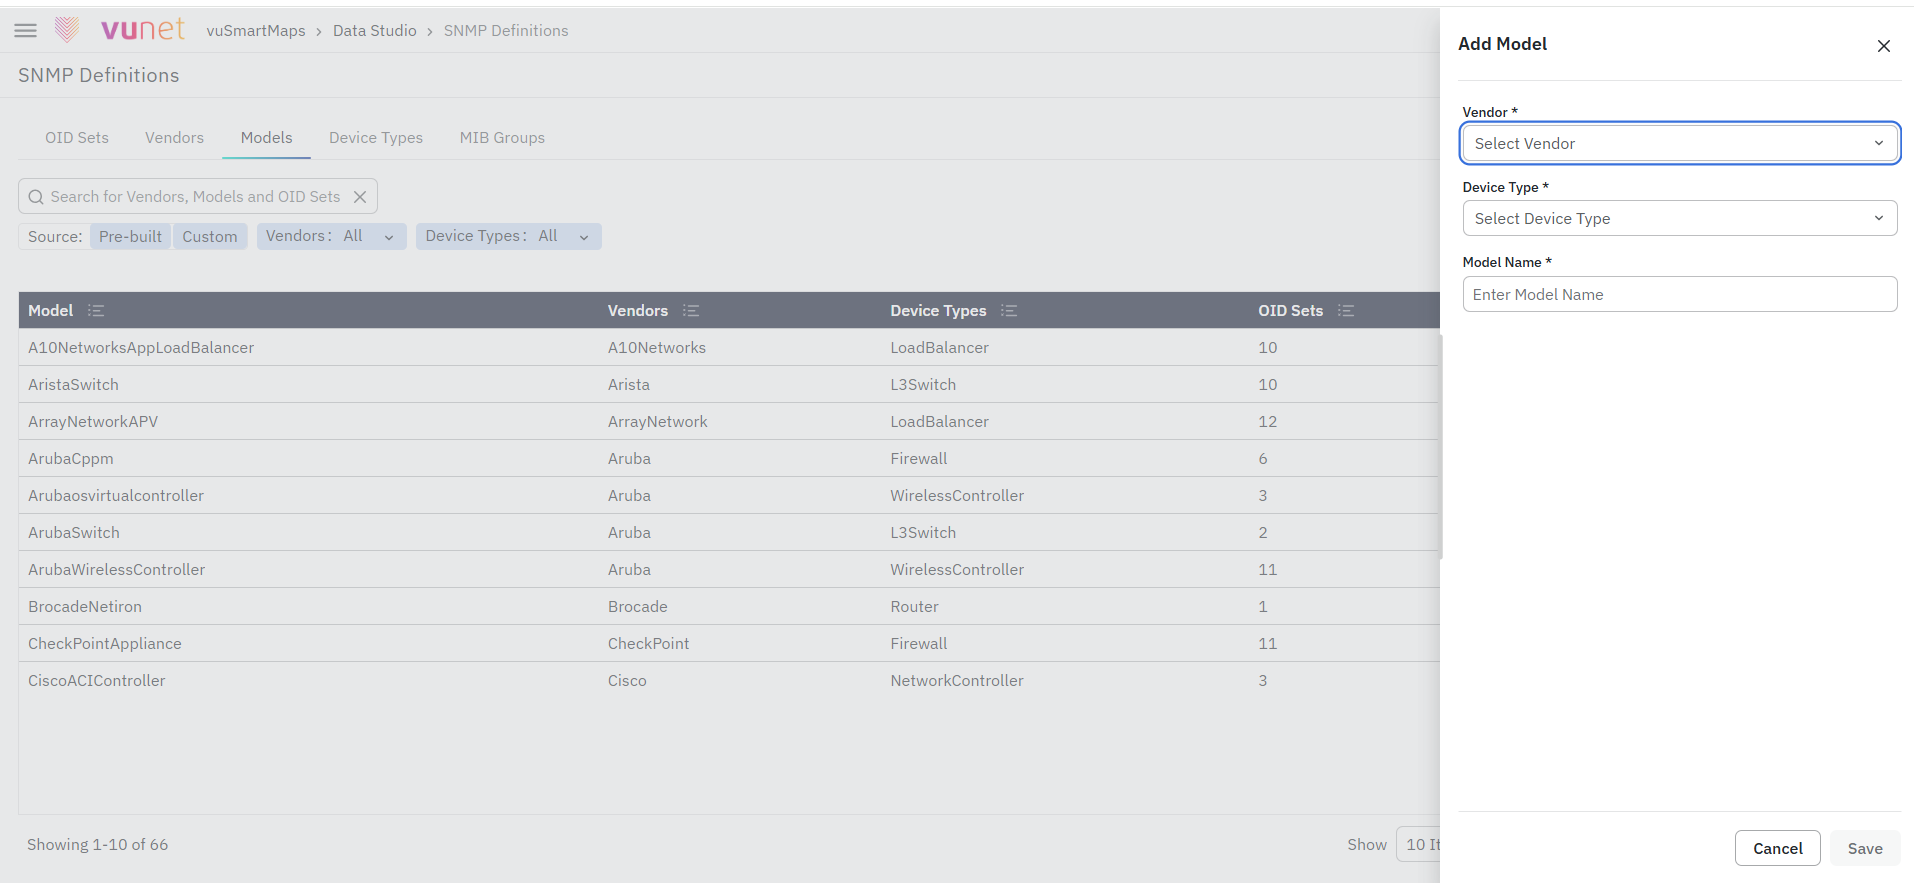
Click the + Add Model button.
-
Select the required Vendor under which the model should be created.
-
Enter the Device Type and Model Name.
-
Review the entered details.
-
Click Save.
Once saved, the model will be available for selection in vendor-specific OID set creation.
Edit a Model
-
Navigate to Data Studio → SNMP Definitions.
-
Open the Models tab.
-
Locate the custom model to be updated.
-
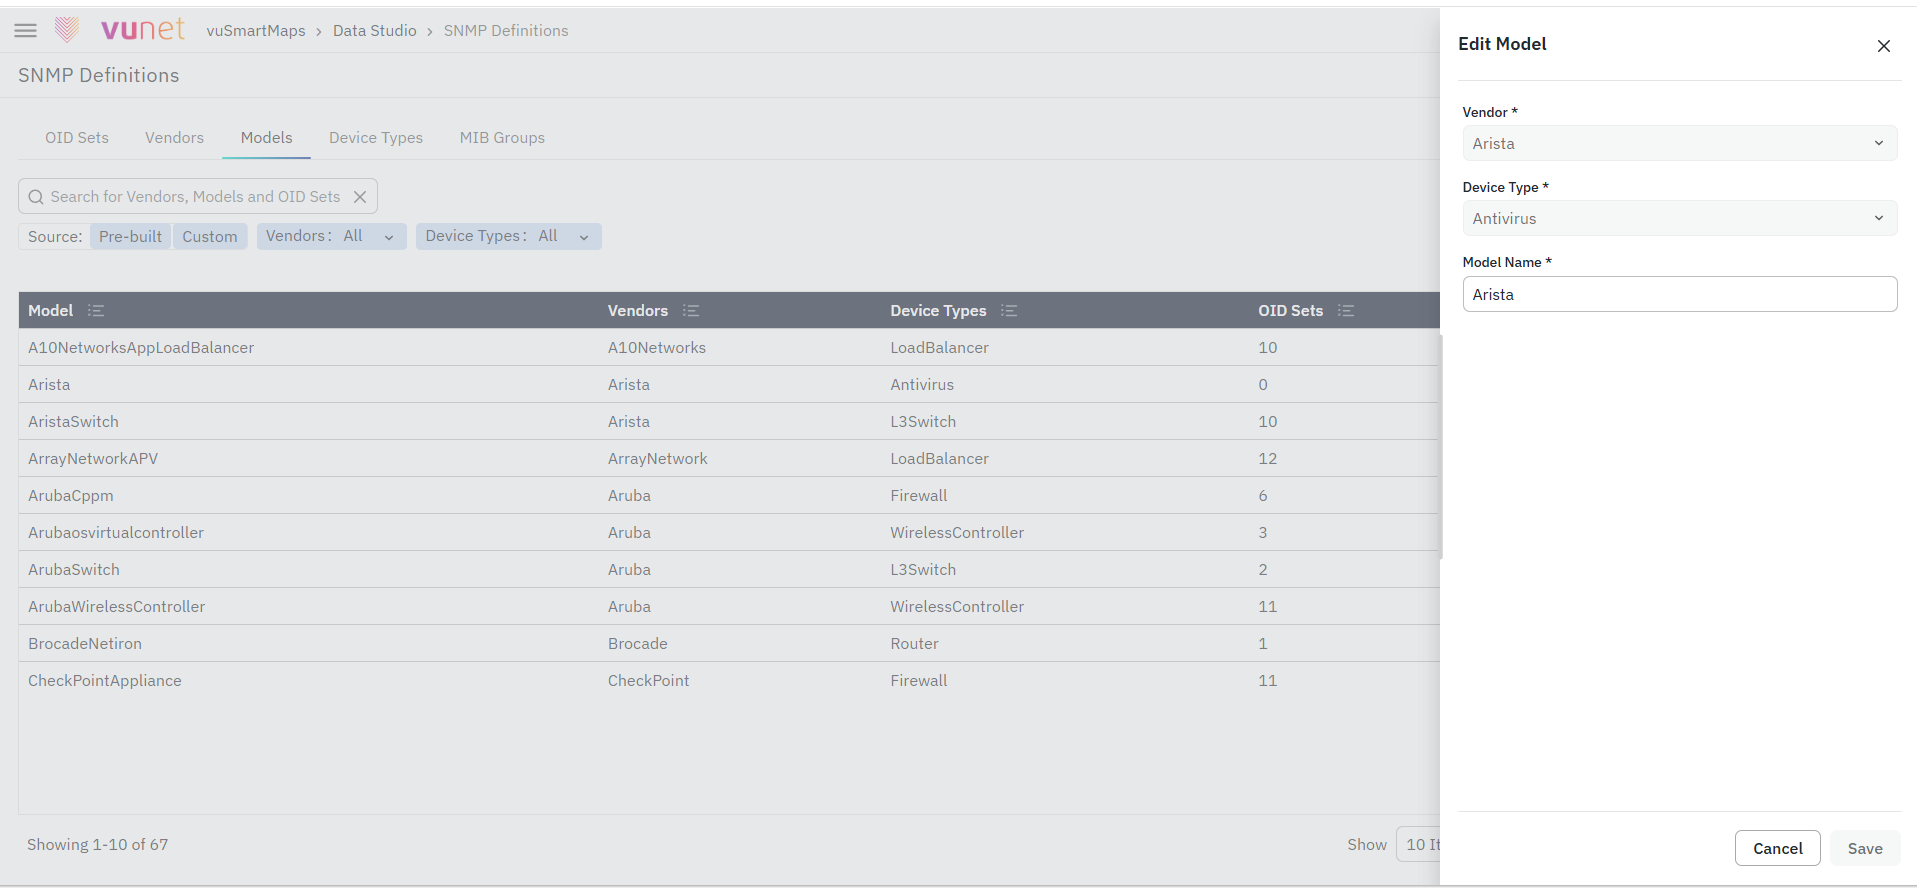
Click the Edit icon.
-
Update the Model Name.
-
Click Save.
- Models that are part of pre-built OID sets cannot be edited, while models in custom OID sets can be edited.
- During edit, the Vendor field is not editable (disabled). Only the Model name can be modified.
Delete a Model
-
Navigate to Data Studio → SNMP Definitions.
-
Open the Models tab.
-
Locate the custom model you want to delete.
-
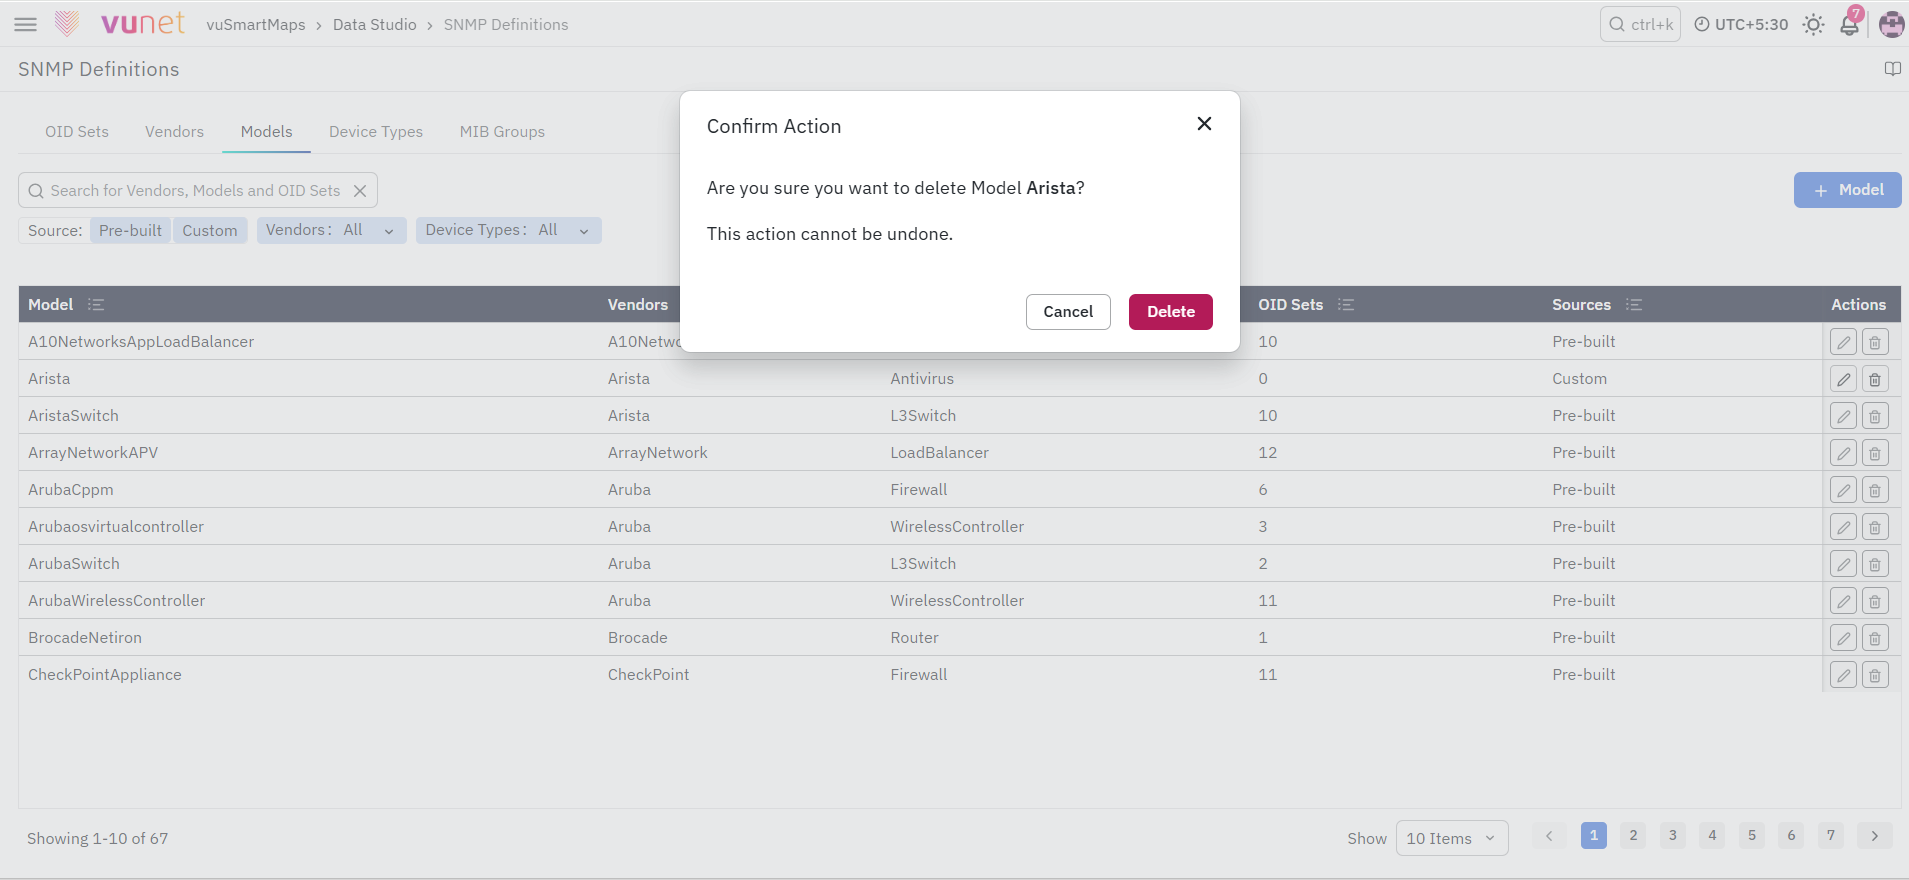
Click the Delete icon.
-
Review the warning shown by the system.
-
Confirm the deletion.
Pre-built models cannot be deleted. Custom models can be deleted only if they are not referenced by any OID set.
Adding a New Device Type
Use this option when the required device category is not already available.
-
Navigate to Data Studio → SNMP Definitions.
-
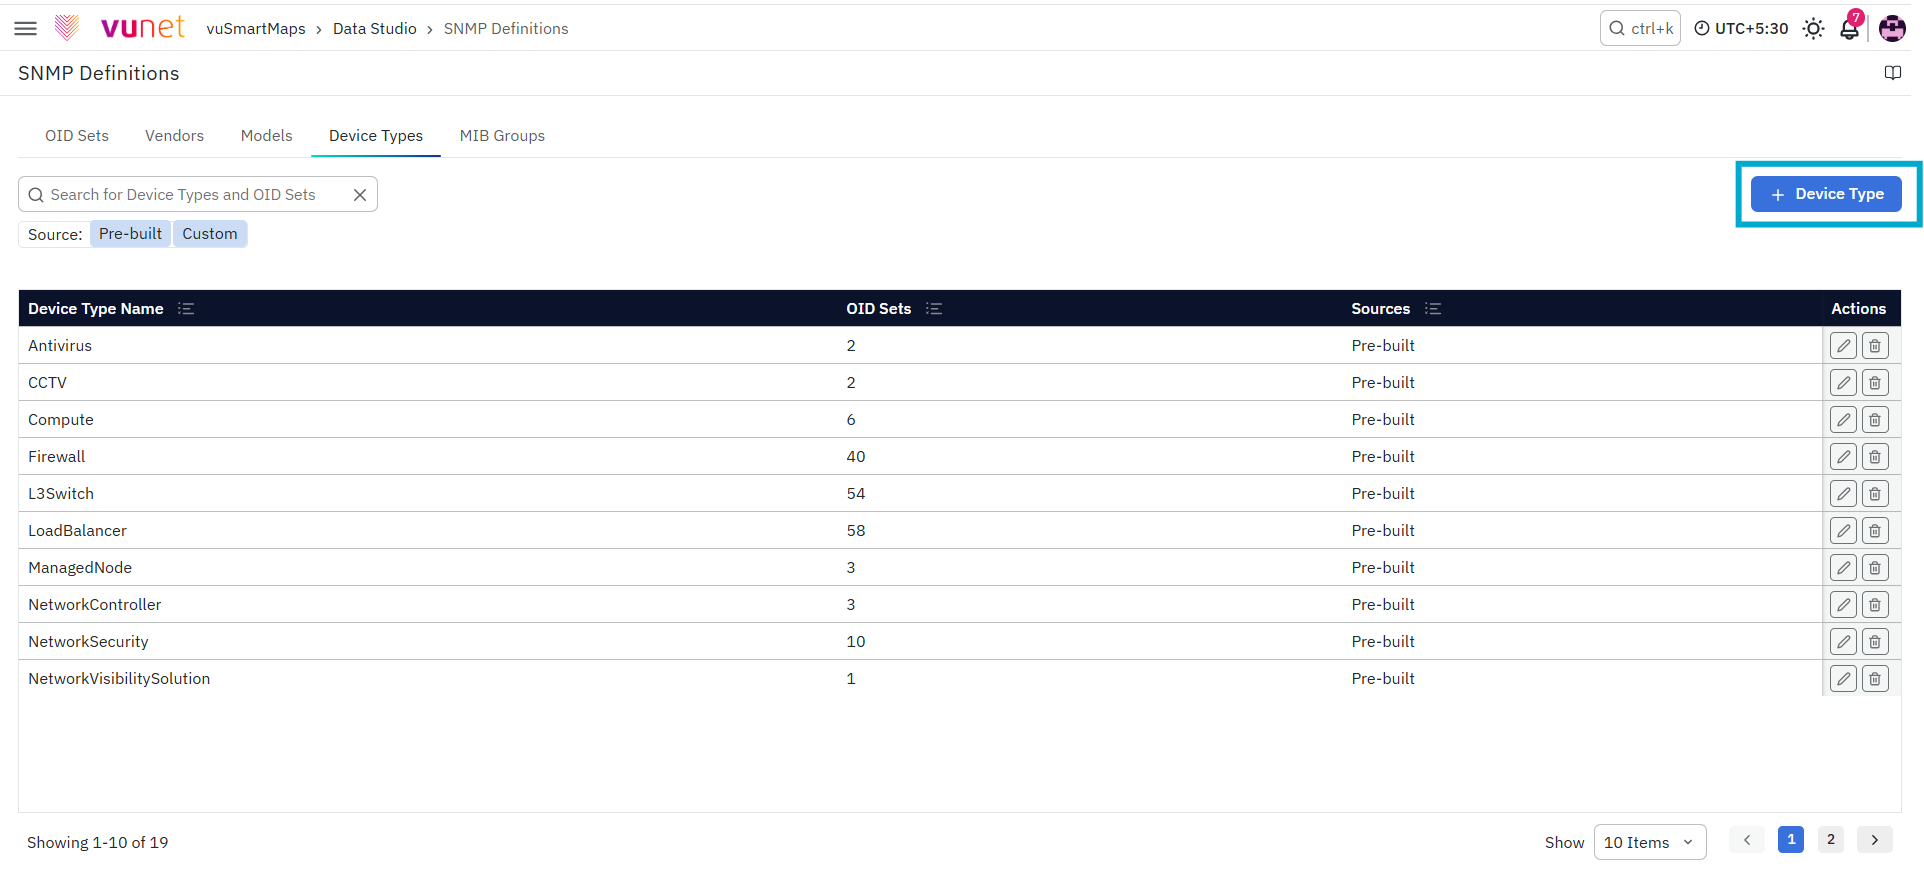
Open the Device Types tab.
-
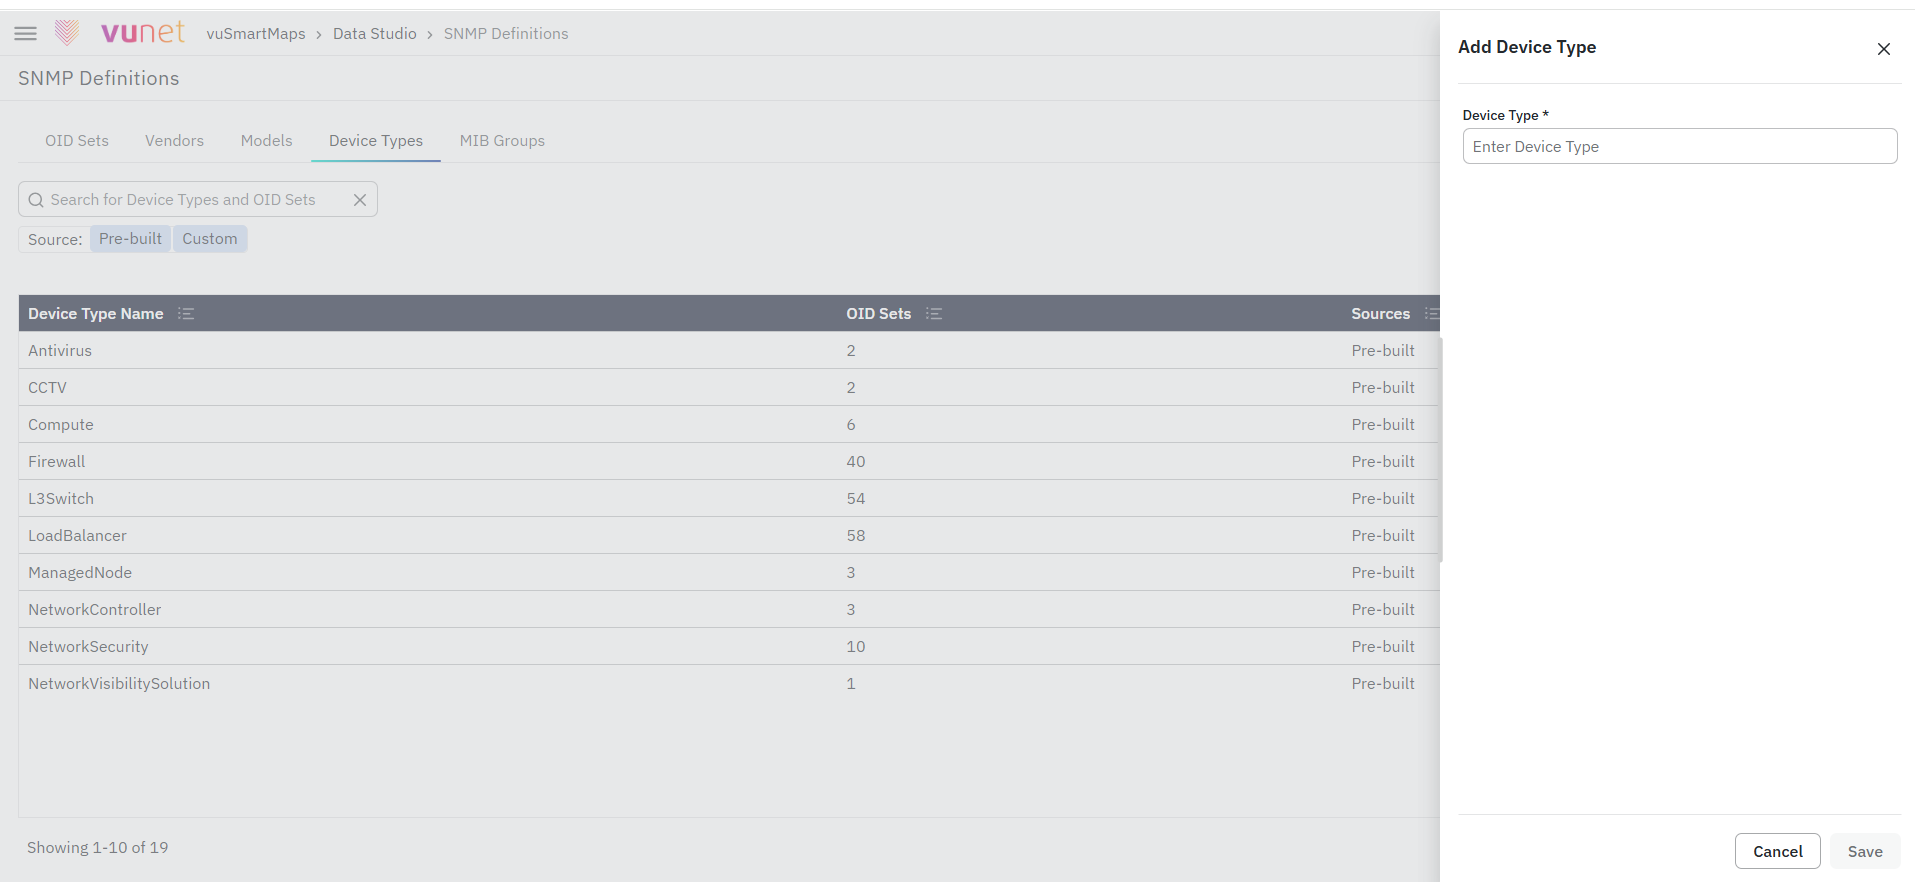
Click the + Add Device Type button.
-
Enter the device type name.
-
Review the value entered.
-
Click Save.
Once saved, the device type will be available for selection in vendor-specific OID sets. Examples of device types may include Router, Switch, Firewall, or Server, depending on your monitoring needs.
Edit a Device Type
-
Navigate to Data Studio → SNMP Definitions.
-
Open the Device Types tab.
-
Locate the custom Device Type entry.
-
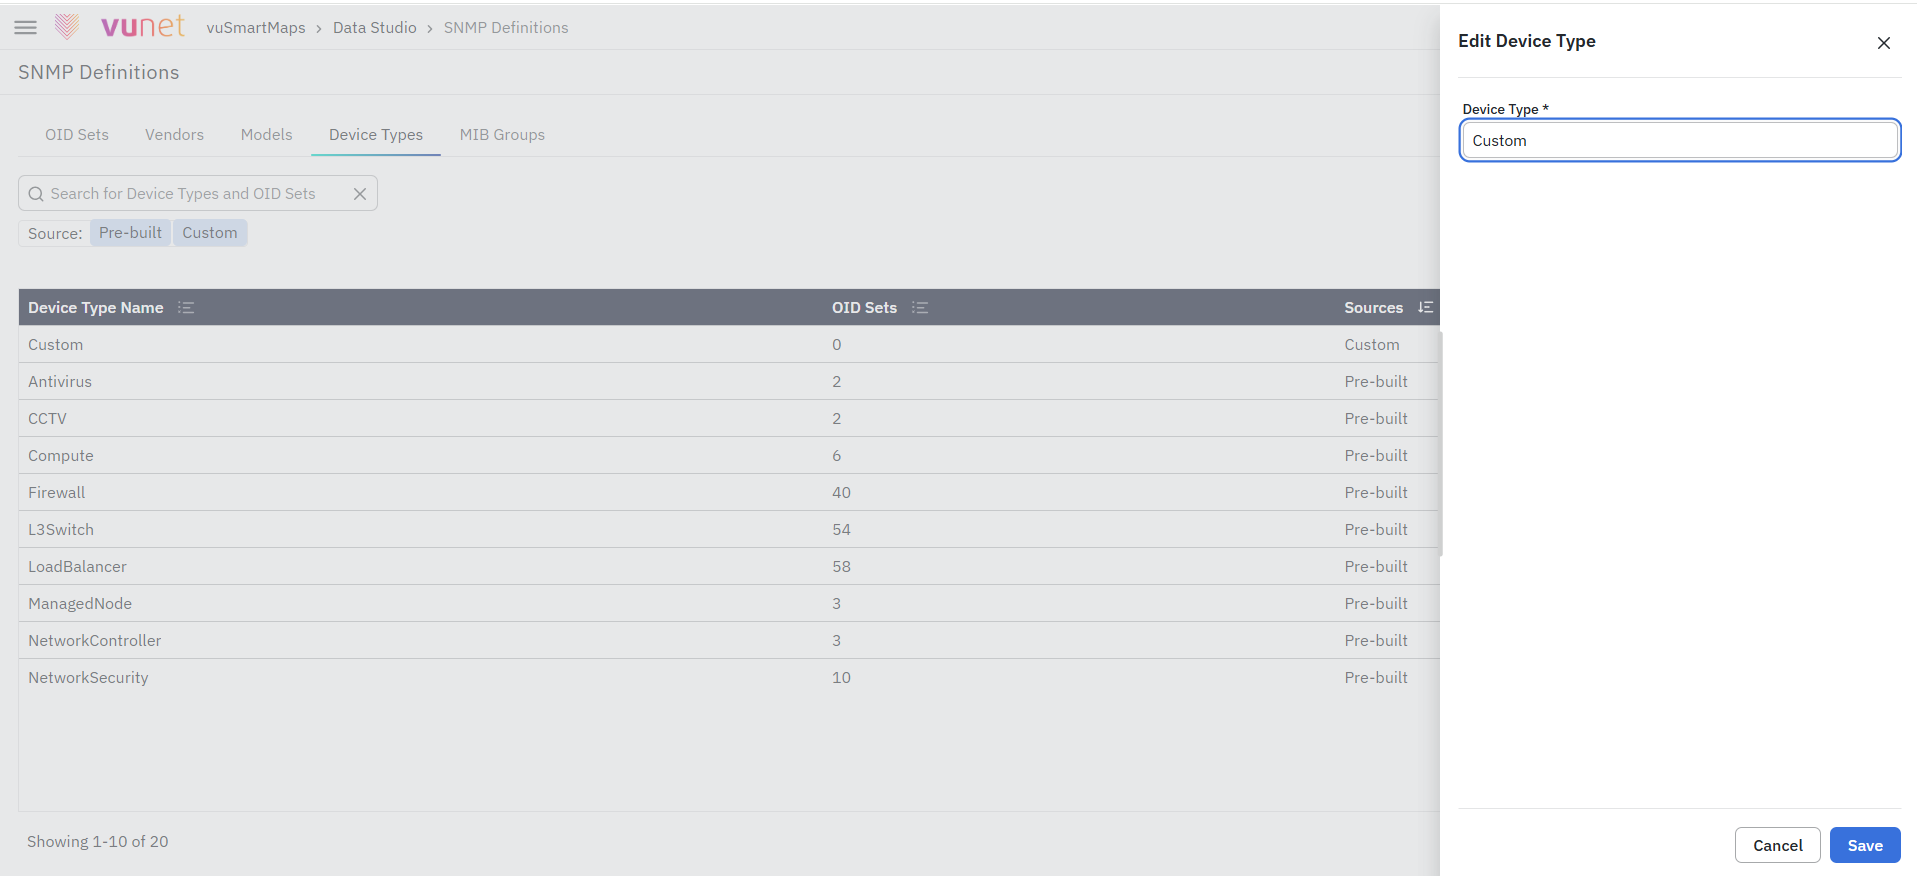
Click the Edit icon.
-
Update the Device Type.
-
Click Save.
Device types that are part of pre-built OID sets cannot be edited, while device types in custom OID sets can be edited.
Delete a Device Type
-
Navigate to Data Studio → SNMP Definitions.
-
Open the Device Types tab.
-
Locate the custom Device Type entry.
-
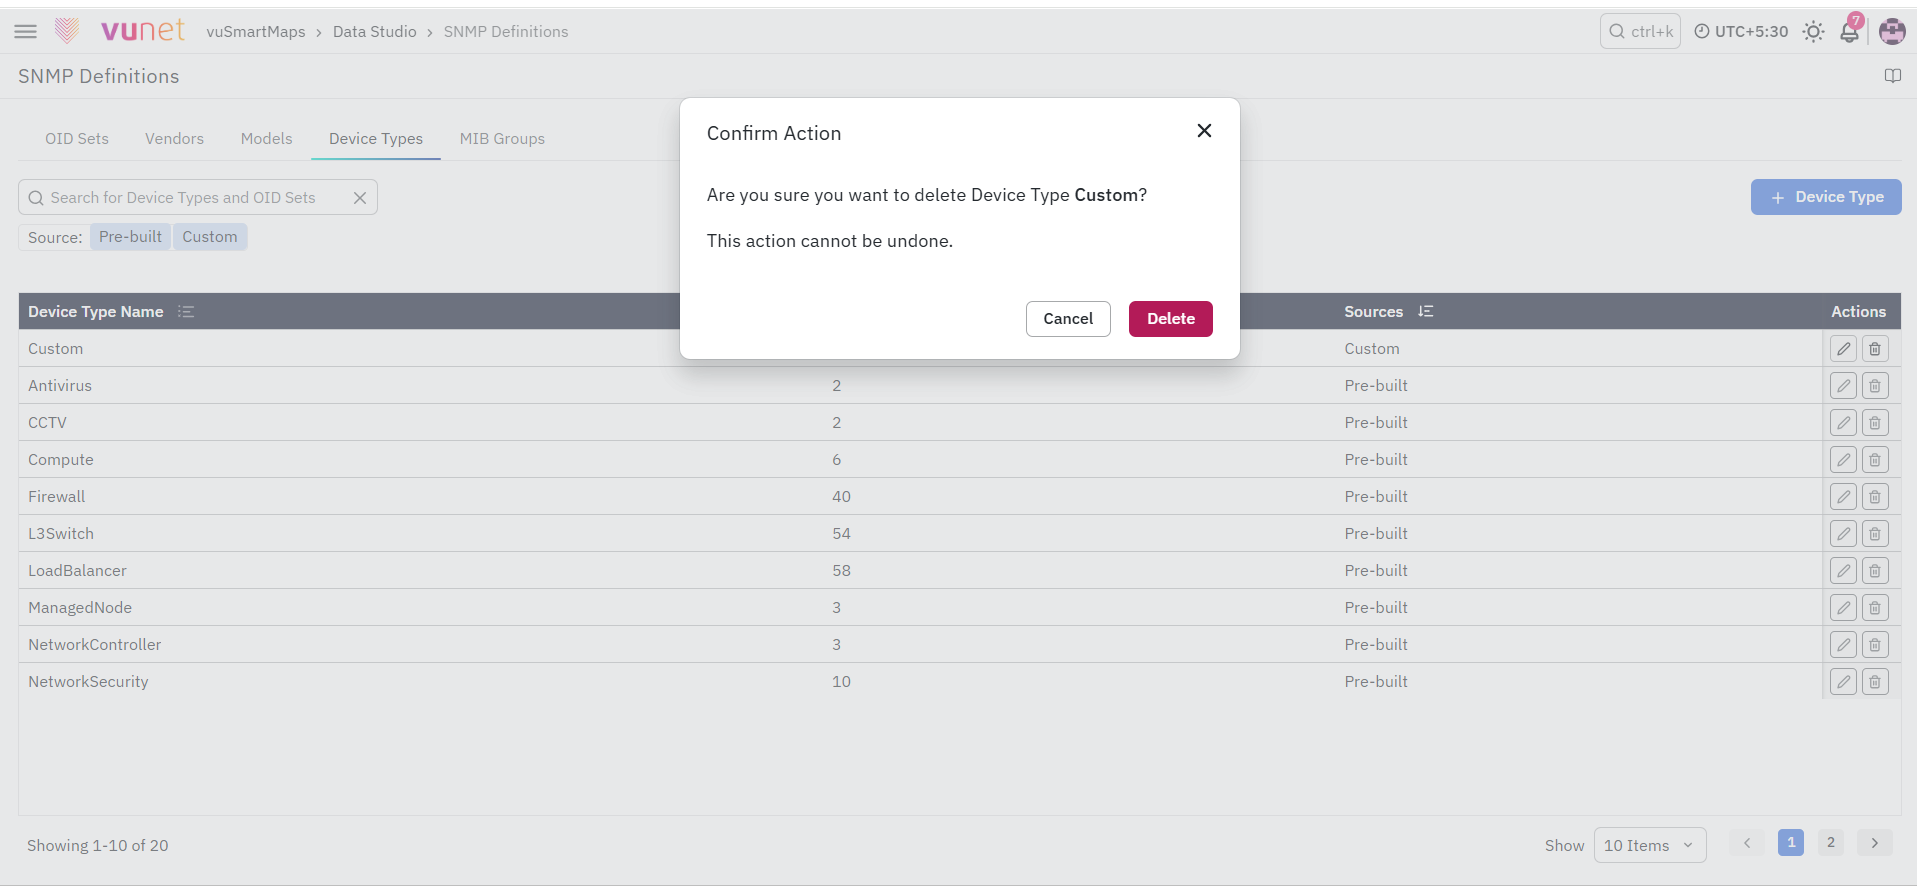
Click the Delete icon.
-
Review the warning message.
-
Confirm the deletion.
Pre-built device types cannot be deleted. Custom device types can be deleted only if they are not referenced by any OID set.
Adding a New MIB Group
Use this option when you want to organize OIDs under a new logical group.
-
Navigate to Data Studio → SNMP Definitions.
-
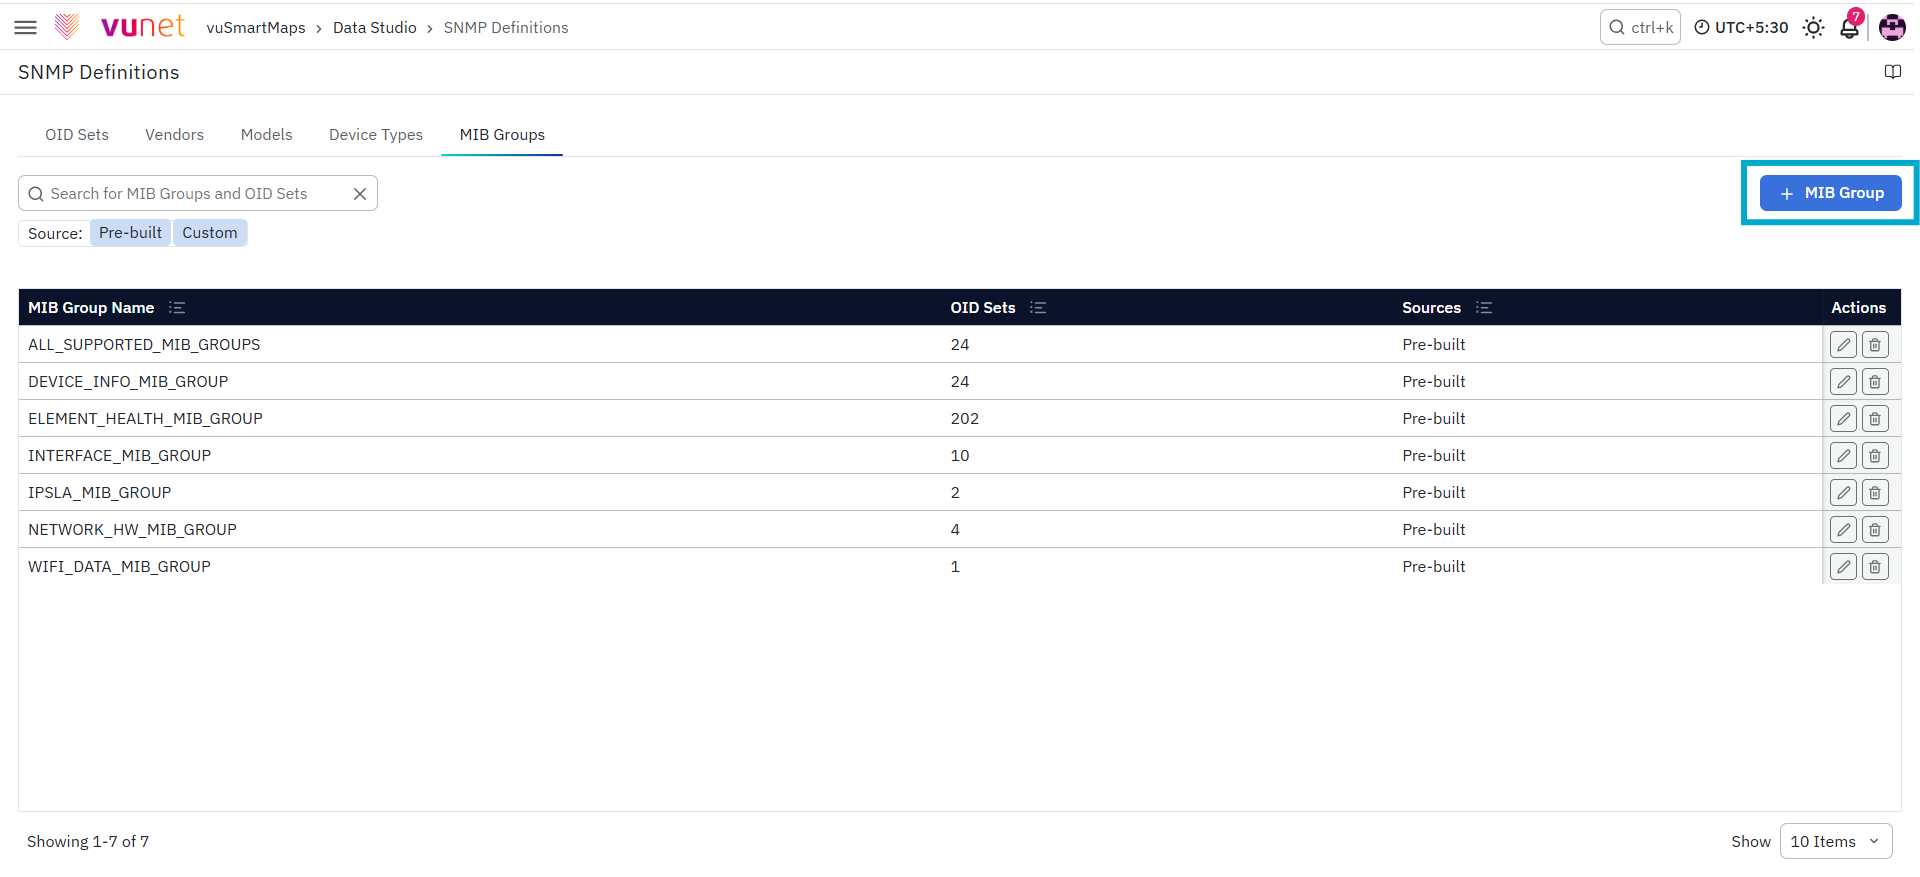
Open the MIB Groups tab.
-
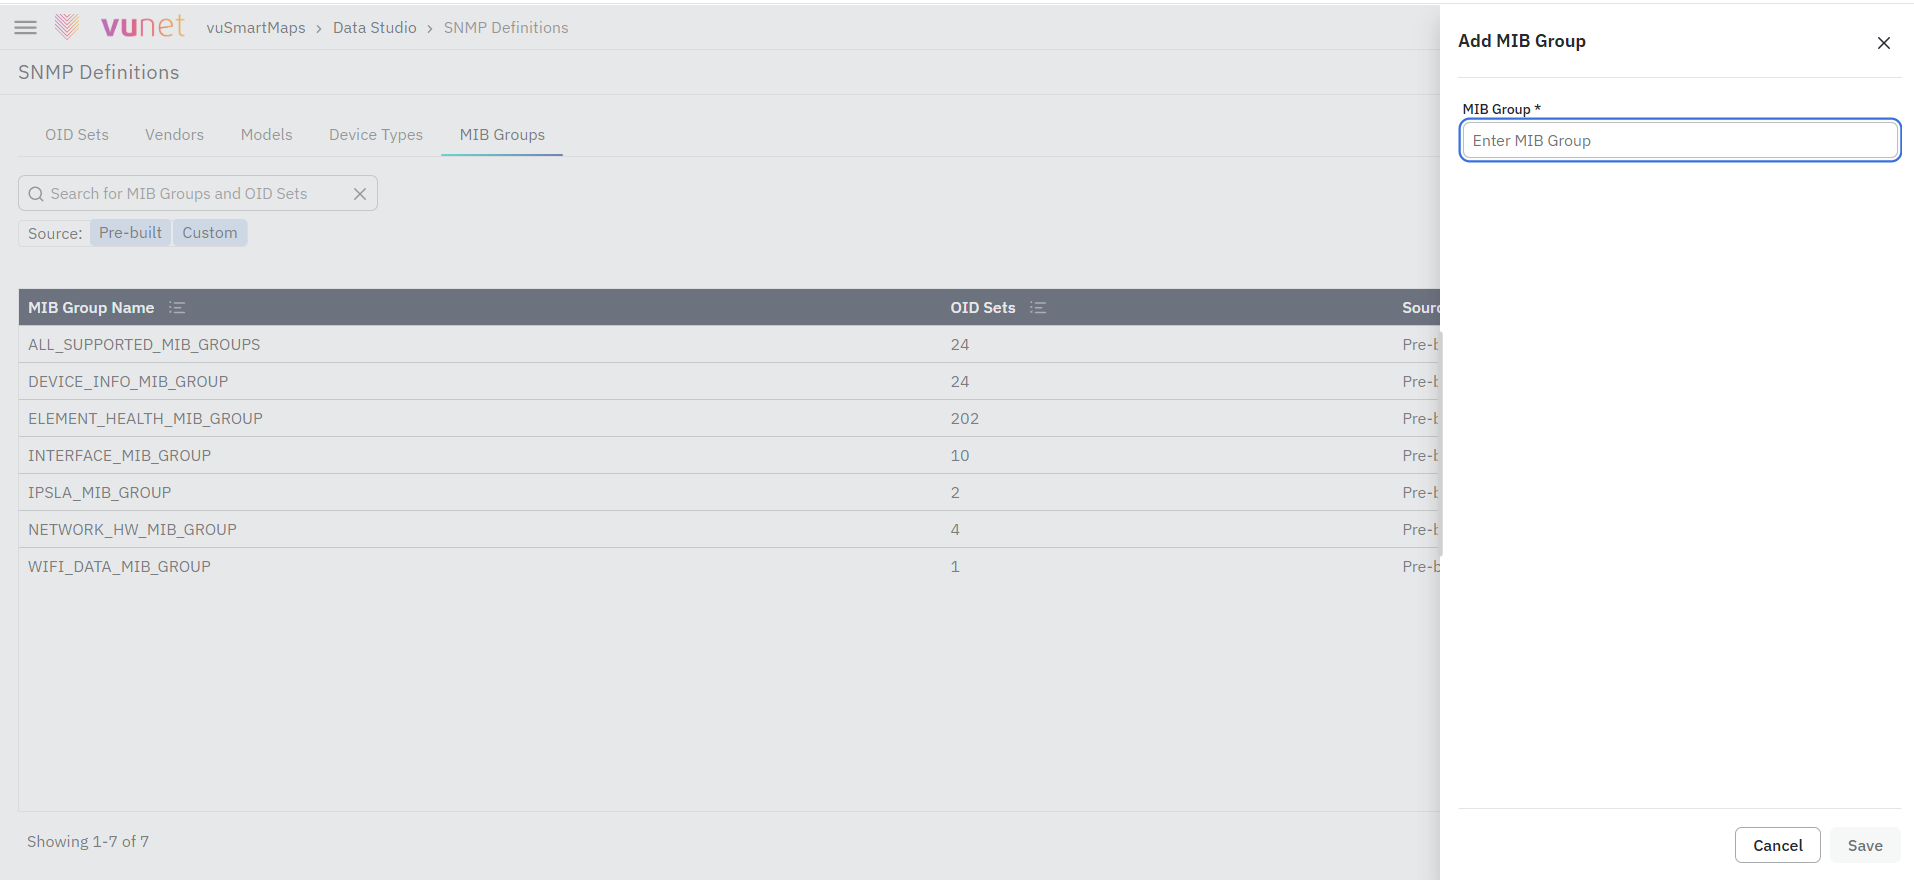
Click the + Add MIB Group button.
-
Enter the MIB Group Name.
-
Review the value entered.
-
Click Save.
Once saved, the MIB Group will be available for selection while creating OID sets.
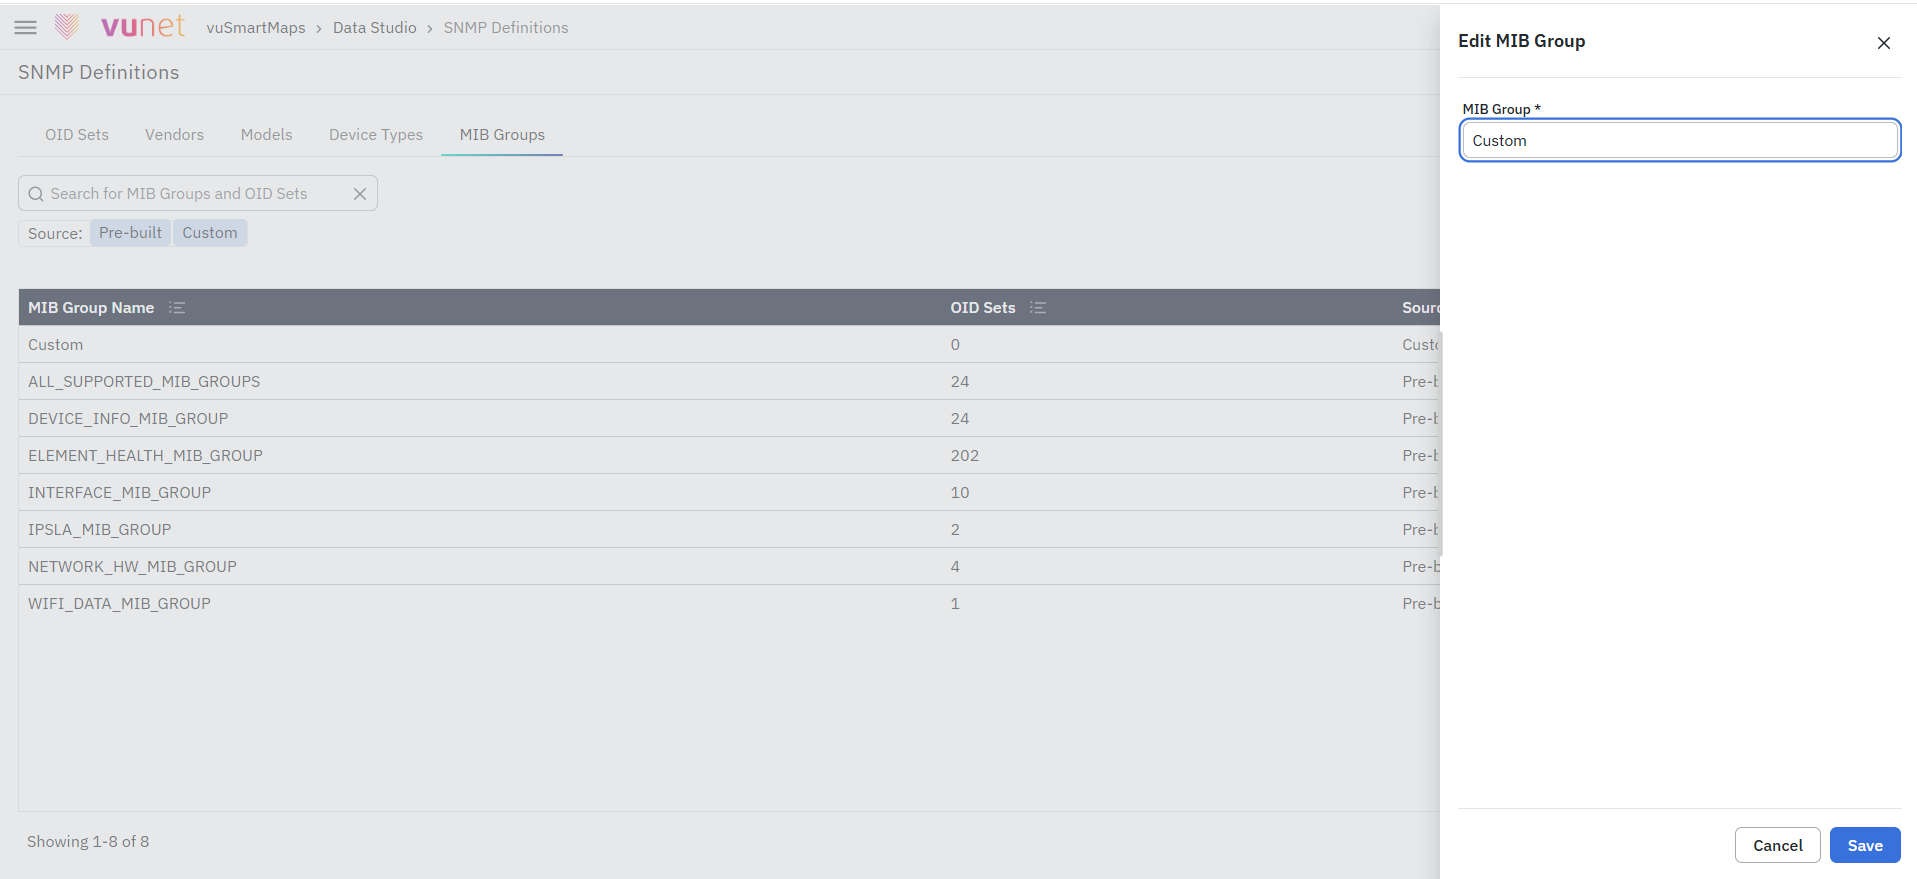
Edit a MIB Group
-
Navigate to Data Studio → SNMP Definitions.
-
Open the MIB Groups tab.
-
Locate the custom MIB Group entry.
-
Click the Edit icon.
-
Update the MIB Group Name.
-
Click Save.
MIB Groups that are part of pre-built OID sets cannot be edited, while MIB Groups in custom OID sets can be edited.
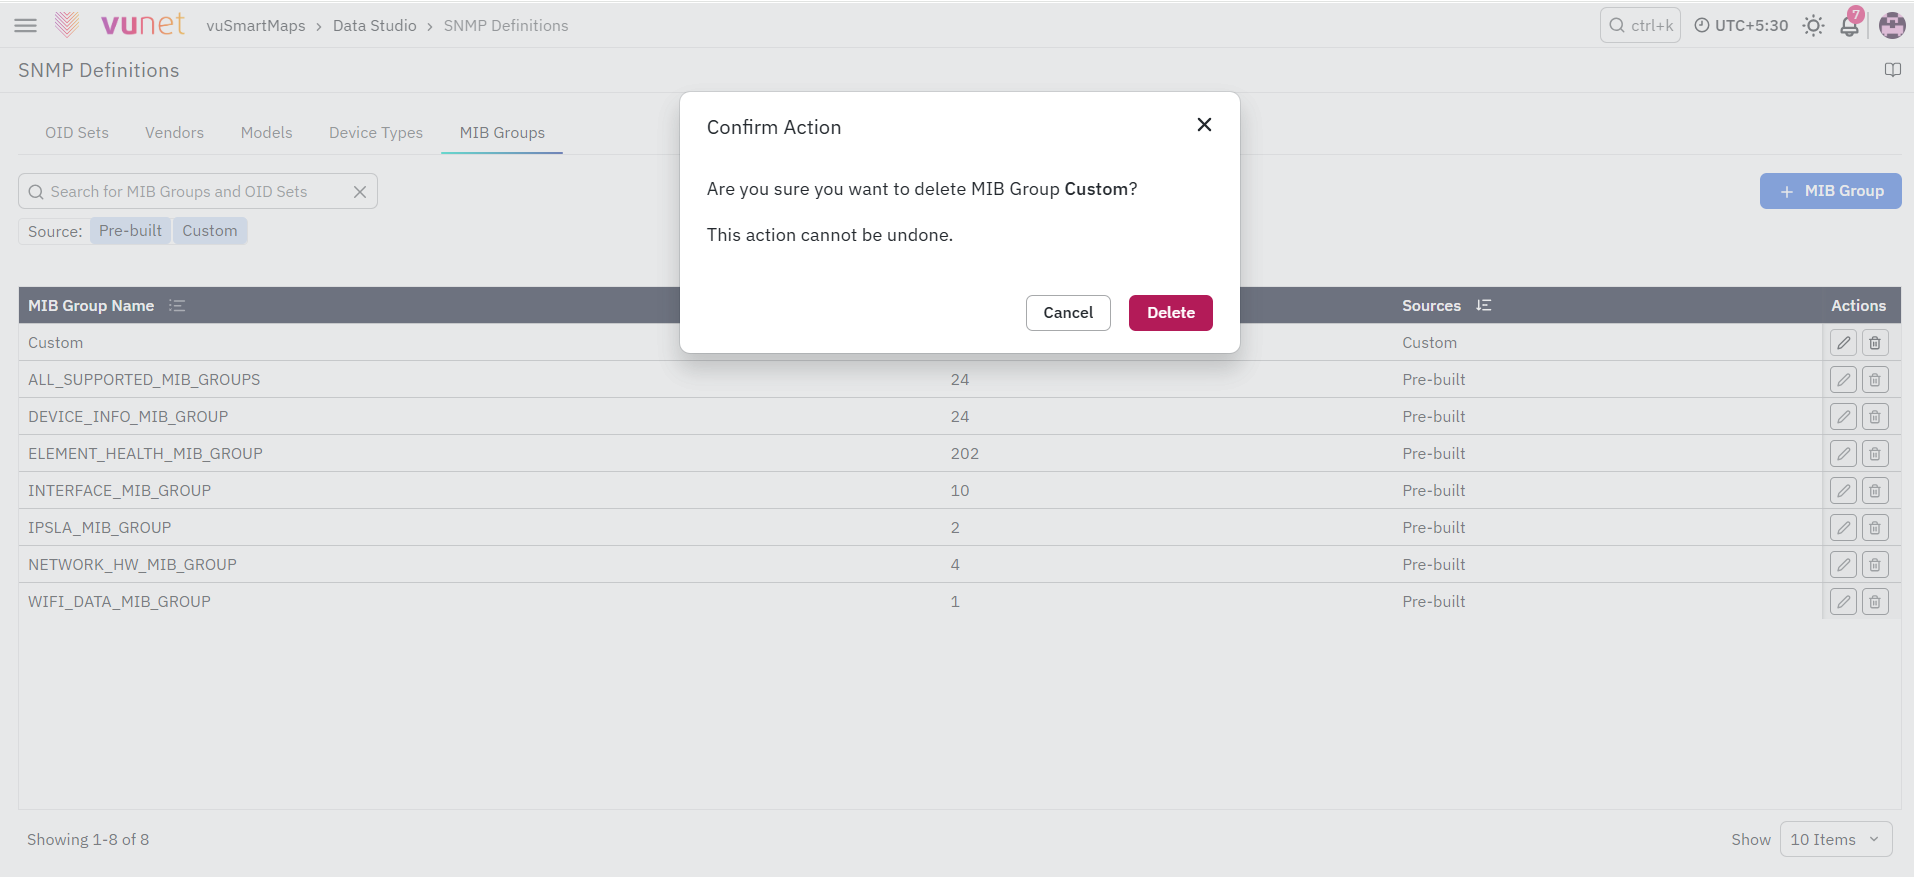
Delete a MIB Group
-
Navigate to Data Studio → SNMP Definitions.
-
Open the MIB Groups tab.
-
Locate the custom MIB Group entry.
-
Click the Delete icon.
-
Review the warning shown by the system.
-
Confirm the deletion.
Pre-built MIB Groups cannot be deleted. Custom MIB Groups can be deleted only if they are not referenced by any OID set.
What Happens After the Steps
Once an OID set is created or updated:
-
It becomes available in SNMP Polling configuration
-
SNMP Polling uses it to collect data from devices
-
Data flows through the platform pipeline
-
The collected data can be used to create:
- Dashboards
- Alerts
- Reports
No additional setup is required after saving the configuration.
