User-Specific Views
User-Specific Views in vuSmartMaps ensure that users accessing the same dashboards can view data according to the policies configured for their respective roles. This feature enables a personalized and secure data experience by restricting or allowing access to specific data sets based on role-based policies. User-Specific Views are applied based on the Role for Data Store Access Control field configured for each user. By defining data access policies for roles, administrators can ensure that users only see the data relevant to their responsibilities. This approach allows organizations to maintain shared dashboards while ensuring that each user sees only the data permitted by their role.

Tenant-Specific Data Isolation
To enhance data security, the platform enforces tenant-level data isolation.
- Users belonging to one tenant cannot view data belonging to another tenant.
- Each tenant’s data remains restricted to its own users.
- Super tenants may have broader visibility across tenants.
This ensures that observability data remains confidential and isolated across different tenants.
Data Access Policies
User-Specific Views operate using Data Set Policies, which determine how observability data is made available to users based on their roles.
The following policy options are supported:
-
Deny Access to All Observability Data
Prevents users from accessing any observability data. -
Allow Access to All Observability Data
Allows users to access the entire observability data set. -
Allow Access to Specific Data Sets
Allows administrators to grant access to selected data categories. -
Deny Access to Specific Data Sets
Restricts access to selected data categories.
These policies help ensure that users only view the data relevant to their role.
Data Set Categories
User-Specific Views support multiple data set categories that can be used when configuring access policies.
Administrators can select one or more of the following categories:
- Traces
- RUM (Real User Monitoring)
- Logs
- Metrics
- Events
- Transactions
- Custom
These categories allow administrators to define exactly which types of observability data are accessible to users.
It is to be noted that the policies will apply to tables with specific prefixes as outlined below:
| Category | Table Name Prefix |
|---|---|
| Traces | vtraces |
| RUM | vrum |
| Logs | vlogs |
| Metrics | vmetrics |
| Events | vevents |
| Transactions | vtrans |
Selecting Data Set Policy
While creating a new role, you need to select Data Set Policy from the following 4 options:
- Deny access to all Observability data
- Allow access to all Observability data
- Allow access to specific Data Sets
- Deny access to specific Data Sets
Deny access to all Observability data
Administrators possess the capability to impose access restrictions on entire observability datasets for specific roles, significantly enhancing data security. This measure explicitly denies access to observability data for roles where heightened security is a priority.
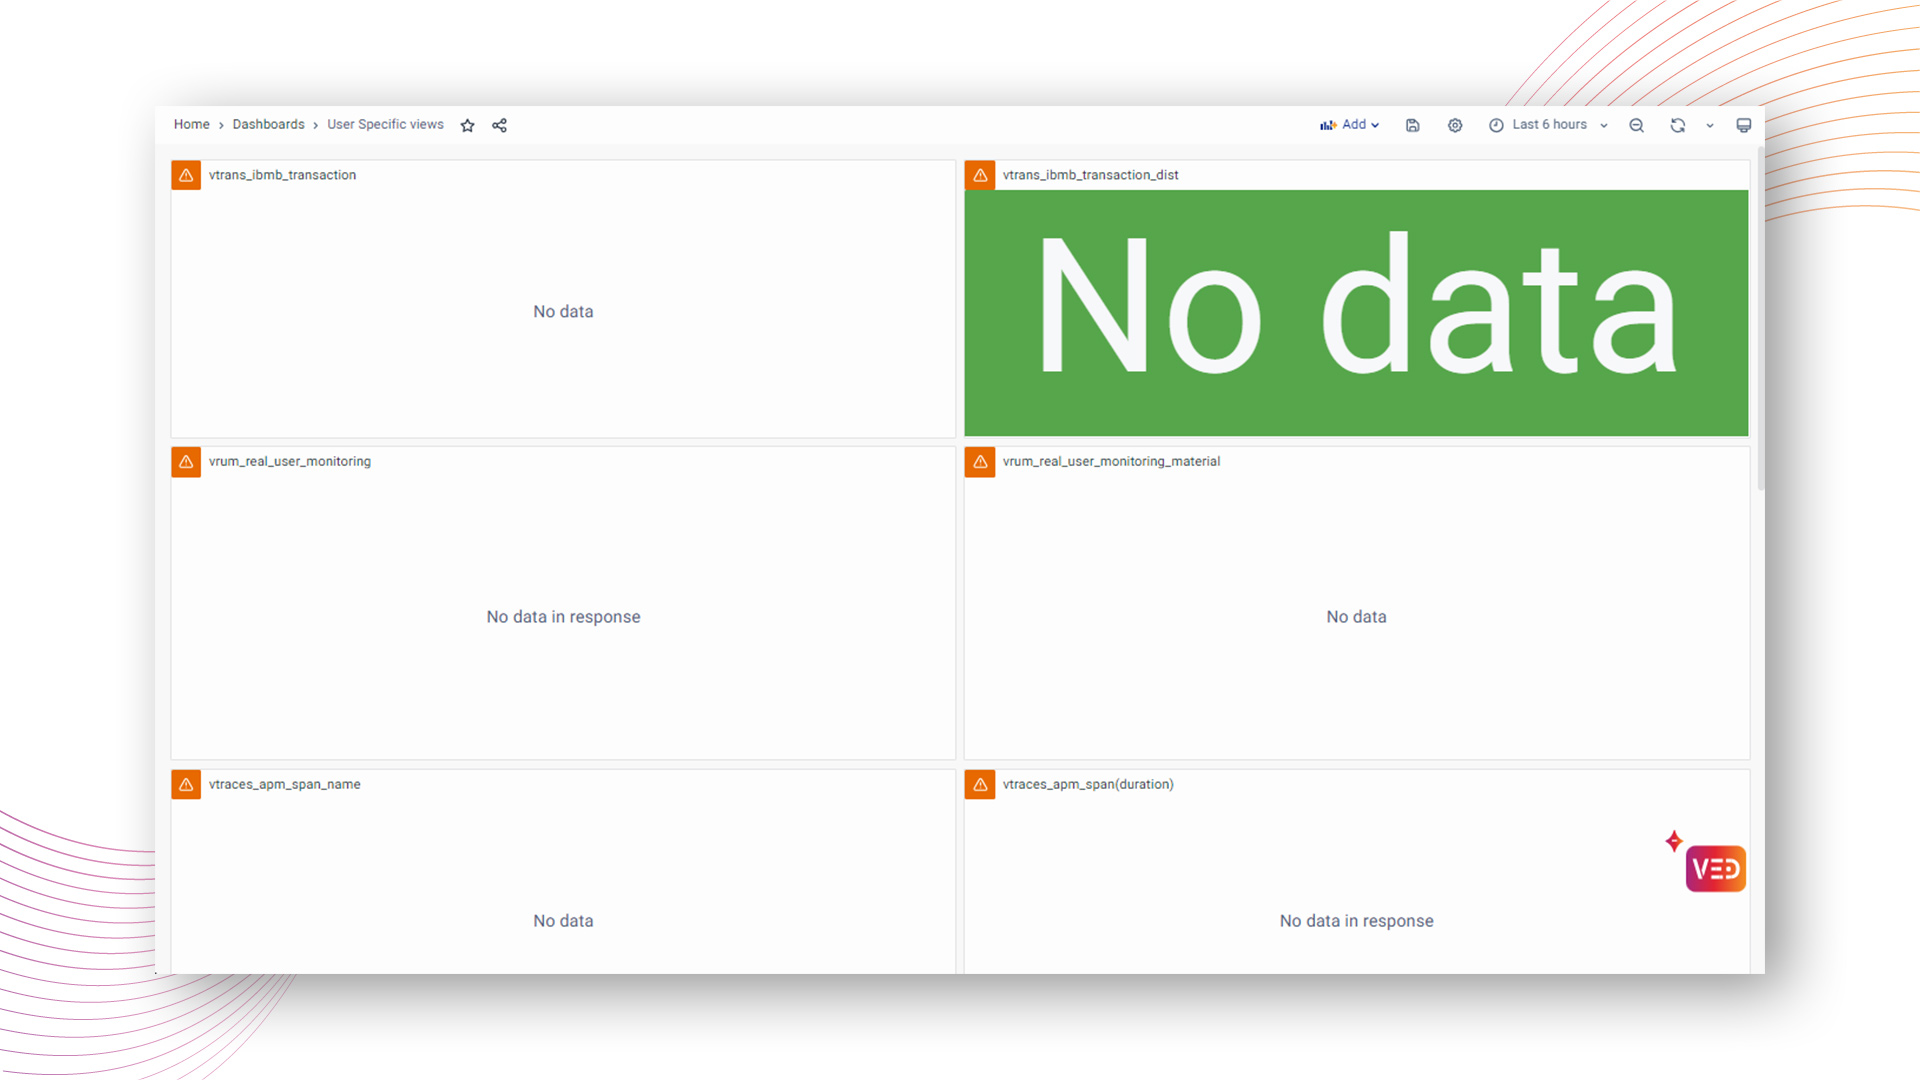
Example: Consider a scenario where a user is assigned a role configured with the "Deny Access to all Observability Data" policy in the Data Access settings.
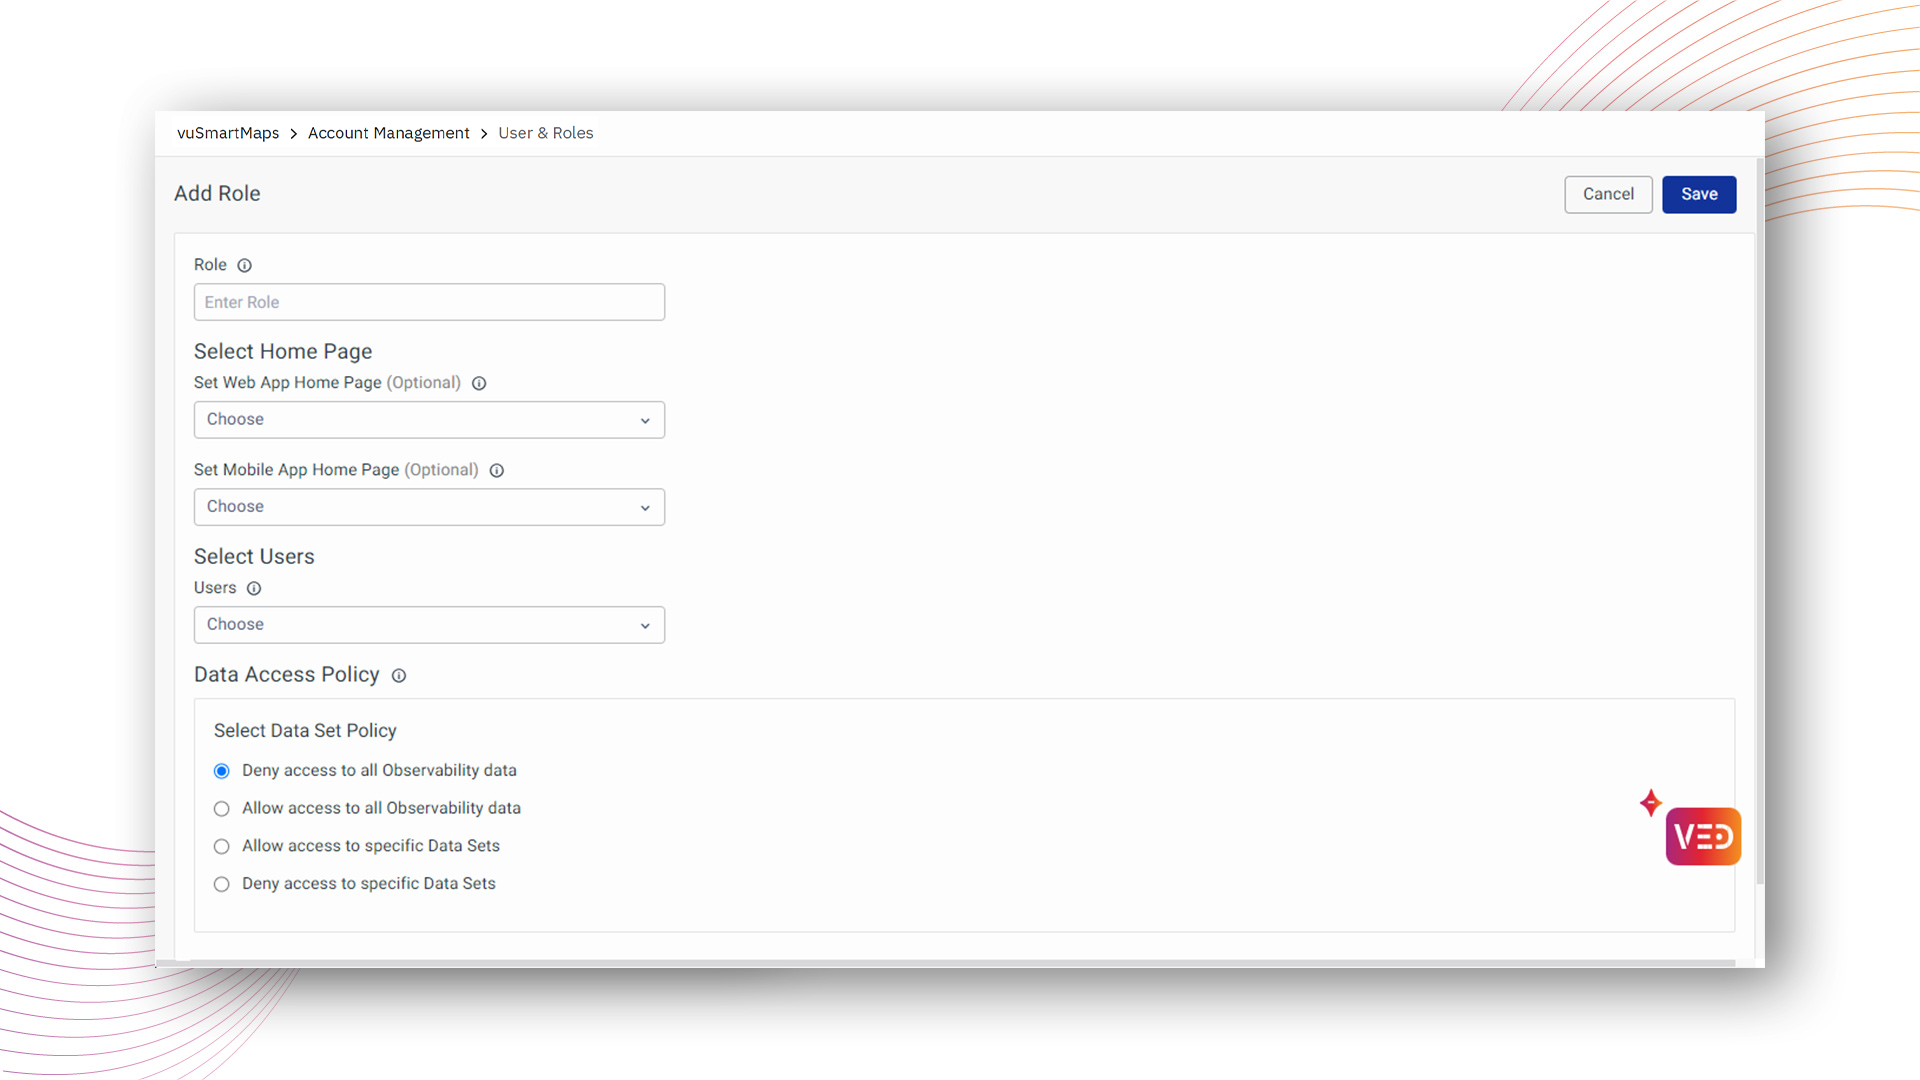
In this case, the user mapped to this role will be unable to access any observability data. The resulting dashboard will display no data, showing the restricted access enforced by the specified data policy.
Allow access to all Observability data
Administrators possess the authority to grant access to the entire observability dataset for specific roles, providing meticulous control over data permissions. This facilitates precise management of observability data access in alignment with distinct roles and responsibilities, allowing seamless data access with a single click.
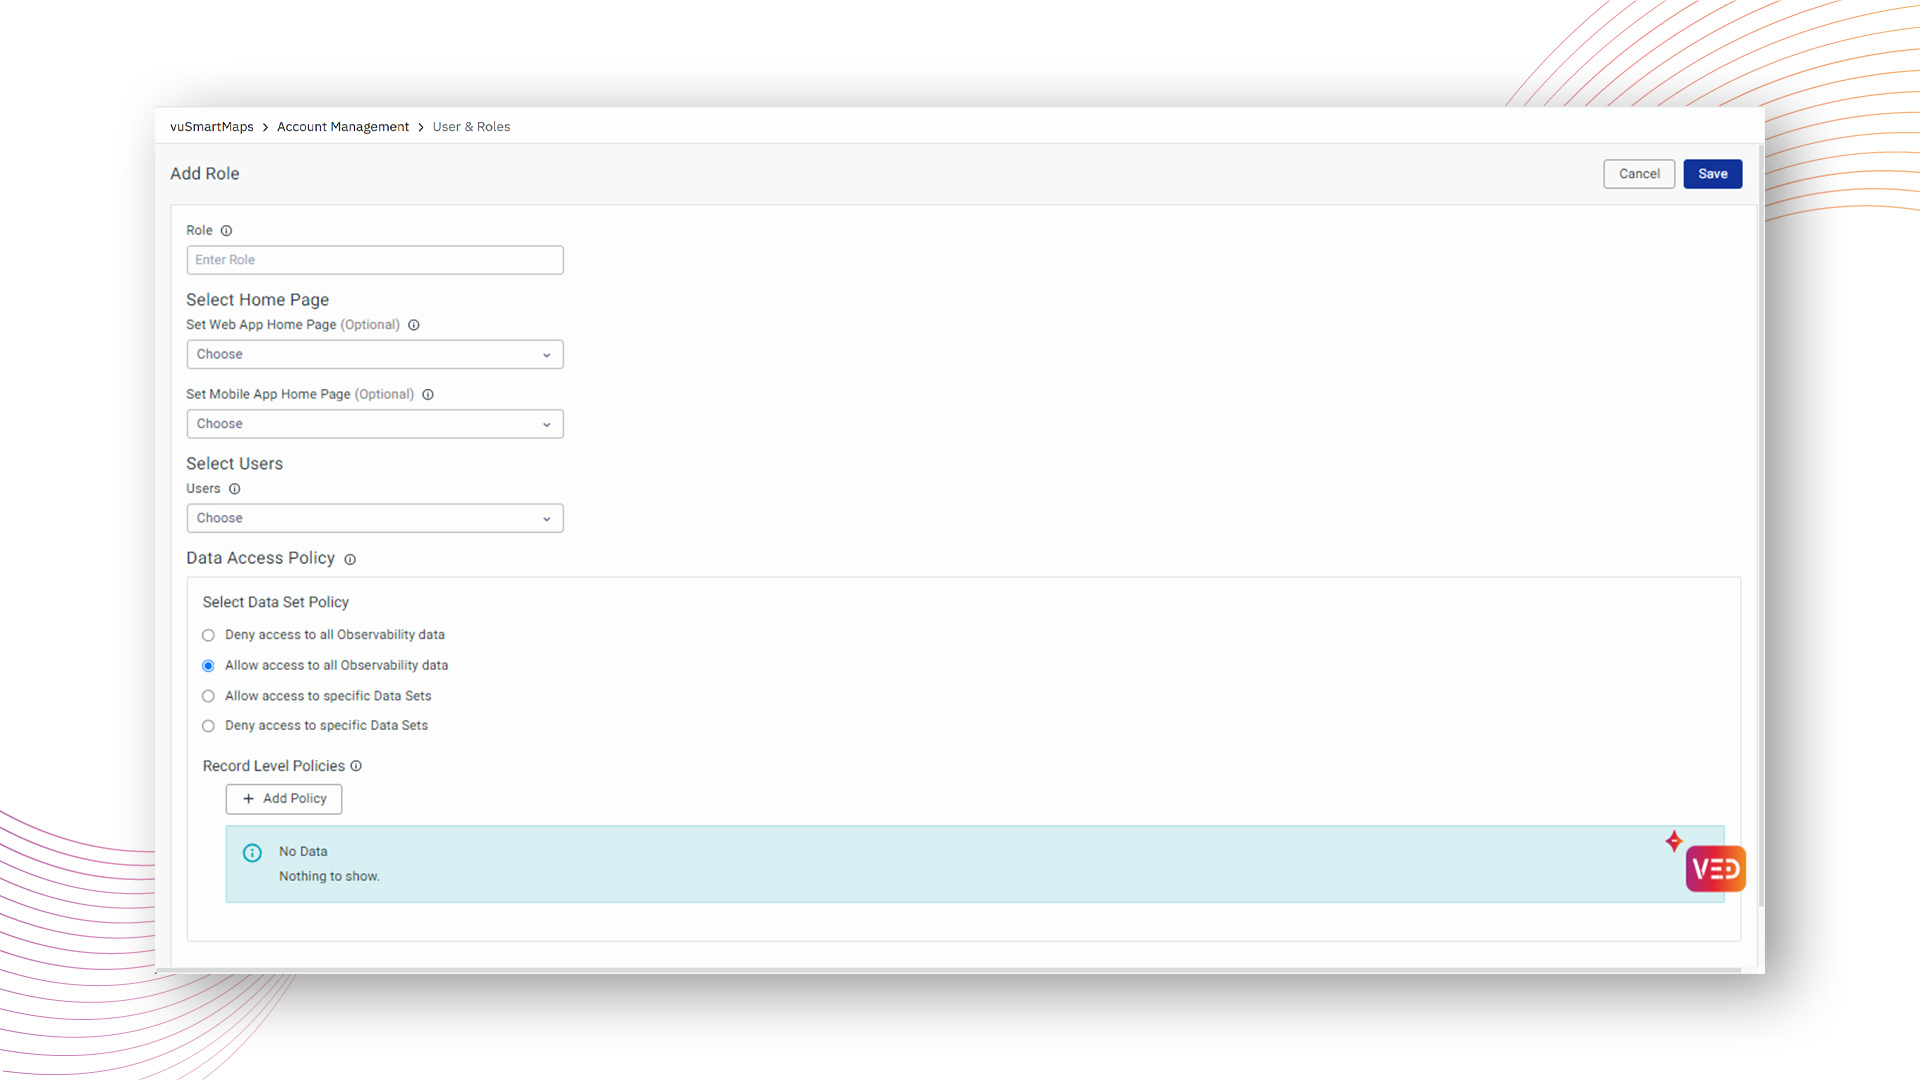
Example:
Consider a scenario where a user is assigned a role configured with the "Allow Access to all Observability Data" policy in the Data Access settings.
In this case, the user mapped to this role will have unrestricted access to all observability data. The resulting dashboard will display the complete dataset, showcasing the comprehensive access granted to the user based on the specified data policy.
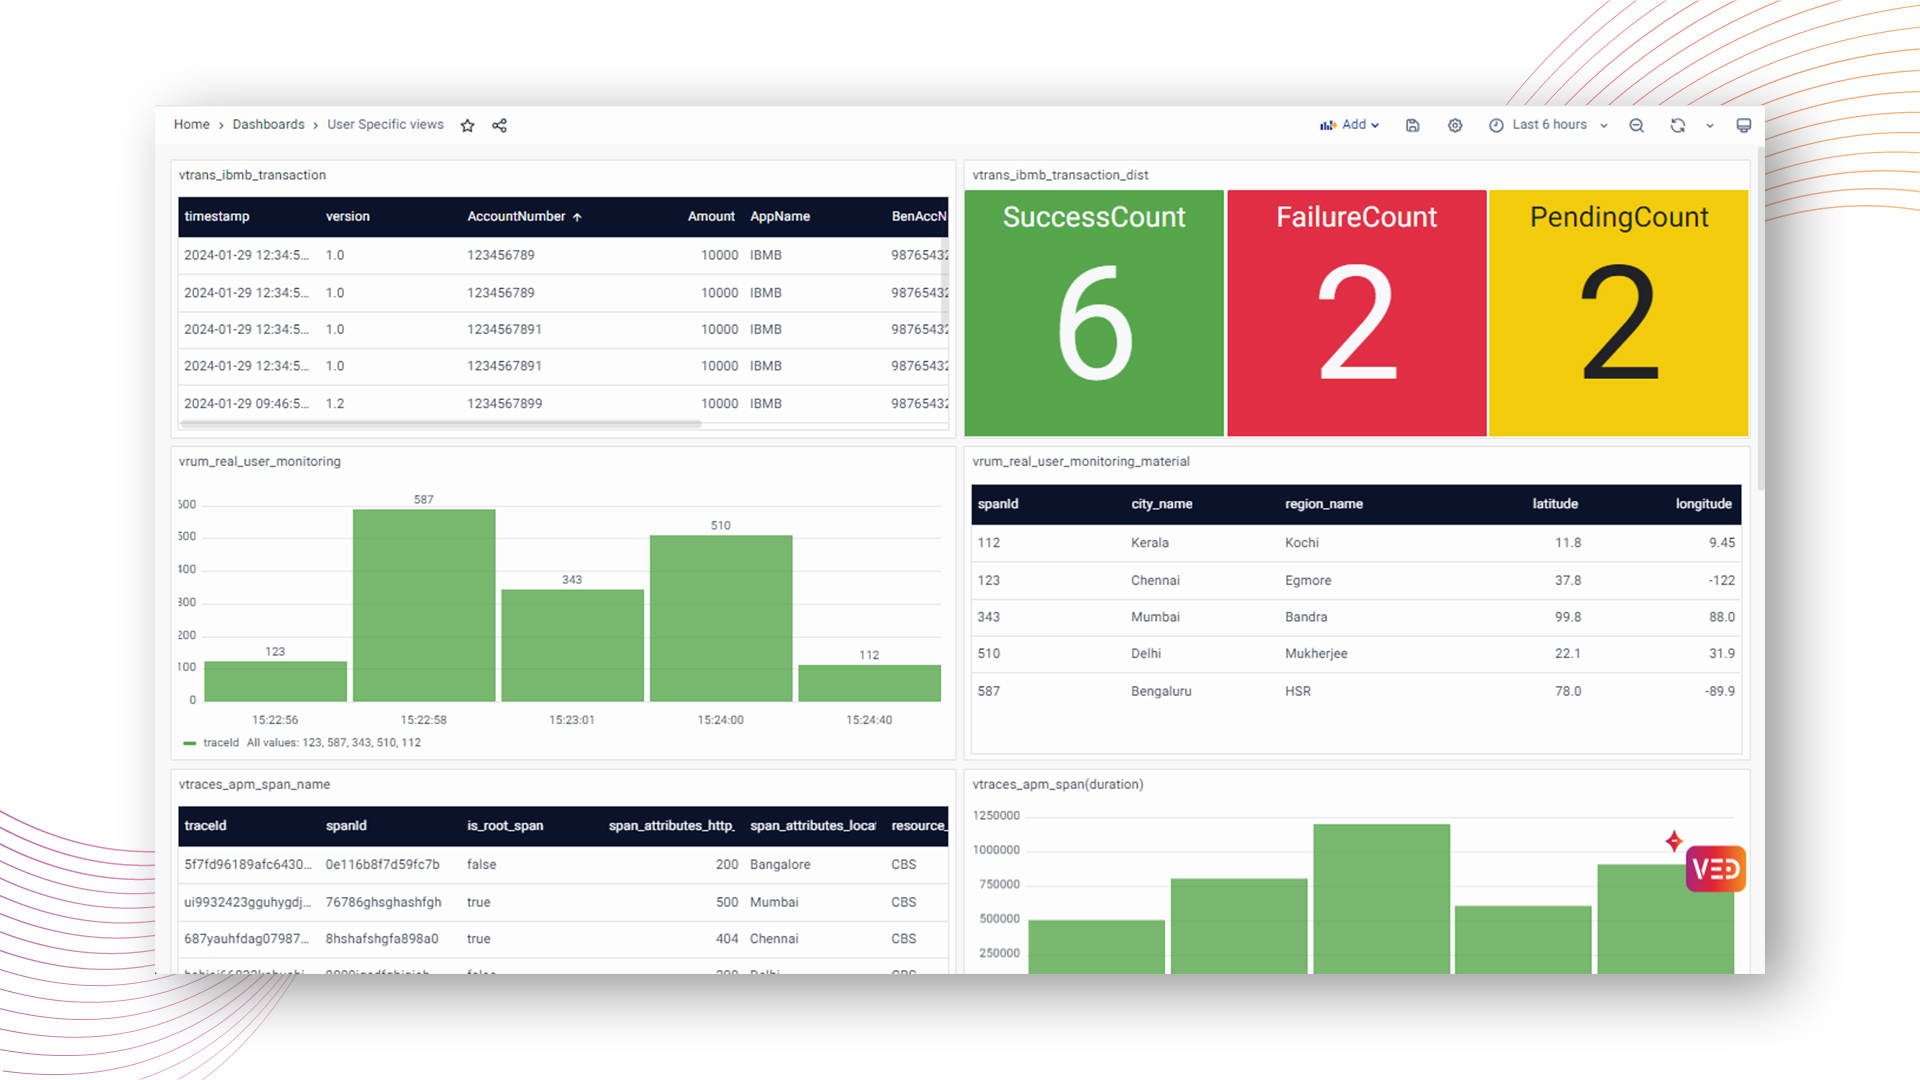
Allow access to specific Data Sets
With the "Allow access" policy, users can meticulously choose data categories and grant access to specific datasets, fostering a streamlined approach to viewing tailored data while adhering to organizational data compliance.
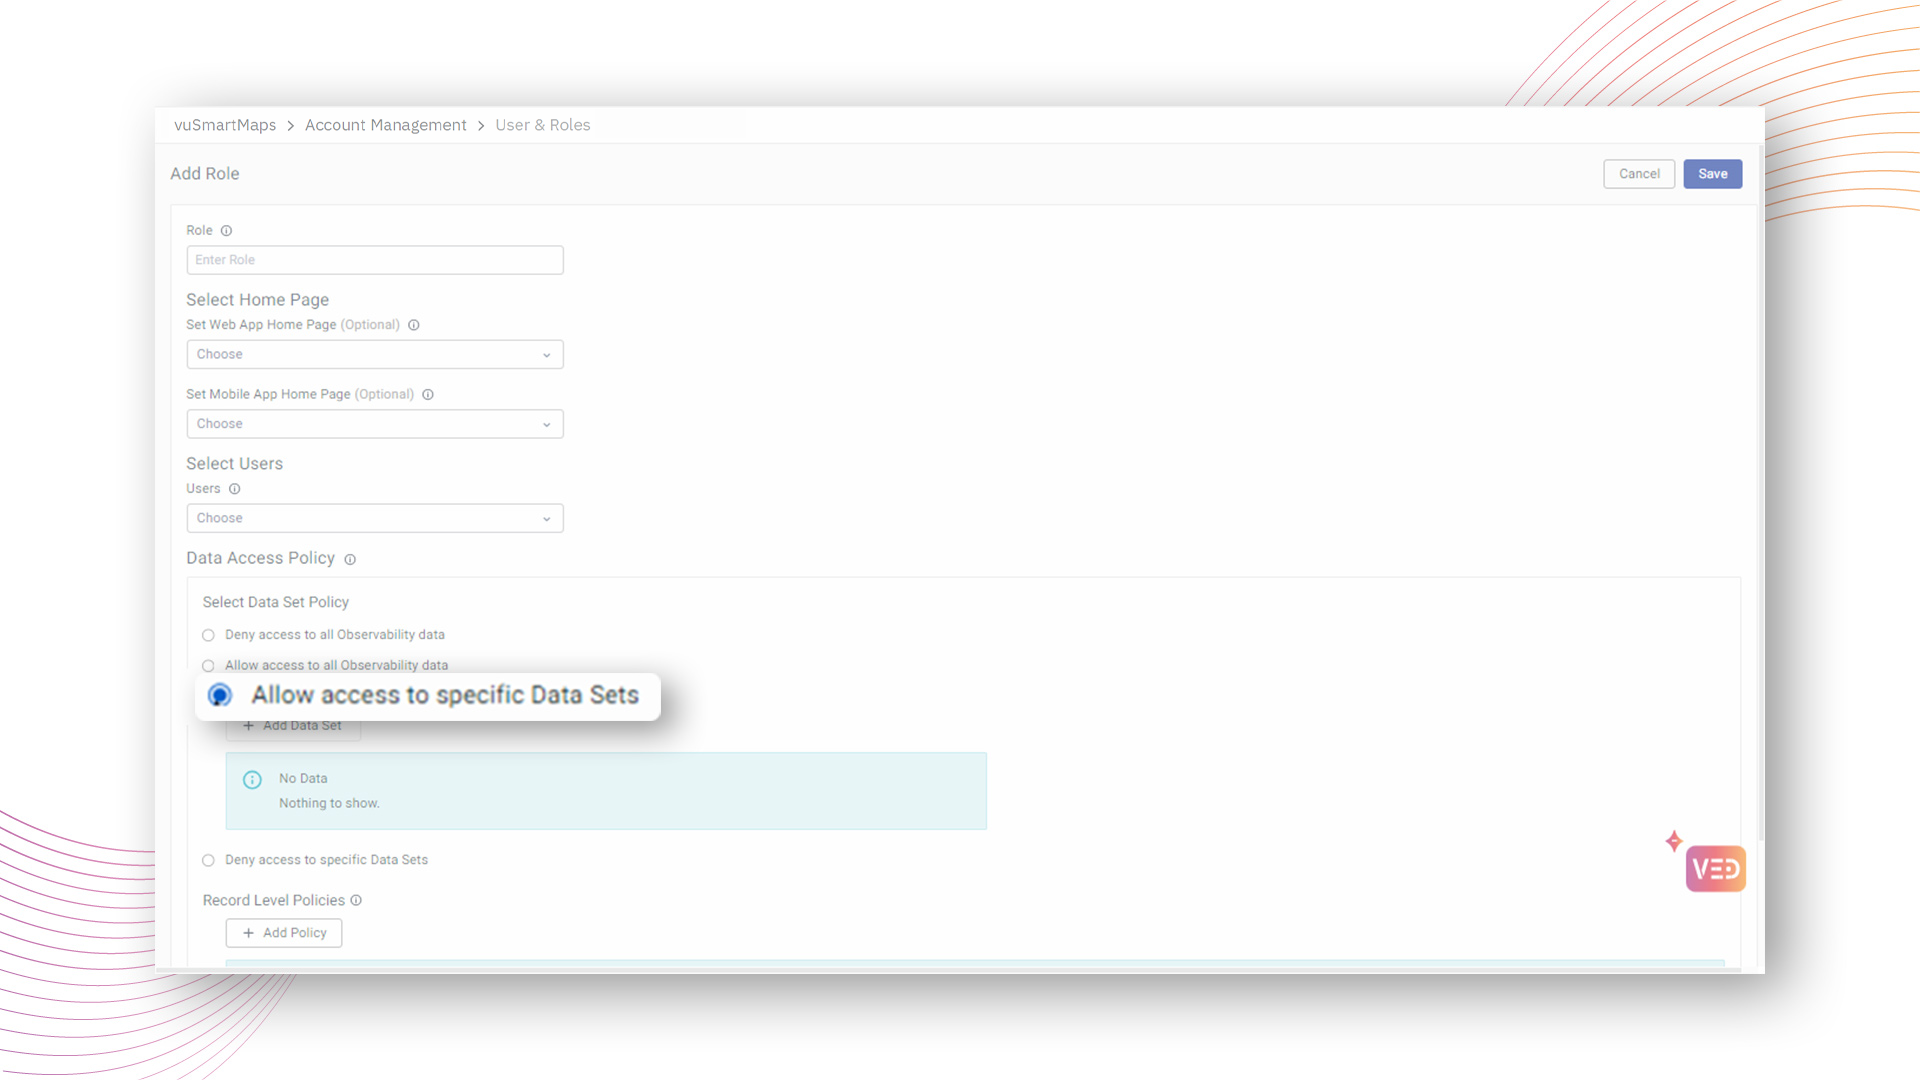
Users have the flexibility to select desired datasets within predefined categories such as Traces, RUM, Logs, Metrics, Events, and Transactions, or even opt for a custom dataset.
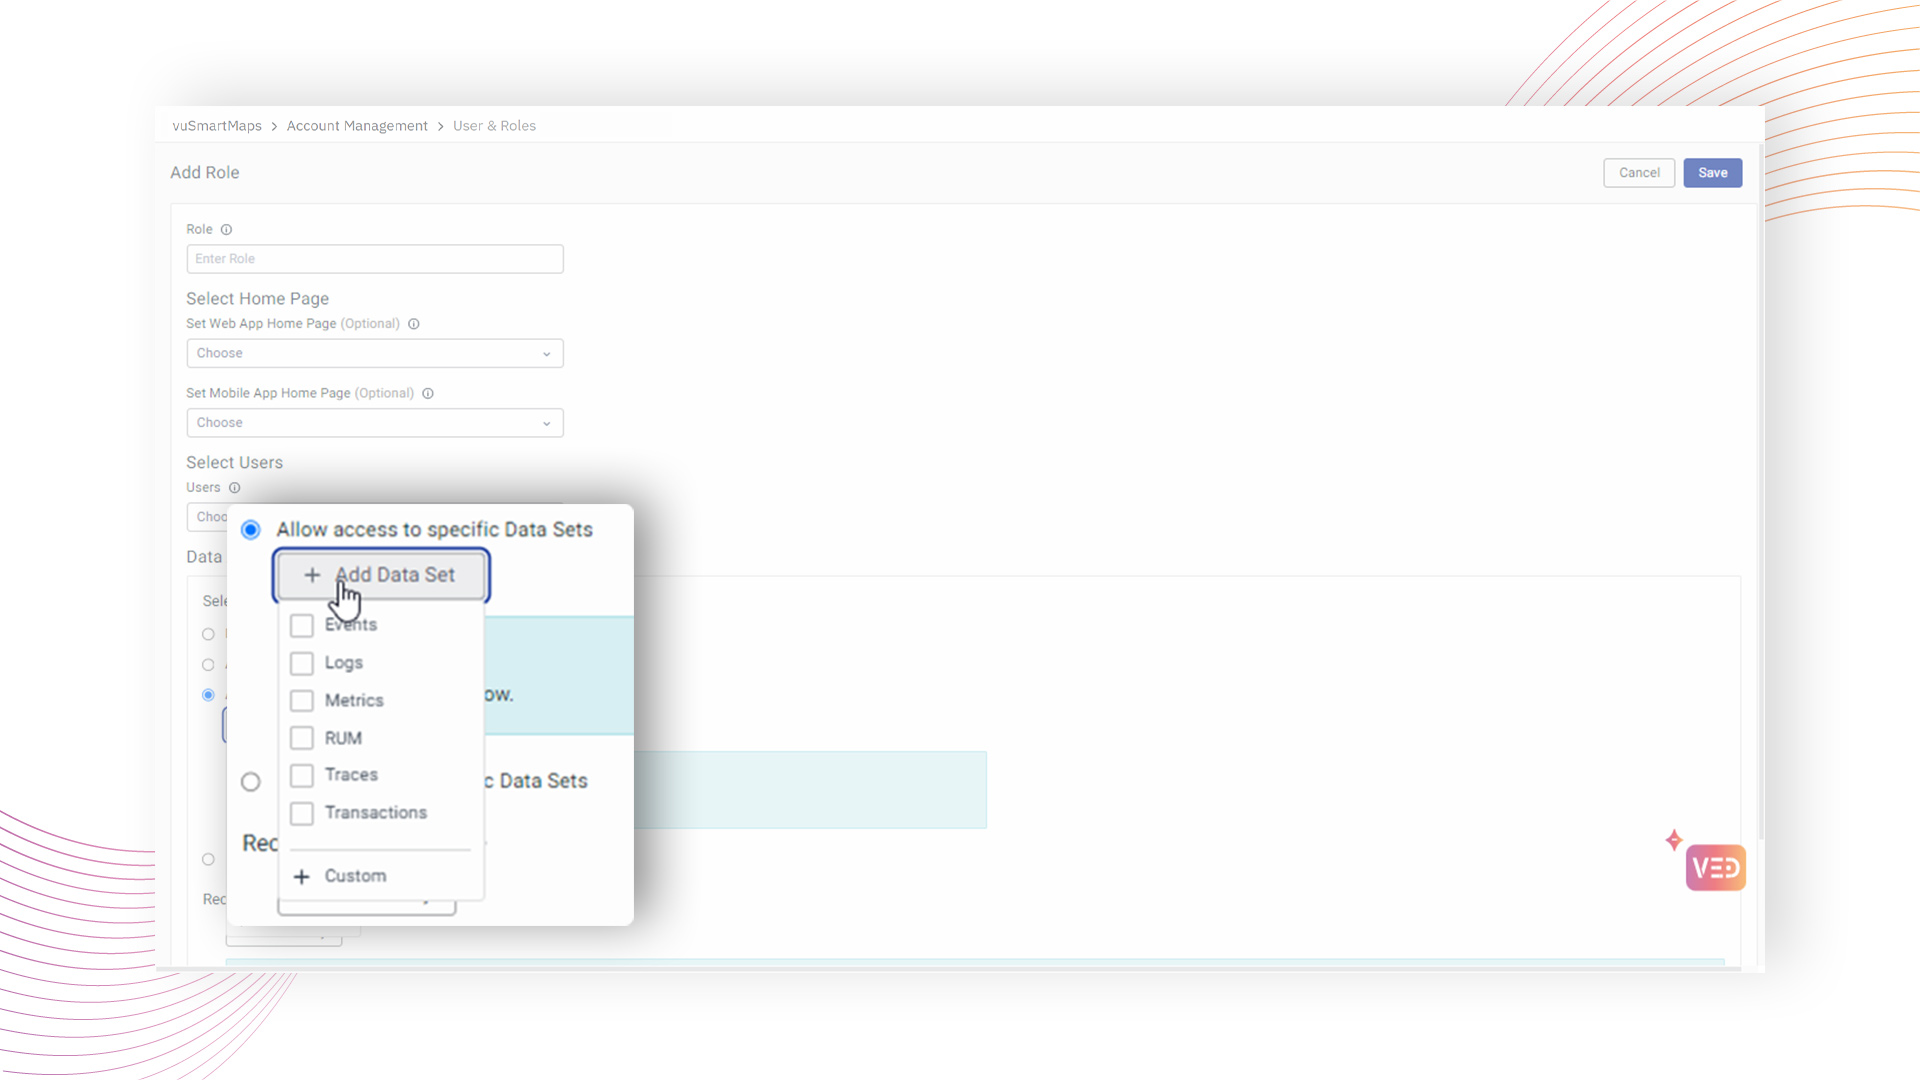
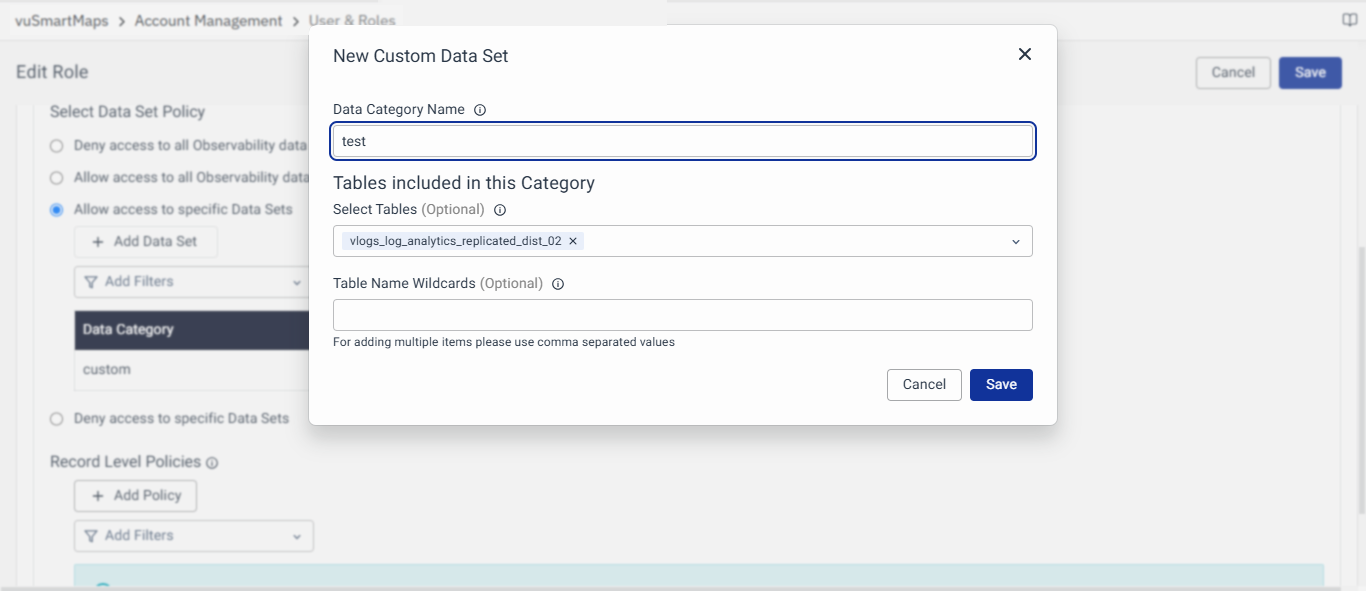
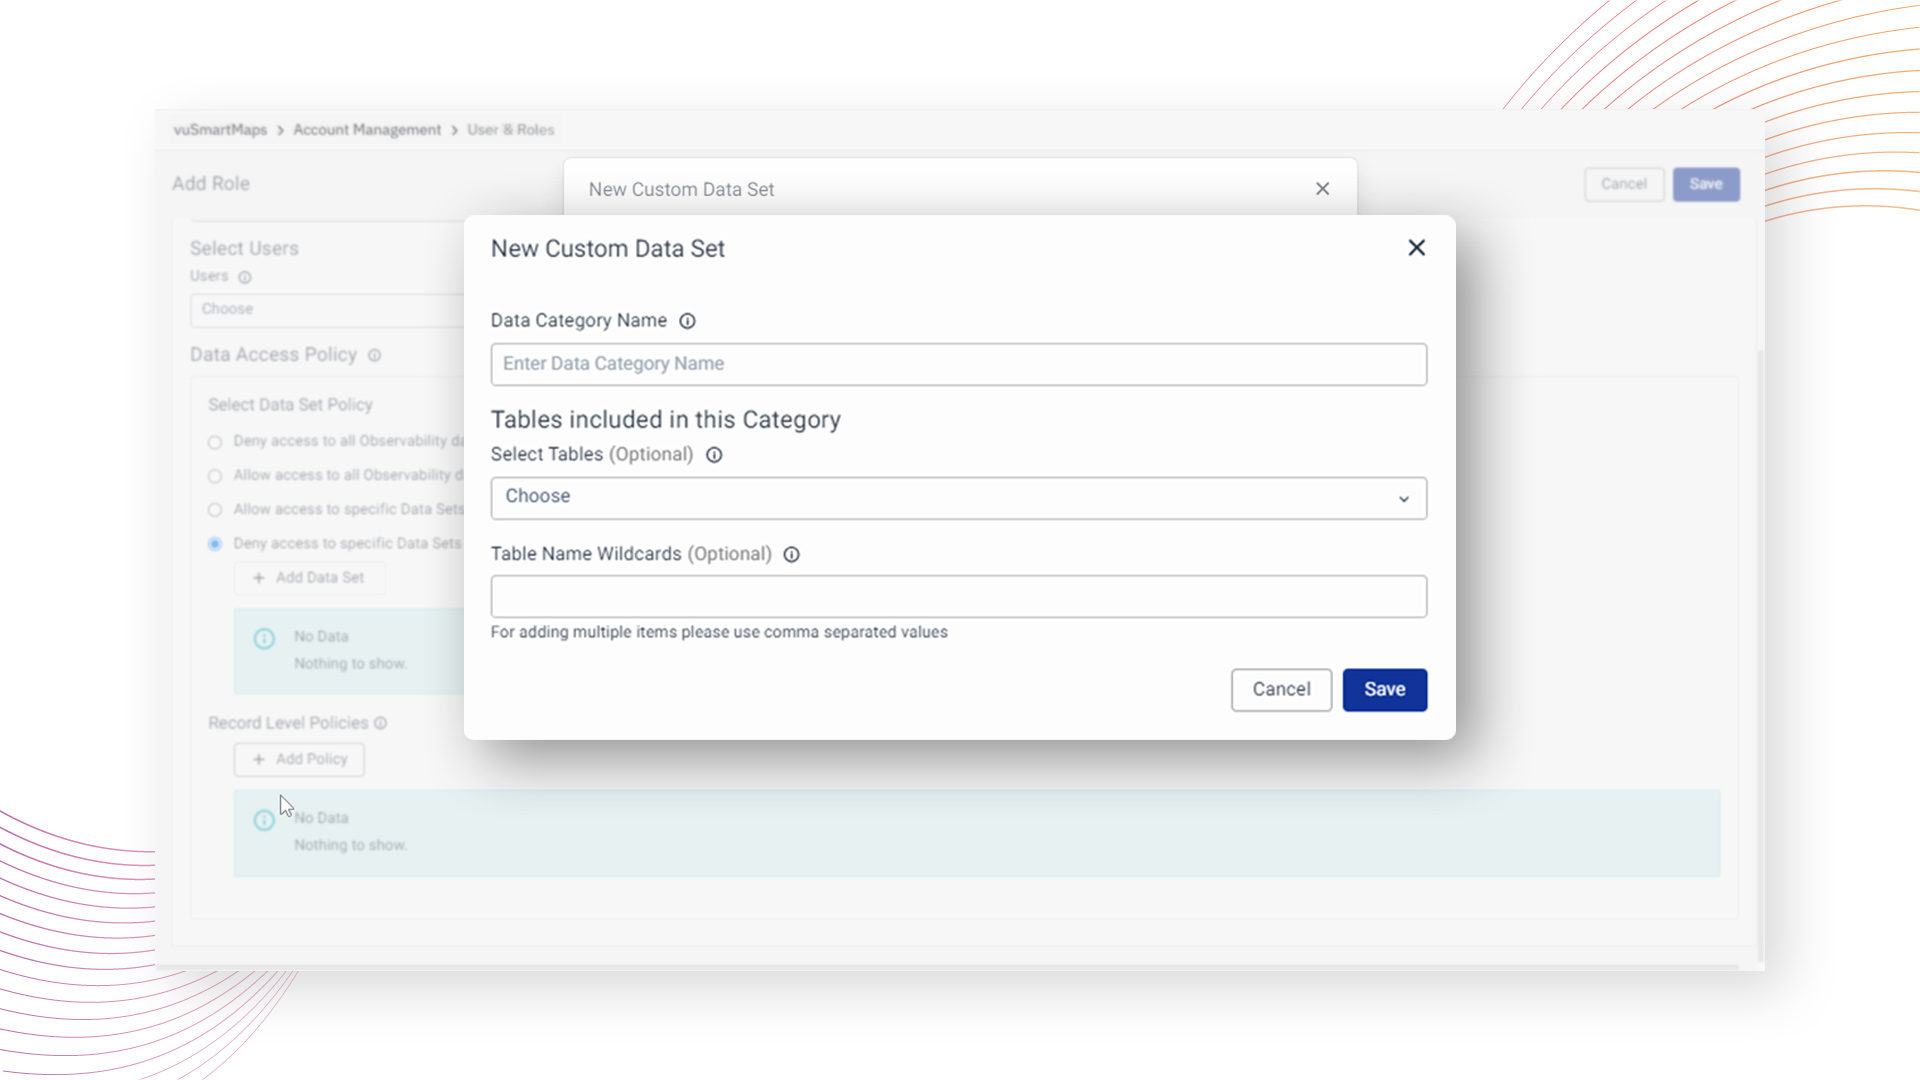
In the case of a "Custom" category selection, users can create a custom category with a designated name and choose specific tables for access.
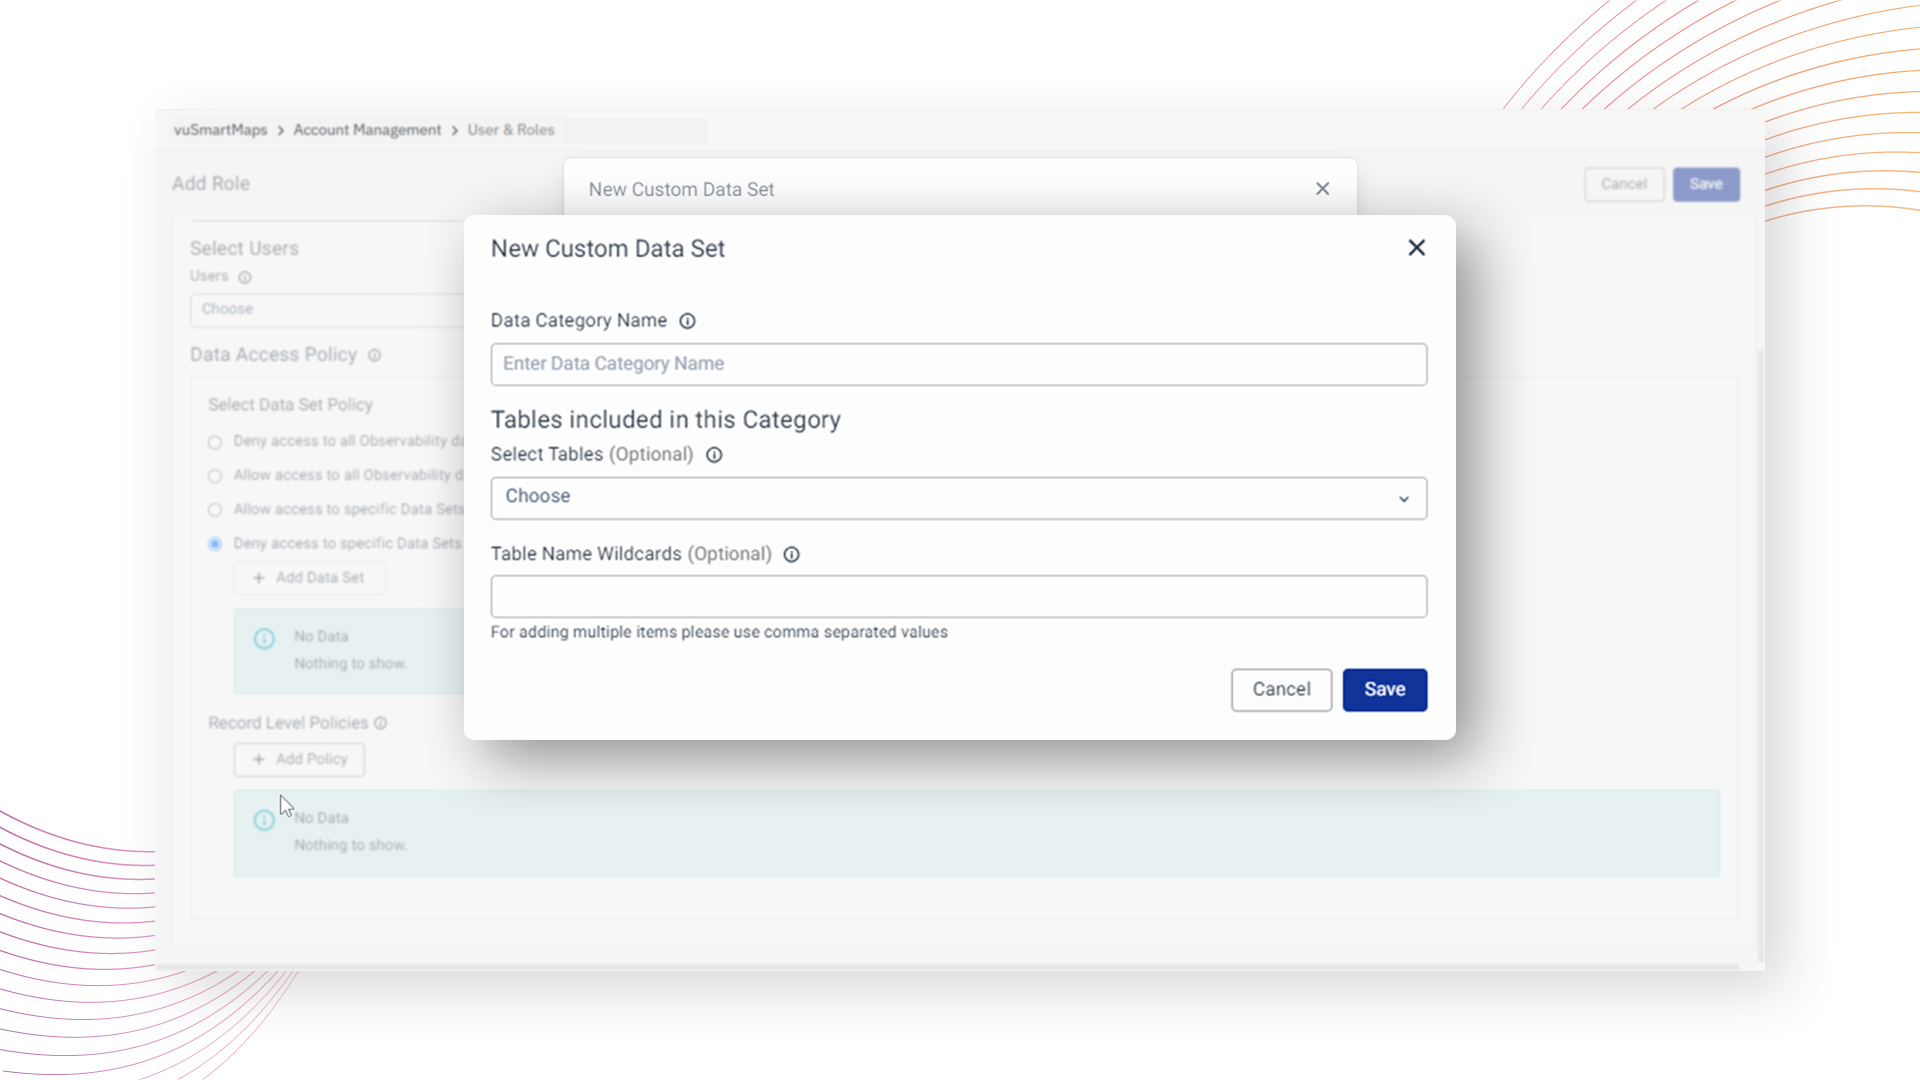
Example:
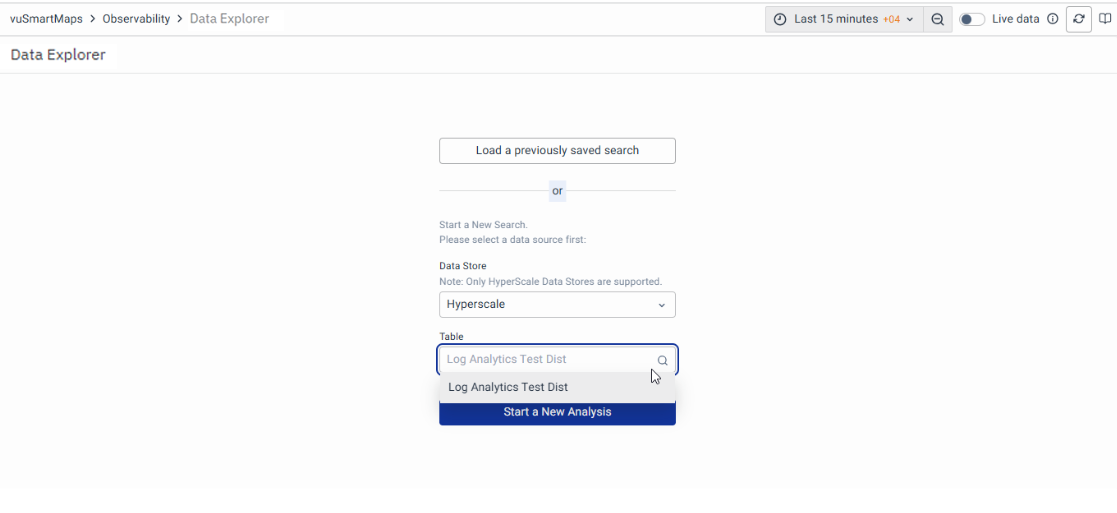
Imagine a user assigned a role configured with the "Allow access to specific Data Sets" policy, within the "custom" data category, allowing access to the particular log table.
In this scenario, when the user accesses the Data Explorer module, the system will list only the log tables the user can view. While other log tables outside the user's access scope will be excluded. This ensures secure and compliant access, allowing the user to view only the relevant log data as per the configured policy.
Deny access to specific Data Sets
By adopting the "Deny access" policy, users can define access restrictions, enhancing security measures through a user-friendly interface within vuSmartMaps.
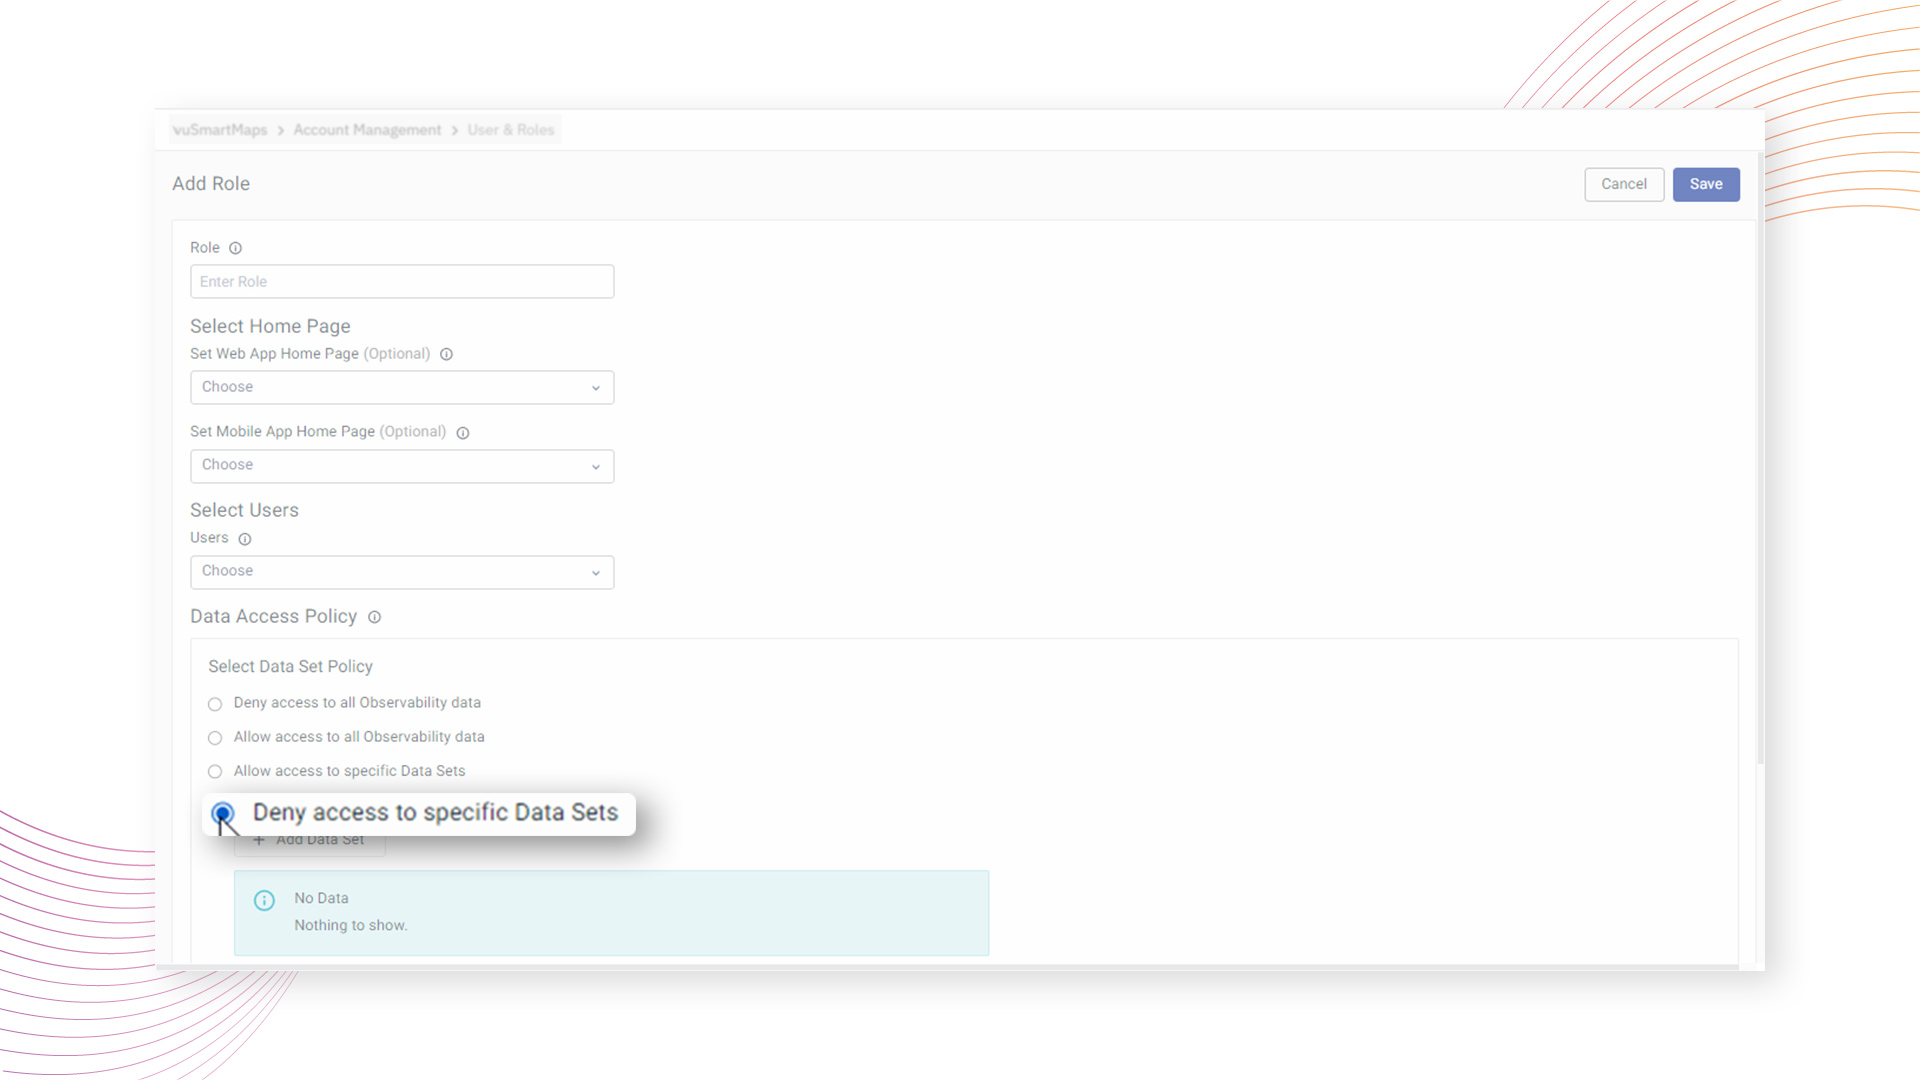
Upon selecting the policy, users are empowered to choose one or more data categories for denial, ensuring a tailored approach to access control. For instance, an administrator aiming to limit data access for a specific role in the APM data category can seamlessly select the APM category under the "Deny Access to specific data category" policy.
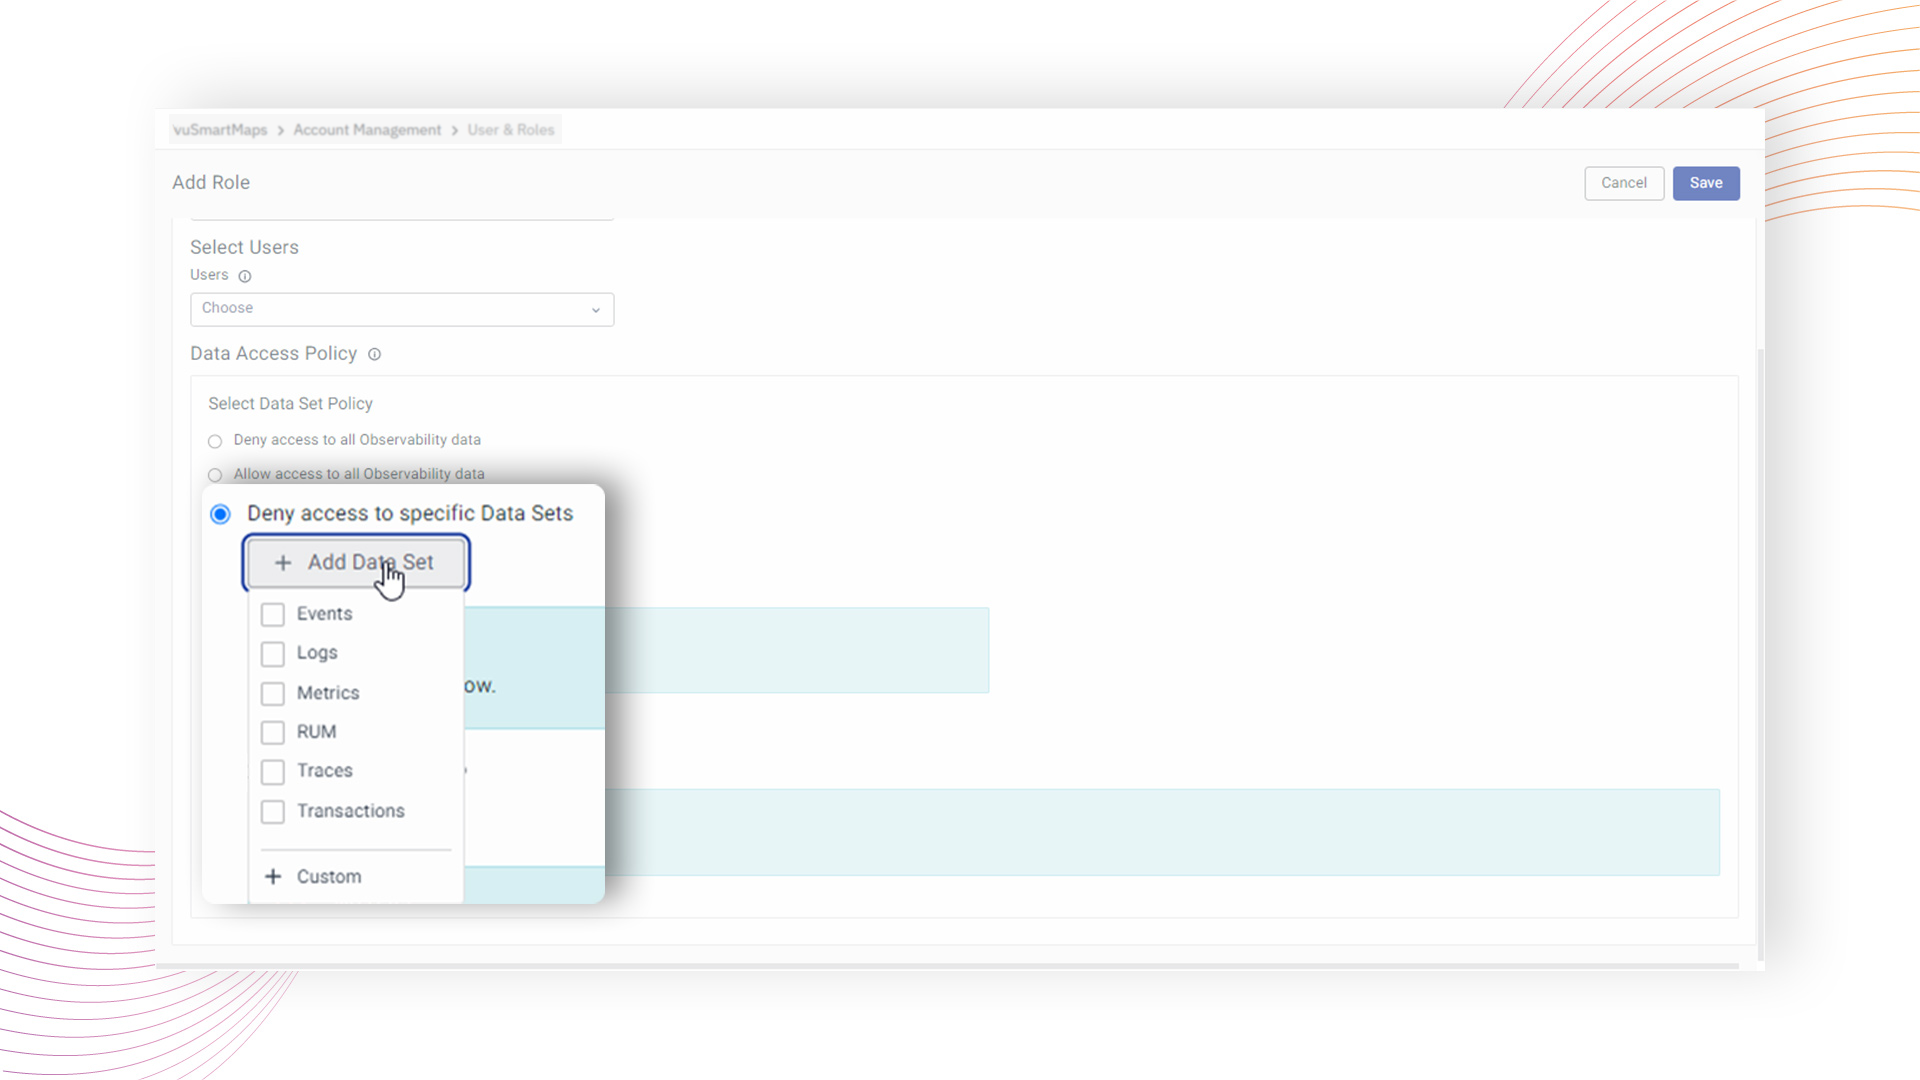
In cases where a "Custom" category is chosen, users are provided the flexibility to create a custom category with a designated name and specify tables to be denied access. vuSmartMaps diligently enforces these access restrictions, actively preventing users associated with the configured role from accessing the restricted datasets.
Example:
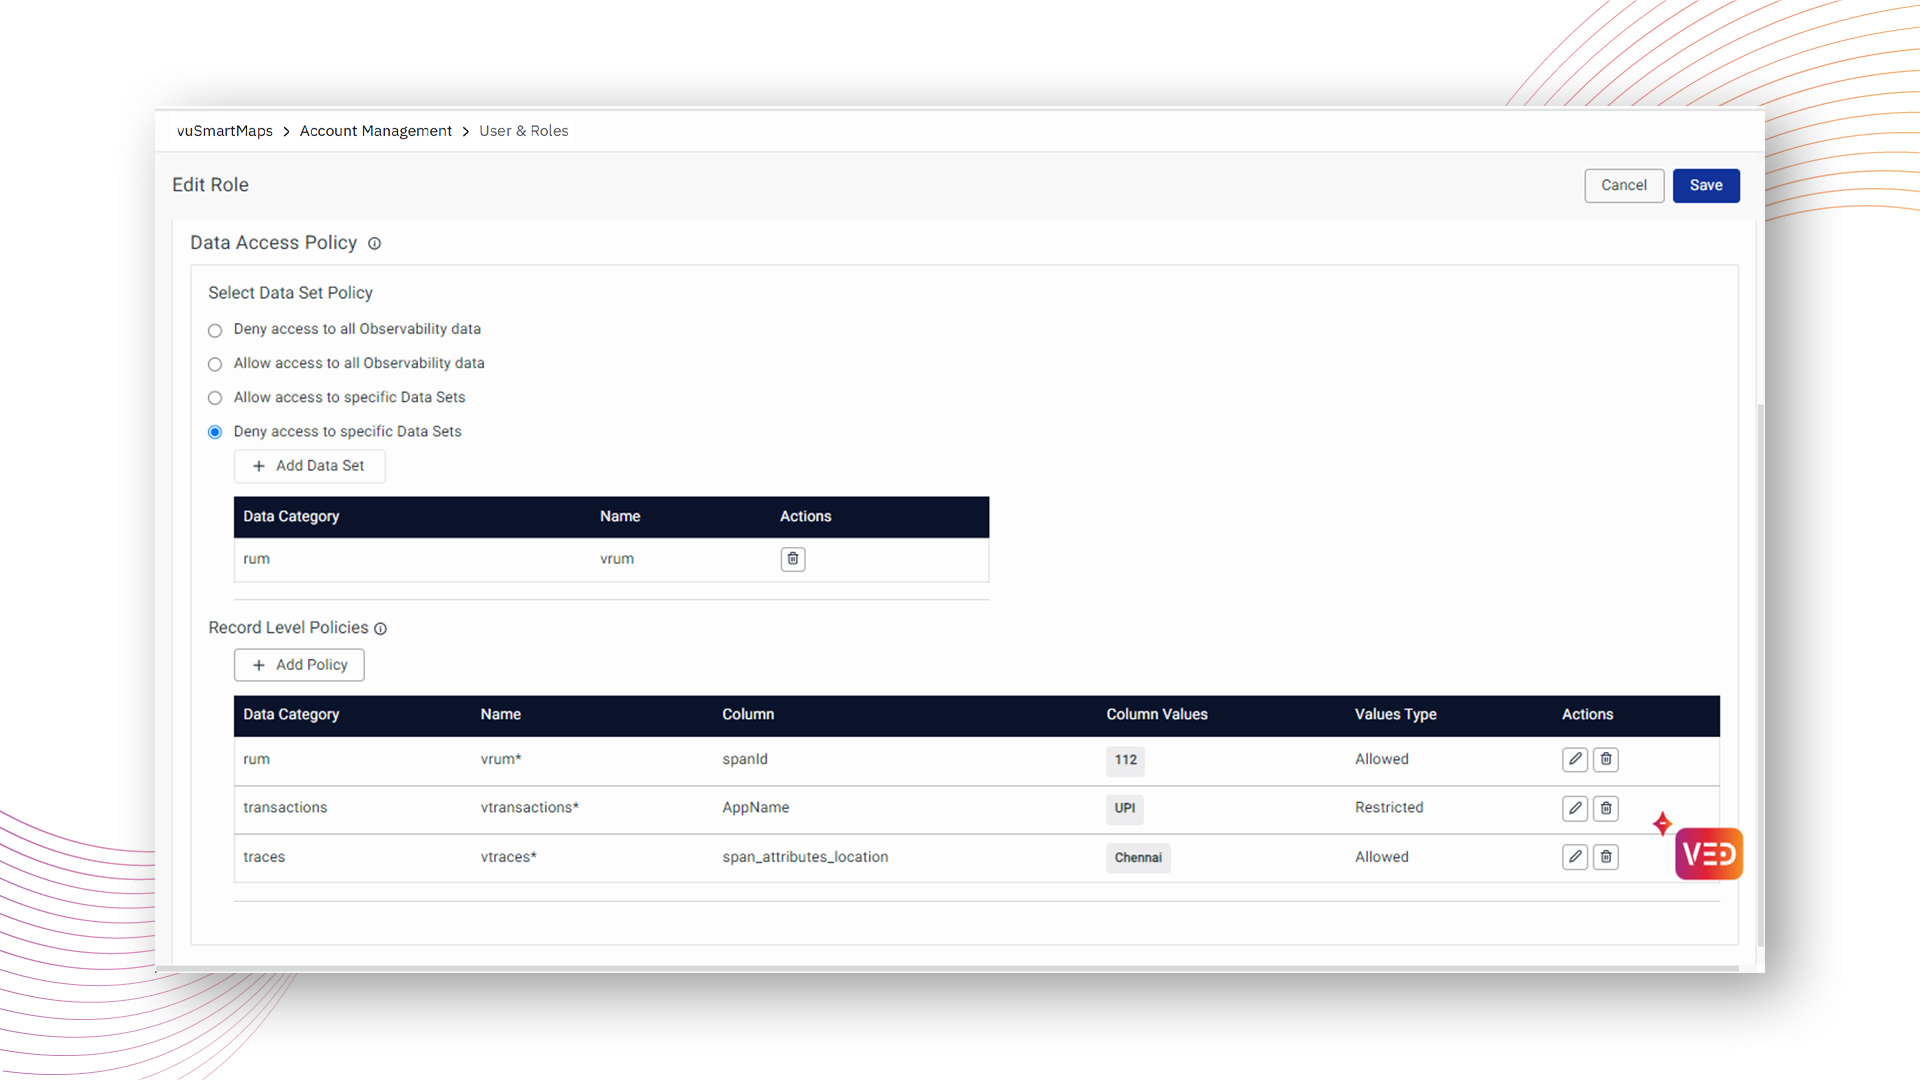
Consider a role configured with the "Deny access to specific Data Sets" policy, denying access to data categories such as transactions, traces, rum, events, and custom.
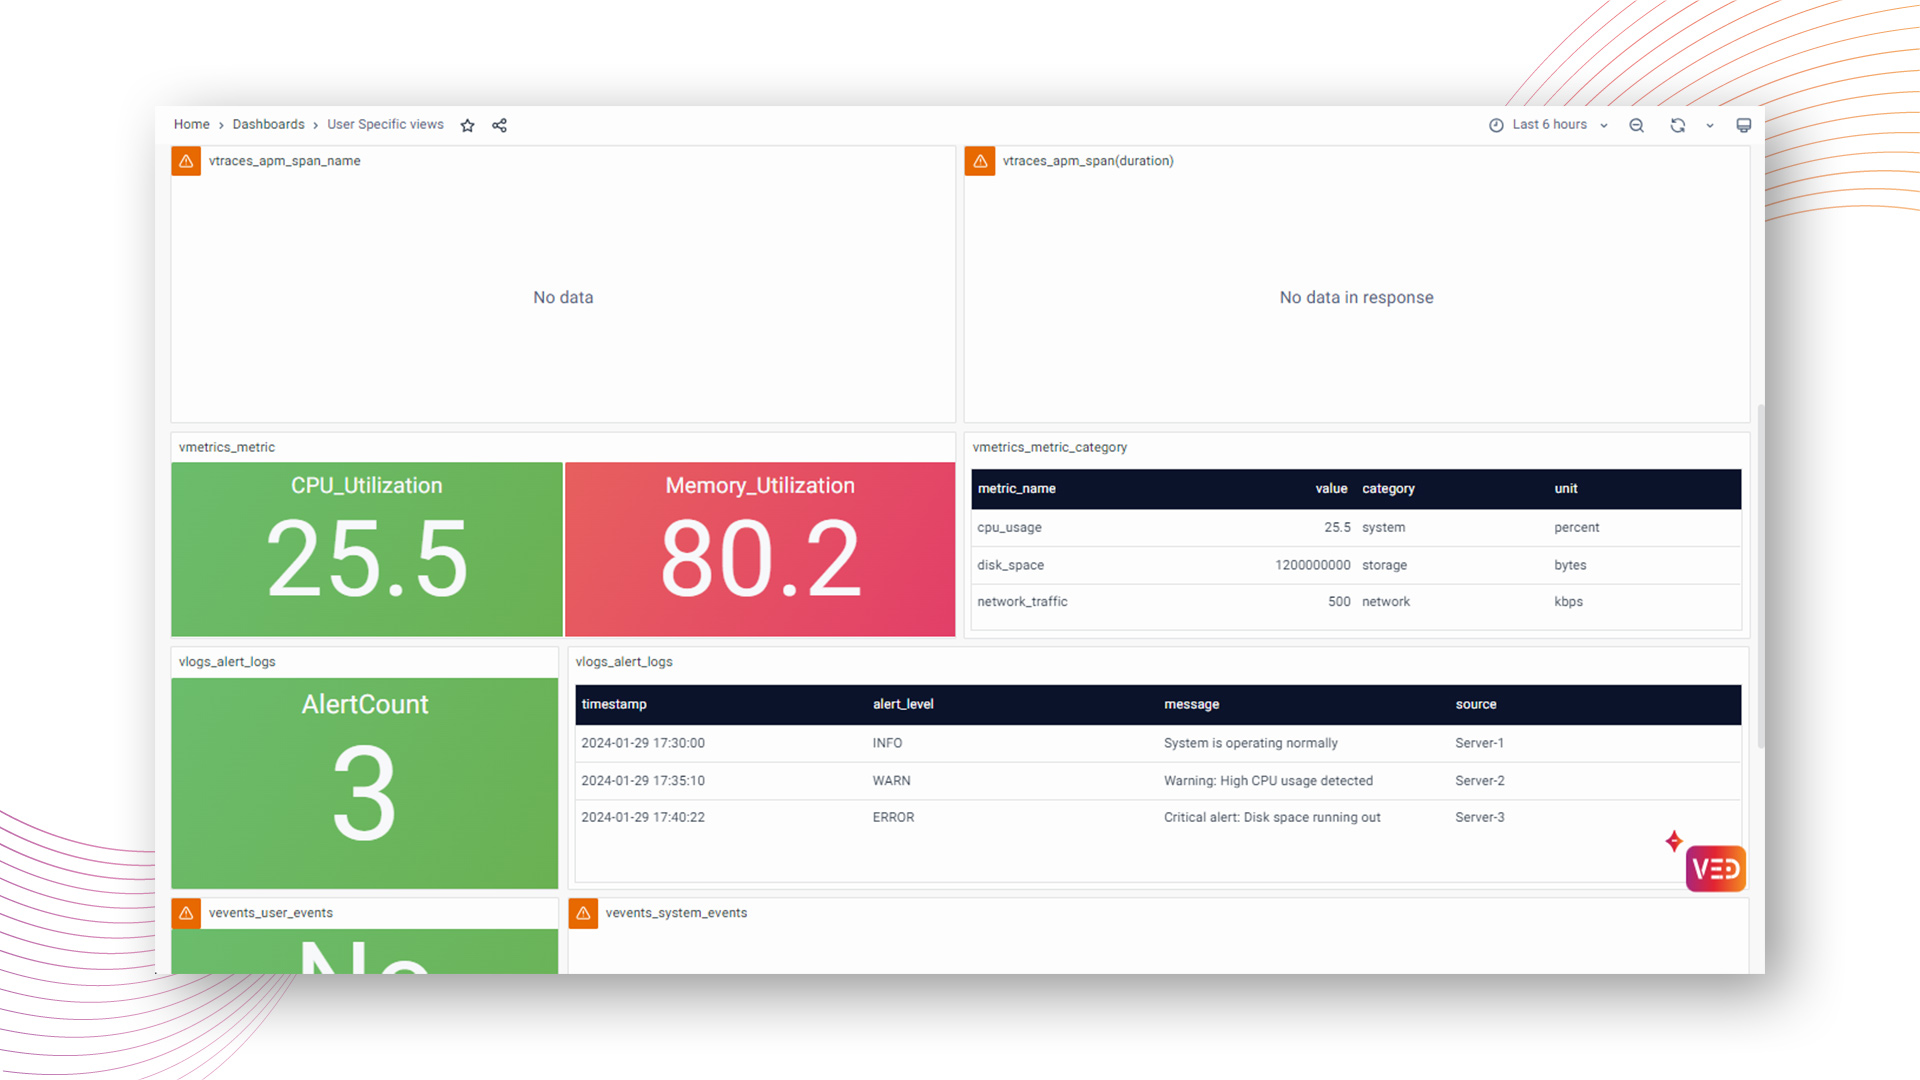
For a user linked to this role, the dashboard will display visible data only for permitted datasets, exemplifying the effective implementation of access restrictions based on the configured policy.
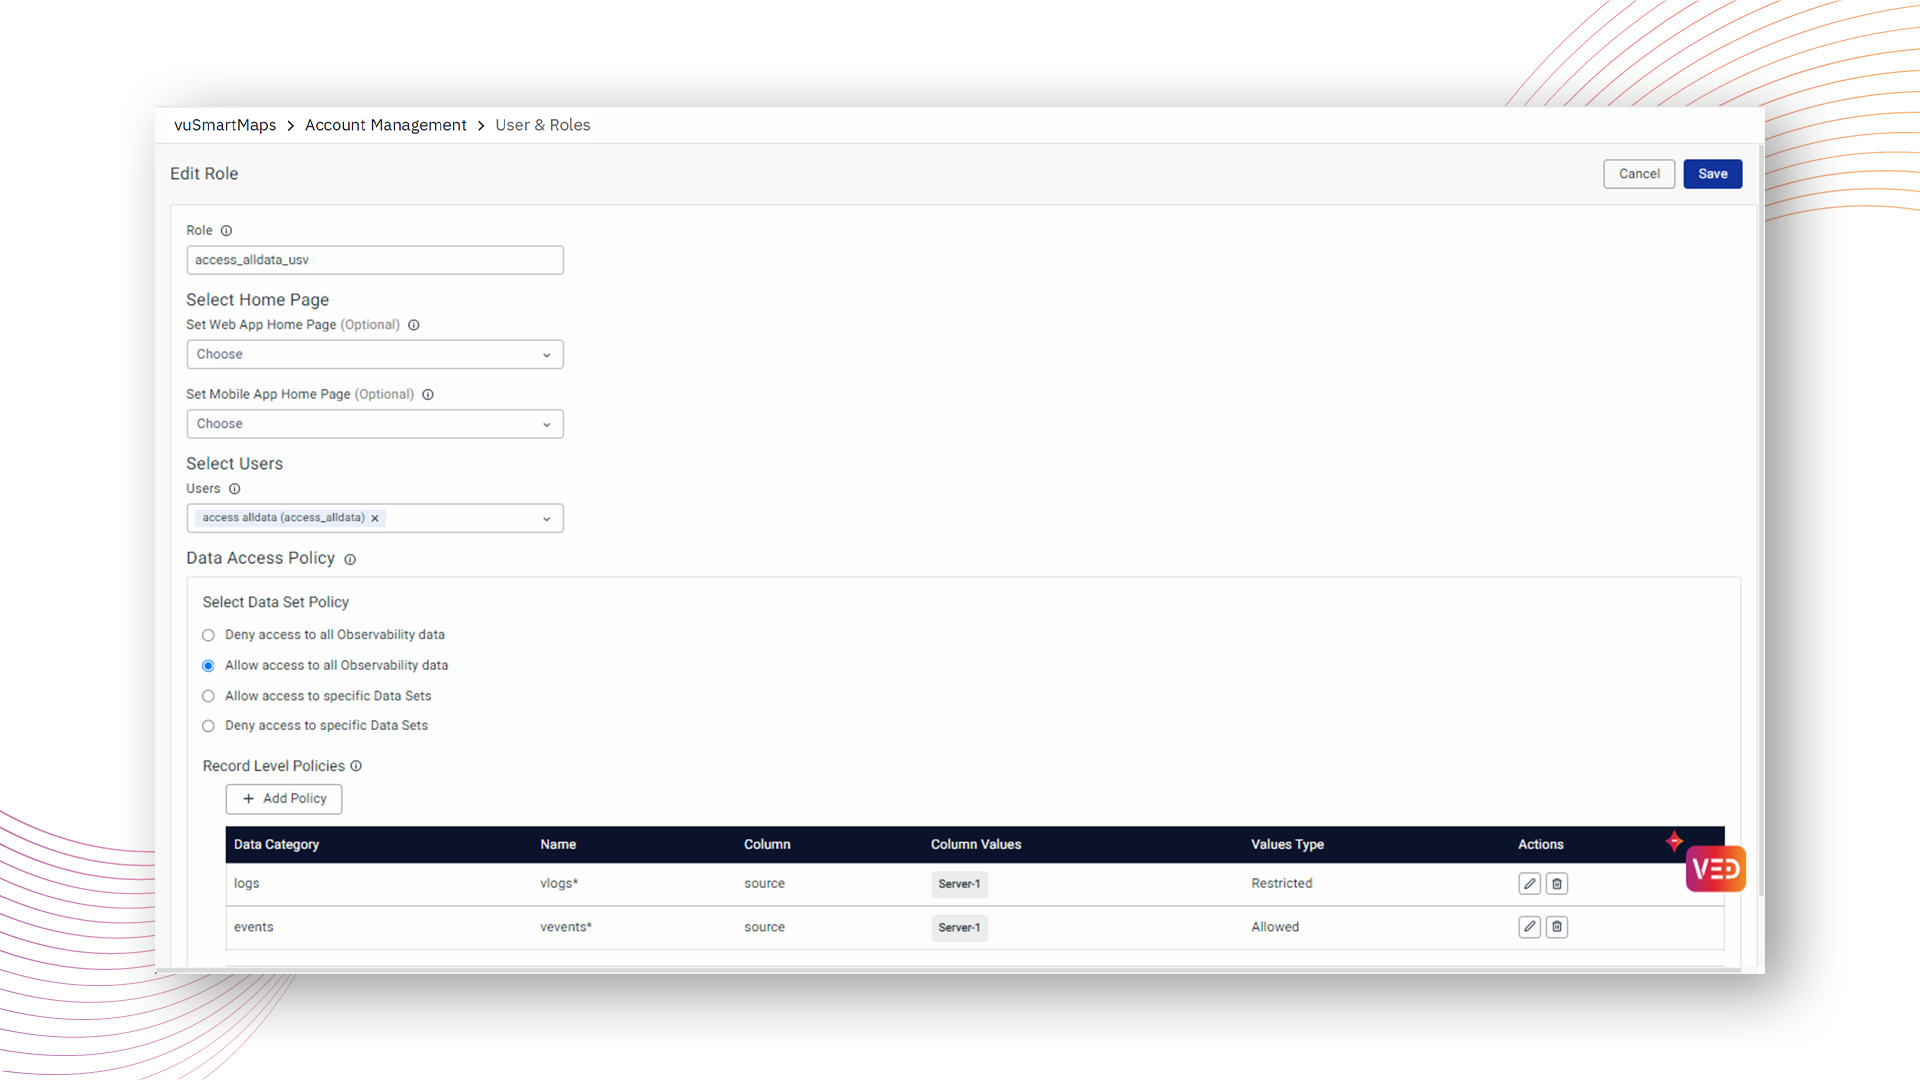
In addition to data set policies, administrators can configure record-level policies to enforce more granular access control. Record-level policies allow administrators to restrict data based on specific column values within tables.
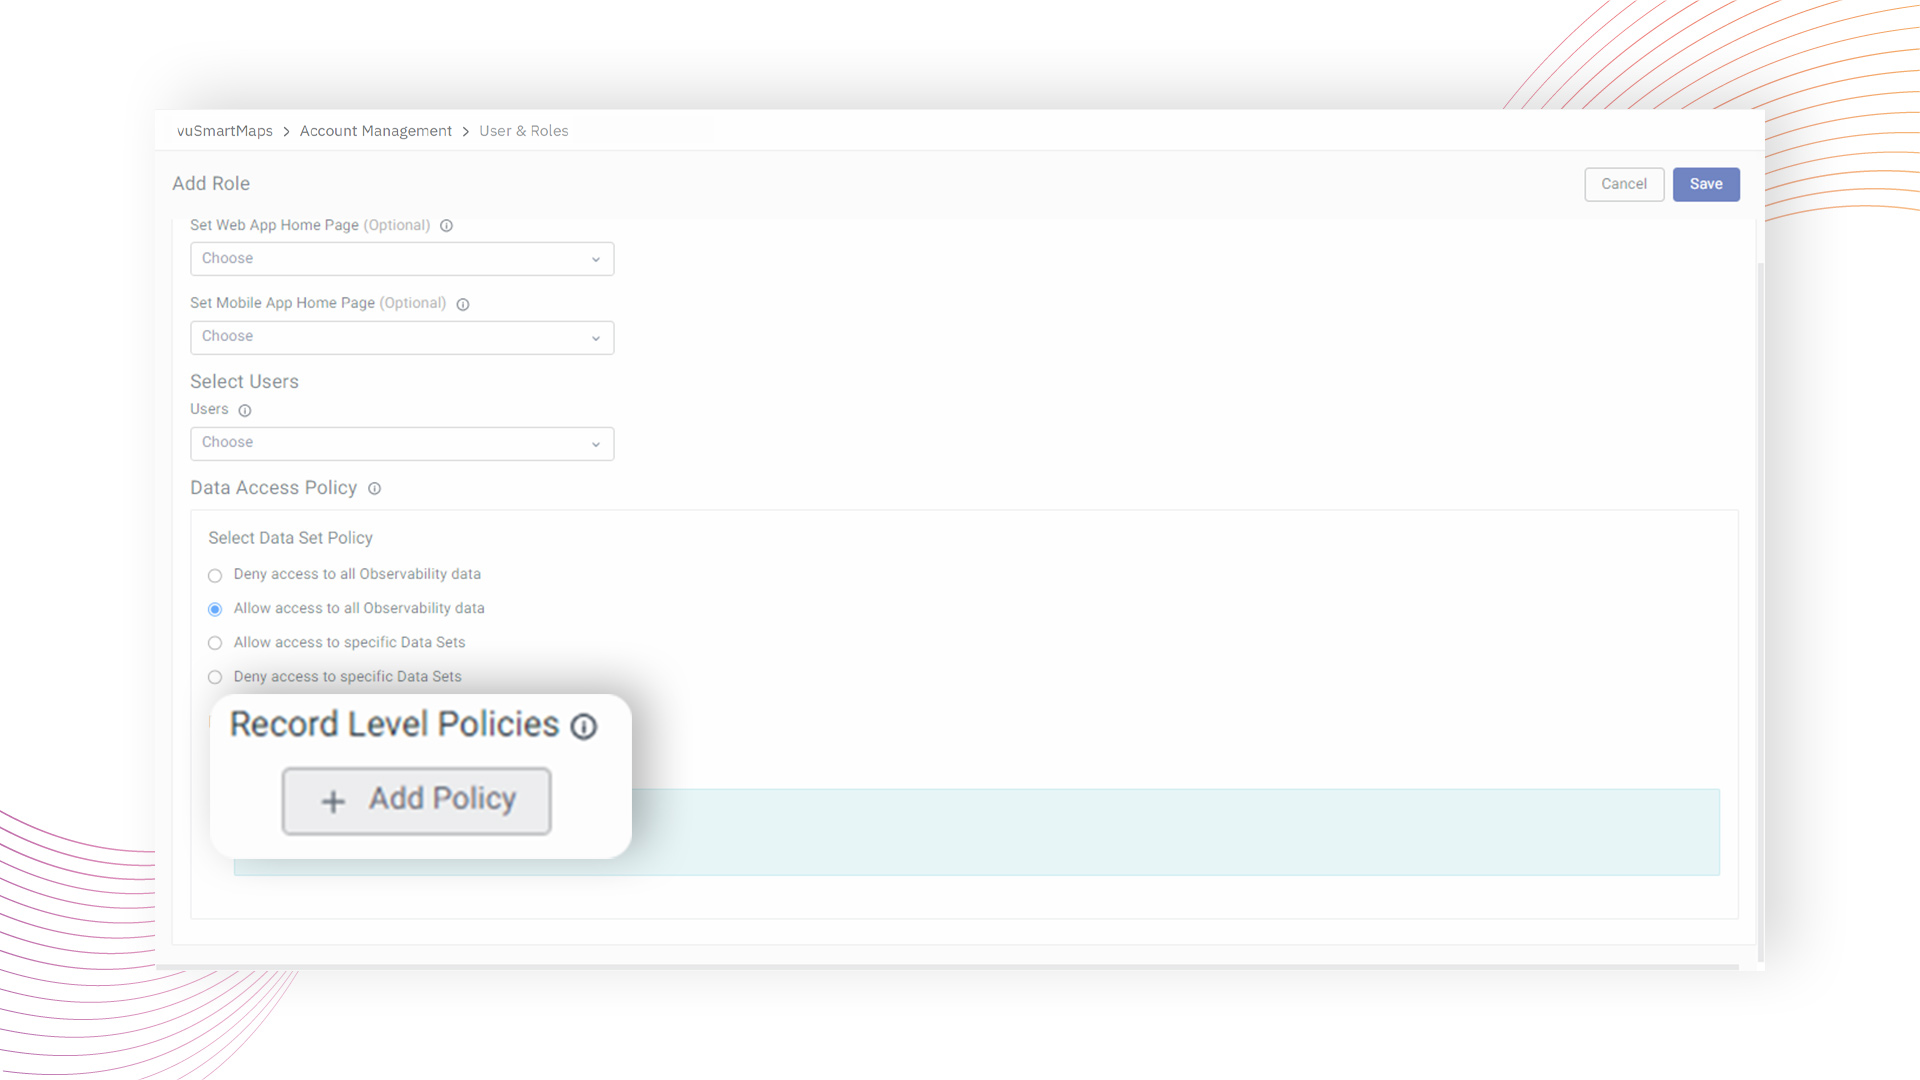
Administrators can initiate the creation of a new access policy by clicking on the + Add Policy button, and selecting the option that leads to policy definition.
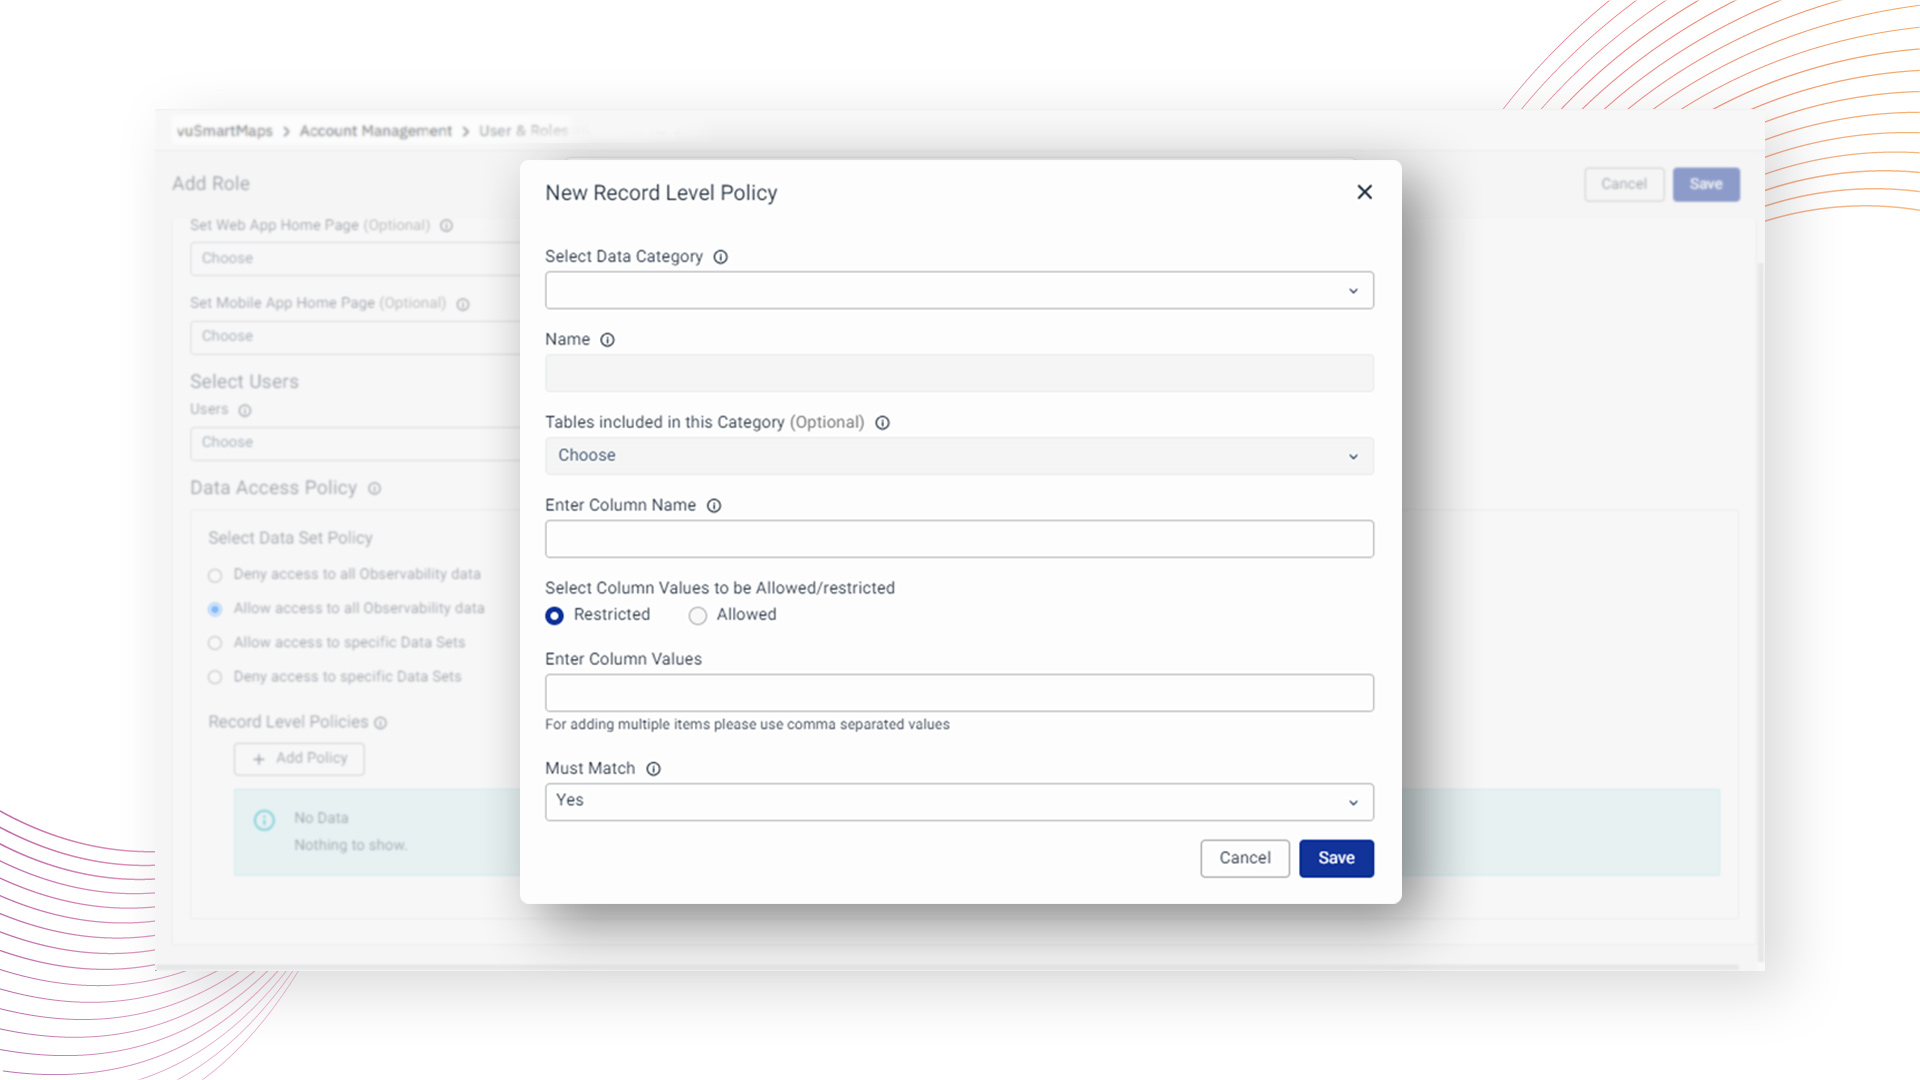
- Navigate to the Record-Level Policy configuration section for the selected role.
- Select the relevant Data Category for which the access policy needs to be created.
- After selecting the data category, the system will automatically populate the Name and Tables fields.
- If Custom is selected as the data category, manually enter the Name and Table Name.
- Enter the Column Name for which the access policy will be applied.
- Choose the required policy type:
- Allow – Grants access to records that match the specified column values.
- Restrict – Denies access to records that match the specified column values.
- Enter the required column values within single quotes and separate each value with a comma. Example: 'John, Smith', 'Ram'.
- If the Restrict access policy is selected, specify the Must Match option by choosing Yes or No, depending on the required access behavior.
- Save the configuration to apply the record-level access policy.
When a Restrict access policy is applied to a column, users assigned to the corresponding role will be denied access to records that match the specified criteria in the defined column within the selected Data Category.
Example: Consider a scenario where the role denies access to the "rum" data category. Record level policies are then configured to allow access for "span id 112" in "rum," restrict access for "appname UPI" in "transactions," and allow access for "span attribute location chennai" in "traces”.
For the user associated with this role, the resulting dashboard reflects visible and hidden data as per the defined dataset and record-level policies.

What Happens After the Steps
After creating a user
The new user appears immediately in the Users list. They can log in using the username and password set during creation. On login, they land on their configured homepage. Their access is governed by the permissions of their assigned roles.
After creating a role and assigning permissions
The role is immediately active. Any user assigned to this role now has the permissions you configured. Updates to a role's permissions take effect for all users in that role the next time they interact with the platform.
After configuring a Data Access Policy
Users in that role will only see observability data matching the policy. Dashboard panels that draw from blocked data categories will show no data for those users. Other panels drawing from permitted categories will work normally.
After deleting a user or role
Deleted users lose access immediately. Deleted roles are removed from all users who were assigned to them. Those users retain access through any remaining roles they still belong to.
Tips and Best Practices
- Design roles around job functions, not individuals. Roles like 'NOC_Operator' or 'Payment_Analyst' are easier to manage than roles created per person. When a new team member joins, simply assign them the correct existing role.
- Prefix LDAP roles with 'Vunet-'. For organisations using LDAP or Active Directory, prefix roles intended for vuSmartMaps with 'Vunet-' (for example, 'Vunet-NOC'). This ensures only relevant roles are pulled during LDAP synchronisation and reduces unnecessary role imports.
- Set default homepages at the role level. This reduces maintenance effort. Only override at the user level if a specific individual has genuinely different needs from their team.
- Audit access regularly. Use the export feature on the Users tab to download the full user list in CSV format and review it periodically for stale accounts.
- Test a new role before assigning it to a team. Create a test user, assign the new role, and log in as that user to verify the correct dashboards and modules are visible.
- Use Bulk Permission Management for large role setups. When configuring object-level permissions for a role that needs access to many dashboards or alert rules, use bulk selection to save time.
- Apply the least-privilege principle. Start with the most restrictive Data Access Policy and open up access only as needed. It is safer to add access later than to remove it after users have already seen restricted data.
Troubleshooting
-
Issue: A user can log in but all dashboards are empty.
- Possible Cause: The Data Access Policy on the role set as the user’s Role for Data Store Access Control may be set to Deny all.
- Solution: Check the Data Access Policy on the role set as the user’s Role for Data Store Access Control. If it is set to Deny all, the user will see no data. Update the policy to the appropriate setting.
-
Issue: A user cannot see a specific dashboard they should have access to.
- Possible Cause: The dashboard may have object-level permissions configured, and the user’s role may not have View permission for that dashboard.
- Solution: Check whether the dashboard has object-level permissions configured. The user’s role may not have been granted View permission for that dashboard. Go to Roles > Edit Object Permissions and update the setting.
-
Issue: A user cannot access a module at all.
- Possible Cause: The user’s role may not have read permission for that module.
- Solution: The user’s role does not have read permission for that module. Go to Roles > Edit Role Permissions and enable the required permission.
-
Issue: A user can see data they should not be able to see.
- Possible Cause: The Data Access Policy on the user’s role may be set to Allow all.
- Solution: Review the Data Access Policy on their role. If it is set to Allow all, change it to Allow specific data sets and select only the appropriate categories.
FAQs
Do I need to create local users if we are using ADFS/LDAP?
If your organization is using ADFS/LDAP for authentication, you typically do not need to create local users. The system will use the existing directory services to manage user authentication. Admin users can integrate vuSmartMaps with LDAP, ADFS.
How can users reset their password if forgotten?
Users can reset their password by clicking the "Forgot Password" link on the login page. They will need to follow the instructions sent to their registered email to reset their password. Alternatively, an admin user with the write permission to the User Management module can reset your password.
I have only view access, how do I change my password?
Even with view access, you can change your password by going to your profile settings. Click on your profile picture or name in the top right corner, select "Change Password," and follow the instructions.
However, you will only be able to change your password if your role has the changePassword permission enabled.
If not, the "Change Password" option will appear disabled with a tooltip: "You do not have permission to change password." You can contact the admin in case of absence of permissions.
I'm encountering "permission denied" when accessing alerts. What should I do?
If you receive a permission denied message when accessing some particular module, contact your system administrator. They can review and adjust your permissions to ensure you have the necessary access.
Will my account be locked after multiple failed login attempts?
Currently, vuSmartMaps does not lock user accounts after multiple failed login attempts. However, organizations using ADFS/LDAP may enforce their own lockout policies externally, which would apply to vuSmartMaps authentication.
Can I import users in bulk using a file?
No, we do not currently have a feature to import bulk users. However, you can integrate ADFS/LDAP for authorization if your organization supports this, enabling Single Sign-On (SSO).
How can I add new users to vuSmartMaps?
You can add new team members by navigating to the User Management section and clicking the “+” button on the Users tab to create a new user profile. Assign appropriate roles and a default homepage for web/mobile, and set the Role for Data Store Access Control.
How can administrators configure the default home page for both the Web and Mobile App versions in vuSmartMaps?
How can I configure data access restrictions in vuSmartMaps? For instance, how can I set it up so that only admin users have access to all data, while UPI users are limited to viewing only data related to the UPI application?
While creating or editing roles, you can configure user-specific views to define Data Access Policies and Record-Level Policies to configure access. You can allow or deny access to specific data sets like Traces, Logs, Metrics, etc., and even set restrictions based on column values.
How can I create a role with permission to create users?
Post creating a new user role, you can click on the Edit Role Permissions icon in the 'Action' column in the User Role listing table. In this, you will find 'User Management' as one of the permissions. You can enable the read or write permissions based on your need and save your preferences.
What are object-level permissions in vuSmartMaps and how do they work?
Object-level permissions allow fine-grained access control to specific dashboards, reports, alerts, and other objects. Admins can assign View, Modify, or None permissions for each object per role. This enhances data governance by ensuring only authorized roles access specific objects.
Can I assign permissions to multiple objects at once?
Yes. Using the Bulk Permission Management feature, administrators can assign or modify permissions for multiple objects across modules like Alerts, UTM, Reports, etc., from a centralized interface. This saves time and ensures consistency in access control.
Can password change permission be disabled for users?
Yes. Administrators can disable password change functionality by removing the changePassword permission from the user's assigned role. In such cases, the "Change Password" option will appear disabled with a tooltip, and the user will not be able to update their password.
