vuApp360 Deployment & Configuration
vuSmartMaps Configuration: Enabling Distributed Traces Telemetry
Traces O11ySource collects Distributed Traces telemetry from applications to provide comprehensive observability, offering deep insights into application performance through standard applications performance monitoring dashboards.
Enabling Traces O11ySource
- Navigate to O11ySources:
- vuSmartMaps O11ySources can be accessed by navigating from the left navigation menu (Data Ingestion > O11ySources).
- Locate Traces O11ySource on the landing page.
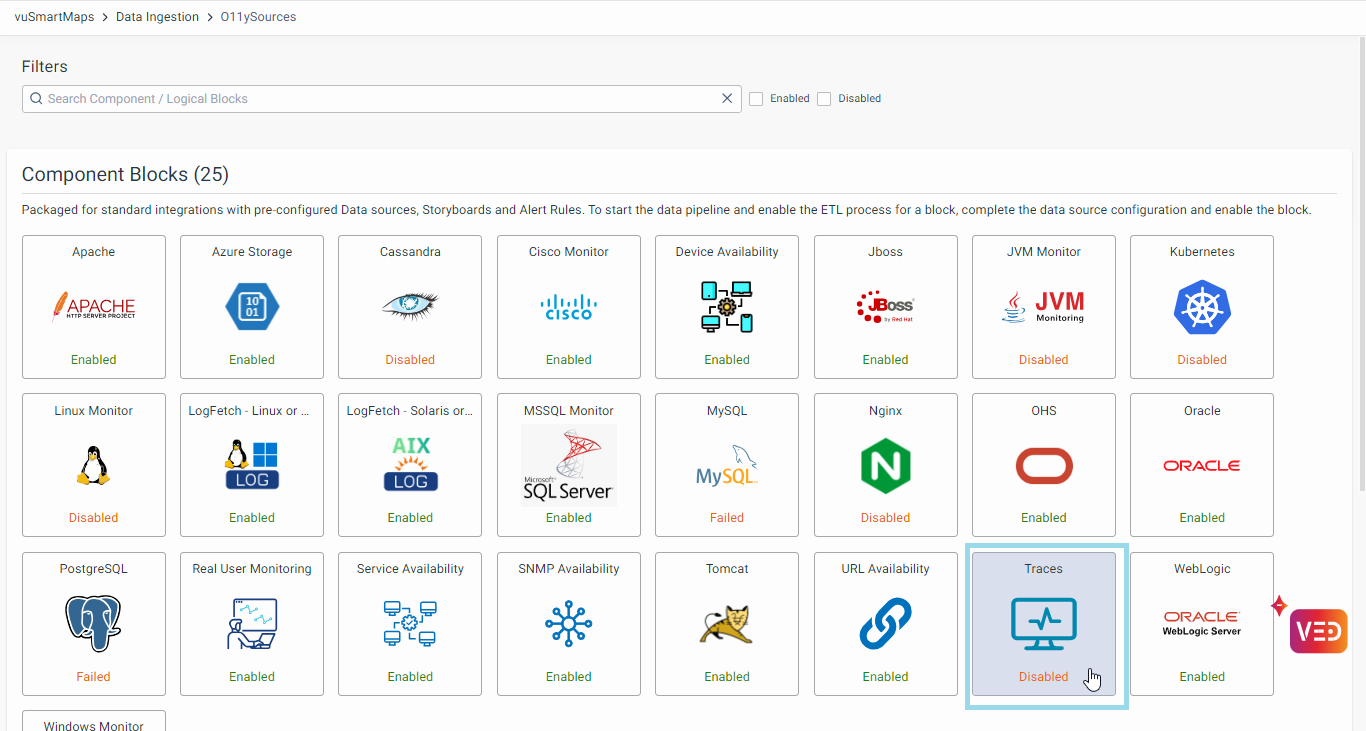
- Enable Traces O11ySources:
- Click the Enable button to activate Traces O11ySource.

Configuring Data Sources
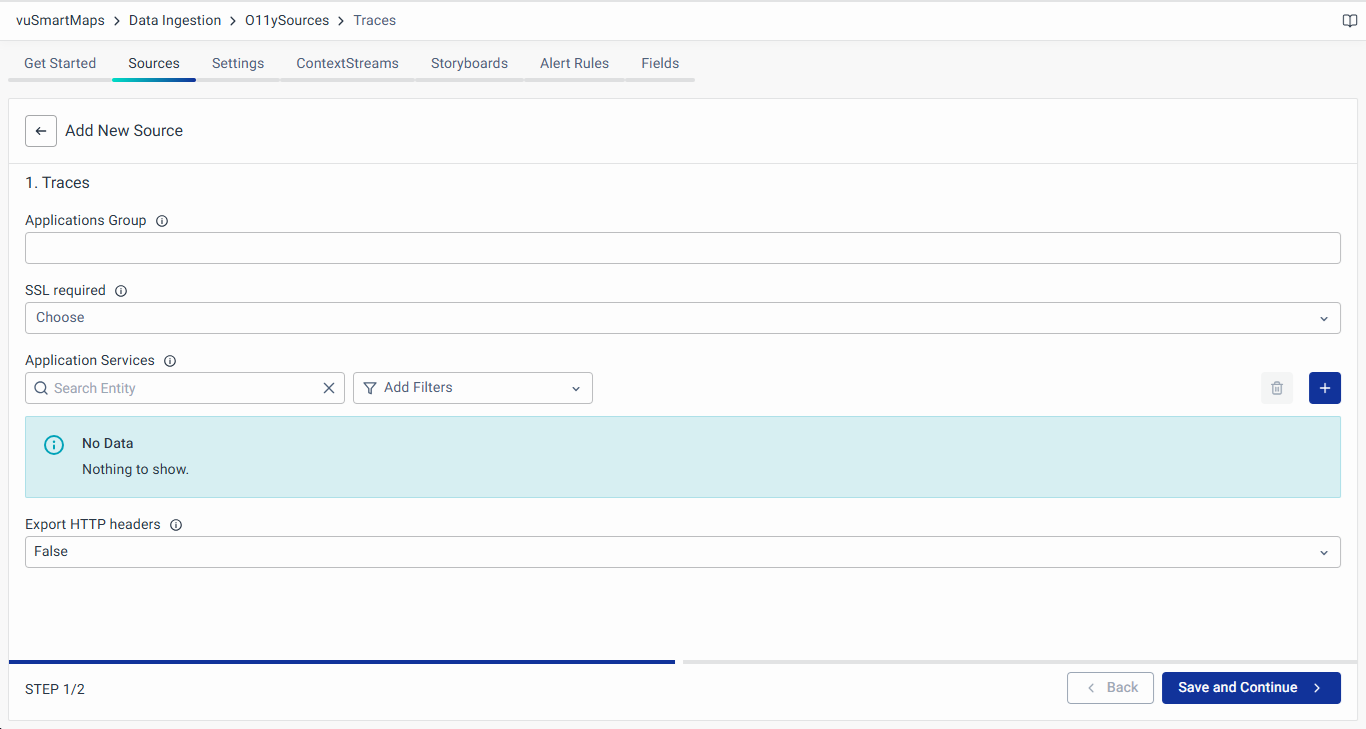
- Navigate to the Sources tab and click the + button to add new services to be monitored.
- Fill up the Following Details in the Wizard:
- Applications Group: Name of the application group.
- SSL Required: If Yes, TLS will be turned ON.
- Application Services: Specify the name of your application and service that will be displayed in the observability UI. In a microservices architecture, an application can consist of multiple services. However, in the absence of microservices, each application would typically have just one service. It is possible to have the same name for both the application and service if desired.
- Language: The programming language used for developing the application service: Java, NodeJS, .NET, GoLang.
- Application Name: Name of the target application.
- Service Name: Service name in the application. Typically in monolithic applications, the service name and application name are the same. In the microservices application, there would be one application that can have one or more services.
- Export HTTP Header (True/False): Enable this field, if HTTP Header is required to be captured.
- Download the client instrumentation package for the selected language from the agent configuration wizard.
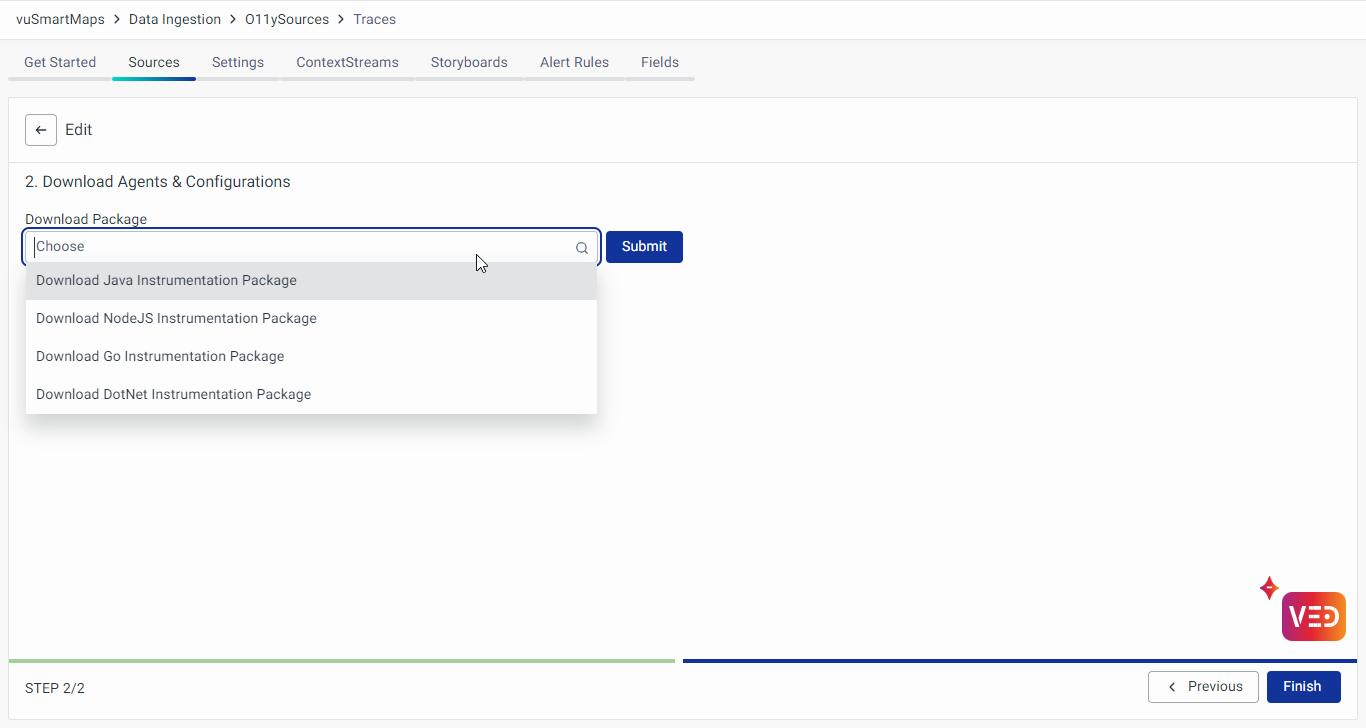
- Follow the instructions provided in the client instrumentation package.
Following these steps, you have successfully enabled Traces O11ySource and configured the data sources for real-time application performance monitoring.
Configuring Sampling Policies
Sampling configuration allows the system to selectively decide on which traces to store. This helps in reducing the amount of data kept in the system.
There are two types of sampling policies that can be configured for traces:
- Global Policies: Apply to all types of traces coming into the system.
- Service-Specific Policies: Apply to a specific set of services.
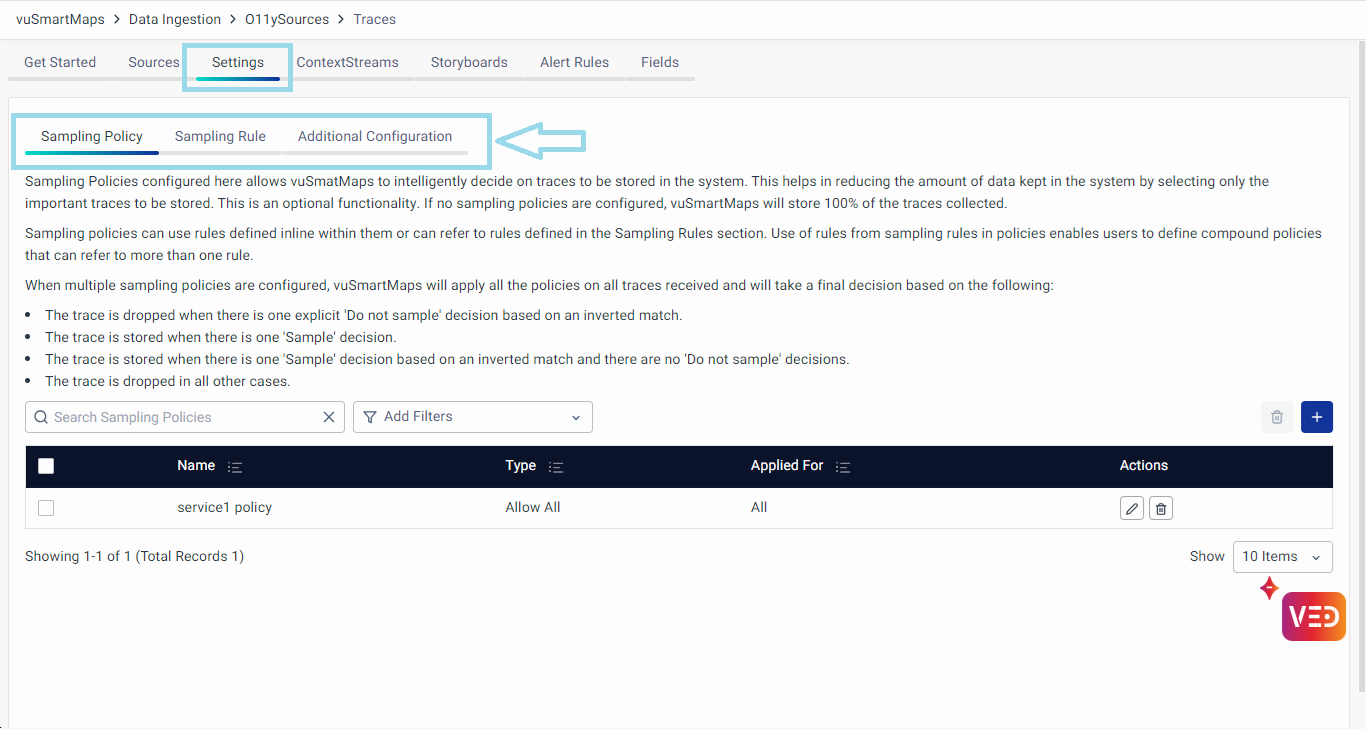
A separate page for sampling-related configurations is introduced. These configurations are controlled from the Settings tab on the Traces O11ySource page. The Settings tab includes three sections:
- Sampling Policy
Defines policies for deciding which traces to store. Policies can use inline rules or refer to rules defined in the Sampling Rules section. - Sampling Rule
Provides a way to define individual rules that can be referred to in Sampling Policies to form compound rules. - Additional Configuration
Controls data enrichments and transformations on received traces using optional YAML configurations.
The dashboards provided in vuApp360 are designed to display pre-sampled data.
Sampling Policy
Sampling Policies configured here allow vuSmartMaps to intelligently decide on which traces to store, helping to reduce the amount of data kept in the system by selecting only important traces. This is an optional functionality. If no sampling policies are configured, vuSmartMaps will store 100% of the traces collected.
Sampling policies can use rules defined inline within them or refer to rules defined in the Sampling Rules section. Using rules from sampling rules in policies enables users to define compound policies that can refer to more than one rule. When multiple sampling policies are configured, vuSmartMaps will apply all the policies to all traces received and will take a final decision based on the following:
- The trace is dropped when there is one explicit 'Do not sample' decision based on an inverted match.
- The trace is stored when there is one 'Sample' decision.
- The trace is stored when there is one 'Sample' decision based on an inverted match and there are no 'Do not sample' decisions.
- The trace is dropped in all other cases.
To configure a new sampling policy, use the + button and provide the following details in the modal:

- Policy Name: Unique name assigned by the user.
- Scope: Specify whether the policy applies to all traces (Global) or to a specific set of services. Options include All, For These Services, For Services Except These.
- Definition Type: Choose to define the policy details inline or refer to a rule defined in the Sampling Rules Section.
- Inline: If this option is selected, the configured policy type becomes applicable:
- Policy Type: Specify the type of sampling policy. vuSmartMaps offers following seven policy types:
- Allow All: Marks all traces received to be stored.
- Data Rate: Tracks spans per second rate of traces and drops traces beyond the configured threshold.
- Spans per Second: Maximum number of spans that can be processed each second.
- Latency: Stores only those traces with latency greater than the configured threshold.
- Threshold in Milliseconds: Only traces with latency greater than the given threshold (in ms) will be allowed.
- Number Attribute: Stores only those traces with the value of the configured attribute falling within a specified range.
- Attribute: Select the attribute key to match data received from applications (e.g., HTTP Status Code).
- Minimum Value: Enter the minimum acceptable value (e.g., 400 for HTTP Status codes).
- Maximum Value: Enter the maximum acceptable value (e.g., 500 for HTTP Status codes).
- Percentage: Stores only a specified percentage of traces received, dropping the rest.
- Sampling Percentage: The percentage rate at which traces are sampled.
- Status: Stores traces with specified statuses, dropping the rest.
- Status Type: Status value for which traces will be retained. Options: Error, OK, Unset.
- String Attribute: Stores only those traces with the value of a configured attribute matching the configured condition.
- Attribute: Select the attribute key to match data received from applications (e.g., Application, Service Name, Host Name, HTTP Host, HTTP Target, HTTP Route, HTTP URL, DB Name, DB System, Messaging System, Transaction).
- Values: Enter the values to match against (e.g., health, metrics, etc.).
- Regular Expression: When 'True', the system will match the attribute values by regular expression string.
- Invert Match: When 'True', the system will reverse the match condition.
- Use Predefined Rule Sets: If this option is selected, choose one of the following policy types and select the relevant rules from the Sampling Rules section:
- AND of Multiple Rules: Build a compound rule with an AND of multiple rules defined in the Sampling Rules section.
- Rate Distribution: Allocate portions of the total allowed rate to a set of rules from the Sampling Rules Section. Traces matching each rule will be allocated a portion of the total rate allowed.
- Single Rule: Use a single rule defined in the Sampling Rules section.
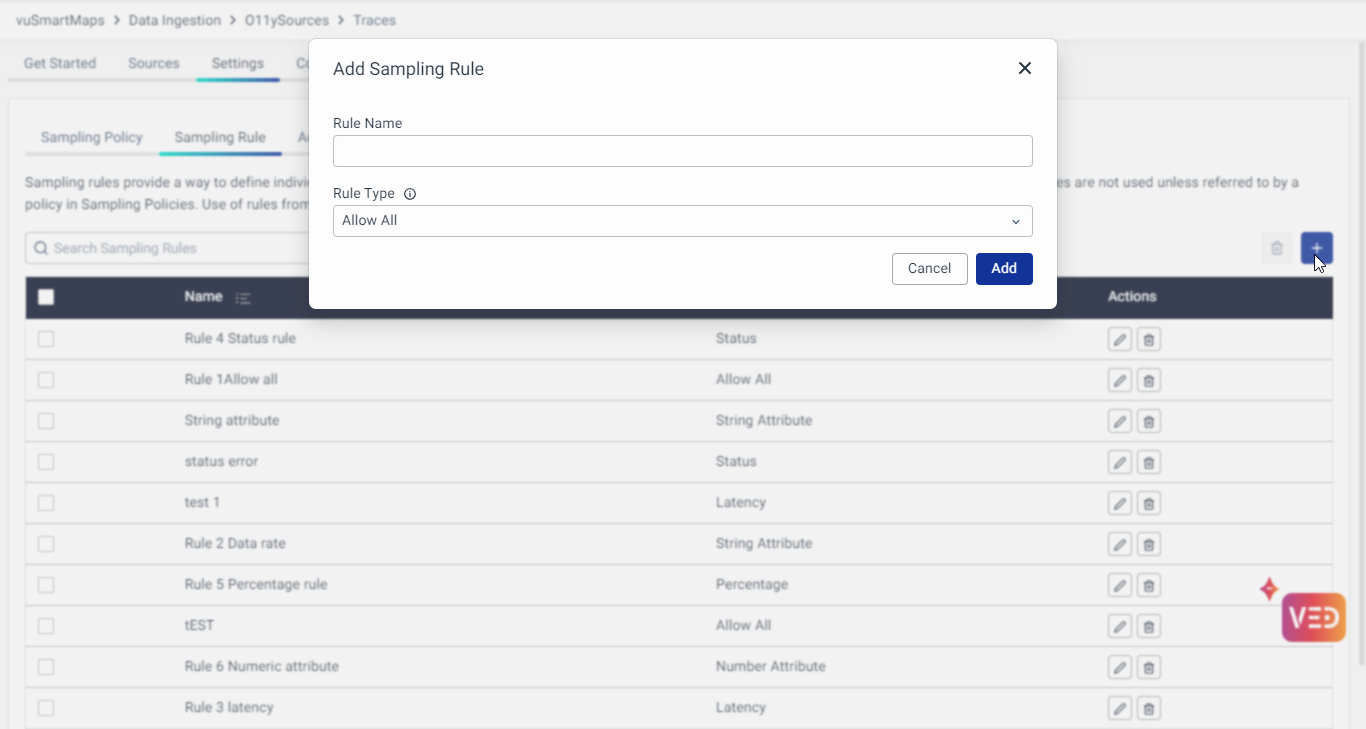
Sampling Rule
Sampling rules provide a way to define individual rules that can be referred to in Sampling Policies to form compound rules. The rules defined in Sampling Rules are not used unless referred to by a policy in Sampling Policies. Using rules from Sampling Rules in policies enables users to define compound policies that can refer to more than one rule.
To configure a new sampling rule, use the + button and provide the following details in the modal:
- Rule Name: Unique name assigned by the user.
- Rule Type: Specify the type of sampling rule. vuSmartMaps offers seven predefined rule types (as explained above for inline policy types).
Additional Configuration
The Additional Configuration section can be used to control data enrichments and transformations done on traces received. Users can add optional YAML configurations. Below is an example:
transform:
trace_statements:
 - context: span
   statements:
     - set(attributes["instrumentation_library_name"], instrumentation_scope.name)
     - set(attributes["library"], attributes["db.system"])
     - set(attributes["library"], attributes["messaging.system"])
     - set(attributes["library"], "Express") where instrumentation_scope.name == "@opentelemetry/instrumentation-express"
     - set(attributes["library"], "MongoDB") where instrumentation_scope.name == "io.opentelemetry.mongo-3.1"
     - set(attributes["library"], "Go-kit") where instrumentation_scope.name == "go.opentelemetry.io/contrib/instrumentation/github.com/go-kit/kit/otelkit"
     - set(attributes["library"], "RabbitMQ") where instrumentation_scope.name == "io.opentelemetry.rabbitmq-2.7"
     - set(attributes["library"], "NodeJS HTTP Client / Server") where instrumentation_scope.name == "@opentelemetry/instrumentation-http"
     - set(attributes["library"], "Redis") where instrumentation_scope.name == "@opentelemetry/instrumentation-redis"
     - set(attributes["library"], "Spring MVC") where instrumentation_scope.name == "io.opentelemetry.spring-webmvc-3.1"
     - set(attributes["library"], "Tomcat") where instrumentation_scope.name == "io.opentelemetry.tomcat-7.0"
     - set(attributes["library"], "Servlet") where instrumentation_scope.name == "io.opentelemetry.servlet-3.0"
     - set(attributes["library"], attributes["db.system"]) where instrumentation_scope.name == "io.opentelemetry.jdbc"
     - set(attributes["library"], "Spring Data") where instrumentation_scope.name == "io.opentelemetry.spring-data-1.8"
     - set(attributes["library"], "Hibernate") where instrumentation_scope.name == "io.opentelemetry.hibernate-4.0"
     - set(attributes["library"], "Go HTTP Client / Server") where instrumentation_scope.name == "go.opentelemetry.io/contrib/instrumentation/net/http/otelhttp"
     - set(attributes["library"], "Spring Scheduling") where instrumentation_scope.name == "io.opentelemetry.spring-scheduling-3.1 1.14.0-alpha"
     - set(attributes["destination"], attributes["db.system"])
     - set(attributes["destination"], attributes["messaging.system"])
     - set(attributes["destination"], attributes["net.peer.name"])
     - set(attributes["destination"], replace_match(attributes["http.url"], "https?://[^/]+/([^/]+)", "$1"))
     - set(attributes["transaction"], Concat([attributes["http.method"], attributes["http.target"]], " ")) where (attributes["http.target"] != nil and attributes["http.method"] != nil and attributes["http.target"] != "")
     - set(attributes["transaction"], Concat([attributes["http.method"], attributes["http.route"]], " ")) where (attributes["http.route"] != nil and attributes["http.method"] != nil and attributes["http.route"] != "")
     - set(attributes["site"], "default")
This configuration enriches and transforms trace data, making it more meaningful and useful for analysis.
The Settings tab for Traces O11ySource provides a centralized location for configuring sampling policies, rules, and additional configurations. This setup simplifies the process, reduces user confusion, and enhances the ability to manage and control the data stored in the system effectively. By intelligently sampling traces, users can ensure that they are storing only the most relevant and important data, optimizing both storage and analysis capabilities.
Client Side Traces Instrumentation
- Java
- C# / .NET
- Kubernetes
Instrumentation Process SpringBoot / jar Steps to instrument the java application running as a SpringBoot / jar: Download the client instrumentation package from the O11ysource, which contains the Launch the application with the following configuration Ensure to update the following before using this command. Example: JBoss / WildFly (Standalone Mode) in Linux Steps to instrument the java application running in JBoss / WildFly (Standalone Mode) in Linux: Download the client instrumentation package, which contains the Edit the Ensure to update the following before using this command. Example: Restart JBoss JBoss / WildFly (Domain Mode) in Linux Steps to instrument the java application running in JBoss / WildFly (Domain Mode) in Linux: Download the client instrumentation package, which contains the Edit the Ensure to update the following before using this command. Example: Restart JBoss JBoss / WildFly (Standalone Mode) in Windows Steps to instrument the java application running in JBoss / WildFly (Standalone Mode) in Windows: Download the client instrumentation package, which contains the Edit the Ensure to update the following before using this command. Example: Restart JBoss JBoss / WildFly (Domain Mode) in Windows Steps to instrument the java application running in JBoss / WildFly (Domain Mode) in Windows: Download the client instrumentation package, which contains the Edit the Ensure to update the following before using this command. Example: Restart JBoss Apache Tomcat running on Linux Steps to instrument the java application running in Apache Tomcat running on Linux Download the client instrumentation package, which contains the Edit the Ensure to update the following before using this command. Restart Apache Tomcat Apache Tomcat running on Windows Steps to instrument the java application running in Apache Tomcat running on Windows: Download the client instrumentation package, which contains the Edit the Ensure to update the following before using this command. Restart Apache Tomcat Weblogic (Standalone Weblogic Servers) Steps to instrument the java application running in a standalone Weblogic server: Download the client instrumentation package, which contains the Edit Ensure to update the following before using this command. Restart Weblogic Weblogic (Servers managed by Admin Console) Steps to instrument the java application running in clustered Weblogic server where the admin console is used to manage the instance: Download the client instrumentation package, which contains the For clustered WebLogic servers, you start and stop using Node Manager and configure server startup in the WebLogic Server Administration Console. Open the WebLogic Server Administration Console. Navigate to Environment > Servers and click your server in the Server List Click the Server Start tab. Add the javaagent argument and set the value to the path to the Java Agent Please update the following before using this command. Restart the Weblogic managed server Websphere Application Server ND Steps to instrument the java application running in Websphere Application Server Network Deployment: Download the client instrumentation package which contains the Log in to the WebSphere Integrated Solutions Console Navigate to Servers > Server type > WebSphere application servers. Select the server. Go to Java and Process Management > Process Definition. Select Java Virtual Machine. In Generic JVM arguments, add the following arguments. Please update the following before saving the configuration Save the configuration and restart the server. Docker If your application is running in Docker, then modify the Dockerfile to include the JVM parameters mentioned above. See the extract from a sample Dockerfile. If you don’t want to rebuild the container, then you can re-run the container with the following additional environment variables. Ensure to update the following before using this command.
vunet-opentelemetry-javaagent.jar.
vunet-opentelemetry-javaagent.jar in your preferred directory.
APPLICATION_NAME: Change it to match your application name.SERVICE_NAME: Change it to match the service name (microservices) or application layer (monolithic)TRACES_INGESTION_ENDPOINT: Change it to match the URL of the vuSmartMaps.
vunet-opentelemetry-javaagent.jar.
vunet-opentelemetry-javaagent.jar in your preferred directory.<JBOss_HOME>/bin/standalone.conf file and update the JAVA_OPTS environment variable
APPLICATION_NAME: Change it to match your application nameSERVICE_NAME:
TRACES_INGESTION_ENDPOINT: Change it to match the URL of the vuSmartMaps. It should be http://<vuSmartMaps Server IP>:4317
vunet-opentelemetry-javaagent.jar.
vunet-opentelemetry-javaagent.jar in your preferred directory.<JBOss_HOME>/bin/domain.conf file and update the JAVA_OPTS environment variable
APPLICATION_NAME: Change it to match your application nameSERVICE_NAME:
TRACES_INGESTION_ENDPOINT: Change it to match the URL of the vuSmartMaps. It should be http://<vuSmartMaps Server IP>:4317.
vunet-opentelemetry-javaagent.jar.
vunet-opentelemetry-javaagent.jar in your preferred directory.<JBOss_HOME>/bin/standalone.conf.bat file and update the JAVA_OPTS environment variable
APPLICATION_NAME: Change it to match your application nameSERVICE_NAME:
TRACES_INGESTION_ENDPOINT: Change it to match the URL of the vuSmartMaps. It should be http://<vuSmartMaps Server IP>:4317.
vunet-opentelemetry-javaagent.jar.
vunet-opentelemetry-javaagent.jar in your preferred directory.<JBOss_HOME>/bin/domain.conf.bat file and update the JAVA_OPTS environment variable
APPLICATION_NAME: Change it to match your application nameSERVICE_NAME:
TRACES_INGESTION_ENDPOINT: Change it to match the URL of the vuSmartMaps. It should be http://<vuSmartMaps Server IP>:4317.
vunet-opentelemetry-javaagent.jar.
vunet-opentelemetry-javaagent.jar in your preferred directory.setenv.sh in the bin directory of Tomcat and add the following content.
setenv.sh in the bin directory if it doesn't exist
APPLICATION_NAME: Change it to match your application nameSERVICE_NAME:
TRACES_INGESTION_ENDPOINT: Change it to match the URL of the vuSmartMaps. It should be http://<vuSmartMaps Server IP>:4317
vunet-opentelemetry-javaagent.jar.
vunet-opentelemetry-javaagent.jar in your preferred directory.setenv.bat in the bin directory of Tomcat and add the following content.
setenv.bat in the bin directory if it doesn't exist
APPLICATION_NAME: Change it to match your application nameSERVICE_NAME:
TRACES_INGESTION_ENDPOINT: Change it to match the URL of the vuSmartMaps. It should be http://<vuSmartMaps Server IP>:4317
vunet-opentelemetry-javaagent.jar.
vunet-opentelemetry-javaagent.jar in your preferred directory.startWebLogic.sh located at <weblogic_<version#>_install_dir>/user_projects/domains/<domain_name>/bin/startWebLogic.sh.
APPLICATION_NAME: Change it to match your application nameSERVICE_NAME:
TRACES_INGESTION_ENDPOINT: Change it to match the URL of the vuSmartMaps. It should be http://<vuSmartMaps Server IP>:4317
vunet-opentelemetry-javaagent.jar.
vunet-opentelemetry-javaagent.jar in your preferred directory.
APPLICATION_NAME: Change it to match your application nameSERVICE_NAME:
TRACES_INGESTION_ENDPOINT: Change it to match the URL of the vuSmartMaps. It should be http://<vuSmartMaps Server IP>:4317
vunet-opentelemetry-javaagent.jar.
vunet-opentelemetry-javaagent.jar in your preferred directory.

APPLICATION_NAME: Change it to match your application nameSERVICE_NAME:
TRACES_INGESTION_ENDPOINT: Change it to match the URL of the vuSmartMaps. It should be http://<vuSmartMaps Server IP>:4317
APPLICATION_NAME: Change it to match your application nameSERVICE_NAME: Change it to match the service name (microservices) or application layer (monolithic)TRACES_INGESTION_ENDPOINT: Change it to match the URL of the vuSmartMaps. It should be http://<vuSmartMaps Server IP>:4317
Configuration TLS Configuration If the TLS is enabled on the vuSmartMaps traces receiver, please get the certificate from the server and configure the following additional parameters. The server certificate is included in the downloaded instrumentation package. For the TLS case Capture HTTP Headers In some applications, key transaction identifiers are passed as HTTP headers to the APIs. To capture these headers, additional instrumentation configurations are required. Below are the steps and examples for capturing HTTP headers for both HTTP servers and clients. Capture HTTP Request Header for HTTP Server To capture the request headers passed to a service, use the following configuration along with other instrumentation configurations mentioned in the previous sections. You can configure one or more headers to be captured. If capturing multiple headers, separate them with commas. An example is given below Capture HTTP Response Header for HTTP Server To capture the response headers passed from a service, use the following configuration along with other instrumentation configurations mentioned in the previous sections. You can configure one or more headers to be captured. If capturing multiple headers, separate them with commas. An example is given below Capture HTTP Request Header for HTTP Client To capture the request headers passed by a service, use the following configuration along with other instrumentation configurations mentioned in the previous sections. You can configure one or more headers to be captured. If capturing multiple headers, separate them with commas. An example is given below Capture HTTP Response Header for HTTP Client To capture the response headers received by a service, use the following configuration along with other instrumentation configurations mentioned in the previous sections You can configure one or more headers to be captured. If capturing multiple headers, separate them with commas. An example is given belowTRACES_INGESTION_ENDPOINT should be https://<vuSmartMaps Server IP>:4318
Instrumentation Process .NET Core 3.1 Application The .NET Core 3.1 application does not support full auto instrumentation. It is partial auto instrumentation, which means code changes are required. The code changes are related to initializing the open telemetry. Add the Open telemetry packages Add Open telemetry service. In the Make sure you include the required packages Set the following environment variables Build the application and run it. .NET Application Running in Linux / MacOS (.NET Core) Download the instrumentation package from the O11ysource and extract it to your favorite folder. This is the OTel home directory. Install opentelemetry core files by running the bash script Activate the auto instrumentation by running the following commands This sets the required environment variables to the current terminal session. Set the following environment variables in the same terminal session In the same terminal session, run the .NET application. Remove the instrumentation Go to the OTel Home directory Run the following commands This removes the instrumentation, and you can run the application as usual. .NET Application Running on Container (.NET Core) Modify the Dockerfile to include the following lines to enable opentelemetry auto instrumentation Build the docker image Create a file called Run the Docker image with the following environment variables and env file ASP.NET Application running in IIS (.NET Framework & .NET Core) Download the instrumentation package ( Open Powershell in administrator mode. Go into the folder where the instrumentation packages are extracted. Install open telemetry auto instrumentation by running the powershell script By default, this is installed in the “C:\Program Files\OpenTelemetry .NET AutoInstrumentation” directory. You can install this in any folder by changing the “InstallDir” option Run the command Set the setting to the application. For .NET Framework applications. For .NET Core applications. Example: Restart IIS Enable / Disable Instrumentation per Application Pool (.NET Framework only) By default, all the applications are instrumented. But you can disable instrumentation per application pool. To enable the instrumentation for the Application Pool, you can use the below command Remove Instrumentation .NET Application running as exe in Terminal Download the instrumentation package ( Open Powershell in administrator mode. Go into the folder where the instrumentation packages are extracted. Install open telemetry auto instrumentation by running the powershell script By default, this is installed in the “C:\Program Files\OpenTelemetry .NET AutoInstrumentation” directory. You can install this any folder by changing the “InstallDir” option Run the command Set the following environment variables Run the application exe Uninstall Open telemetry for exe .NET Application running as exe in Task Scheduler Download the instrumentation package ( Open Powershell in administrator mode. Go into the folder where the instrumentation packages are extracted. Install open telemetry auto instrumentation by running the powershell script By default, this is installed in the “C:\Program Files\OpenTelemetry .NET AutoInstrumentation” directory. You can install this in any folder by changing the “InstallDir” option Create a wrapper PowerShell script to wrap your exe Configure the following to match your environment Modify your task Example: Uninstall Open telemetry for exe running in Task Scheduler
Startup.cs add the below code
OTEL_EXPORTER_OTLP_ENDPOINT with value “http://<vuSmartMaps Server IP>:4318”OTEL_EXPORTER_OTLP_PROTOCOL with value “http/protobuf”OTEL_RESOURCE_ATTRIBUTES with value “application=<APPLICATION_NAME>”OTEL_SERVICE_NAME with value “<SERVICE_NAME>”
install.sh. This will install it in the dist folder.
OTEL_EXPORTER_OTLP_ENDPOINT with value “http://<vuSmartMaps Server IP>:4318”OTEL_EXPORTER_OTLP_PROTOCOL with value “http/protobuf”OTEL_RESOURCE_ATTRIBUTES with value “application=<APPLICATION_NAME>”OTEL_SERVICE_NAME with value “<SERVICE_NAME>”
otel-dotnet.env with the following content
dotnet_auto_instrumentation_offline_package.zip) from the O11ysource and extract it.OpenTelemetry.DotNet.Auto.psm1Register-OpenTelemetryForIIS. This will restart the IIS.

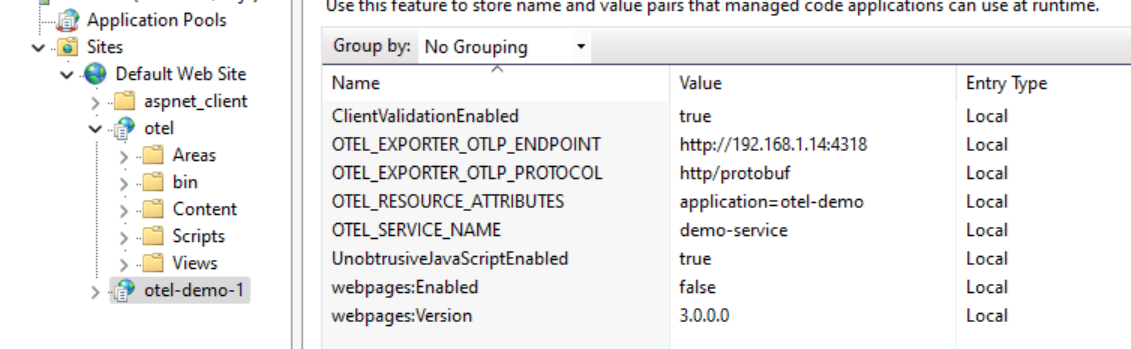
OTEL_EXPORTER_OTLP_ENDPOINT with value “http://<vuSmartMaps Server IP>:4318”OTEL_EXPORTER_OTLP_PROTOCOL with value “http/protobuf”OTEL_RESOURCE_ATTRIBUTES with value “application=<APPLICATION_NAME>,host.name=<host_name>,host.ip=<host_ip>”OTEL_SERVICE_NAME with value “<SERVICE_NAME>”OTEL_METRICS_EXPORTER with value “none”OTEL_DOTNET_AUTO_TRACES_WCFSERVICE_INSTRUMENTATION_ENABLED with value “false”<appSettings> section in the Web.config file. An example is shown below.
<environmentVariables> in <aspNetCore> section in web.config file
OTEL_EXPORTER_OTLP_ENDPOINT with value “http://<vuSmartMaps Server IP>:4318”OTEL_EXPORTER_OTLP_PROTOCOL with value “http/protobuf”OTEL_RESOURCE_ATTRIBUTES with value “application=<APPLICATION_NAME>,host.name=<host_name>,host.ip=<host_ip>”OTEL_SERVICE_NAME with value “<SERVICE_NAME>”OTEL_METRICS_EXPORTER with value “none”
dotnet_auto_instrumentation_offline_package.zip) from O11ysources and extract it.OpenTelemetry.DotNet.Auto.psm1Register-OpenTelemetryForCurrentSession
OpenTelemetry.DotNet.Auto.psm1
dotnet_auto_instrumentation_offline_package.zip) from O11ysources and extract it.OpenTelemetry.DotNet.Auto.psm1
$otelResourceAttributes = "application=$applicationName,host.name=$hostName,host.ip=$hostIp"$otelResourceAttributes = "application=$applicationName,host.name=$hostName,host.ip=$hostIp"
powershell.exe. The path is typically “C:\Windows\System32\WindowsPowerShell\v1.0\powershell.exe”
-ExecutionPolicy Bypass -File "<full path of the wrapper powershell script you created>"-ExecutionPolicy Bypass -File "C:\Myne\instrument-exe\MyDotNetApp\MyApp.ps1"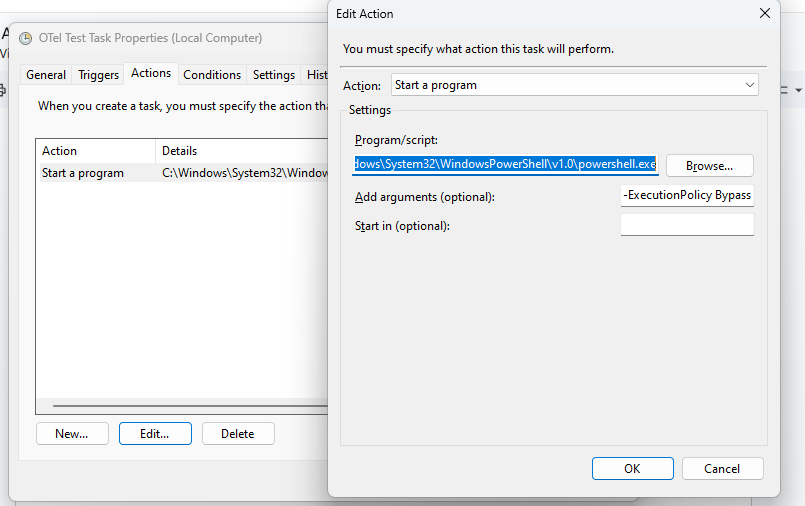
OpenTelemetry.DotNet.Auto.psm1
Configuration Capture HTTP Headers In some applications, key transaction identifiers are passed as HTTP headers to the APIs. To capture these headers, additional instrumentation configurations are required. Below are the steps and examples for capturing HTTP headers for both HTTP servers and clients. Capture HTTP Request Header for ASP.NET Core To capture the request headers of ASP.NET Core, use the following configuration along with other instrumentation configurations mentioned in the previous sections. You can configure one or more headers to be captured. If capturing multiple headers, separate them with commas. Based on the environment, add this additional configuration.
For example Capture HTTP Response Header for ASP.NET Core To capture the response headers of ASP.NET Core, use the following configuration along with other instrumentation configurations mentioned in the previous sections. You can configure one or more headers to be captured. If capturing multiple headers, separate them with commas. Based on the environment, add this additional configuration.
For example Capture HTTP Request Header for ASP.NET To capture the request headers of ASP.NET, use the following configuration along with other instrumentation configurations mentioned in the previous sections. You can configure one or more headers to be captured. If capturing multiple headers, separate them with commas. Based on the environment, add this additional configuration.
For example Capture HTTP Response Header for ASP.NET To capture the response headers of ASP.NE, use the following configuration along with other instrumentation configurations mentioned in the previous sections. You can configure one or more headers to be captured. If capturing multiple headers, separate them with commas. Based on the environment, add this additional configuration.
For example
Instrumentation Process
-
Download the Opentelemetry Operator helm chart from O11ysources and install it
helm install opentelemetry-operator opentelemetry-operator-0.71.0.tgz \--namespace opentelemetry-operator-system \--create-namespace \--set "manager.collectorImage.repository=otel/opentelemetry-collector-k8s" \--set admissionWebhooks.certManager.enabled=false \--set admissionWebhooks.autoGenerateCert.enabled=true -
Download the vuTraces auto instrumentation helm chart from O11ysources and install it
helm install vutraces-auto-instrumentation vutraces-auto-instrumentation-1.0.0.tgz \--namespace opentelemetry-operator-system \--create-namespace \--set vutracesexporter.endpoint="http://<vuSmartMaps_server:4317" -
Add the following annotation to your deployments.
-
Java workloads
annotations:instrumentation.opentelemetry.io/inject-java: "opentelemetry-operator-system/vutraces-auto-instrumentation" -
.NET workloads
annotations:instrumentation.opentelemetry.io/inject-dotnet: "opentelemetry-operator-system/vutraces-auto-instrumentation" -
Go workloads
annotations:instrumentation.opentelemetry.io/inject-go: "opentelemetry-operator-system/vutraces-auto-instrumentation"If there are multiple containers exists in the pod, then add the below annotation too
annotations:instrumentation.opentelemetry.io/container-names: <name of the application container> -
If you have a limited number of deployments in your cluster, modify your application helm charts or k8s manifests. In the deployment add the annotation in spec -> template -> metadata
-
If you have many deployments and it is not possible to manually update them then do some automation. One such automation script is available here. Please use this as a reference and create an automation script that works for your environment.
-
The annotations can be also added at the namespace
-
-
Add the following environment variable in the deployment to set the application name.
name: OTEL_RESOURCE_ATTRIBUTESvalue: "application=<app_name>"
