API Identites
Overview
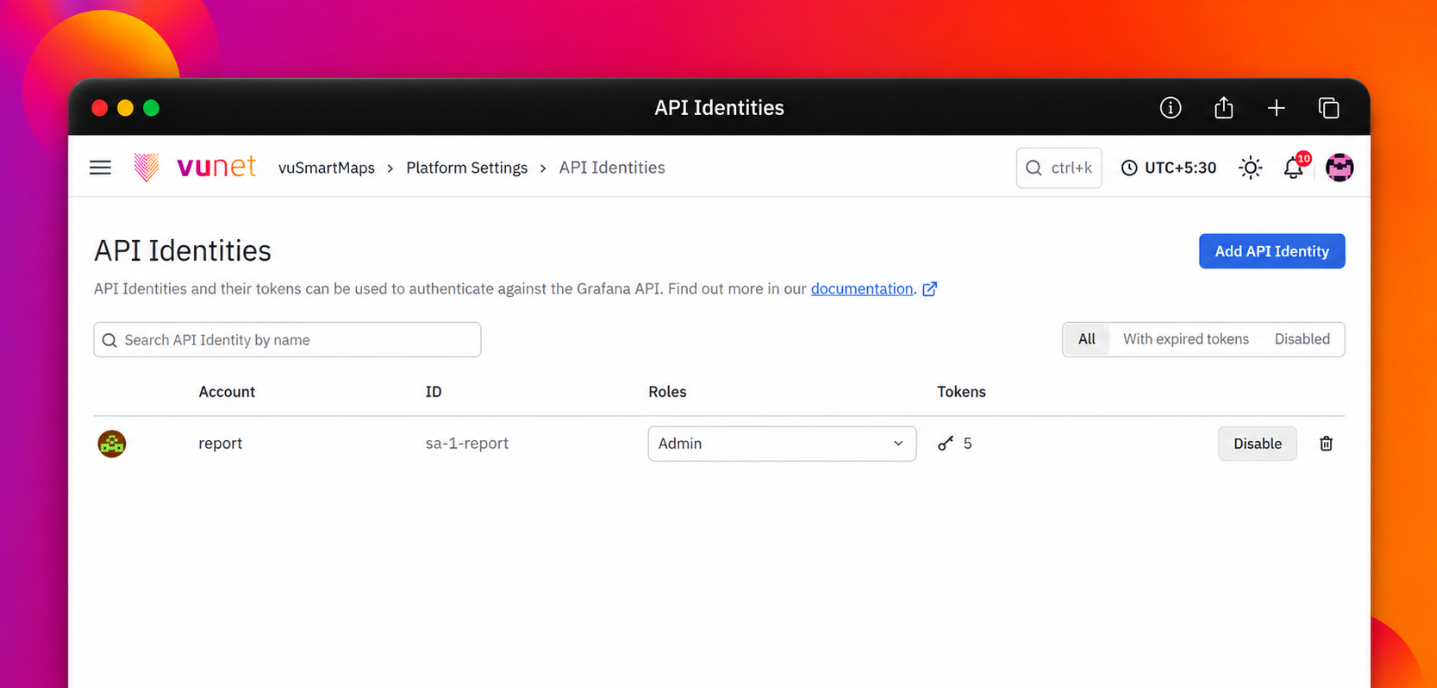
API Identities in vuSmartMaps provide dedicated identities for applications, integrations, and automated activities that need to authenticate against the Grafana API. An application uses a token generated for an API Identity instead of using the sign-in credentials of an individual user. Each API Identity has an assigned Viewer, Editor, or Admin role. Tokens generated under the identity inherit this role. The module also provides token expiration settings, user and team management permissions, and options to disable or delete an identity.
Why This Feature Is Useful
API Identities separate application access from personal user access. This allows the identity, assigned role, tokens, and management permissions to be controlled from one place without depending on the account of the person who created it.
- Create dedicated access for an application or automated activity.
- Control API access through an assigned Viewer, Editor, or Admin role.
- Create separate tokens under the same identity when the same role is required.
- Create a token with no expiration or with a selected expiration date.
- Allow selected users or teams to manage a specific API Identity.
- Stop access by disabling the identity, or permanently remove it by deleting it.
Example Scenario
An automated service requires Editor-level access to work with dashboard content. An administrator creates an API Identity named service-chart, assigns the Editor role, and generates a token. The service uses the token for authentication. When access is required only for a limited period, an expiration date is set while generating the token.
When to Use This Feature
- An application or integration requires Grafana API authentication.
- An automated activity must operate independently of an individual user account.
- Separate tokens are required for activities using the same assigned role.
- Token access must end on a specified date.
- A user or team must be allowed to manage a particular API Identity.
- Access must be paused without permanently removing the identity.
Comprehensive Understanding
Automatically Generated API Identity
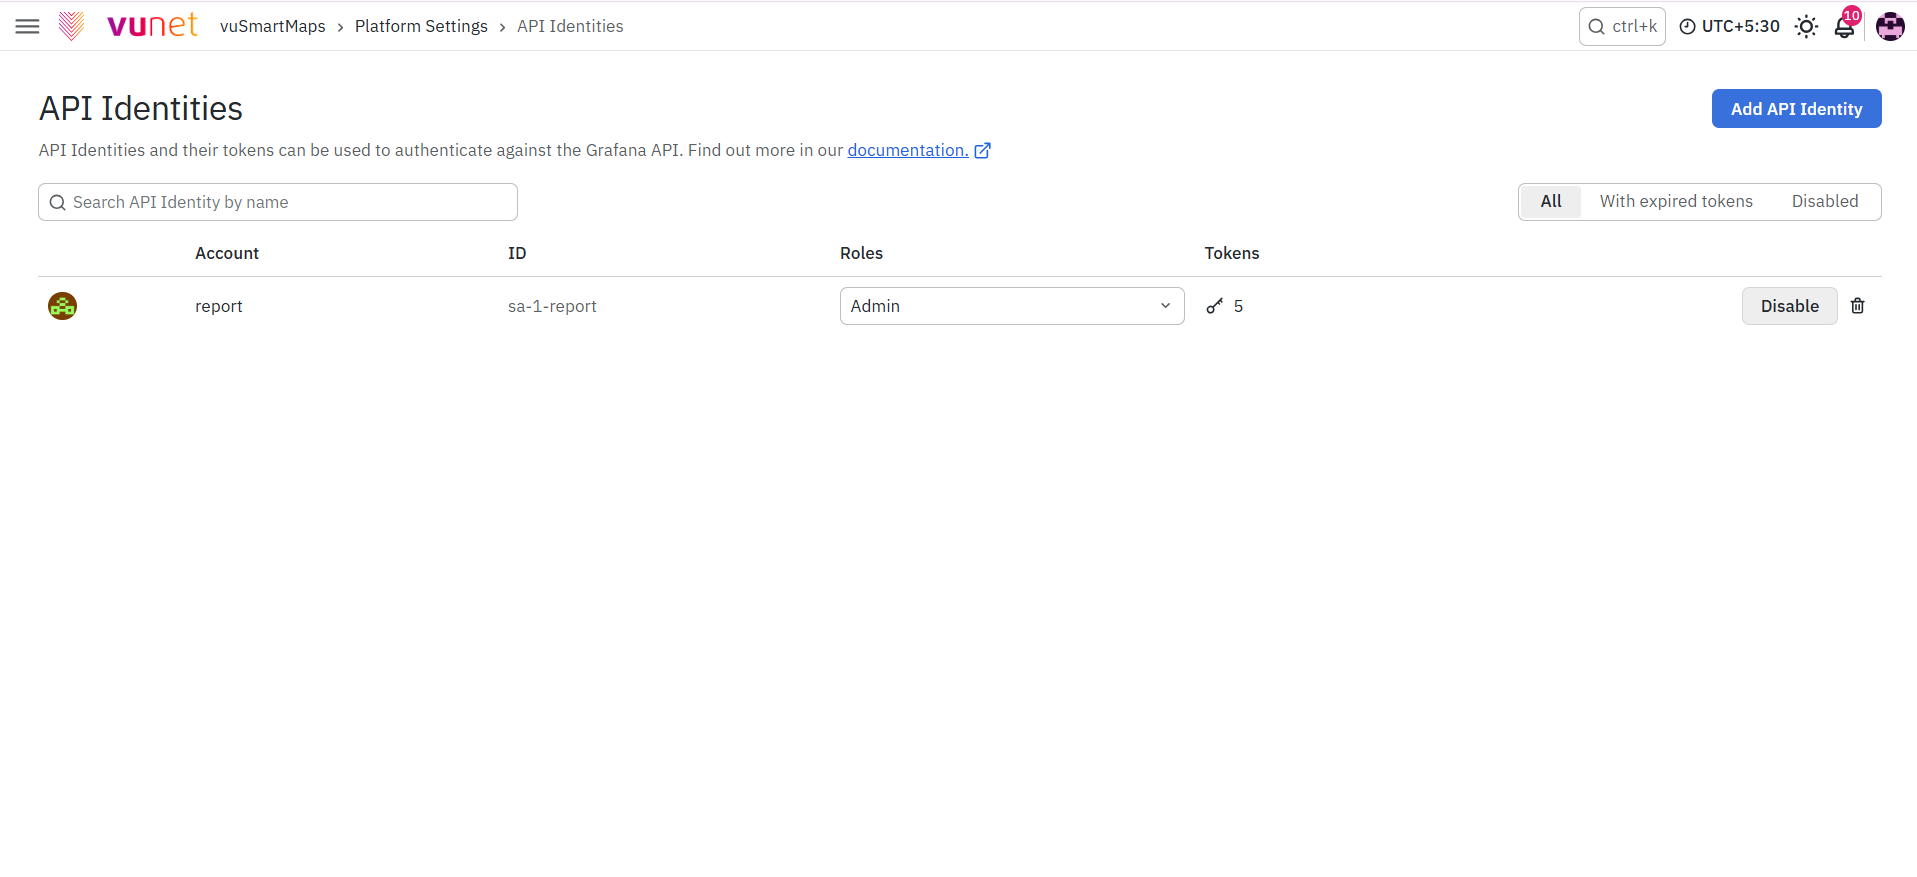
One API Identity is generated automatically when vuSmartMaps is deployed. It is displayed on the API Identities page with its system-generated ID, assigned role, and token information. This automatically generated identity can be managed from the same page as any additional API Identity. Additional API Identities can be created when different applications require separate roles, independent tokens, or separate management and auditing.
Understanding the API Identities Page
The API Identities page is the main workspace for viewing and managing API Identities. It provides namebased search, status filters, identity information, assigned roles, token status, and actions for creating tokens, disabling an identity, or deleting an identity.
- Add API Identity: Opens the Create API Identity page.
- Search API Identity by name: Filters the displayed identities using the entered account name.
- All: Displays all available API Identities.
- With expired tokens: Displays API Identities that contain expired tokens.
- Disabled: Displays API Identities that have been disabled.
- Account: Displays the API Identity name. Selecting the name opens the identity details page.
- ID: Displays the system-generated ID associated with the identity.
- Roles: Displays the Viewer, Editor, or Admin role assigned to the API Identity and allows the role to be updated.
- Tokens: Displays the number of tokens associated with the API Identity or No tokens when no token has been generated.
- Add token: Opens the token creation window for the selected identity.
- Disable: Opens a confirmation window to disable the identity.
- Delete icon: Opens a confirmation window to delete the identity
API Identity, Role, and Token
An API Identity represents an application or automated workload. The identity role controls the access available through the Grafana HTTP API, while its token is the generated credential used for authentication. A token acts as an alternative to a password and inherits the role and permissions assigned to the API Identity.
- Tokens inherit the Viewer, Editor, or Admin role assigned to the API Identity.
- A separate role is not selected when a token is generated.
- One API Identity can contain multiple tokens.
- Each token can have no expiration or a selected expiration date.
- When the assigned role changes, the associated tokens inherit the updated role.
- The API Identity Role controls API access, while User or Team Permission controls who can manage the API Identity.
- Multiple tokens are useful when applications share the same permissions but must be audited or managed independently, or when a token must be rotated or replaced.
Creating an API Identity and Assigning a Role
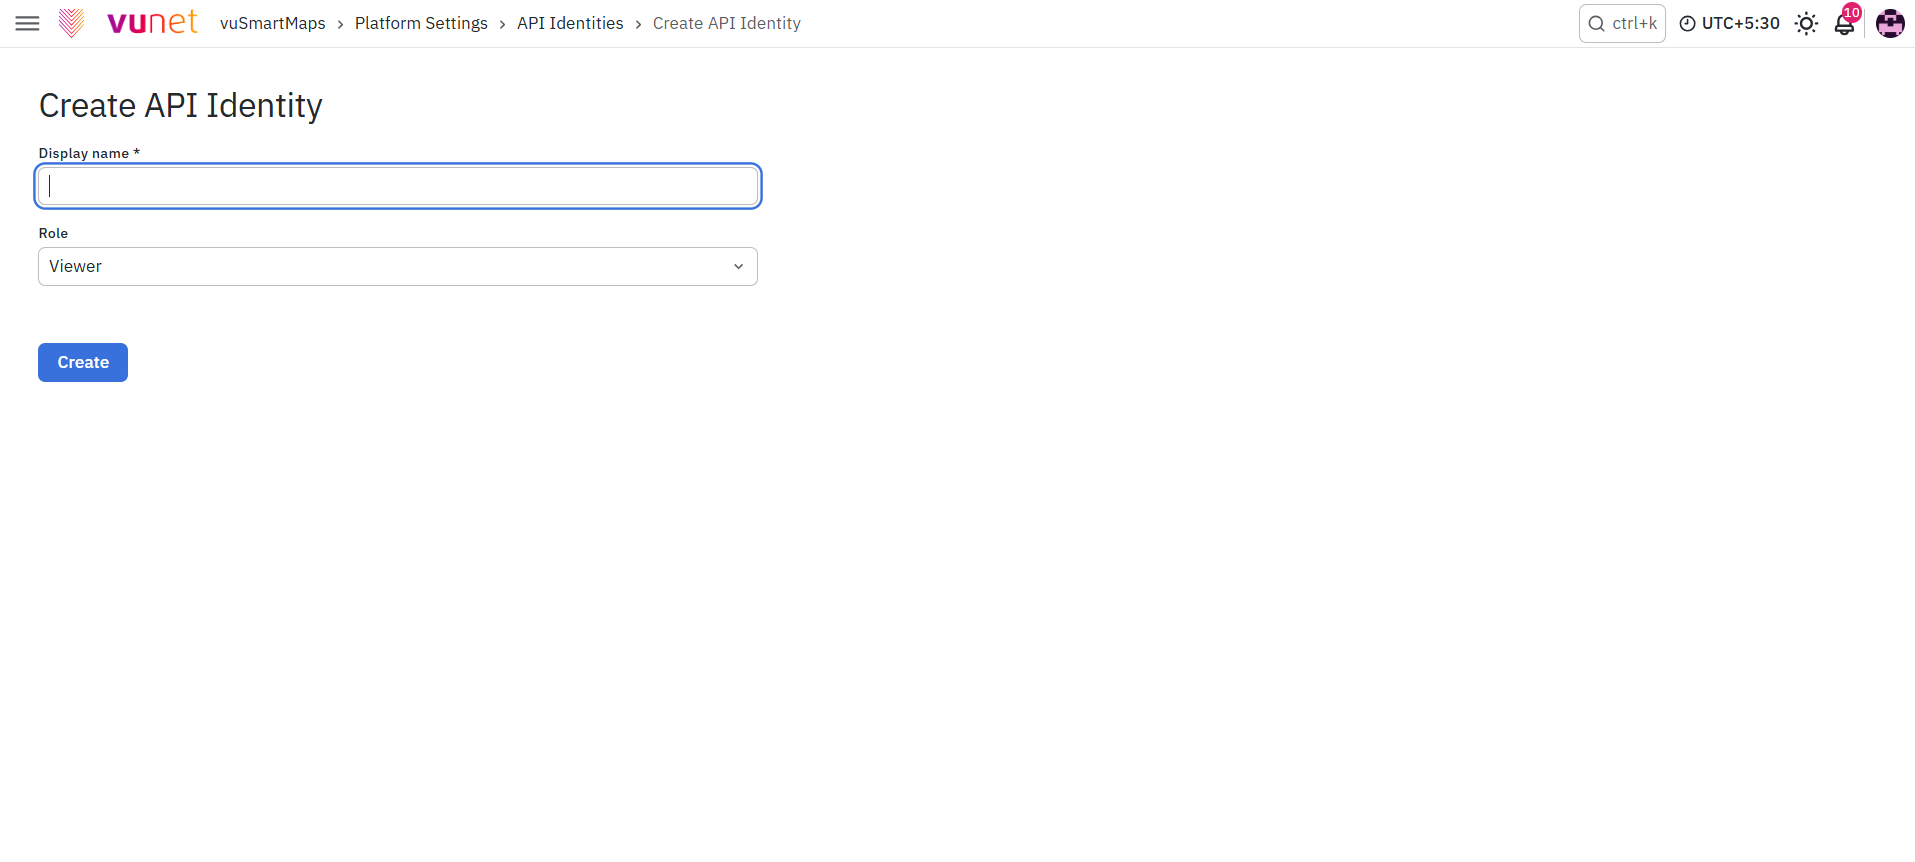
Before creating or editing an API Identity, ensure that the account has the required administrative permission. By default, organization administrator access is required. The user who creates an API Identity can read, update, and delete that identity and manage its permissions.
Select Add API Identity to open the creation page. Enter a unique Display name because the display name determines the generated ID, and select Viewer, Editor, or Admin according to the access required by the application. Use a consistent naming convention so that API Identities remain easy to identify and manage, and then select Create.
The display name can be changed after creation by selecting Edit on the details page. The assigned role can also be changed from the Roles dropdown on the API Identities page or the details page, and the associated tokens inherit the selected role.
API Identity Details
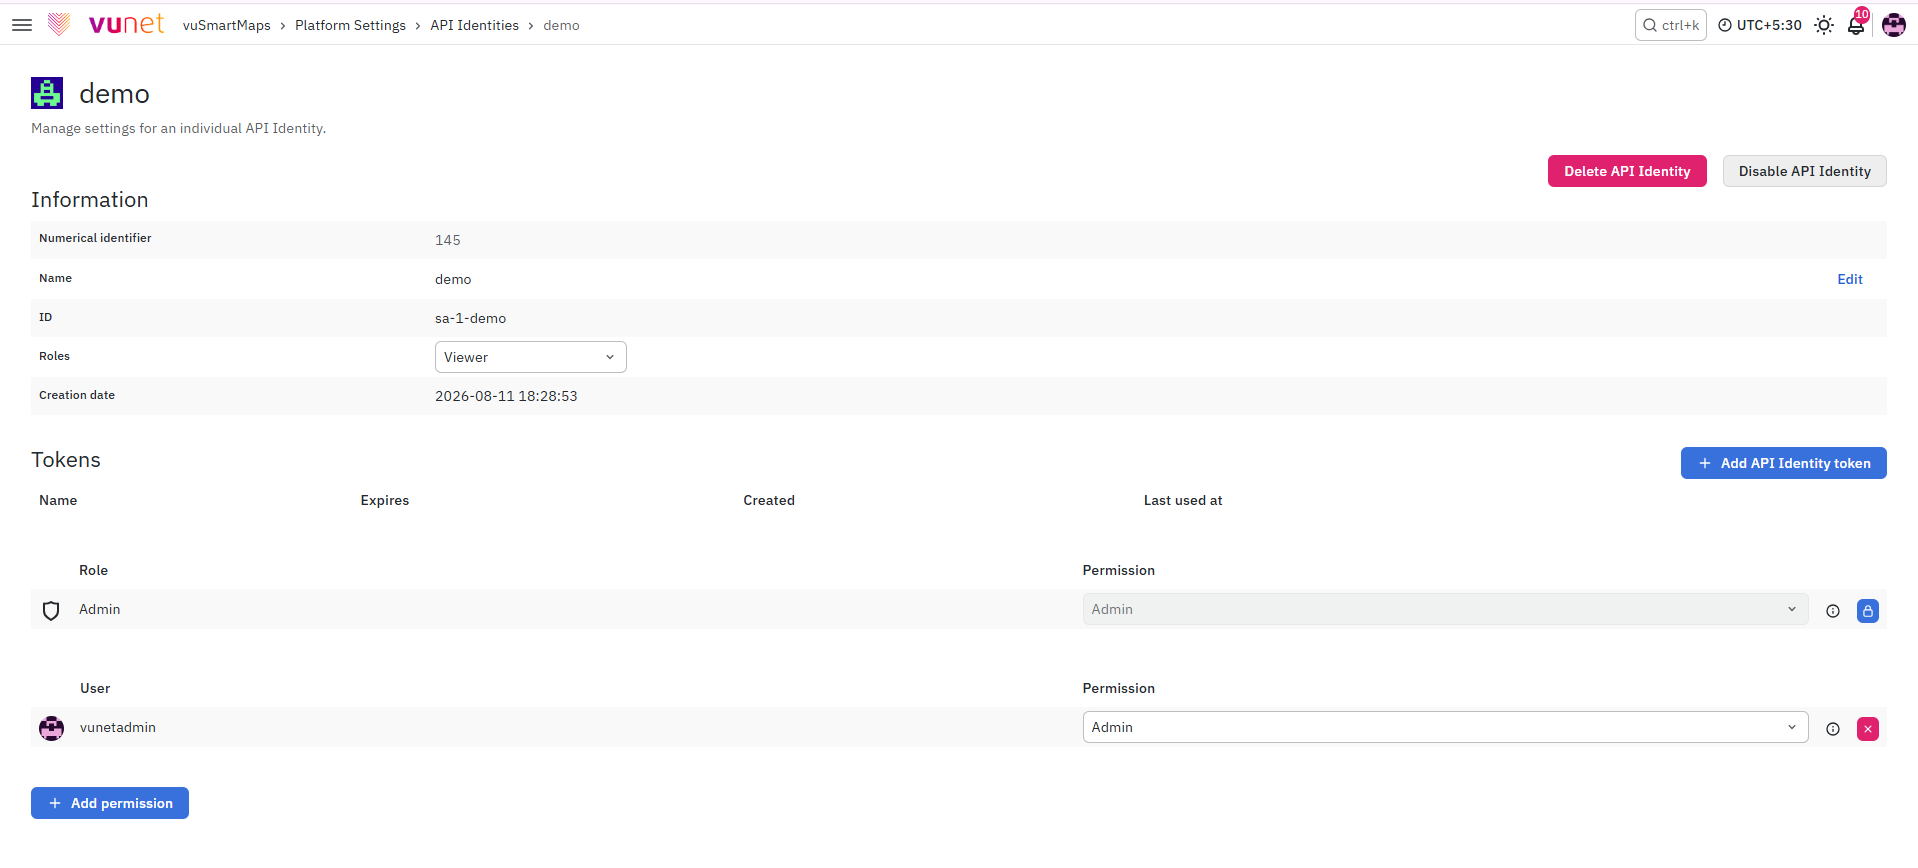
Selecting an account name on the API Identities page opens the details page for that identity. The page provides identity information, token management, user and team management permissions, and actions to disable or delete the identity.
- Numerical identifier: Displays the platform-generated numeric identifier for the API Identity.
- Name: Displays the API Identity display name. Select Edit to update the name.
- ID: Displays the system-generated API Identity ID.
- Roles: Displays the assigned role and allows it to be changed.
- Creation date: Displays the date and time when the API Identity was created.
- Tokens: Displays token information under Name, Expires, Created, and Last used at.
- Add API Identity token: Opens the token creation window.
- Add permission: Allows a User or Team to be assigned Edit or Admin management permission. * Disable API Identity: Opens the confirmation window used to disable the identity.
- Delete API Identity: Opens the confirmation window used to permanently delete the identity.
- Disable API Identity: Opens the confirmation window used to disable the identity.
Tokens and Expiration
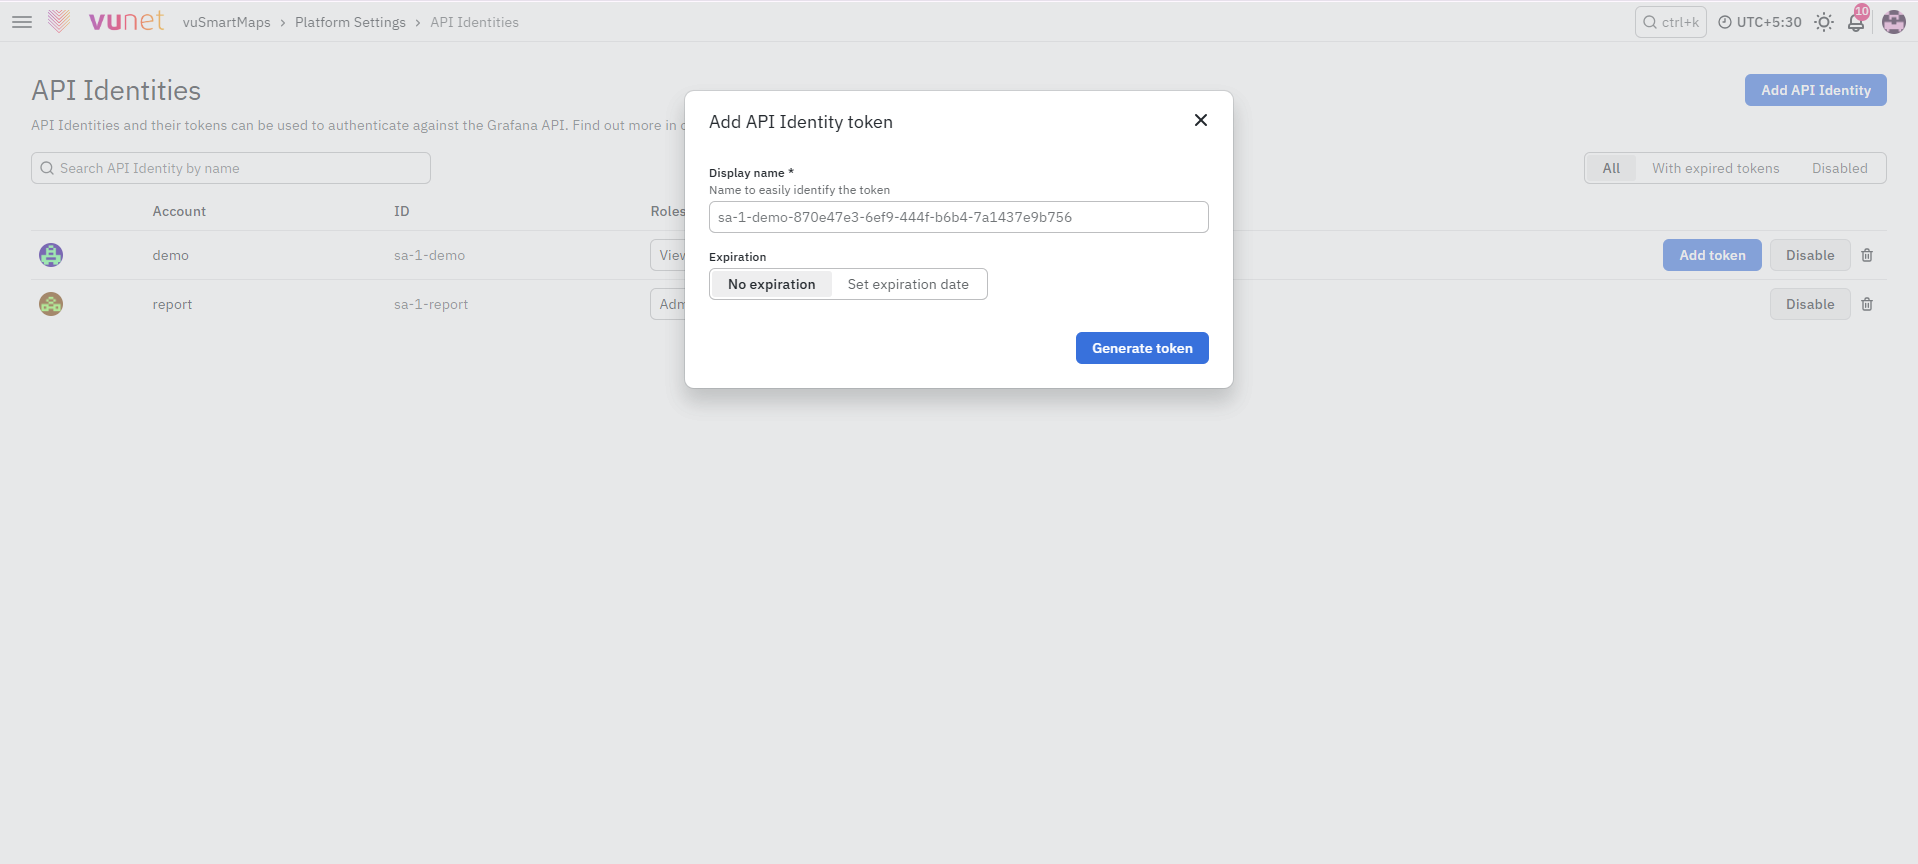
An API Identity token is a generated random string used as an alternative to a password when authenticating with the Grafana HTTP API. A token can be added from the API Identity details page by selecting Add API Identity token, or from the identity row by selecting Add token when that action is available.
- Display name: Provides the required name used to identify and manage the token. A generated value is displayed and can be changed before the token is created.
- No expiration: Creates the token without an expiration date. This is the default selection.
- Set expiration date: Displays the Expiration date field so that the token validity can be limited to a selected date.
- Generate token: Creates the token under the API Identity. The token inherits the API Identity role and permissions.
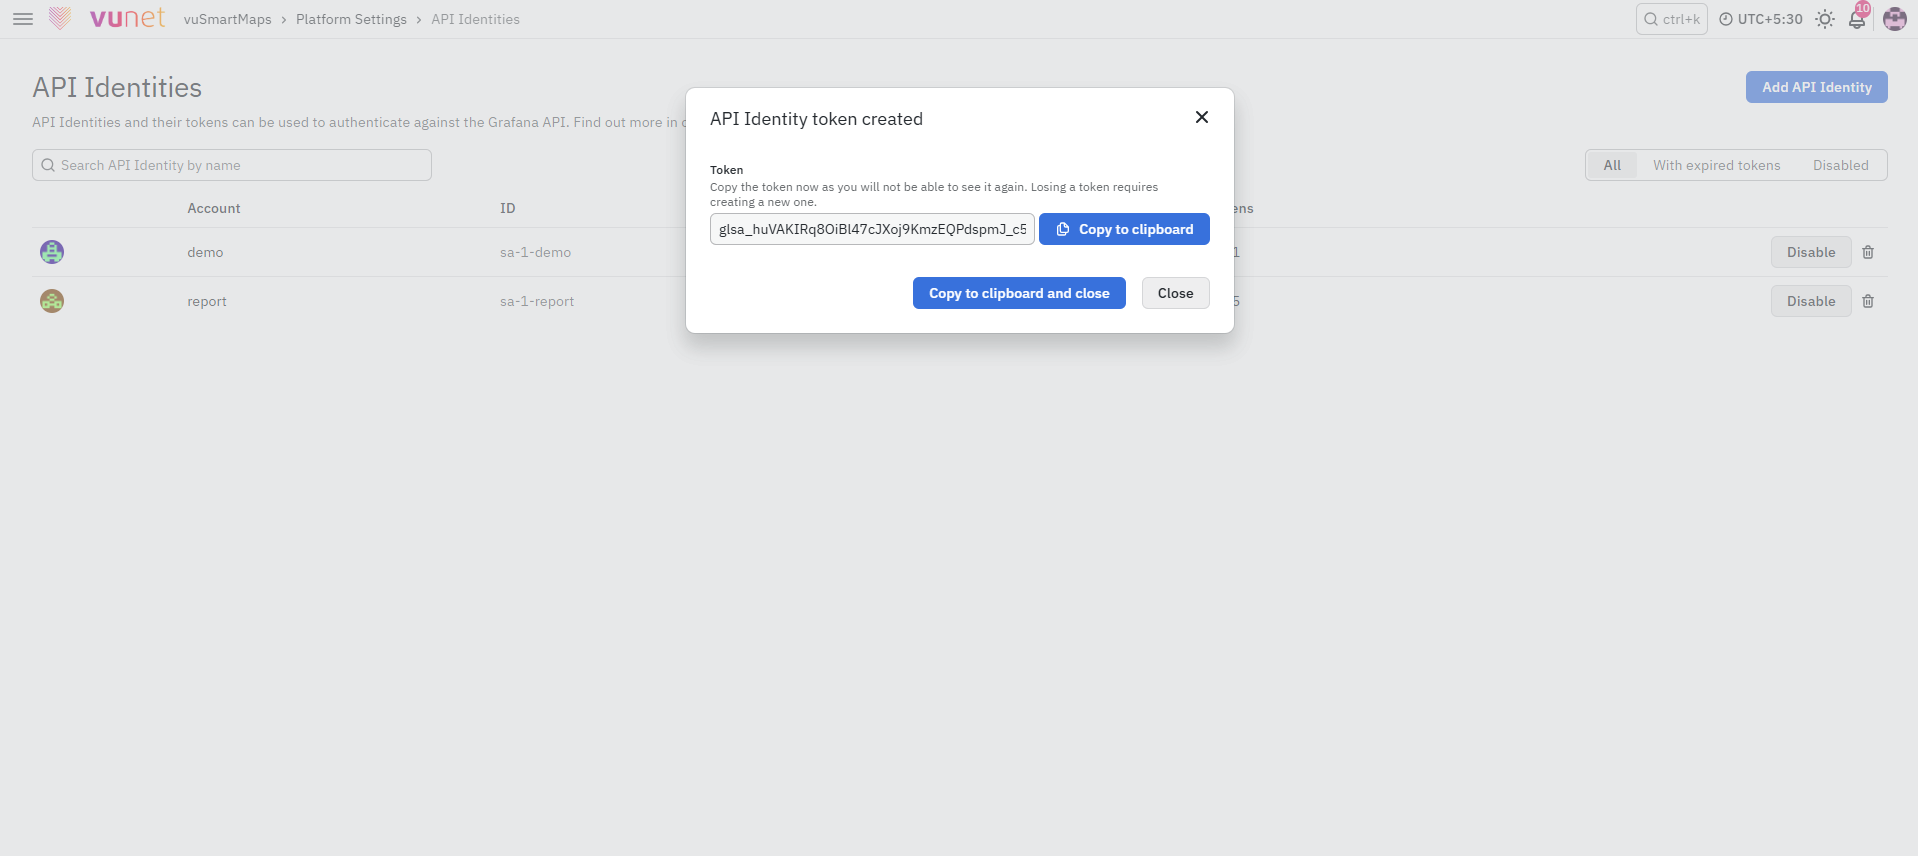
After the token is generated, use it as a Bearer token in the Authorization header of requests sent to the vuSmartMaps Grafana HTTP API. Store and handle the token as an authentication credential. The Tokens section displays the token name, expiration information, creation time, and last-used information. API Identities containing expired tokens can be located by using the With expired tokens filter.An API Identity can have multiple tokens. Use separate tokens when multiple applications require the same permissions but their activity must be managed independently, or when rotating or replacing a token.
Using the Token for HTTP API Authentication
Include the token in the Authorization header of every authenticated HTTP API request. The header value must use the Bearer prefix.
Authorization: Bearer \< API_IDENTITIES-TOKEN>
User and Team Management Permissions
The permissions area controls which users or teams can manage a specific API Identity. These management permissions are separate from the Viewer, Editor, or Admin role used by the API Identity tokens. Select Add permission, choose User or Team, select the required user or team, choose Edit or Admin, and select Save. The assigned user or team is then displayed with the selected permission. The remove icon can be used to remove an assigned user or team permission.
- User or Team: Identifies whether the management permission is being assigned to an individual user or a team.
- Edit: Allows the selected user or team to view and edit the API Identity, enable or disable it, and add or delete its tokens.
- Admin: Includes all Edit capabilities and also allows the selected user or team to manage user and team permissions for the API Identity.
- Save: Adds the selected permission to the API Identity.
Disabling and Deleting an API Identity
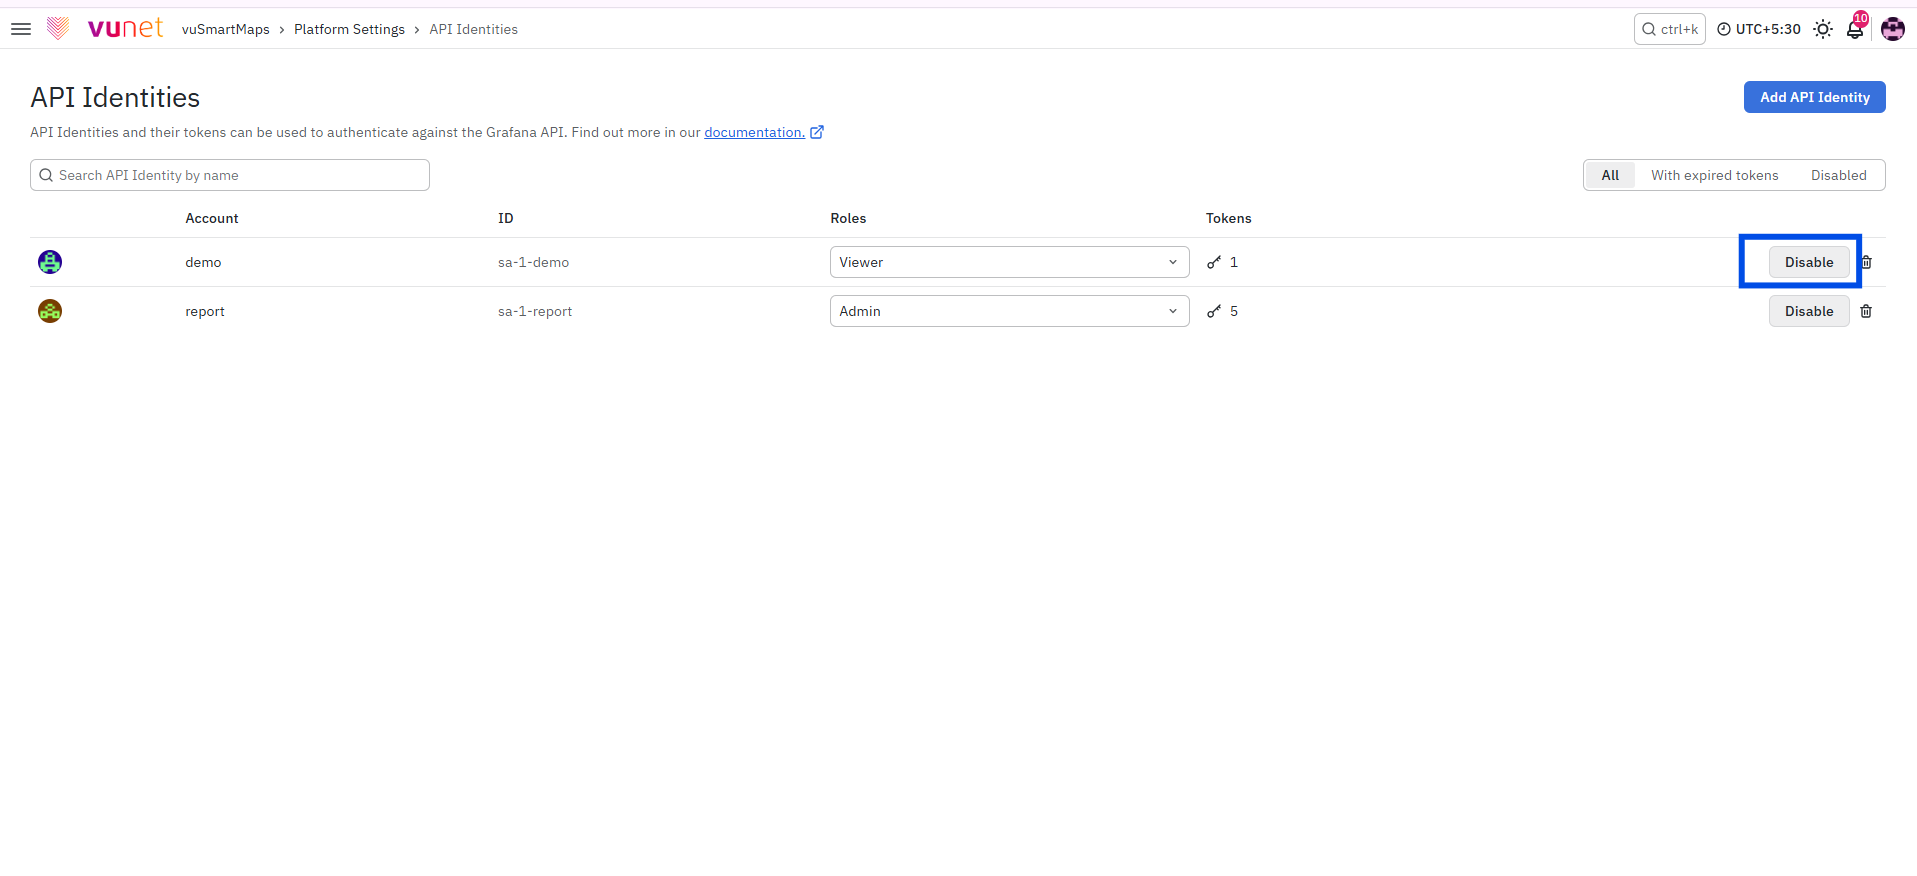
Disable is used to stop the API Identity from being used for authentication while retaining the identity. A disabled identity can be located using the Disabled filter on the API Identities page. Delete permanently removes the API Identity and should be used only when the identity is no longer required. Both actions display a confirmation window and provide a Cancel option to return without completing the action.
Scope and Limitations
An API Identity works only within the organization in which it is created. When the same automated task must operate in multiple organizations, create and manage an API Identity in each organization. API Identities cannot perform instance-wide operations such as global Identity and Access or organization management. These operations require a user with the applicable server administrator permission.
Checking Token Permissions
Use the access-control permissions endpoint to verify the permissions attached to an API Identity token when an API request is rejected or returns an authorization error.
curl \-H "Authorization: Bearer <API_IDENTITY_TOKEN> " -X GET "https://<vusmartmaps-url>/api/access-control/user/permissions"
To check which dashboards the token can read, filter the response for the dashboards:read permission. The returned values identify dashboards and folders by their unique identifiers.
curl \-H "Authorization: Bearer <API_IDENTITY_TOKEN> " -X GET "https://<vusmartmaps-url>/api/access-control/user/permissions" | jq '."dashboards:read"'
Step-by-Step Instructions
Access API Identities
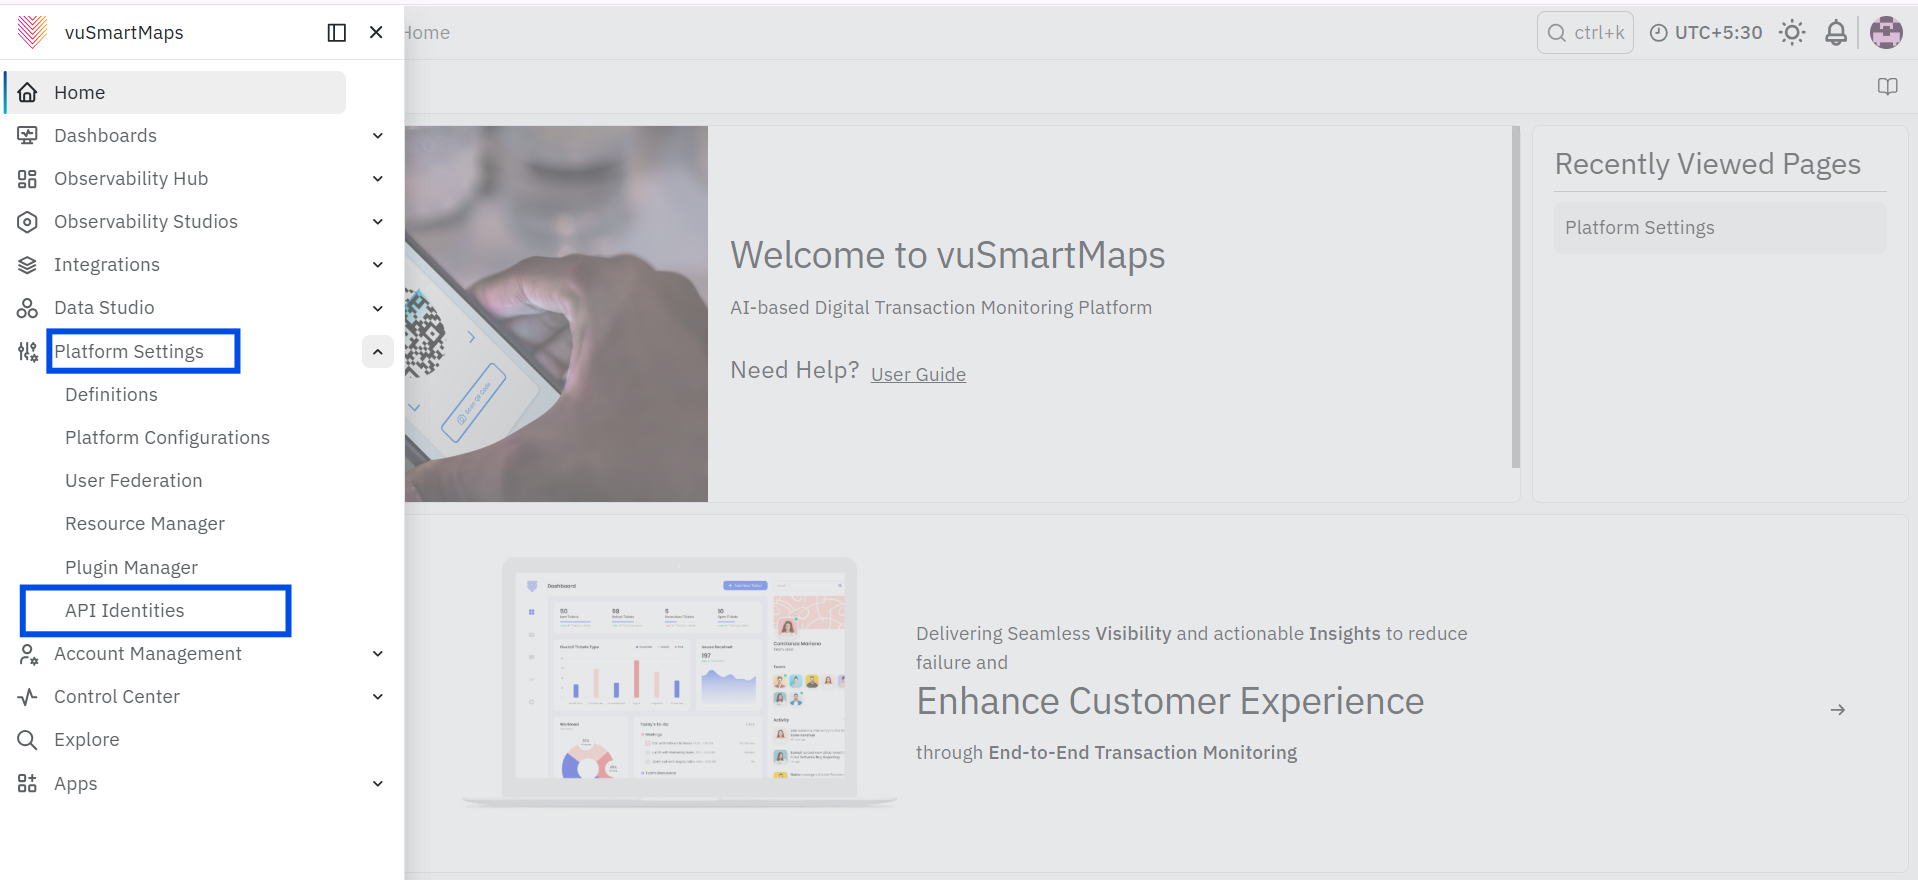
- Sign in to vuSmartMaps.
- Open the navigation menu.
- Expand Platform Settings.
- Select API Identities. The API Identities page is displayed.
Review the Automatically Generated API Identity
- Locate the API Identity generated during vuSmartMaps deployment.
- Review its ID, assigned role, and token status.
- Open the identity when its tokens, name, role, or management permissions must be reviewed or updated.
Create an API Identity
- On the API Identities page, select Add API Identity.
- In Display name, enter a meaningful name for the application or automated activity
- From Role, select Viewer, Editor, or Admin according to the required access.
- Select Create.
- The API Identity details page opens and displays the generated identity information.
Add an API Identity Token
- Open the required API Identity and select Add API Identity token. Alternatively, select Add token from the identity row when the action is available.
- Review or update the token Display name.
- Select No expiration, or select Set expiration date and enter the required Expiration date.
- Select Generate token.
- Use the generated token as a Bearer token for HTTP API authentication and store it securely as an authentication credential.
Use the Token in an HTTP API Request
- Add the Authorization header to the API request.
- Set the header value to Bearer followed by the API Identity token.
- Send the request to the required vuSmartMaps Grafana HTTP API endpoint.
- When authorization fails, use /api/access-control/user/permissions to verify the token permissions.
Change the Assigned Role
- Locate the API Identity on the API Identities page, or open its details page.
- Open the Roles dropdown.
- Select Viewer, Editor, or Admin. Tokens under the identity use the selected role.
Edit the API Identity Name
- Open the required API Identity.
- Select Edit beside Name.
- Update the display name and save the change.
Add User or Team Permission
- Open the required API Identity.
- Select Add permission.
- Choose User or Team.
- Select the required user or team.
- Select Edit or Admin permission.
- Select Save. The user or team is displayed with the assigned permission.
Remove User or Team Permission
- Open the required API Identity.
- Locate the user or team permission that must be removed.
- Select the remove icon displayed for that entry.
Disable an API Identity
- Select Disable for the required identity on the API Identities page. The identity can also be opened and Disable API Identity can be selected.
- Review the confirmation message.
- Select Disable API Identity to confirm, or select Cancel to return without disabling it.
- Use the Disabled filter to locate the disabled identity.
Delete an API Identity
- Select the delete icon for the required identity on the API Identities page. The identity can also be opened and Delete API Identity can be selected.
- Review the confirmation message.
- Select Delete API Identity to confirm, or select Cancel to return without deleting it.
View Expired or Disabled API Identities
- Open the API Identities page.
- Select With expired tokens to display identities that contain expired tokens.
- Select Disabled to display disabled identities.
- Select All to return to the complete identity list.
What Happens After the Steps
- The automatically generated API Identity is available after deployment, and each additional API Identity appears with its generated ID and assigned role after creation.
- A generated token is associated with the API Identity and inherits its role and permissions.
- The token list displays its name, expiration information, creation time, and last-used information.
- A user or team added through Add permission appears with the selected Edit or Admin management permission.
- Changing the assigned role updates the role inherited by the tokens under that identity.
- A disabled identity is available through the Disabled filter and cannot be used for authentication.
- A deleted identity is permanently removed from the API Identities list.
FAQs
What are API Identities used for?
API Identities provide dedicated identities for applications, integrations, and automated activities that need to authenticate against the Grafana API. They allow applications to use generated tokens instead of an individual user's sign-in credentials.
What roles can be assigned to an API Identity?
An API Identity can be assigned a Viewer, Editor, or Admin role. Tokens created under the API Identity automatically inherit the assigned role and permissions.
Can an API Identity have multiple tokens?
Yes. A single API Identity can contain multiple tokens. Separate tokens can be used when applications require the same permissions but need to be managed, audited, rotated, or replaced independently.
Can an API Identity token be configured with an expiration date?
Yes. A token can be created with no expiration or with a selected expiration date. API Identities containing expired tokens can be identified using the With expired tokens filter.
What is the difference between disabling and deleting an API Identity?
Disabling an API Identity stops it from being used for authentication while retaining the identity. Deleting an API Identity permanently removes it from the API Identities list.
