OmniAgent Installation
Overview
In the Auto Discovery Instrumentation (ADI) framework, OmniAgent installation is performed through a guided and platform-driven workflow available in the Host Landscape. Unlike traditional onboarding workflows, the ADI-based approach does not require manual configuration such as editing configuration files, setting API keys, or defining connectivity parameters. Instead, it simplifies onboarding by generating a pre-configured installation command directly from the platform.
This ensures that:
- The host is onboarded with the correct Environment
- The host is mapped to the appropriate Host Group
- Authentication is handled using an opaque API key beginning with
vun_. The key is created through API Key Management under the protectedsystem-sa-omniagentService Account and included in the platform-generated installation command. - The installation process is consistent and error-free
This approach significantly reduces manual effort and standardizes the onboarding process across different environments.
Host discovery and monitoring after OmniAgent installation depend on the ADI_ENABLED platform configuration. Only when ADI_ENABLED is enabled can ADI discover hosts, identify entities, and automatically apply monitoring.
Supported Operating Systems
OmniAgent can be installed on supported operating systems to enable automated discovery, inventory synchronization, monitoring, and instrumentation through the Auto Discovery & Instrumentation (ADI) framework. The generated installation package and commands available from the Download OmniAgent dialog are specific to the selected platform.
The current release supports installation on the following operating systems:
| Operating System | Support Status |
|---|---|
| Red Hat Enterprise Linux (RHEL) | Supported |
| Ubuntu Linux | Supported |
| Microsoft Windows | Supported |
Support for additional operating systems may be introduced in future releases as ADI capabilities continue to expand.
Select the appropriate platform in the Download OmniAgent dialog before generating the installation command. The generated package and installation command are specific to the selected operating system and onboarding context.
How OmniAgent Installation Works in ADI
The OmniAgent installation process follows a structured flow controlled by the platform.
End-to-End Flow
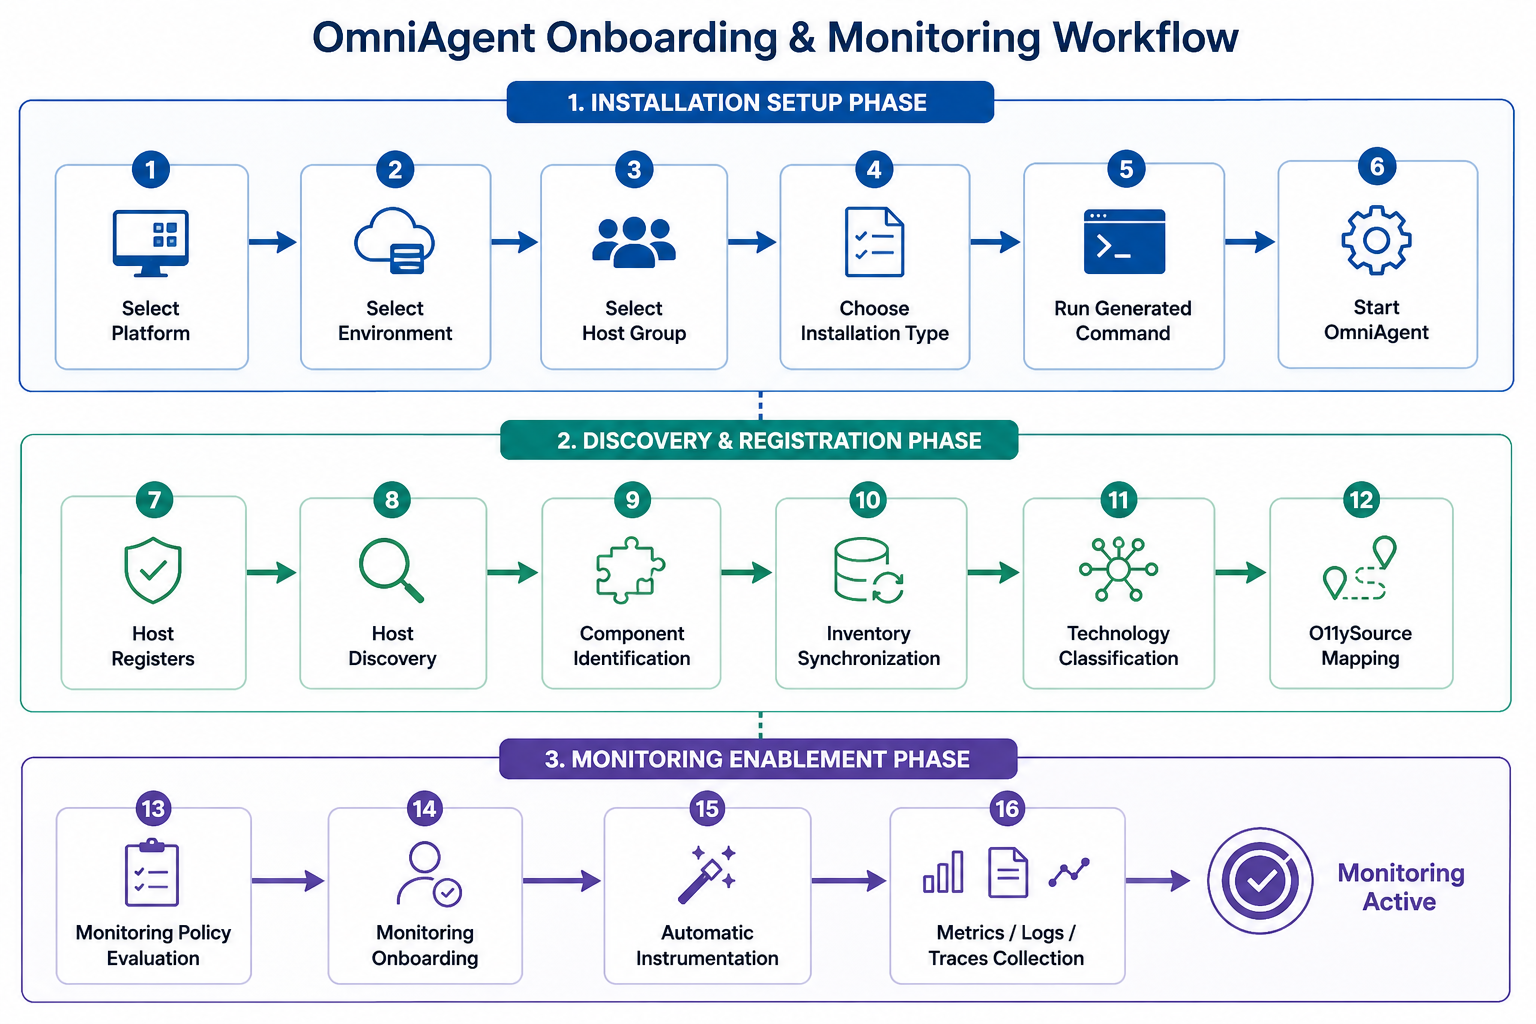
Once the installation is complete, the OmniAgent registers the host with the platform and initiates the discovery process. Supported infrastructure and application components are identified, synchronized with the centralized Host Landscape inventory, and classified based on their detected technology. The platform then evaluates the configured monitoring policies, associates the appropriate O11ySource configuration, automatically provisions monitoring where applicable, enables instrumentation for supported technologies, and begins collecting telemetry such as metrics, logs, and traces.
Accessing Download OmniAgent
The OmniAgent installation workflow is initiated through the Download OmniAgent option available in the Host Landscape.
Navigation
- Go to vuSmartMaps
- Navigate to Data Studio > Host Landscape
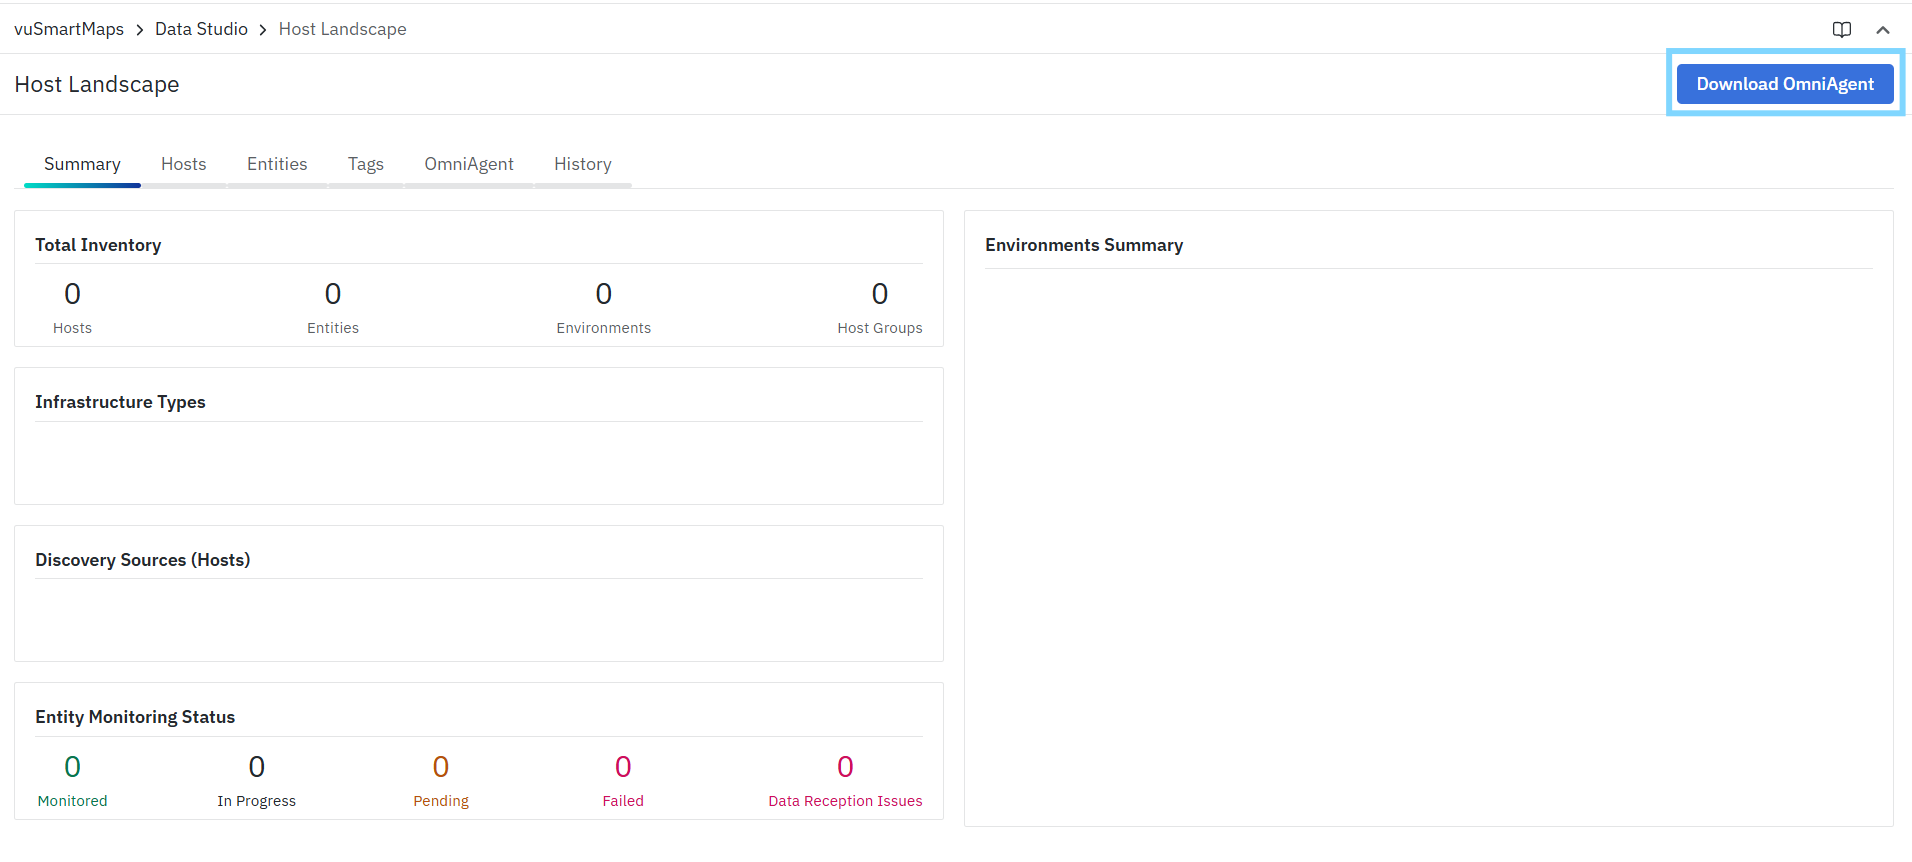
- Click Download OmniAgent (top-right corner)
This opens the Download OmniAgent dialog, which provides all controls required for onboarding.
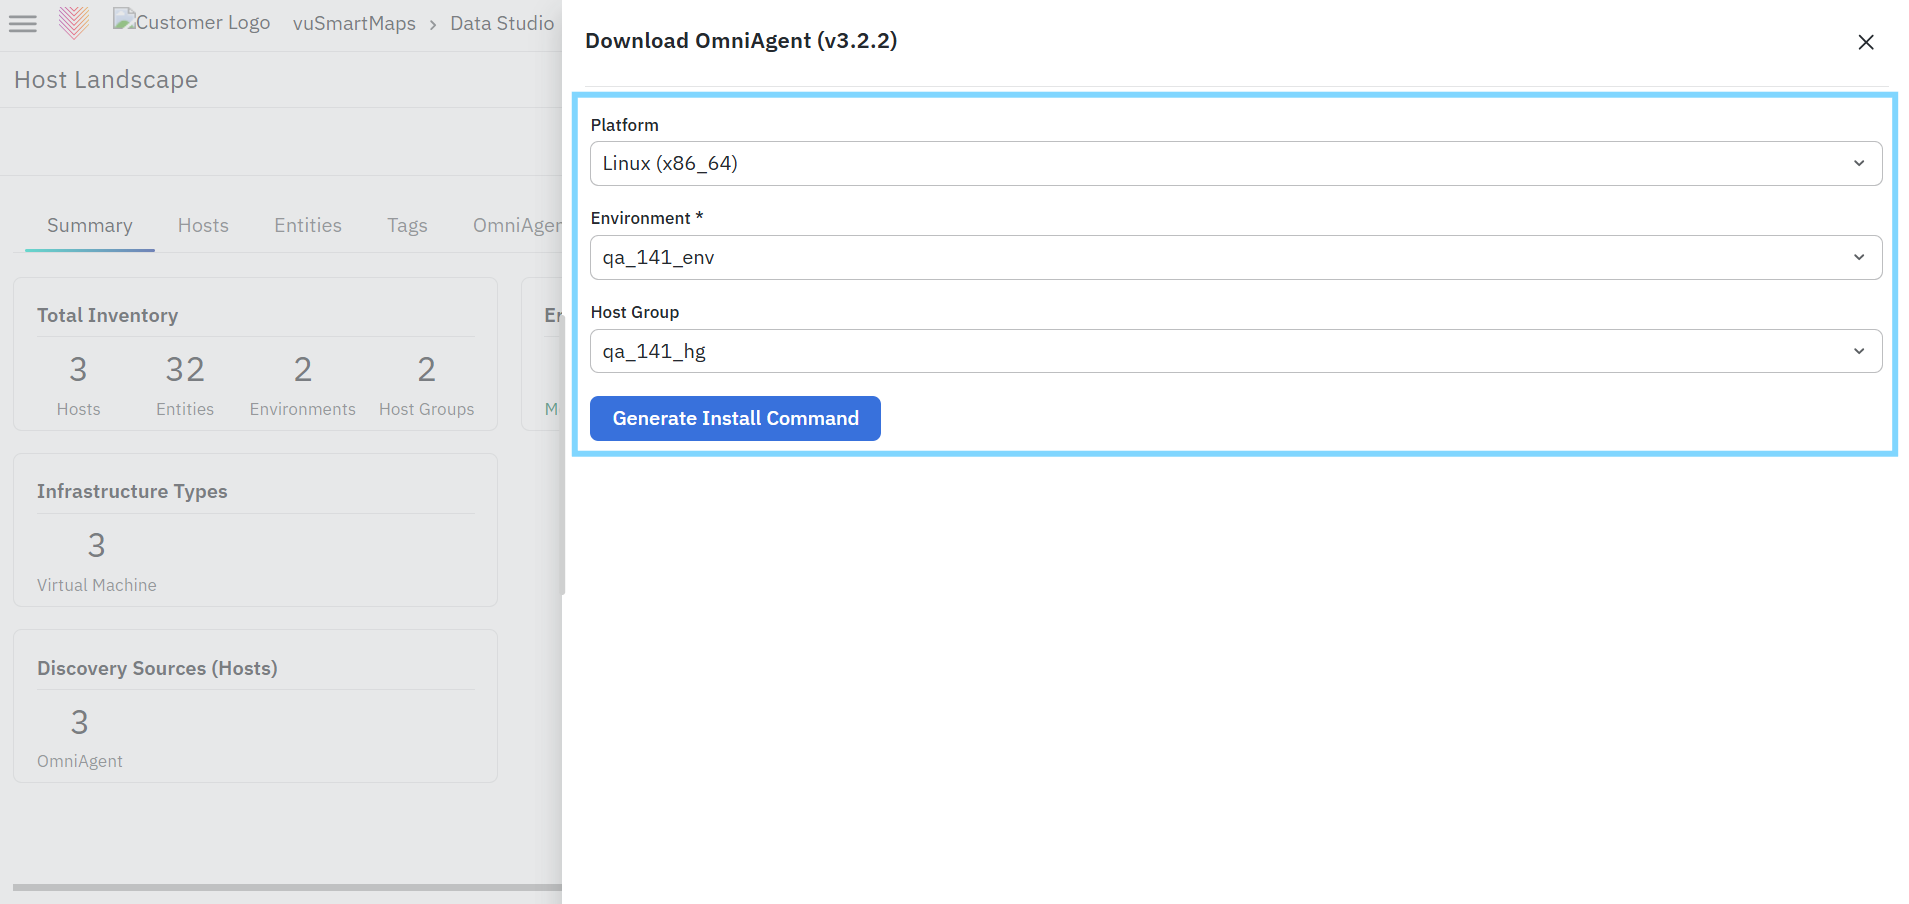
Download OmniAgent Dialog Overview
The Download OmniAgent dialog allows you to generate a platform-specific OmniAgent installation command for the selected onboarding context.
To generate the installation command:
- Select the required Platform.
- Select the target Environment.
- Select the appropriate Host Group.
- Click Generate Install Command.
After the installation command is generated, the available installation options are displayed. Select the required Installation Type (One-Click or Manual) to view the corresponding installation command and proceed with the installation.
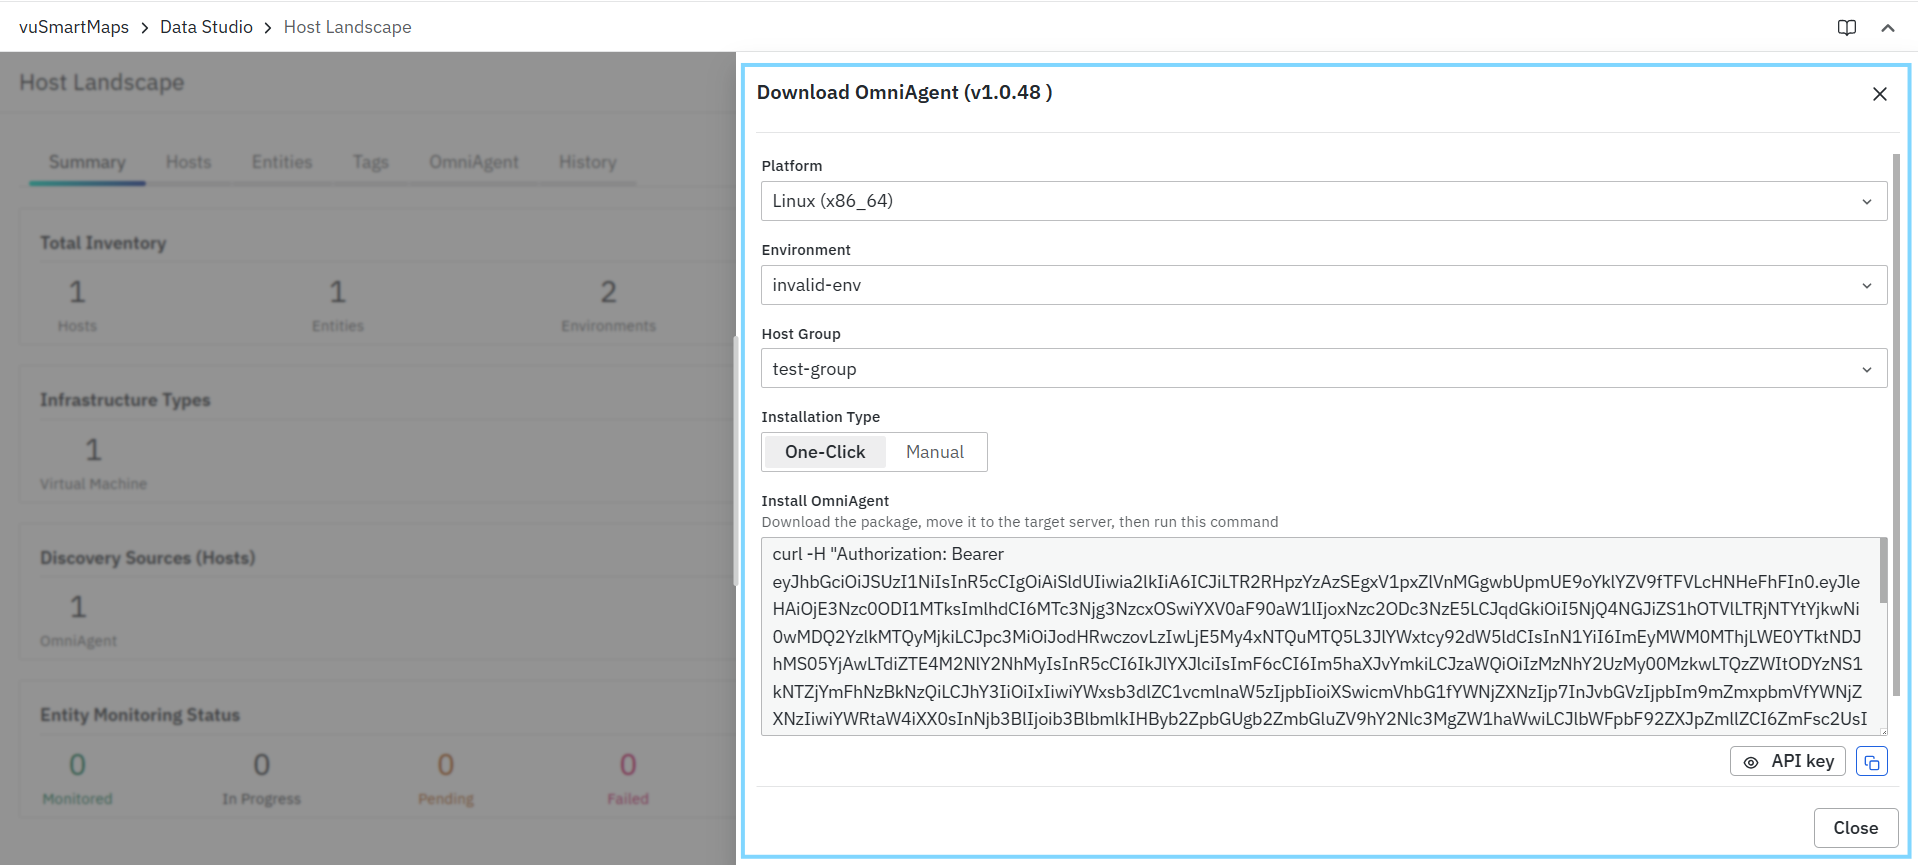
The dialog includes the following sections:
- Platform
- Environment
- Host Group
- Installation Type
- Install OmniAgent (generated installation instructions/command area)
- Opaque API key visibility control
- Copy command action
- Close
The generated installation command contains an opaque OmniAgent API key beginning with vun_. The signed-in operator’s authorization is used for the one-time package download, while the generated vun_ key is used by OmniAgent for subsequent runtime communication with the platform.
Depending on the selected installation type, the dialog may also display a Download OmniAgent Package action.
Platform
The Platform field is used to select the operating system and architecture for the target host where OmniAgent will be installed. Available platform options include:
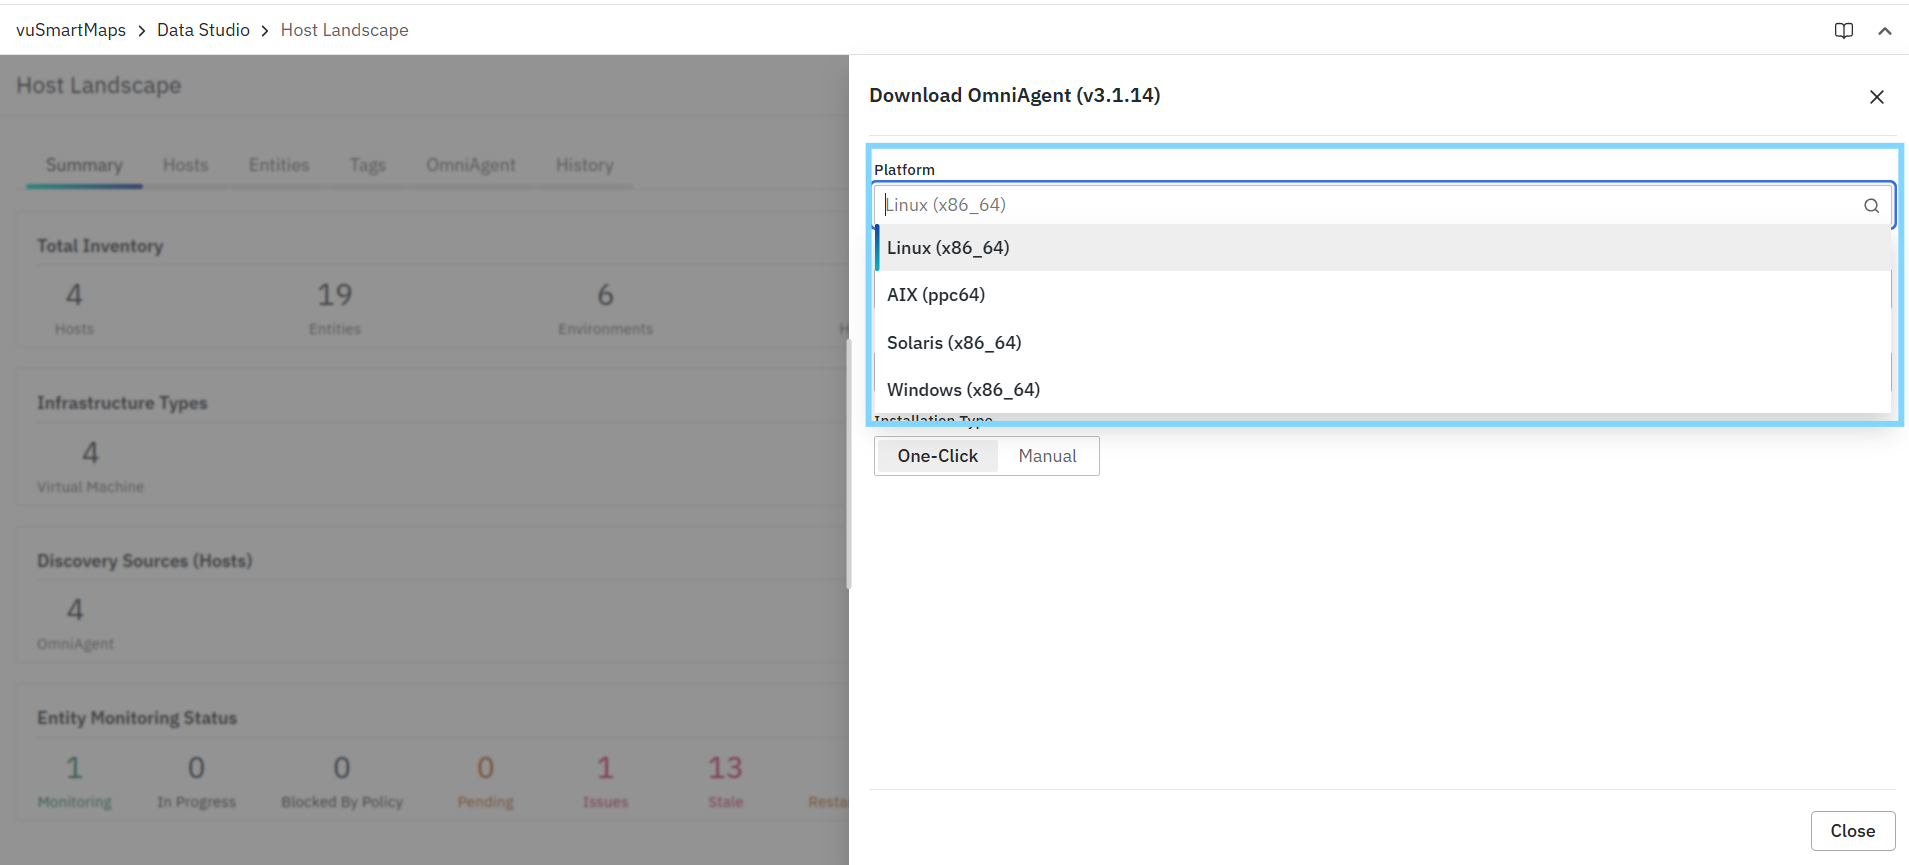
- Linux (x86_64)
- AIX (ppc64)
- Solaris (x86_64)
- Windows (x86_64)
The selected platform determines:
- The package type that is downloaded
- The generated installation command format
- The platform-specific installation and service-management instructions displayed in the Install OmniAgent section
The platform options available in this field can vary depending on the release version and deployment configuration.
Environment
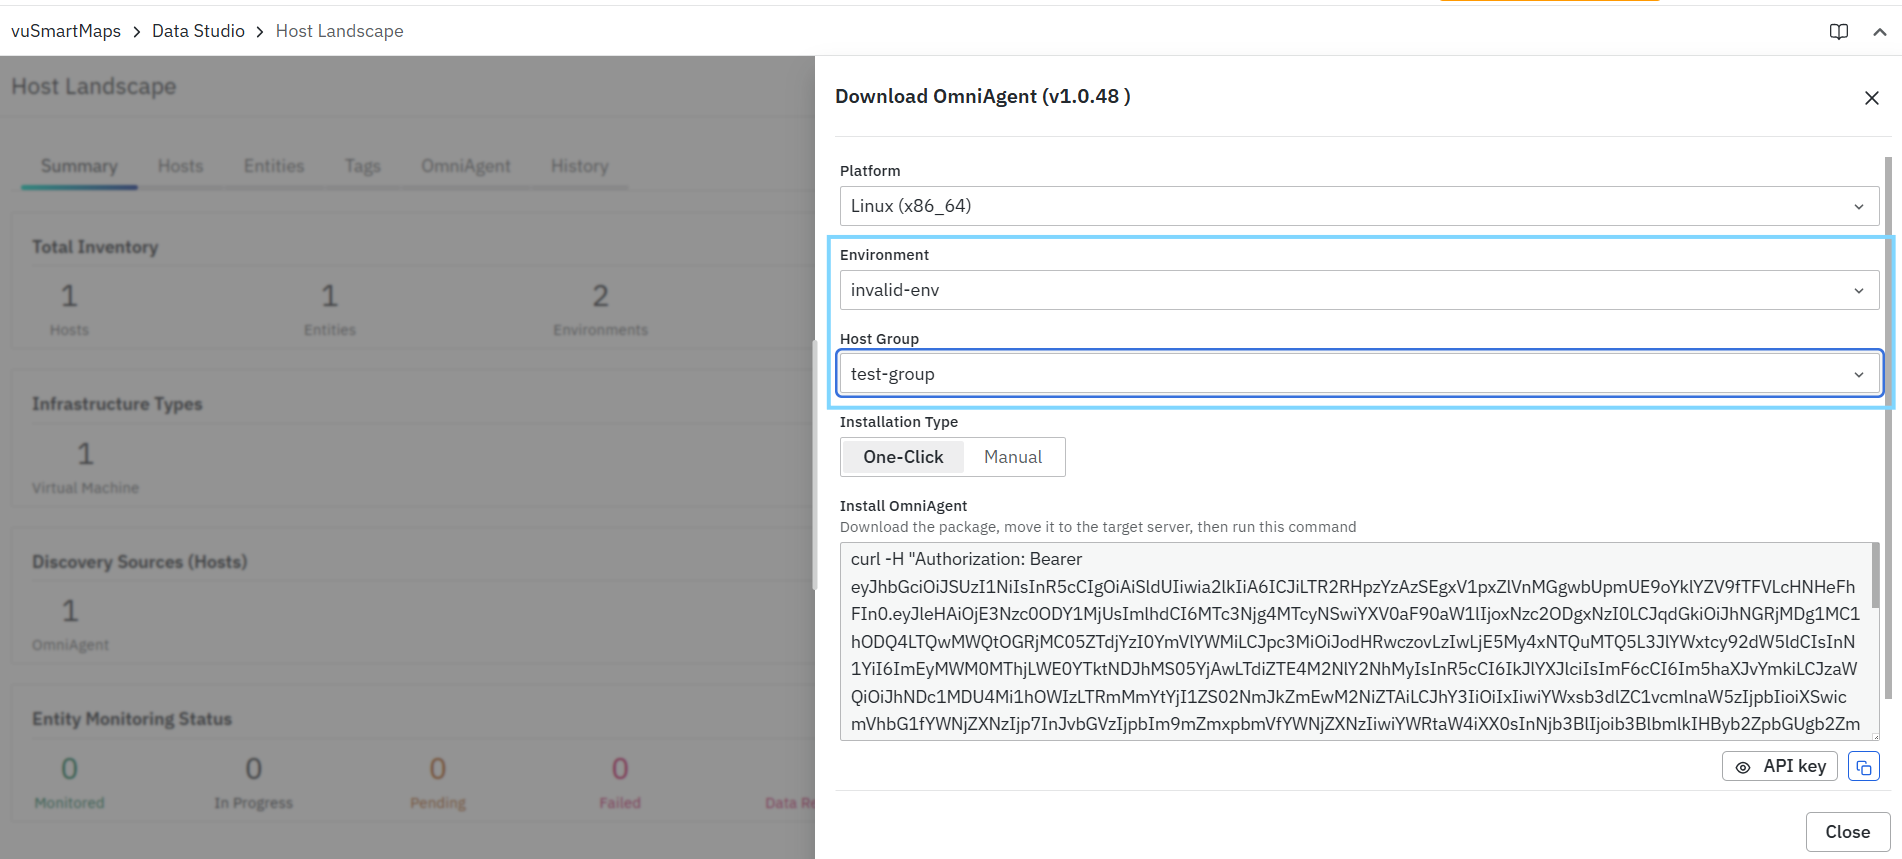
- The Environment field is used to select the environment to which the target host should be associated during onboarding.
- The selected environment is included in the generated installation command and helps ensure that the host is onboarded into the correct logical environment.
- This is useful for organizing hosts into operational or deployment-specific environments, such as:
- Development
- Test
- Staging
- Production
- Customer-specific environments
- Before proceeding, verify that the correct environment is selected, as this value becomes part of the onboarding context for the host.
Host Group
- The Host Group field is used to assign the target host to a host group during onboarding.
- The selected host group is included in the generated installation workflow and helps organize the host within the Host Landscape.
Using the correct host group helps with:
- Structured grouping of onboarded hosts
- Better inventory organization
- Easier filtering and management
- Cleaner operational categorization
If your onboarding workflow requires host grouping, ensure that the correct host group is selected before downloading the package or running the generated installation command.
Environment and Host Group selections are not used only for organizing hosts. ADI also uses these associations to determine which monitoring policies and configurations should be applied automatically after discovery.is
Installation Type
The Installation Type section lets you choose how OmniAgent will be installed on the target host. Before selecting an installation type, make sure you have selected the following required values:
- Platform
- Environment
- Host Group
Once these values are selected, choose one of the following installation options:
- One-Click provides a single generated command that combines the package download and installation steps.
- Manual separates the package download from the installation command, allowing the package to be downloaded first and installed later on the target host.
The installation content is generated based on the selected onboarding context. If the required selections are not completed, the installation section is not displayed. This gives you the flexibility to choose between a streamlined command-driven workflow or a staged installation workflow.
For Unix-based platforms (Linux, Solaris, and AIX), OmniAgent installation and service-management operations require administrative privileges where applicable. Permanent sudo access is not required. OmniAgent must be installed in a dedicated system directory such as /opt/vunet/omniagent. Installing OmniAgent in user home directories (for example, home,user...) is not supported and will cause the installation to fail.
One-Click Installation
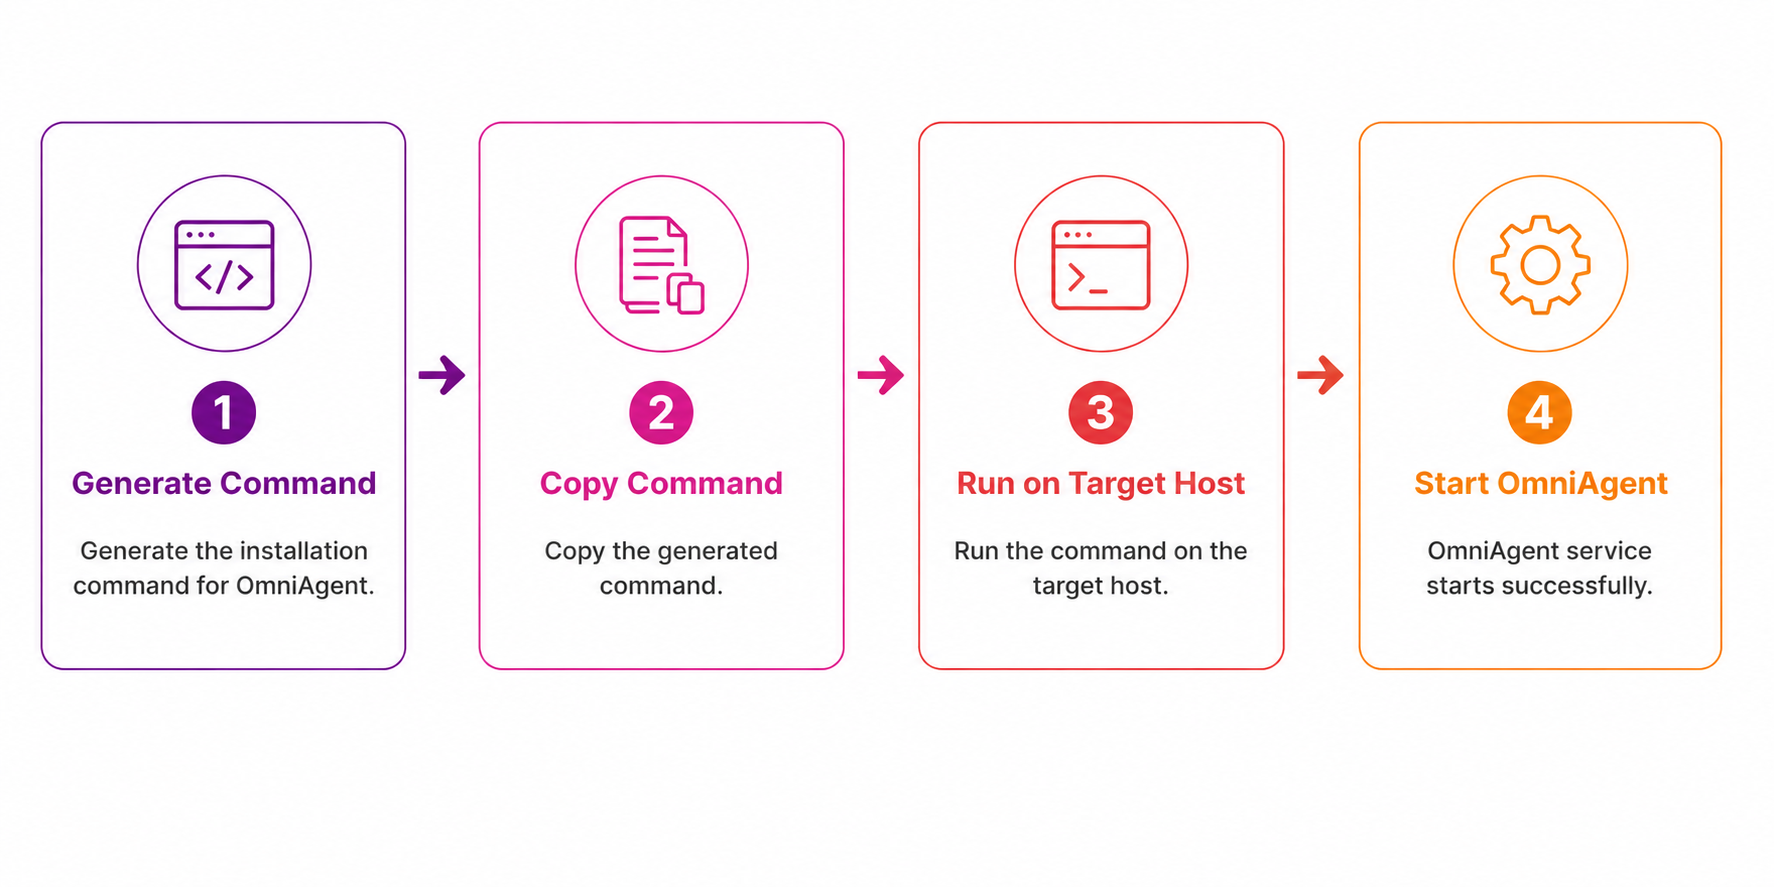
- The One-Click installation type provides a single generated command that combines the required package download and installation steps into one guided workflow.
- After you select the Platform, Environment, and Host Group, the Install OmniAgent section displays a platform-specific command that can be executed directly on the target host.
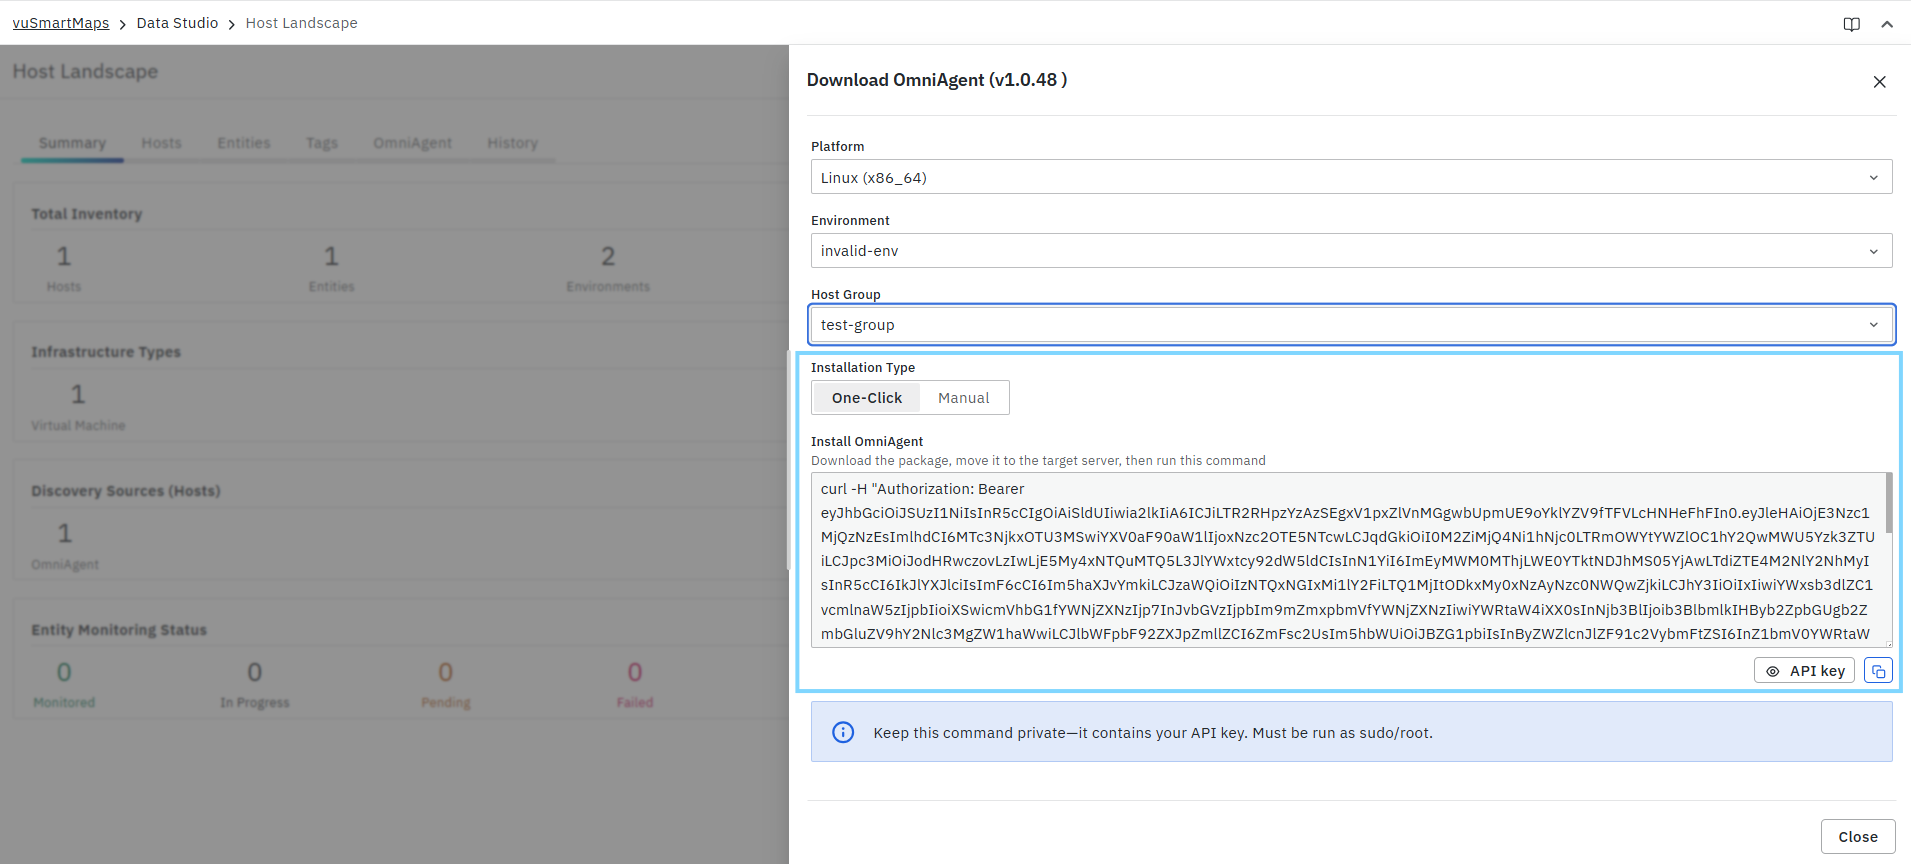
- This command is generated automatically based on the selected onboarding context and is intended to simplify the installation process by reducing the number of separate actions required. It also ensures that the selected Environment and Host Group are included as part of the installation metadata, which aligns with the ADI host-group mapping flow described in the PRD. When OmniAgent is installed with a host group selection, the host and its discovered entities are automatically associated with that host group.
How One-Click Works
In One-Click mode, the Install OmniAgent section provides a single generated command that performs the end-to-end onboarding preparation in one sequence. Based on the selected platform, the generated command can:
- Download the OmniAgent package from the configured management endpoint.
- Download the OmniAgent package and verify the package SHA256 checksum included in the generated installation command to ensure the package was downloaded successfully and has not been modified.
To securely download the OmniAgent package, VuNet Systems' CA certificate must be present in the target host’s system trust store. If the certificate is not available in the trust store, additional TLS validation handling may be required during installation.
- Extract the downloaded package.
- Run the OmniAgent installation command using the selected onboarding details.
- Display a follow-up instruction to start OmniAgent after installation.
Because the command is generated by the platform, it reduces manual effort and helps ensure that the installation uses the correct Environment and Host Group values.
Steps to Use One-Click Installation
- Navigate to vuSmartMaps > Data Studio > Host Landscape.
- Click Download OmniAgent.
- In the Download OmniAgent dialog, select the required Platform.
- Select the required Environment.
- Select the required Host Group.
- Under Installation Type, select One-Click.
- Review the generated command shown in the Install OmniAgent section.
- Use the API key visibility control only when you need to inspect the opaque
vun_API key embedded in the generated command. Treat the displayed key and the copied command as sensitive credentials. - Click the Copy icon to copy the generated command.
- Open a terminal or shell session on the target host.
- Review the generated command. If your deployment requires a custom working directory, update the installation command accordingly. VuNet recommends using a dedicated system directory such as /opt/vunet/omniagent instead of user home directories.
- Paste and run the generated installation command using the required administrative privileges. Permanent sudo access is not required.
- After the installation completes, run the suggested start command shown in the dialog.
For Solaris and AIX, installation command uses the $USER environment variable and the OmniAgent process is owned by the same user. To change the user, replace the $USER with another existing username in the command you copied.
sudo ./omniagent start
Install OmniAgent Section (One-Click)
When One-Click is selected, and all required values are provided, the Install OmniAgent section becomes available. This section displays the generated command that must be run on the target host.
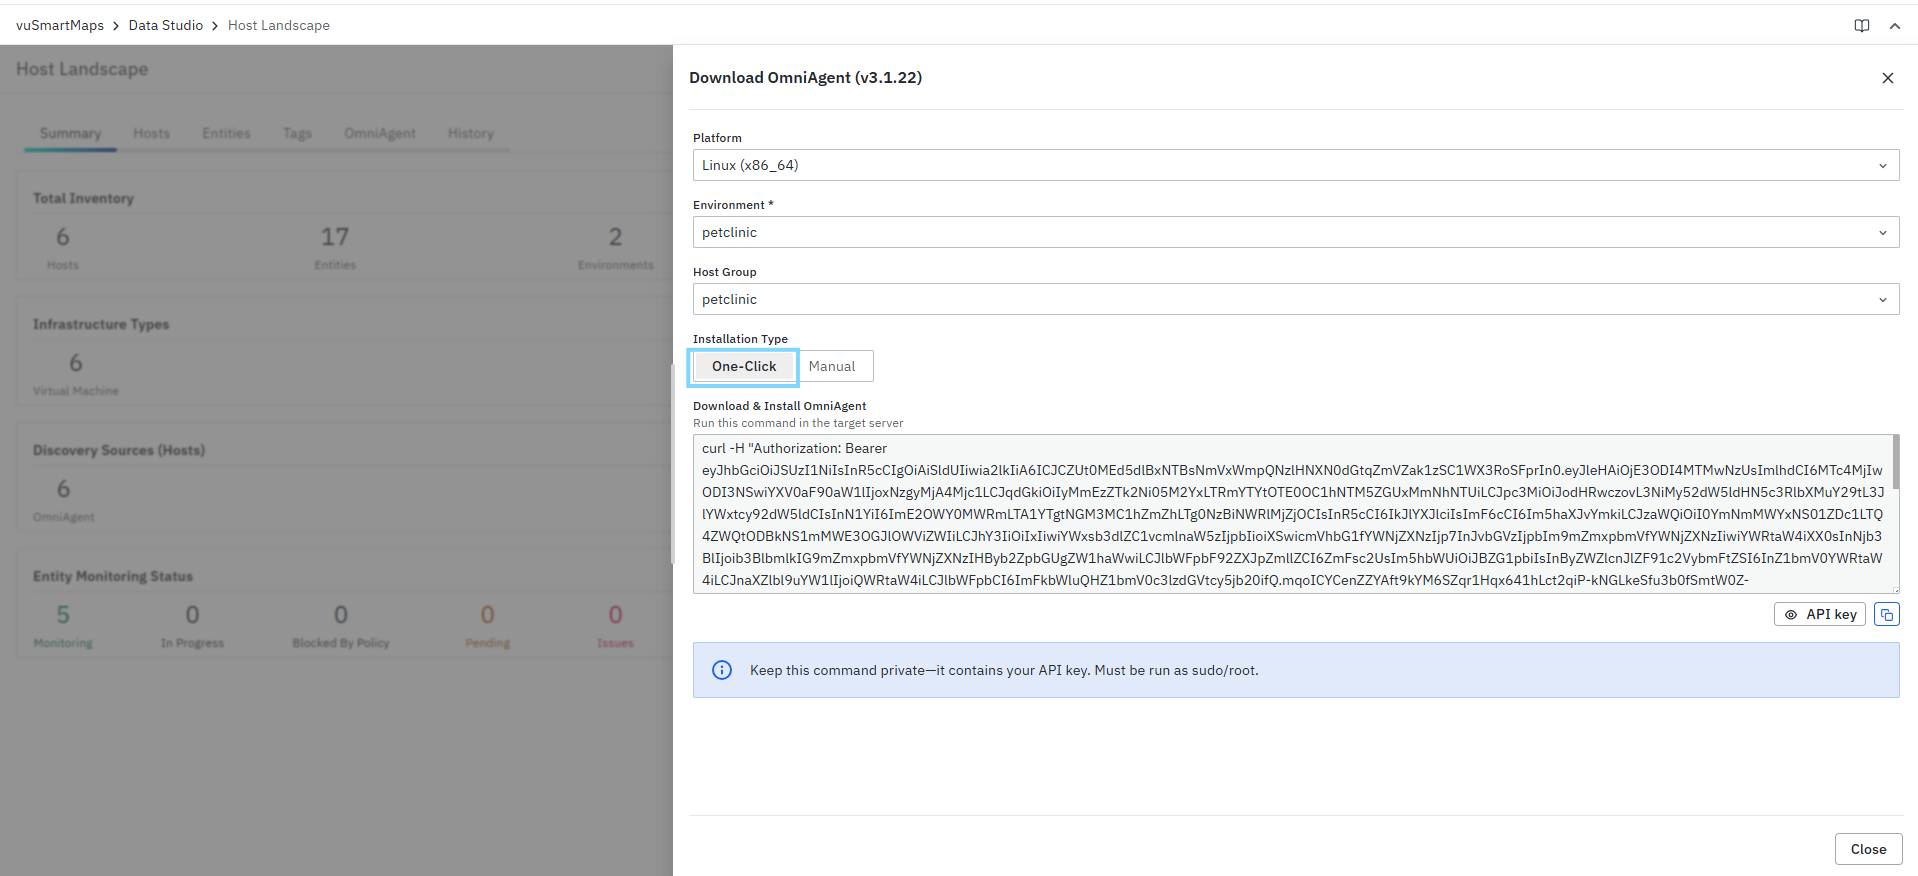
Unlike Manual mode, One-Click does not show a separate package download button. Instead, the package download is already included as part of the generated command.
This section can also include:
- API key visibility control
- Copy command action
The command contains sensitive credentials and should be executed using the required administrative privileges. Permanent sudo access is not required.
Generated One-Click Command
The generated One-Click command is a combined command sequence that automates the download and installation workflow. It includes:
- Downloading the OmniAgent package using a platform-specific download URL.
- Saving the package as:
omniagent__<platform_arch>__<version>.tar.gz - Verifying the downloaded package using the package SHA256 checksum.
- Extracting the package contents.
- Running the OmniAgent installation command.
- Passing the required installation parameters, such as:
-c config.yaml-u <user> (Unix-based platforms)--api-key <vun_api_key>--environment <environment-name>--hostgroup <host-group-name>
The exact command structure varies depending on the selected operating system and platform.
- Displaying a follow-up instruction to start OmniAgent using:
sudo ./omniagent start
If a working directory is not explicitly specified during installation, OmniAgent uses the default installation location based on the operating system:
- Linux:
/opt/vunet/omniagent - AIX:
/opt/vunet/omniagent - Solaris:
/opt/vunet/omniagent - Windows:
C:\vunet\omniagent
-
To securely download the OmniAgent package, VuNet Systems' CA certificate must be present in the target host’s system trust store. If the certificate is not available in the trust store, the generated download command may include the -k option.
-
The generated One-Click command automatically validates the downloaded package using the package SHA256 checksum before extraction and installation. If checksum validation fails, the installation process is aborted automatically to prevent installation of a corrupted or modified package. Manual package checksum verification is therefore not required when using the generated One-Click workflow.
Platform-Specific Command Examples
The generated One-Click command differs based on the selected operating system and architecture. The following examples illustrate the command structure generated for each supported platform:
- Linux (amd64)
- AIX (ppc64)
- Solaris (amd64)
- Windows (amd64)
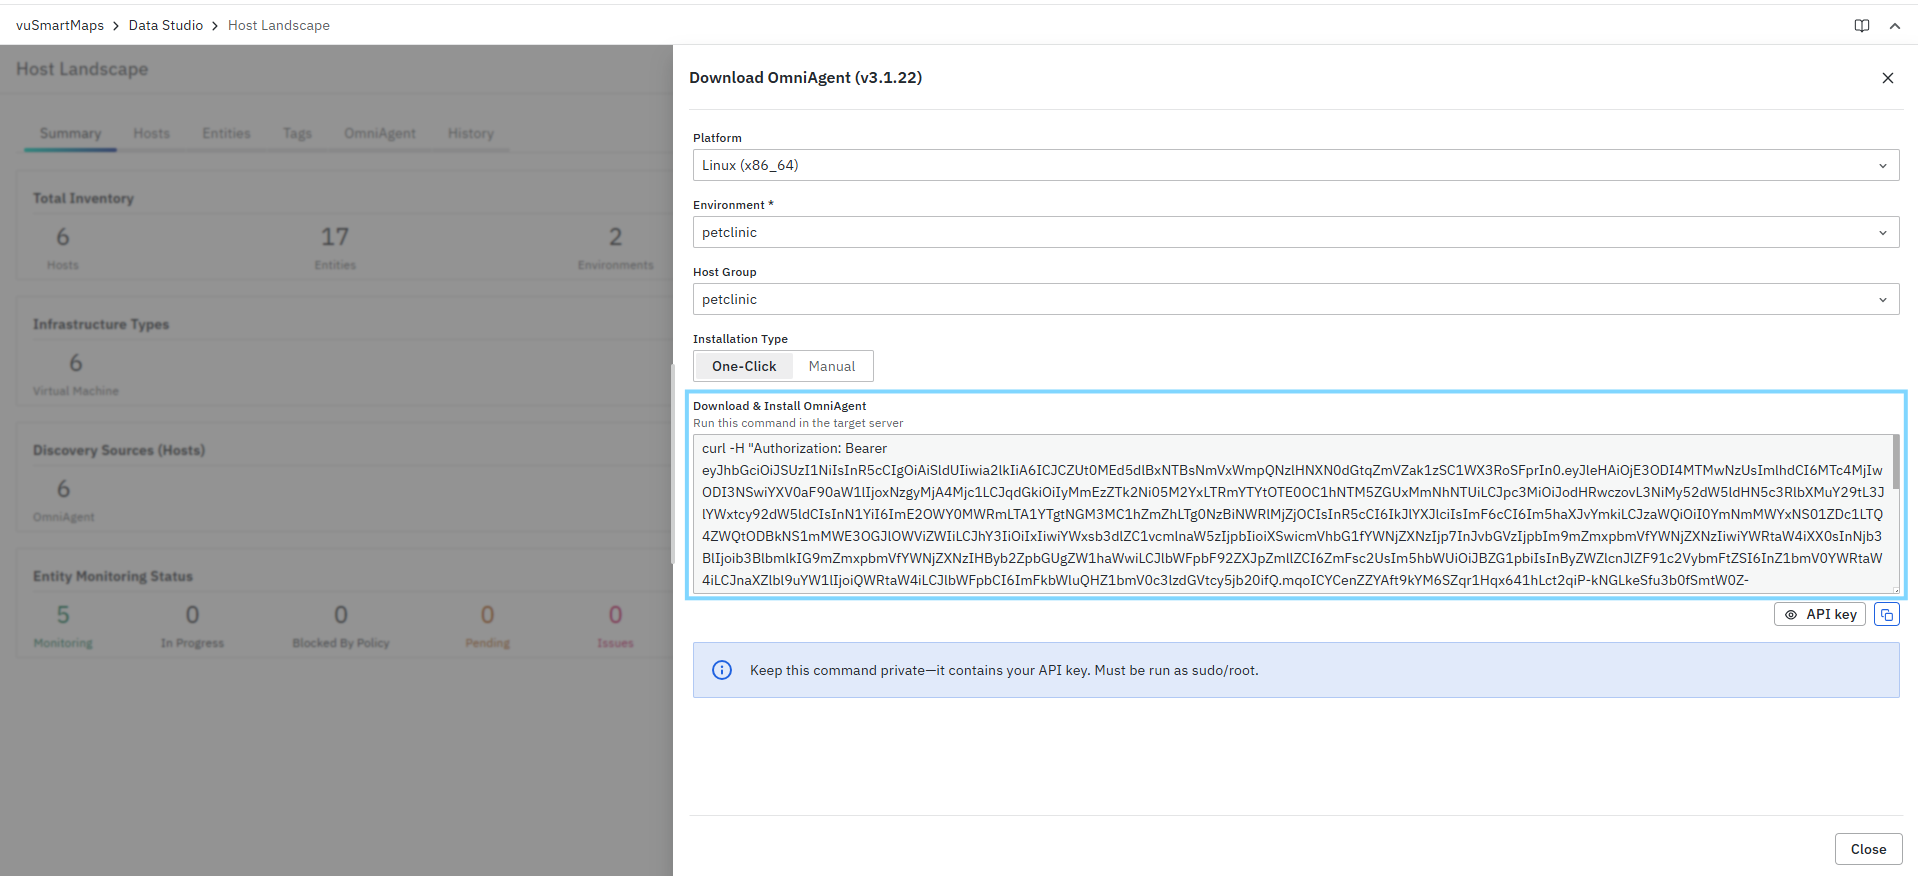
API Key and Copy Command (One-Click)
- The API key visibility control allows you to show or hide the opaque
vun_API key embedded in the generated command. Use this control only when verification or troubleshooting is required.
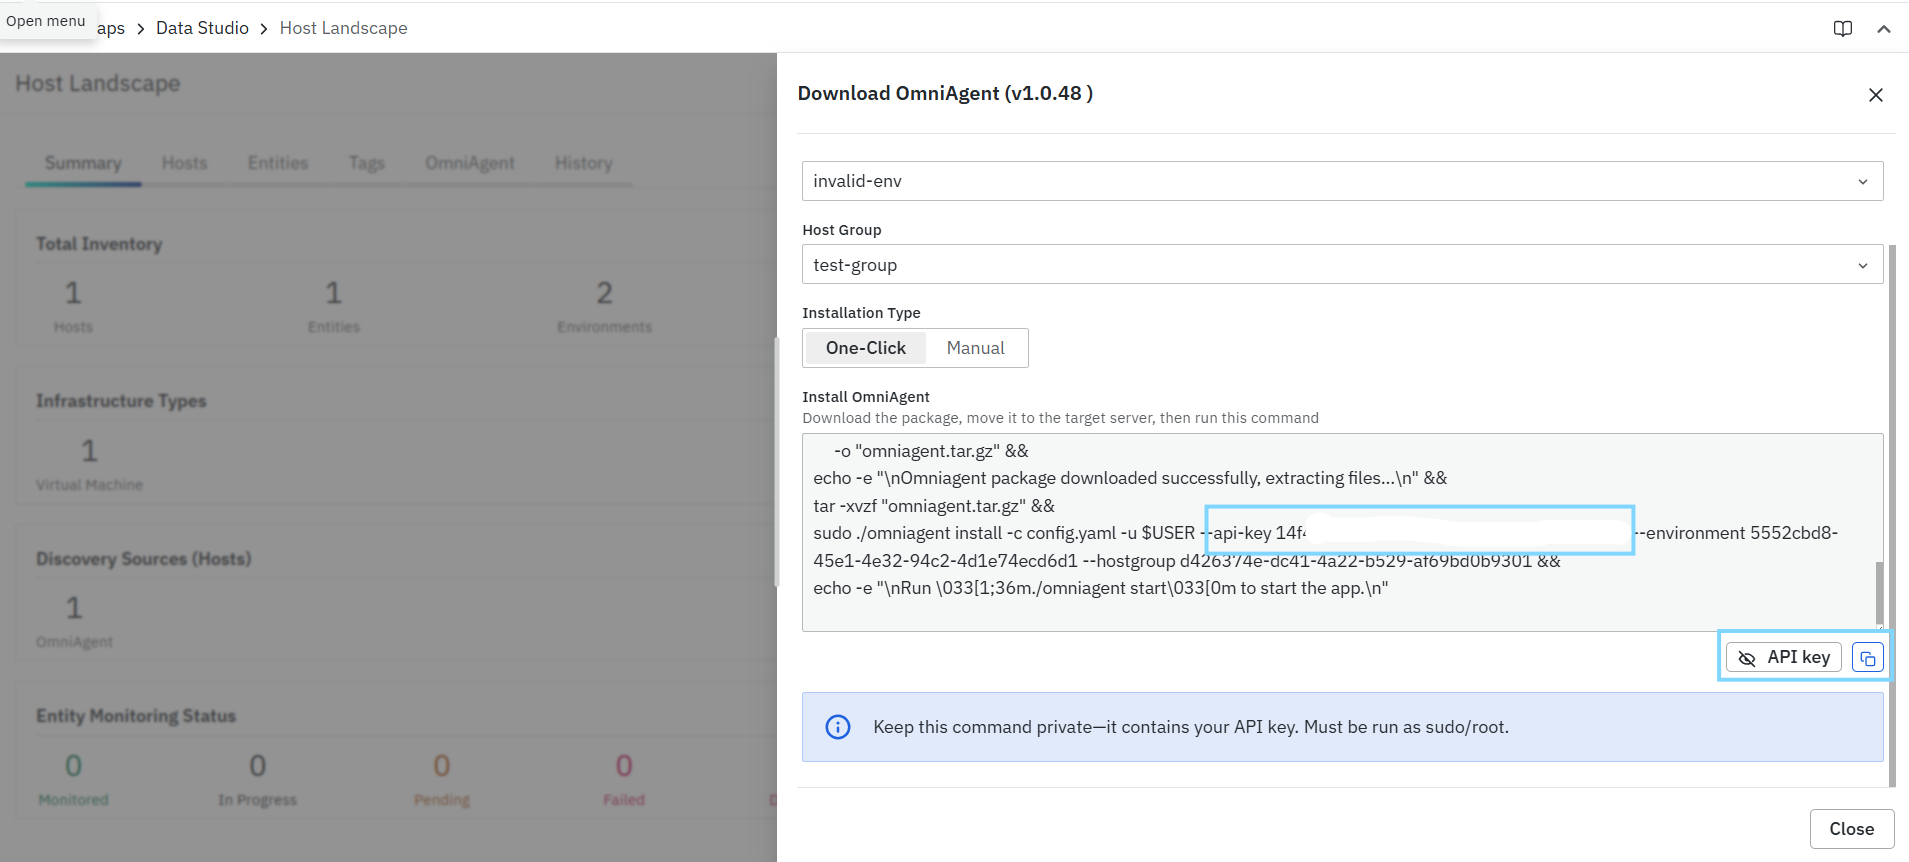
- The Copy icon copies the complete generated command to the clipboard. This is the recommended method because it preserves the generated parameters and avoids typing errors.
The copied command contains a sensitive OmniAgent API key. Do not share it or store it in an unsecured location.
After Installation (One-Click)
After the One-Click installation command completes successfully:
- The OmniAgent package is downloaded and extracted on the target host.
- OmniAgent is installed using the selected onboarding context.
- The host is associated with the selected Environment and Host Group.
sudo ./omniagent start
- Once OmniAgent is started, the host becomes part of the ADI onboarding flow, after which the platform can continue with discovery, inventory updates, and downstream onboarding behavior.
Manual Installation
The Manual installation type provides a staged installation workflow where the OmniAgent package is downloaded separately before the installation command is executed on the target host. This mode is useful when you want more control over how the package is transferred and installed, or when the download must be performed separately from the target server execution.
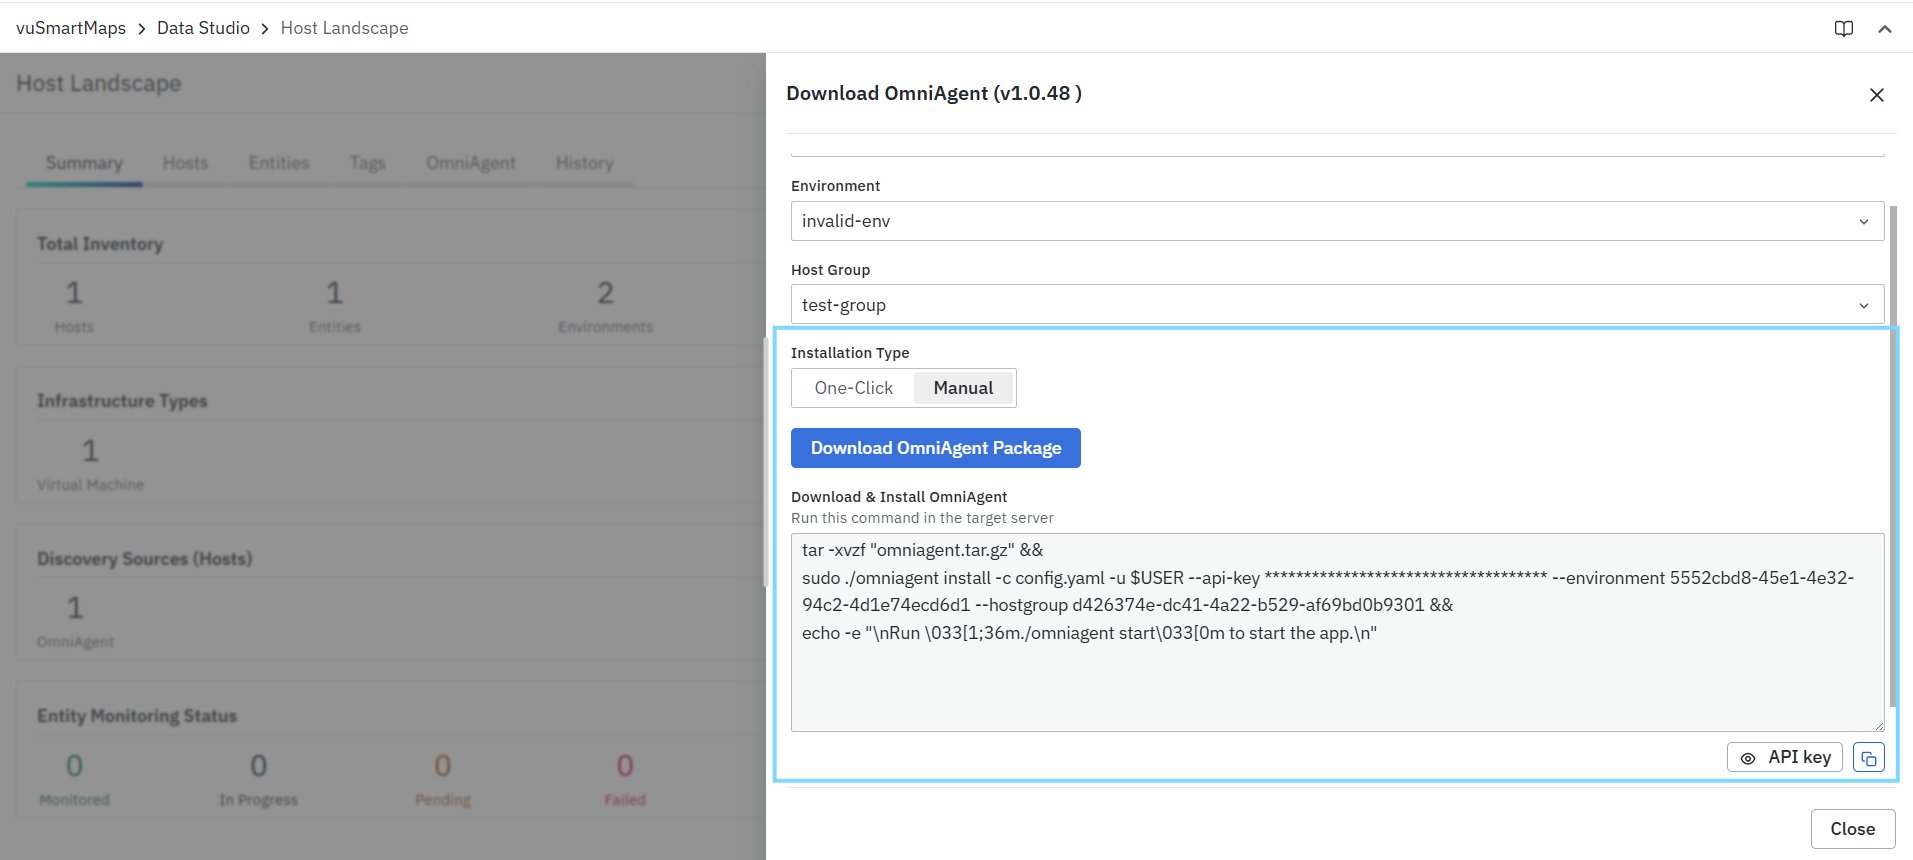
After you select the Platform, Environment, and Host Group, and then choose Manual, the dialog displays:
- Download OmniAgent Package
- Download & Install OmniAgent
- A generated installation command
- API key visibility control
- Copy command action
How Manual Works
- In Manual mode, the package download and installation are separated.
- You first download the OmniAgent package using the Download OmniAgent Package button.
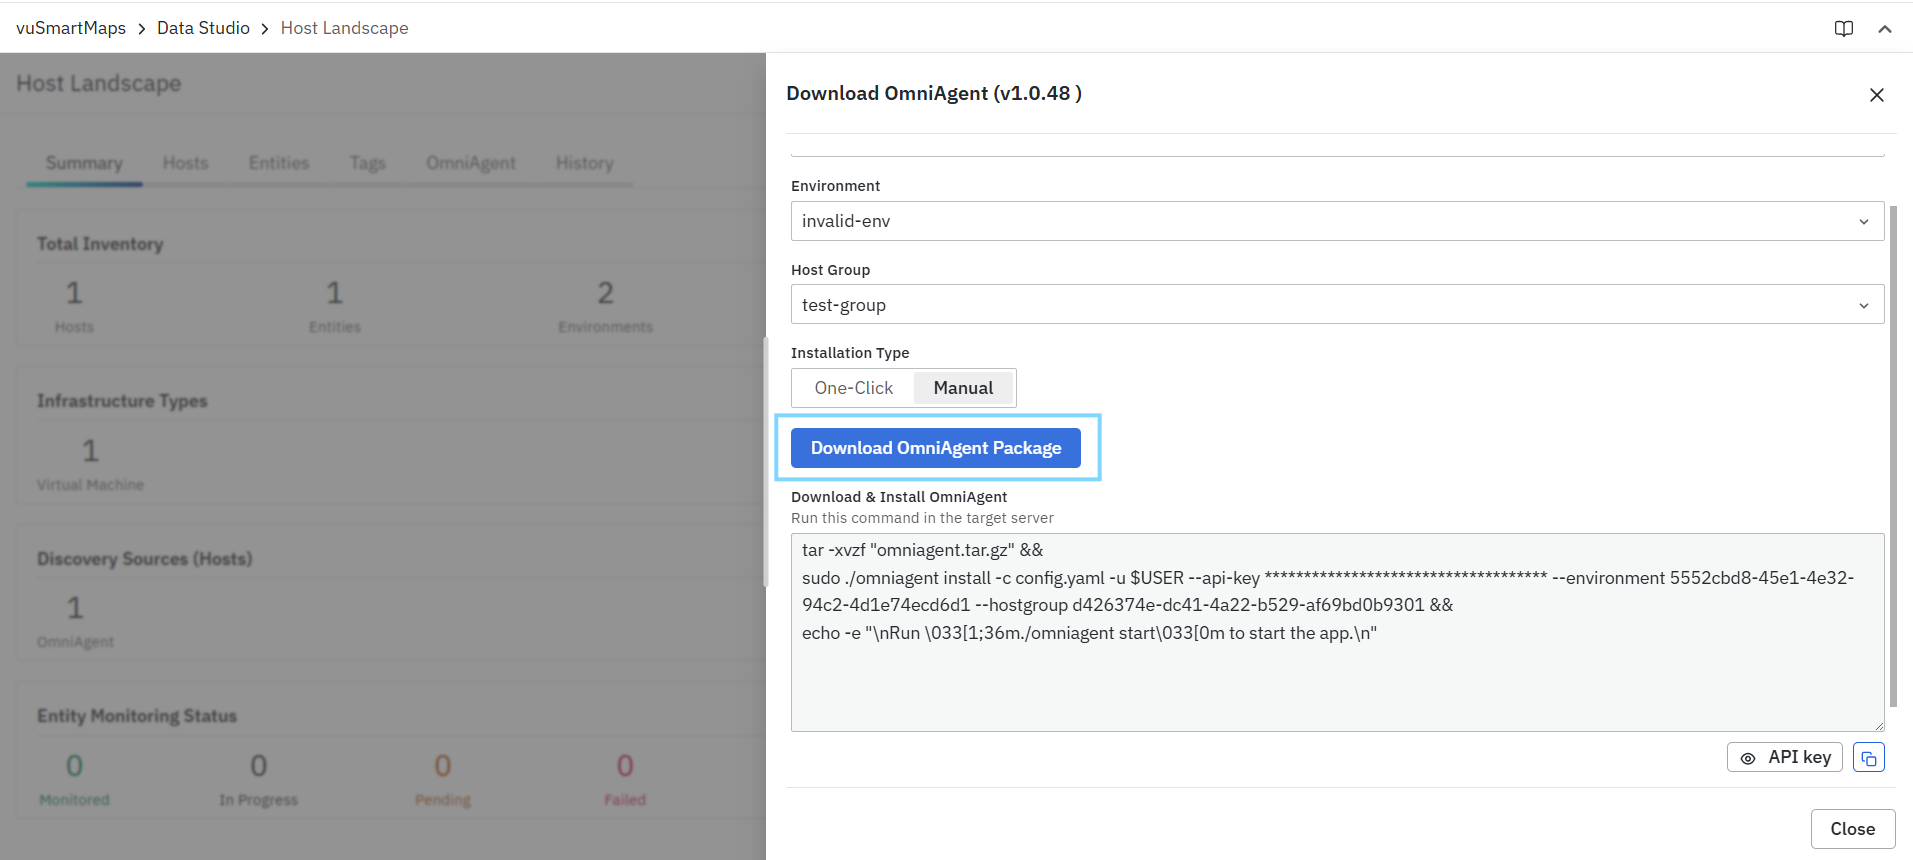
- After the package is available on the target host, the generated command in the Download & Install OmniAgent section is used to complete the installation.
- Unlike One-Click, the generated command in Manual mode does not include the package download step. It assumes that the package has already been downloaded and moved to the target host.
Steps to Use Manual Installation
- Navigate to vuSmartMaps > Data Studio > Host Landscape.
- Click Download OmniAgent.
- In the Download OmniAgent dialog, select the required Platform.
- Select the required Environment.
- Select the required Host Group.
- Under Installation Type, select Manual.
- Click Download OmniAgent Package.
- Save the downloaded package to your local system.
- Transfer the package to the target host if the download was performed on a different system.
- Review the generated command shown in the Download & Install OmniAgent section.
- Use the API key visibility control only when you need to inspect the opaque
vun_API key embedded in the generated installation command. Treat the displayed key and copied command as sensitive credentials. - Click the Copy icon to copy the command.
- Open a terminal or shell session on the target host.
- Paste and run the generated installation command using the required administrative privileges. Permanent sudo access is not required.
- After the installation completes, run the suggested start command shown in the dialog
For Solaris and AIX, installation command uses the $USER environment variable and the OmniAgent process is owned by the same user. To change the user, replace the $USER with another existing username in the command you copied.
sudo ./omniagent start
Download OmniAgent Package (Manual)
The Download OmniAgent Package button is available only in Manual mode. Use this button to download the OmniAgent package for the selected platform.
After downloading the package:
- Save it locally.
- Verify the package integrity using the package SHA256 checksum provided alongside the downloaded package.
- Ensure that the package is available in the location where you plan to execute the installation command.
- Package checksum validation confirms that the downloaded package is complete and has not been altered during transfer.
This staged approach is useful when the download is performed on an intermediate workstation, and the package must then be transferred securely to the target server.
Verify Package Integrity (SHA256)
Before extracting or installing OmniAgent, verify that the downloaded package matches the published SHA256 checksum. The package SHA256 checksum is used to validate the integrity of the downloaded package and helps ensure that the package has not been corrupted or modified during download or transfer.
Linux
sha256sum <downloaded-package>
Windows (PowerShell)
Get-FileHash .\<downloaded-package> -Algorithm SHA256
Compare the calculated SHA256 value with the published checksum. If the values match, proceed with extraction and installation.
Do not install the package if the calculated checksum does not match the published SHA256 value.
Executable Integrity Verification
After extracting the OmniAgent package, additional checksum files are included within the package:
- omniagent.sha256 (Linux, AIX, Solaris)
- omniagent.exe.sha256 (Windows)
- autodiscovery.sha256 (Linux, AIX, Solaris)
- autodiscovery.exe.sha256 (Windows)
These checksum files are provided for environments that require verification of executable integrity as part of internal security, compliance, or software validation processes. The OmniAgent checksum files validate the OmniAgent executable, while the autodiscovery checksum files validate the Discovery Probe executable included with the package. Compare the executable checksum against the corresponding SHA256 file according to your organization's security validation procedures before deployment.
Download & Install OmniAgent Section (Manual)
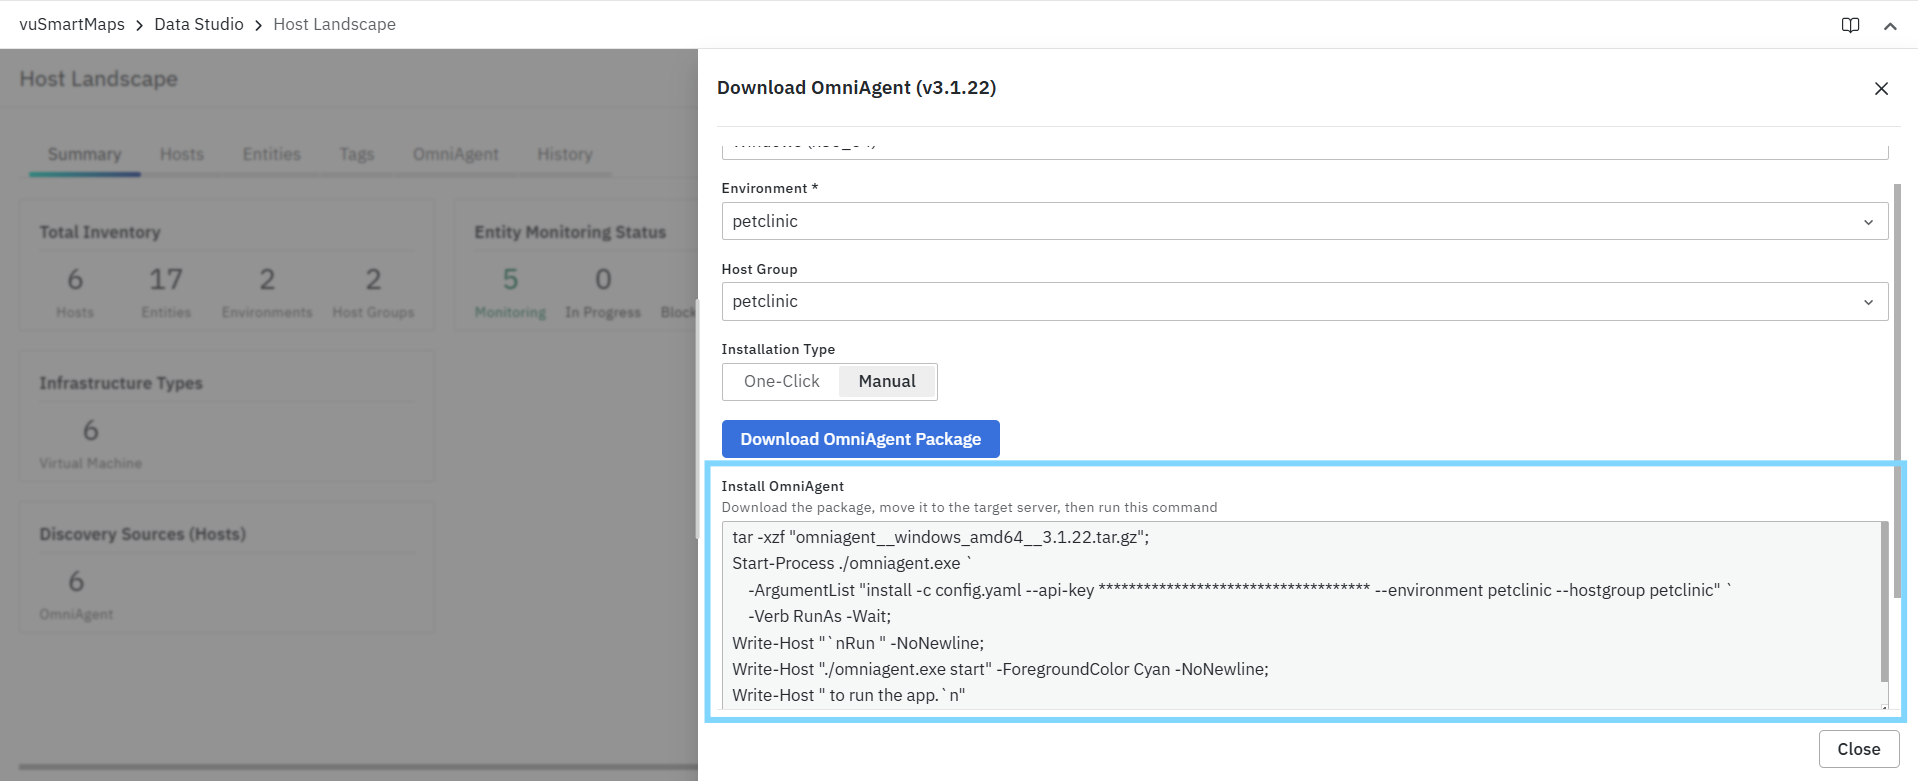
When Manual is selected, the dialog displays the Download & Install OmniAgent section. This section provides the installation command that must be executed after the OmniAgent package has already been downloaded and transferred to the target host.
Unlike One-Click, the Manual workflow does not include the package download request. The generated command begins from package verification (where applicable), package extraction, and OmniAgent installation.
Generated Manual Command
The generated Manual command is a platform-specific installation command built from the selected onboarding context. Depending on the selected operating system, the generated command can perform the following actions:
- Verify the integrity of the downloaded package using the package SHA256 checksum (where supported).
- Extract the downloaded OmniAgent package.
- Execute the OmniAgent installation command.
- Pass the required onboarding parameters, such as:
-c config.yaml-u <user>(Unix-based platforms)--api-key <vun_api_key>--environment <environment-id>--hostgroup <host-group-id>
- Display a follow-up instruction to start OmniAgent.
The exact command structure varies based on the selected operating system and platform.
- Do not manually modify the generated command unless there is a validated deployment-specific requirement.
- Linux-generated commands include package SHA256 verification before extraction and installation. If checksum validation fails, the installation process is aborted automatically.
Platform-Specific Installation Behavior
| Platform | Package Extraction Method |
|---|---|
| Linux | tar -xvzf |
| AIX | gzip -dc package.tar.gz |
| Solaris | gzip -dc package.tar.gz |
| Windows | tar -xzf followed by omniagent.exe install |
API Key and Copy Command (Manual)
- The API key visibility control allows you to show or hide the opaque vun_ API key included in the generated installation command.
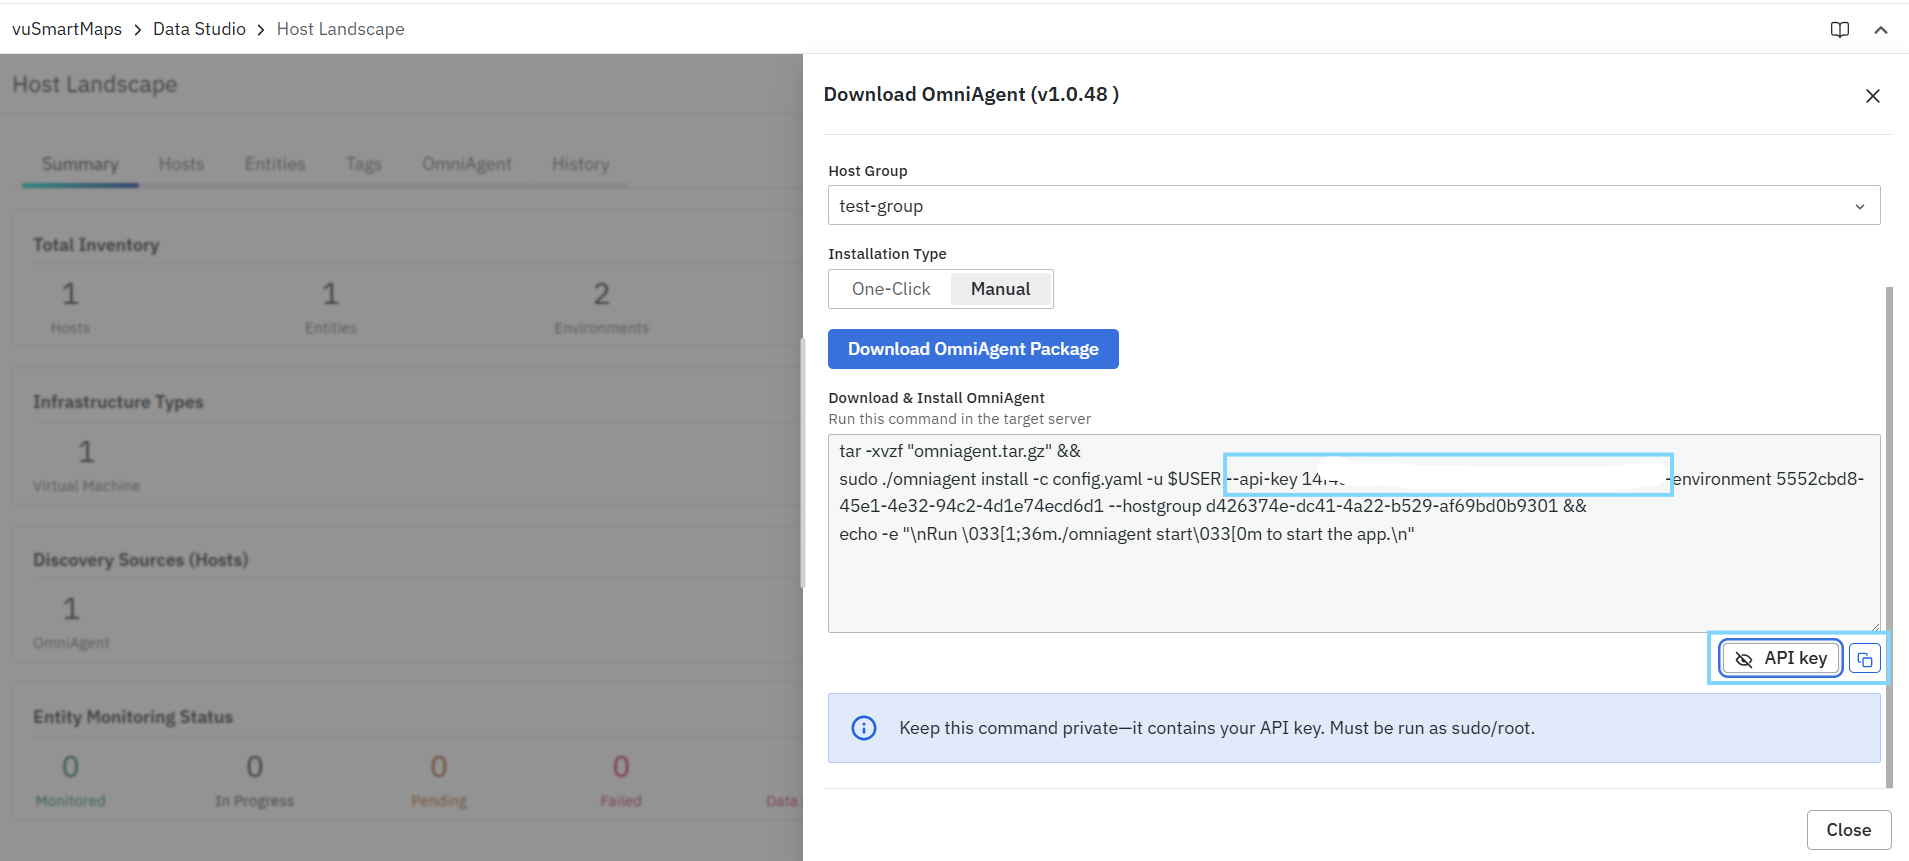
- The Copy icon copies the complete command to the clipboard so that it can be pasted directly into the target host terminal. This preserves the generated parameters and helps avoid typing mistakes.
The copied command contains a sensitive OmniAgent API key. Do not share it or store it in an unsecured location.
After Installation (Manual)
After the Manual installation command completes successfully:
- The downloaded package is extracted on the target host.
- OmniAgent is installed using the selected onboarding context.
- The host is associated with the selected Environment and Host Group.
- Next step:
sudo ./omniagent start
- Once OmniAgent is started, the ADI flow continues with agent registration, discovery probe installation, and discovery processing.
What Happens After Starting OmniAgent
Once OmniAgent is started successfully, the Auto Discovery & Instrumentation (ADI) workflow begins automatically. OmniAgent establishes communication with the vuSmartMaps platform, discovers supported infrastructure and application components, synchronizes the discovered information with the centralized inventory, and initiates monitoring based on the configured onboarding policies. This automated workflow minimizes manual onboarding effort and ensures that newly discovered infrastructure and application components are continuously monitored according to the configured platform policies.
The ADI discovery and monitoring workflow described below is applicable only when the ADI_ENABLED configuration is enabled in the platform deployment. If ADI_ENABLED is disabled, hosts and entities will not be discovered, updated, onboarded, or monitored by the ADI module.
1. Host Registration
After OmniAgent starts:
- OmniAgent sends its securely stored opaque API key in the
Authorization: Bearer vun_<key>header on every runtime request. - The platform Auth Service validates the API key, including its active status, expiry, owning Service Account, and required permission.
- After successful authentication, the host is registered with the platform.
- The platform validates the onboarding information associated with the selected Environment and Host Group.
- After successful registration, the host becomes visible in Host Landscape → Hosts and is prepared for the discovery process.
2. Discovery Begins
After host registration, OmniAgent automatically initiates the discovery process.
During discovery, OmniAgent scans the monitored host and identifies supported infrastructure and application components, including:
- Operating system information
- Running processes
- Application servers
- Runtime technologies
- Databases
- Messaging systems
- Network-accessible services
- Listening ports
- Log locations
- Other supported infrastructure and application components
The discovered information is securely transmitted to the vuSmartMaps platform for processing.
ADI discovers supported services by identifying processes that are actively listening for network connections on the host. Depending on the supported technology, additional runtime information and component metadata may also be collected to support inventory creation and monitoring.
3. Inventory Synchronization
Once discovery is completed:
- The vuSmartMaps platform processes the discovered information.
- Newly discovered hosts and entities are automatically added to the centralized Host Landscape inventory.
- Existing inventory records are updated whenever changes are detected on the monitored host.
- Continuous synchronization ensures that the Host Landscape accurately reflects the current infrastructure and application environment without requiring manual inventory updates.
4. Entity Classification and Policy Evaluation
After the inventory is updated:
- The platform classifies each discovered entity based on its detected technology and runtime characteristics.
- The selected Environment and Host Group are evaluated to determine the applicable onboarding and monitoring policies.
- Supported entities are evaluated for automatic monitoring according to the configured platform policies.
- The platform prepares the monitoring configuration required for each supported component before monitoring begins.
5. Monitoring Configuration
The platform automatically applies monitoring configurations based on the onboarding policies associated with the selected Environment and Host Group.
These configurations determine:
- Which supported entities are eligible for monitoring.
- The monitoring configuration applicable to each discovered component.
- The probes required for telemetry collection.
- Automatic instrumentation for supported technologies, where applicable.
ADI monitoring behavior is controlled through the ADI_ENABLED configuration parameter available in the Helm charts.
ADI_ENABLED = true
-
Hosts with OmniAgent installed are automatically discovered and monitored by the ADI module.
-
Host and entity discovery begins automatically after registration.
-
Discovered entities are evaluated according to the configured onboarding policies.
-
Supported monitoring probes are automatically prepared for deployment.
ADI_ENABLED = false
-
Hosts and entities are not discovered, updated, onboarded, or monitored by the ADI module.
Changing ADI_ENABLED from true to false does not disable monitoring for hosts that were already onboarded and monitored before the configuration was changed.
6. Probe Deployment
After the monitoring configuration is prepared:
- OmniAgent automatically downloads, deploys, configures, and starts the probes required for each supported component.
- Probe deployment is performed according to the monitoring configuration received from the platform.
- Manual probe installation is not required for automatically onboarded components.
- OmniAgent continuously manages the lifecycle and health of deployed probes throughout the monitoring lifecycle.
7. Monitoring and Telemetry Collection
Once probe deployment is completed successfully:
- Telemetry collection begins automatically.
- Depending on the monitored technology, OmniAgent collects metrics, logs, traces, and other supported observability data.
- Probe health, telemetry status, and monitoring progress are continuously reported to the vuSmartMaps platform.
- The collected telemetry is processed and made available for dashboards, alerts, analytics, and troubleshooting.
After telemetry is successfully validated, the discovered entity automatically transitions to the Monitoring state, and its monitoring status is updated in the Host Landscape.
8. Continuous Discovery
Discovery does not stop after the initial onboarding process. OmniAgent continues to perform discovery throughout its lifecycle to identify infrastructure and application changes on the monitored host. As part of continuous discovery:
- Newly deployed infrastructure and application components are automatically detected.
- Changes to existing components are synchronized with the centralized inventory.
- Removed or unavailable components are reflected in the inventory during subsequent discovery cycles.
- Newly discovered supported components are evaluated according to the configured onboarding policies and prepared for monitoring when applicable.
This continuous discovery process helps maintain an accurate and up-to-date inventory while ensuring that monitoring remains aligned with changes occurring across the monitored environment.
Automatic Instrumentation
After the discovery process identifies supported application components, OmniAgent can automatically initiate instrumentation based on centrally configured onboarding policies.
Automatic instrumentation enables supported applications to begin collecting observability data without requiring administrators to manually configure every monitored workload. Depending on the detected technology, OmniAgent can automatically configure metrics collection, log collection, distributed tracing, and technology-specific instrumentation.
Instrumentation is applied only to supported technologies and follows the onboarding and monitoring policies configured within the vuSmartMaps platform. Administrators can centrally control which technologies are instrumented, define inclusion and exclusion rules, and manage instrumentation behavior without manually configuring each monitored host.
If automatic instrumentation is disabled or a discovered component is excluded by policy, administrators can manually initiate monitoring from the Host Landscape page.
This policy-driven approach enables consistent observability across supported environments while reducing manual configuration effort and simplifying the onboarding of newly discovered infrastructure and application components.
How ADI Discovery Works
- Once OmniAgent is started and the host is successfully registered, the Discovery Probe automatically begins scanning the host to identify running services and applications.
- The discovery process is designed to minimize permission requirements. Permanent sudo access is not required for routine discovery operations.
- The OmniAgent identifies processes that are actively listening for network connections, such as web servers, application servers, databases, and middleware components. Information about discovered services is reported to the vuSmartMaps platform and displayed as entities within the Host Landscape.
- Each discovered component is automatically mapped to the appropriate inventory entity within the Host Landscape. This inventory mapping enables ADI to evaluate the discovered component against the configured monitoring policies before applying the required monitoring configuration.
- Based on the Environment and Host Group associated with the host, ADI automatically evaluates the discovered entities and applies the appropriate monitoring configuration. Required probes are deployed automatically, allowing monitoring to begin without manual onboarding of individual services.
- After the monitoring configuration is applied, the platform automatically provisions the required monitoring sources and deploys the appropriate probes for the discovered component. Once telemetry is successfully received and validated, the entity transitions to the Monitoring state and its monitoring status is updated in the Host Landscape.
- This discovery process runs continuously, ensuring that newly started services are identified and reflected in the Host Landscape.
- Discovered services are displayed as entities within the Host Landscape, providing a continuously updated inventory of monitored applications and infrastructure components.
Automatic Monitoring Provisioning
- After a supported component is discovered, ADI automatically evaluates the monitoring policies associated with the selected Environment and Host Group.
- If monitoring is applicable, the platform provisions the required monitoring configuration and deploys the necessary probes without requiring users to manually configure each supported component individually.
- Once telemetry is successfully received, the entity status changes to Monitoring, indicating that the component is actively monitored and visible in the Host Landscape.
Verification
After setup, validate the following:
- Host appears in Host Landscape
- Host status shows as reporting
- Entities are discovered
- Monitoring status is updated
- OmniAgent tab shows probe health
- Verify that the discovered component automatically transitions to the Monitoring state after telemetry begins.
- If a host is successfully discovered but no entities are identified on the host, the Monitoring Status is displayed as No Entities and the Host Monitoring Status is displayed as Not Monitored.
- After installation, discovery and monitoring continue using the configured runtime permissions. Permanent administrative privileges are not required for normal discovery operations.
