Workflow for Configurations
Alert Popup Configuration
In vuSmartMaps, Alert Pop-Ups Integration ensures timely awareness of critical system events by displaying real-time alerts with a buzzer sound. It helps users promptly respond to important notifications, categorize alerts by severity, and customize alert behavior, improving monitoring efficiency and reducing the risk of missing critical issues.
- The following settings apply to Global Alert Pop-Ups Configurations. For user-specific preferences, navigate to the Alert Pop-Ups(User Specific) Section.
- Only users with the necessary access to Platform Configurations in User Management and RBAC can add or edit Global Alert Pop-Ups Configurations.
Configuring Global Alert Pop-Ups

To configure your Global Alert Pop-Ups configuration and take advantage of this feature when it becomes available, follow these steps:
-
Navigate to the Alert Pop-Ups Configuration section on the Platform Configurations landing page.
-
Click the Add/Edit button to open the configuration modal.
-
Show Pop-Ups: Enable this option to activate alert pop-ups. This setting must be turned on for pop-ups to function correctly.
By default, the Show Pop-Ups option is disabled. Users must enable it manually to receive alert notifications.
- Conditions: Users can define conditions for triggering pop-ups based on severity levels. Conditions must be listed in JSON format, specifying tags and their associated severity levels.
Example JSON Format:
[
  {"keywords": "IMPS, not found", "severity": "Critical"},
  {"keywords": "Delay, timeout", "severity": "Error"}
]
Severity levels:
- Critical (Red)
- Error (Orange)
- Warning (Yellow)
- Information (Green)
This allows users to customize alert notifications based on specific keywords and severity levels, ensuring that only relevant alerts are displayed.
- Duration: Users can define how long the pop-up remains visible when an alert is triggered.
- Persistent: The pop-up remains on-screen until manually dismissed.
- Timeout: The pop-up will auto-close after a defined duration.
The default is 0 seconds, meaning the pop-up remains until the user manually dismisses it.
- Click on the Save button to apply these configurations.
- If you are adding a new Alert Pop-Up configuration, a toast message will appear saying "Alert Pop-Ups configuration added!"
- If you are updating an existing Alert Pop-Up configuration, a confirmation popup will appear saying "Update configuration?" Click Update, and a toast message will confirm "Alert Pop-Ups configuration updated!"
Example Output:

Email Configuration
This section is useful for configuring settings for vuSmartMaps to integrate with the Email server for sending out notification emails.
These details may be configured with the Edit button.

Email configurations on the following aspects can be configured with the vuSmartMaps platform:
- Username: User name to be used to login to the Email Server.
- Display Name (Optional): Name to be displayed.
- Email: Use this email address as the sender for emails generated by vuSmartMaps.
- Password: Password for authentication with Email Server.
- SMTP Host: SMTP Server Address.
- SMTP Port: SMTP Server Port.
- Security Protocol: Security protocol to be used for communication with Email Server.
- SSL
- TLS
- None
Testing Configuration
Click the Test button to send a test email to a specified email address. Enter the recipient email ID in the prompted modal. A success message confirms delivery, while a failure message provides error details for resolution.
ITSM Configurations
This section is useful for configuring Settings for vuSmartMaps to integrate with the ITSM system. This will be used to open tickets based on alert conditions and collect details of tickets present in the ITSM system.
These details may be configured with the Edit button.

ITSM configurations on the following aspects can be configured with the vuSmartMaps platform.
1. ITSM Type: ITSM System
This field specifies the ITSM or ticketing system that will be integrated with vuSmartMaps. Once an option is selected, the relevant configuration fields are automatically enabled based on the chosen ITSM system.
A. None
Select None if ITSM integration is not required.
What happens when this option is selected:
-
No tickets will be created for alerts
-
Alerts will continue to function normally within vuSmartMaps
-
Any previously saved ITSM configuration will be removed
This option allows vuSmartMaps to operate independently, without integration to any external ticketing system.
B. ServiceNow
Select this option to integrate vuSmartMaps with ServiceNow.
i. Configuration Mode
Two configuration modes are available:
1. Standard Configuration
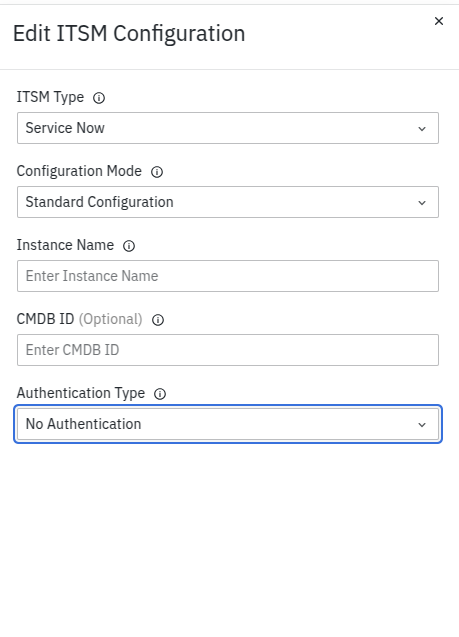
- Choose this option if your ServiceNow instance uses the standard setup (no custom fields, custom tables, or modified workflows).
- When Standard Configuration is selected, the following field appears in the UI:
Instance Name
- Enter the unique name of your ServiceNow instance.
- This identifies the ServiceNow environment that vuSmartMaps will connect to.
Example: dev12345
Where to find the Instance Name:
Check the web address (URL) you use to log in to ServiceNow. It typically looks like:
https://dev12345.service-now.com
The instance name is the part before .service-now.com.
For example If your URL is:
https://company-name.service-now.com
Your instance name is: company-name
This mode assumes standard ServiceNow tables and field structures, and it follows the default vuSmartMaps workflow for creating, updating, fetching, and closing tickets.
2. Custom Configuration
Select this option when your ServiceNow instance has been customized beyond the default setup.
Use Custom Configuration if:
- Custom fields are present
- The payload structure differs from the standard ServiceNow format
- Additional headers or custom logic are required
- The default vuSmartMaps configuration does not meet your ITSM requirements
(Refer to the Default Configuration section to understand what vuSmartMaps sends in Standard mode.)
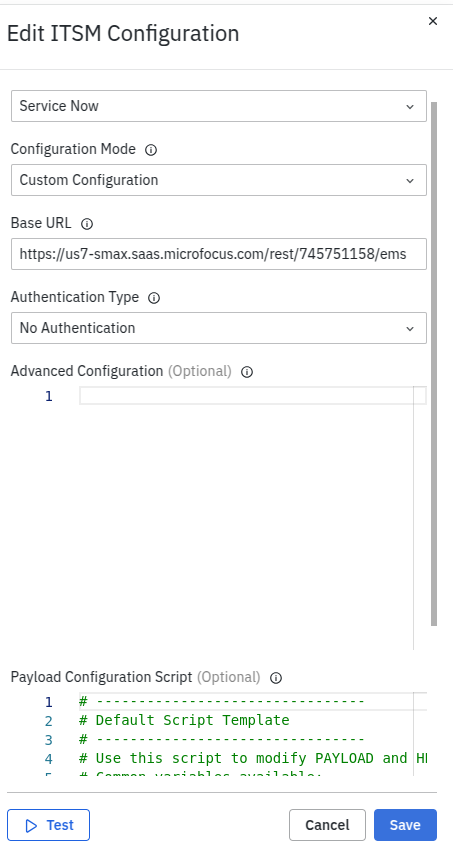
Additional Fields Enabled in Custom Mode
Base URL:
-
Enter the complete URL of your ServiceNow instance.
-
This is the same URL used to access ServiceNow through a web browser.
Example:
https://yourcompany.service-now.com
Advanced Configuration (YAML-based Customization)
Used to define advanced behavior using YAML configuration.
Supports:
-
Payload transformation
-
Field mapping changes
-
Conditional logic
-
Endpoint customization
-
Other advanced integration behaviors
Custom Script
Allows you to write a custom Python script to dynamically construct:
-
API payloads
-
Request headers
Scripts must follow valid Python syntax to avoid runtime errors.
ii. Authentication Type
Select the authentication mechanism used to connect to ServiceNow (for example, Basic Authentication, OAuth, token-based authentication, etc.).
C. Jira
Select Jira to integrate vuSmartMaps with a Jira-based ticketing system.
i. Configuration Mode
Two configuration modes are available:
1. Standard Configuration
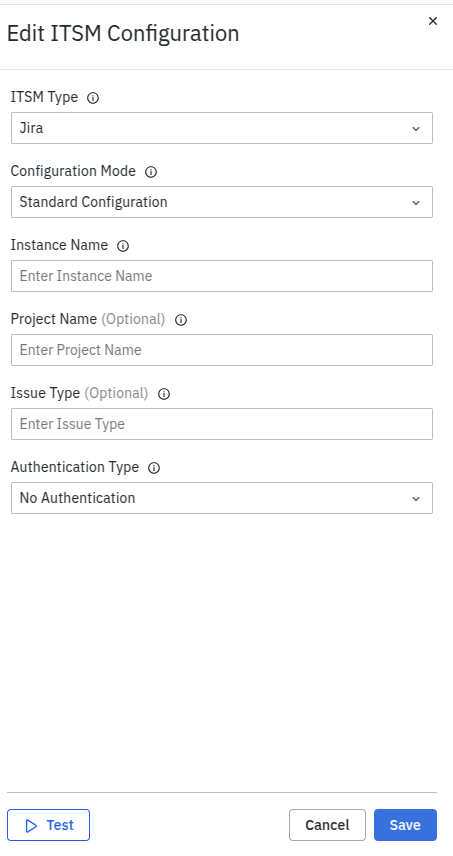
Use this option for a standard Jira setup without custom fields, custom workflows, or modified endpoints. When selected, you must provide:
Instance Name
-
Enter the Jira instance name.
-
This identifies the Jira environment to which vuSmartMaps will connect.
Where to find it:
- Check the browser URL when you are logged into Jira.
- If your URL is:
https://my-team.atlassian.net
- Your Instance Name is: my-team
2. Custom Configuration
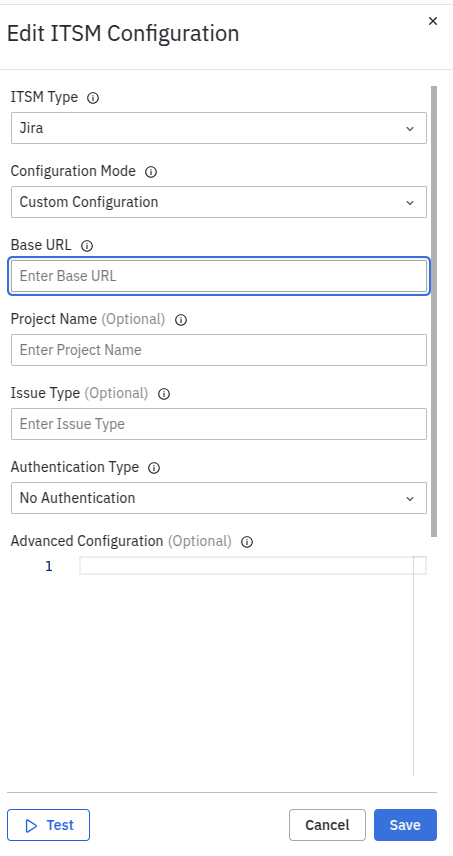
Use this option if your Jira setup includes:
- Custom fields
- Modified workflows
- Different payload requirements from the default Jira payload
- Additional headers or custom logic
(Refer to the Default Payload section to understand what vuSmartMaps sends by default.)
Additional Fields Enabled in Custom Mode
Base URL
- Enter the full URL of your Jira instance.
Example:
https://vunetsystems.atlassian.net
Custom Script
- Used to dynamically construct API payloads or headers.
- Must follow valid Python syntax to ensure compatibility.
Advanced Configuration (YAML-based Customization)
- Allows defining custom payload transformations.
- Useful for adapting the payload structure before sending it to Jira.
- Supports field mapping, key renaming, and conditional logic.
ii. Authentication Type
Select the authentication method used to connect to Jira (for example, Basic Authentication, API Token, OAuth, etc.).
iii. Project Name
- Enter the exact Jira project name where tickets will be created.
- Each Jira instance may contain multiple projects.
- The project name must exactly match the value defined in Jira.
This field is required in both Standard and Custom configuration modes.
iv. Issue Type
- Enter the Jira issue type to be created.
- Common examples include:
- Bug
- Task
- Story
- Incident
- Service Request
- The issue type must exactly match the configuration in Jira.
This field is required in both Standard and Custom configuration modes.
D. Custom ITSM
- Select Custom ITSM to integrate vuSmartMaps with any ticketing system that is not natively supported in the UI.
- This option provides full flexibility and is commonly used for integrations such as BMC Helix, Sapphire, and OpenText SMAX.
Supported Configuration Fields
Base URL
- Enter the main (root) URL of the ITSM system.
- This is required to establish API connectivity.
Where to find it:
Copy the main website address used to access the tool.
What to use:
Use only the root part of the address.
For Example If you view tickets at:
https://helpdesk.company.com/tickets/123
Your Base URL is typically:
https://helpdesk.company.com
Custom Script
Used to dynamically build:
- API payloads
- Request headers
- Response handling logic
The script must follow valid Python syntax to avoid runtime errors.
Advanced Configuration (YAML-based Customization)
Supports advanced integration control, including:
- Payload transformation
- Field remapping
- Conditional logic
- Endpoint configuration
- Additional integration-specific features
Authentication Type
Select the authentication mechanism supported by your ITSM system (for example, Basic Authentication, OAuth, API Token, etc.).
Important Note
The Base URL or Instance Name must be provided based on the selected configuration mode. Providing incorrect or mismatched values may result in:
- Connection failures
- Authentication errors
- Incorrect API routing
Where do I find my instance name or Base URL?
If you are unsure what to enter in the Instance Name or Base URL field, check the address bar of your web browser while logged into your ticketing system. The URL shown there typically contains the required information.
References
- Authentication Type: Refer to the Authentication Types section for supported methods and configuration details.
- Advanced Configuration (YAML-based): Refer to the Advanced Configuration section for details on payload transformation and field mapping.
- Custom Script Configuration: Refer to Creating Payload Configuration Script for guidance on writing Python scripts to dynamically construct API payloads and headers.

Testing Configuration
Click the Test button to validate the configuration to ITSM. For Configured ITSM, a test ticket is created to ensure a successful connection. Errors, such as permission issues or missing fields, are displayed if applicable.
Reports Configurations
With this configuration, the user can provide the date time format in which the date fields of the report need to be displayed. The default format for this configuration is DD/MM/YYYY hh:mm:ss
Reports configurations on the following aspects can be configured with the vuSmartMaps platform.
- Date Format: The format for the Date field in Reports.
These details may be configured with the Edit button.

Ansible Tower Configurations
In vuSmartMaps, Ansible Tower integration is a powerful feature that allows you to manage and execute Auto Remediation jobs seamlessly through its REST API interface. While this feature is not yet available in the current release, it will be implemented in a future release, enhancing the overall automation process.
To configure your Ansible Tower configurations and take advantage of this feature when it becomes available, follow these steps:
- Navigate to the Ansible Tower Configurations section on the Platform Configurations landing page. The Configurations can be configured in the modal by clicking on the Edit button.
- Fill in the details on the following aspects:
- URL: Provide the correct URL. For Auto Remediation provide both IP and port in
http://serverip:portformat - Username: Provide the username
- Password: Password for this username
- URL: Provide the correct URL. For Auto Remediation provide both IP and port in

- Click on the Save button to apply these configurations.
Testing Configuration
Click Test to check the connection and credentials. Successful tests display a confirmation message, while failures show connection, response, or authentication errors.
System Configurations
System configurations on the following aspects can be configured with the vuSmartMaps platform.
- Archival Path: Full path where index archives are to be stored in the Analyser.
If nothing is provided, the default value of /data/vunet-backups will be used.
- Trap Credentials: Credentials to be used by SNMP trap-based discovery.
Should be in this format (separated by comma & colon); type-of-credential:credential-name; For Ex snmp:cred1, snmp:cred2
- SNMP trap discovery time interval: Time interval for SNMP Trap based discovery; Polling interval, in minutes, to be used to check for IPs to discover in SNMP trap data.
Click Edit to modify settings.

WhatsApp Configuration
The platform supports WhatsApp integration for sending alerts and notifications. Users can configure WhatsApp as a notification channel to ensure timely updates. They can choose between two configuration methods:
- Official Meta API Configuration – This is the use of WhatsApp’s official business API to send messages.
- Custom Configuration – Allows integration with third-party WhatsApp service providers.

Both options ensure flexibility in setup while maintaining seamless alerting functionality.

WhatsApp Configuration Methods
-
Official Meta API Configuration
This method leverages Meta’s official WhatsApp Business API for message delivery. The configuration process involves providing key details such as:
- Phone Number ID: Specify the WhatsApp phone number ID that will be used to send messages.
- Access Token: Select the type of WhatsApp API you are using (e.g., official Meta API or Custom for other service providers). For more details, visit the Generating a Permanent Access Token section.
- Template Details: The JSON payload sends a template message according to the template configured with WhatsApp.
These parameters can be updated in the Platform Configurations section and only need changes when credentials or template settings are modified.
Refer to WhatsApp Integration for the advanced settings for creating and configuring WhatsApp business API with Meta.
-
Custom Configuration
The platform supports custom client configurations using a third-party WhatsApp service provider instead of Meta’s API. Users can select the Custom option in the WhatsApp configuration, which introduces additional parameters specific to the chosen service provider.
Configuration Options for Custom Service Provider
Additional configuration options are required when using a third-party WhatsApp service provider. These settings allow users to define API details, authentication, and message templates for seamless integration.
-
API Endpoint: The URL where the POST request will be sent. This includes the necessary payload and authentication headers (if required).
-
Authentication Type: Refer to the authentication type section to check which authentication methods are supported.
-
Template Details: The JSON payload sends a template message according to the template configured with WhatsApp.
-
Advanced Configuration: * Contains a YAML configuration where users can define payload transformation details. It also allows users to specify other custom settings as needed. For more details, refer to Creating Advanced Configuration.
-
Payload Configuration Script: Use a custom script to dynamically construct API payloads and headers. Ensure that the script follows valid Python formatting standards to prevent errors and maintain compatibility with the system. For more details, refer to Creating Payload Configuration Script.
Testing Configuration
Click Test to enter a phone number for testing. The system verifies the configuration and sends a test message. Success confirms message delivery, while failure provides error details for resolution.
Microsoft Teams Configurations
The vuSmartMaps platform allows users to configure MS Teams integration for alert processing. This section outlines the different configuration methods, authentication types, and advanced customization options available.

Configuration Types
-
None: Users can select the None option if they do not wish to configure MS Teams. This disables the integration and ensures no alerts are sent to MS Teams.
- If MS Teams was previously configured but is no longer needed, selecting None will effectively remove the existing configuration.
- This helps in preventing unnecessary alert processing through MS Teams.
-
Standard Configuration: In Standard Configuration mode, users can specify the MS Teams channel URL for sending messages. This is the simplest configuration method, suitable for basic alerting needs.
- Teams Channel URLs Configuration: Enter the Teams channel webhook URLs, typically provided by Teams or a service provider. For each addition of an incoming webhook to a channel, a unique URL is generated. These URLs are added in the Configurations section as a JSON with the channel name as the key and the URL as the value.
{
    "General": "https://vunetsystems.teams.com/message/channel/general",
    "Priority-alerts": "https://vunetsystems.teams.com/message/channel/priority-alerts"
}
Refer to MS Teams Integration for the advanced settings for configuring the Webhook connector and creating the message template.
-
Custom Configuration: The Custom Configuration mode offers flexibility by allowing users to specify an MS Teams API endpoint and define advanced settings.
- Teams Channel URLs Configuration: Enter the Teams channel webhook URLs, typically provided by Teams or a service provider. For each addition of an incoming webhook to a channel, a unique URL is generated. These URLs are added in the Configurations section as a JSON with the channel name as the key and the URL as the value.
{
   "General": "https://vunetsystems.teams.com/message/channel/general",
   "Priority-alerts": "https://vunetsystems.teams.com/message/channel/priority-alerts"
}
Refer to MS Teams Integration for the advanced settings for configuring the Webhook connector and creating the message template.
- API Endpoint: The URL used to send messages to MS Teams through the Graph API.
- Example:
https://graph.microsoft.com/v1.0/teams/{team-id}/channels/{channel-id}/messages
- Example:
- Authentication Type: Refer to the authentication type section to check which authentication methods are supported.
- Advanced Configuration: Contains a YAML configuration where users can define payload transformation details. It also allows users to specify other custom settings as needed. For more details, refer to Creating Advanced Configuration.
- Payload Configuration Script: Use a custom script to dynamically construct API payloads and headers. Ensure that the script follows valid Python formatting standards to prevent errors and maintain compatibility with the system. For more details, refer to Creating Payload Configuration Script.
Testing Configuration
Click Test to validate the URL and send a test message. Success confirms message delivery, while failures display errors for invalid URLs or channel names.
Slack Configurations
To configure alerts from the platform to be sent to your Slack workspace, you need to generate an API token. Insert this token in the Slack Configurations. Once this integration is in place, your platform alerts will be seamlessly relayed to your chosen Slack channels, ensuring efficient communication and timely notifications for your team.

Refer to Slack Integration for the advanced settings for configuring the Slack App and creating the message template.
Testing Configuration
Click Test and enter a Slack channel name. The system sends a test message. Successful tests confirm message delivery, while failures display errors for invalid API keys or channel names.
Zoho Cliq Configurations
Alerts from the platform can be sent to various notification channels, including Zoho Cliq. When a webhook token is generated for a channel, the URL, along with the webhook token, is added in the Configurations section as a JSON object. The channel name serves as the key, and the URL with the webhook token is the corresponding value.

Example JSON:
{"vusmartmaps-alerts":"https://cliq.zoho.in/company/60032630000/api/v2/vusmaps-alerts/message?zapikey=1001.2413906c4fbaf6a48eafc9bb9ce74b46.baf9269384b2f2kw9shd83vbe9wbw8"} |

Breakdown of the example JSON:
- Channel's Unique Name
- In this example, the Channel's Unique Name is
vusmartmaps-alerts.
- In this example, the Channel's Unique Name is
- API Endpoint URL
- The API Endpoint URL is:
https://cliq.zoho.in/company/60032630000/api/v2/vusmaps-alerts/message?
- The API Endpoint URL is:
- Webhook Token
- The Webhook Token for authentication is:
zapikey=1001.2413906c4fbaf6a48eafc9bb9ce74b46.baf9269384b2f2kw9shd83vbe9wbw8
- The Webhook Token for authentication is:
For instructions on retrieving the Channel's Unique Name, API Endpoint URL, and details on generating a Webhook Token, please refer to Zoho Cliq Integration.
Testing Configuration
Click Test to validate the URL and send a test message. Success confirms message delivery, while failures display errors for invalid URLs or channel names.
What happens after configuration
After a configuration is successfully saved and validated:
- Alert notification channels become available for alert delivery.
- Email notifications can be generated using the configured SMTP server.
- ITSM integrations can automatically create, update, and close tickets.
- Teams, Slack, WhatsApp, and Zoho Cliq notifications can be triggered by alert actions.
- Report formatting preferences are applied to generated reports.
- Ansible Tower integrations become available for automated remediation workflows.
- System-level settings are applied globally across the platform.
- Authentication and API configurations are stored securely and used during integration requests.
- Test results are recorded and displayed within the configuration interface.
Tips and Best Practices
- Validate every configuration using the Test option before using it in production.
- Use secure authentication methods and keep credentials updated.
- Verify webhook URLs, API endpoints, and authentication details before saving integrations.
- Configure only the required notification channels to reduce unnecessary alerts.
- Regularly review and update integration settings whenever external systems or credentials change.
- Restrict access to Platform Configurations using appropriate RBAC permissions.
Troubleshooting
- Issue: Unable to save a Platform Configuration.
- Possible Cause: Required configuration fields are missing or contain invalid values.
- Solution: Verify that all mandatory fields are entered correctly before saving the configuration.
- Issue: Configuration test fails.
- Possible Cause: Invalid credentials, API endpoint, or network connectivity issues.
- Solution: Verify the authentication details, endpoint URL, and network connectivity before testing the configuration again.
- Issue: Email notifications are not received.
- Possible Cause: SMTP server settings are incorrect.
- Solution: Verify the SMTP host, port, security protocol, username, and password, then perform a Test to validate the configuration.
- Issue: ITSM tickets are not created.
- Possible Cause: ITSM configuration or authentication is invalid.
- Solution: Verify the ITSM connection details, authentication method, and required permissions before testing the integration again.
- Issue: Notifications are not delivered to Microsoft Teams, Slack, WhatsApp, or Zoho Cliq.
- Possible Cause: Invalid webhook URL, API token, or channel configuration.
- Solution: Verify the configured webhook URLs, authentication details, and channel information, then perform a Test to validate the configuration.
- Issue: Report date and time format is not updated.
- Possible Cause: Configuration changes were not saved successfully.
- Solution: Save the updated Reports configuration and regenerate the report.
- Issue: Ansible Tower connection test fails.
- Possible Cause: Incorrect server URL, credentials, or the Ansible Tower server is unreachable.
- Solution: Verify the server URL, username, password, and network connectivity before testing the connection again.
- Issue: System configuration changes are not reflected.
- Possible Cause: The configuration was not saved or requires a platform refresh.
- Solution: Verify that the configuration is saved successfully and refresh the application if required.
- Issue: Platform configuration is not visible after creation.
- Possible Cause: Insufficient user permissions or the configuration was not saved successfully.
- Solution: Verify your access permissions and confirm that the configuration was created successfully.
- Issue: Authentication fails while connecting to an external service.
- Possible Cause: Invalid username, password, API token, or authentication method.
- Solution: Verify the authentication credentials and ensure the selected authentication method is supported by the external service.
- Issue: Test connection succeeds, but the integration does not work.
- Possible Cause: The external service configuration has changed or required permissions are missing.
- Solution: Verify the integration settings, required permissions, and confirm that the external service is accessible.
- Issue: Changes made to a platform configuration are not applied.
- Possible Cause: The updated configuration requires validation or a service refresh.
- Solution: Save the updated configuration, perform a configuration test if available, and refresh the platform to apply the changes.
FAQs
How do I enable real-time alert pop-ups for users?
Go to Alert Popup Configuration and enable the “Show Pop-Ups” toggle. Define conditions in JSON format with keywords and severity levels, and choose display duration.
How do I add a Microsoft Teams channel for alert delivery?
Create an Incoming Webhook in MS Teams, copy the URL, and configure it in MS Teams Configurations.
How do I configure Slack for receiving alert messages?
Generate an API token from your Slack app and paste it under Slack Configurations. Make sure required scopes (e.g., chat:write) are enabled.
How do I set up Zoho Cliq to receive alerts?
Generate a Webhook Token in Zoho Cliq and use the unique channel name and URL. Add this in Zoho Cliq Configurations.
