Data Control
Attribute Pruning Rules
The Attribute Pruning section under Data Control allows you to control how selected span or resource attributes are handled before they are stored and used for observability analysis.
Use this section to:
- Remove unnecessary attributes from spans
- Retain only a controlled subset of attributes
- Mask sensitive attribute values before storage
This helps reduce storage overhead, minimize noise in trace data, and protect sensitive values while preserving the attributes that are most useful for troubleshooting and analysis. Attribute pruning rules are applied top to bottom, so the order of rules can affect the final result.
Attribute Pruning Rules Page Overview
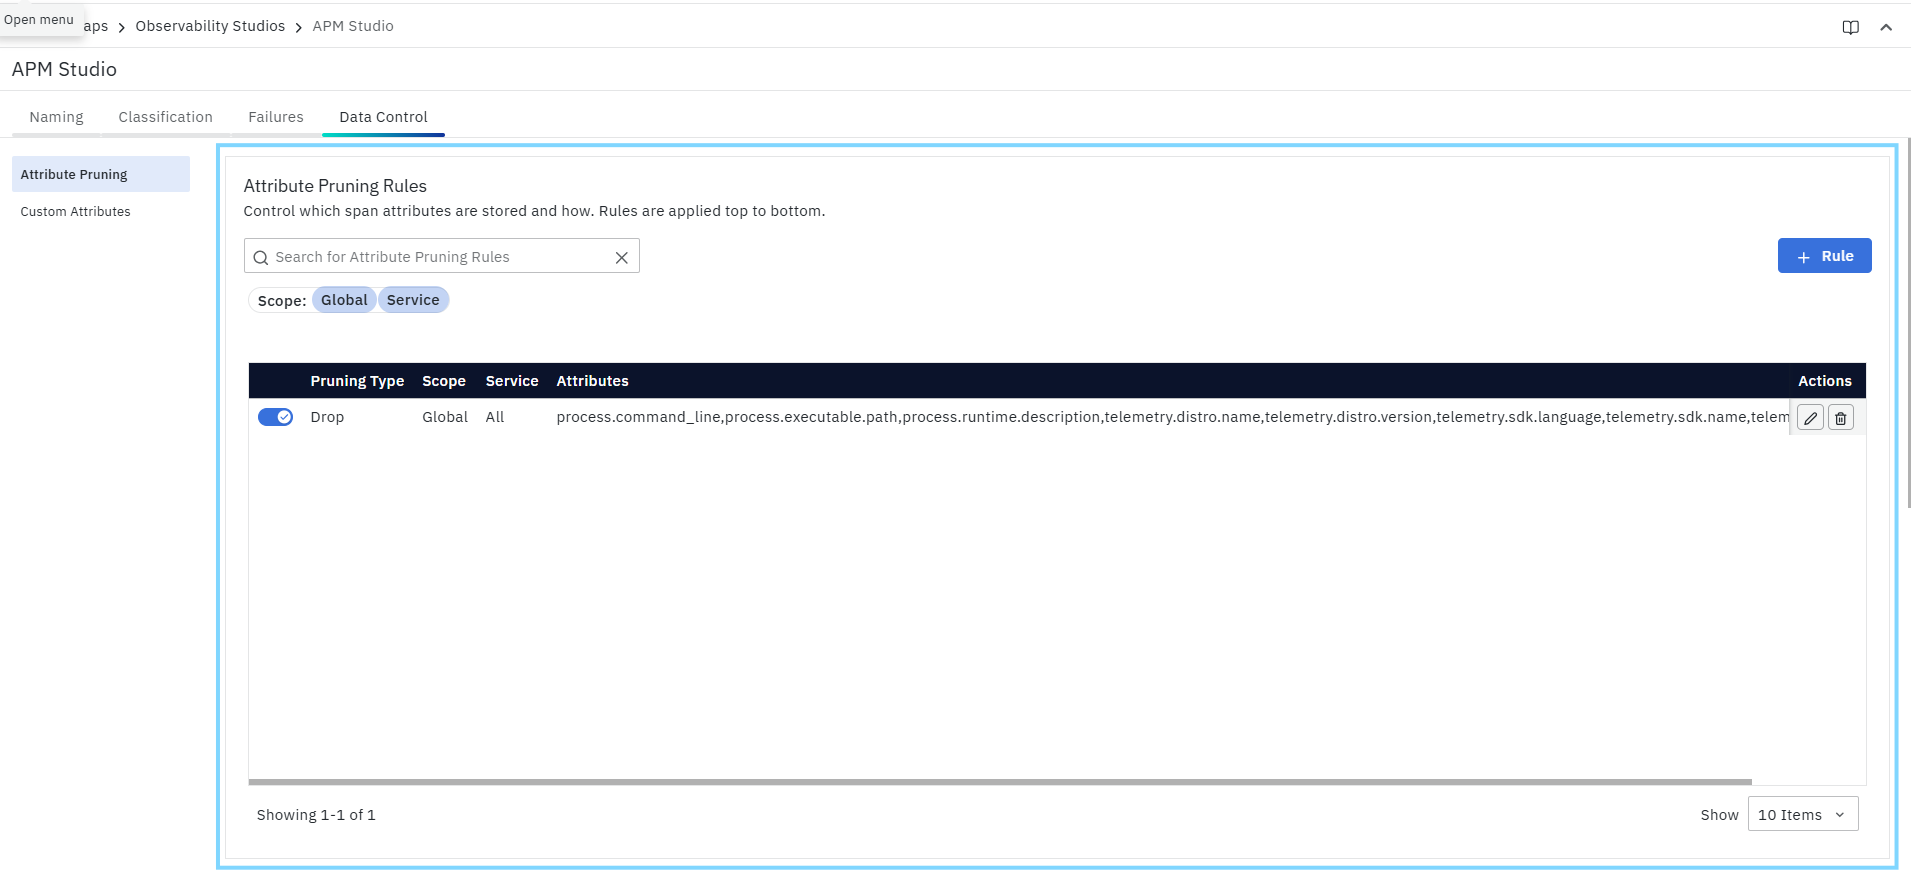
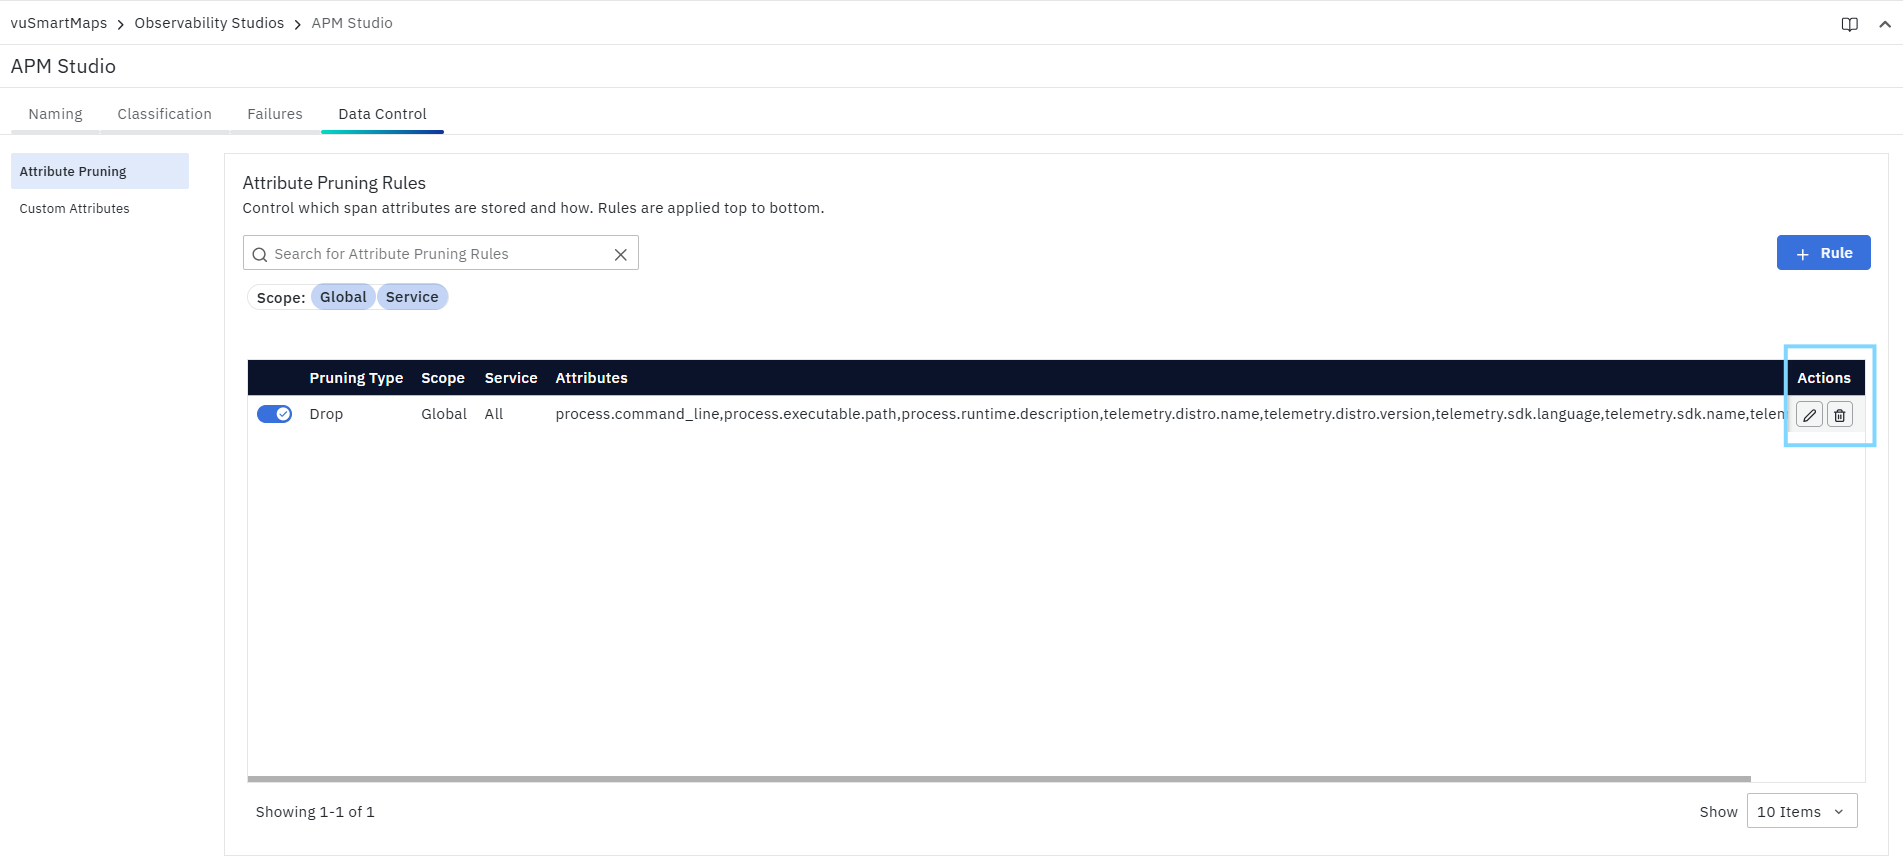
The Attribute Pruning Rules page displays all configured pruning rules in a table. Each rule row shows:
- Pruning Type – how the selected attributes are handled
- Scope – whether the rule is Global or Service
- Service – the selected service name, or All for global rules
- Attributes – the attributes included in the rule
- Actions – options to edit or delete the rule
The page also includes:
- A Search for Attribute Pruning Rules field
- Scope filter chips (Global and Service)
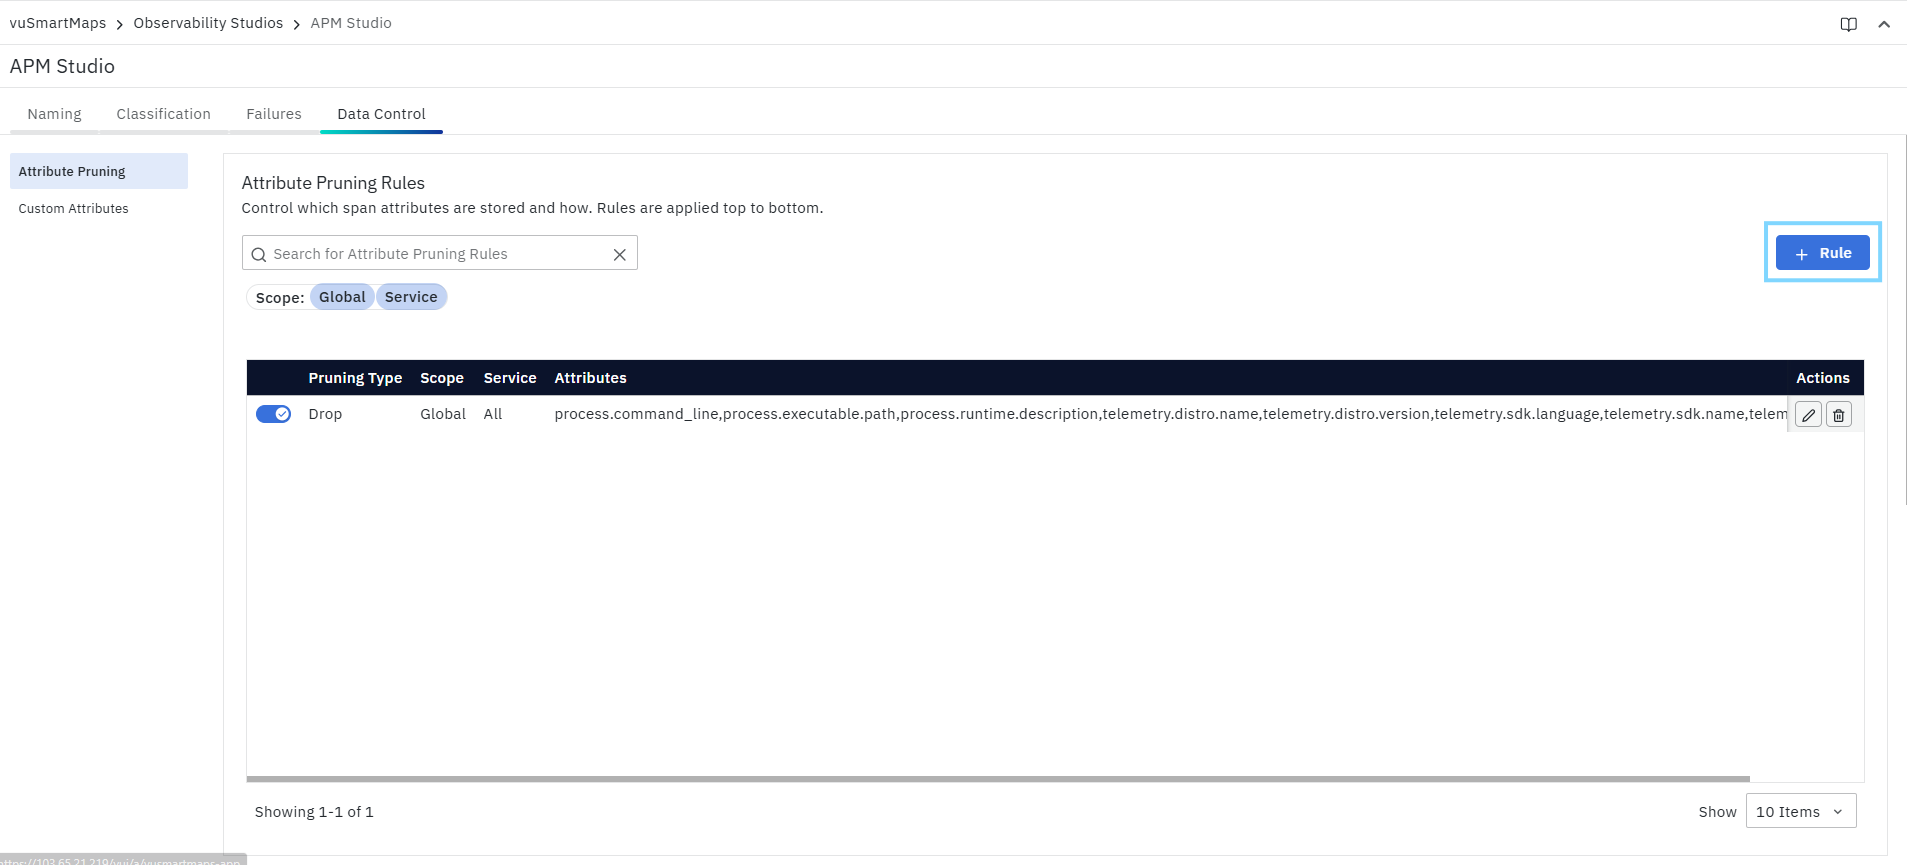
- A + Rule button to create a new pruning rule
Search and Filter Rules
Use the Search for Attribute Pruning Rules field to quickly locate a specific rule. You can also use the Scope filters to narrow the list:
- Global – shows rules that apply across all services
- Service – shows rules that apply only to specific services
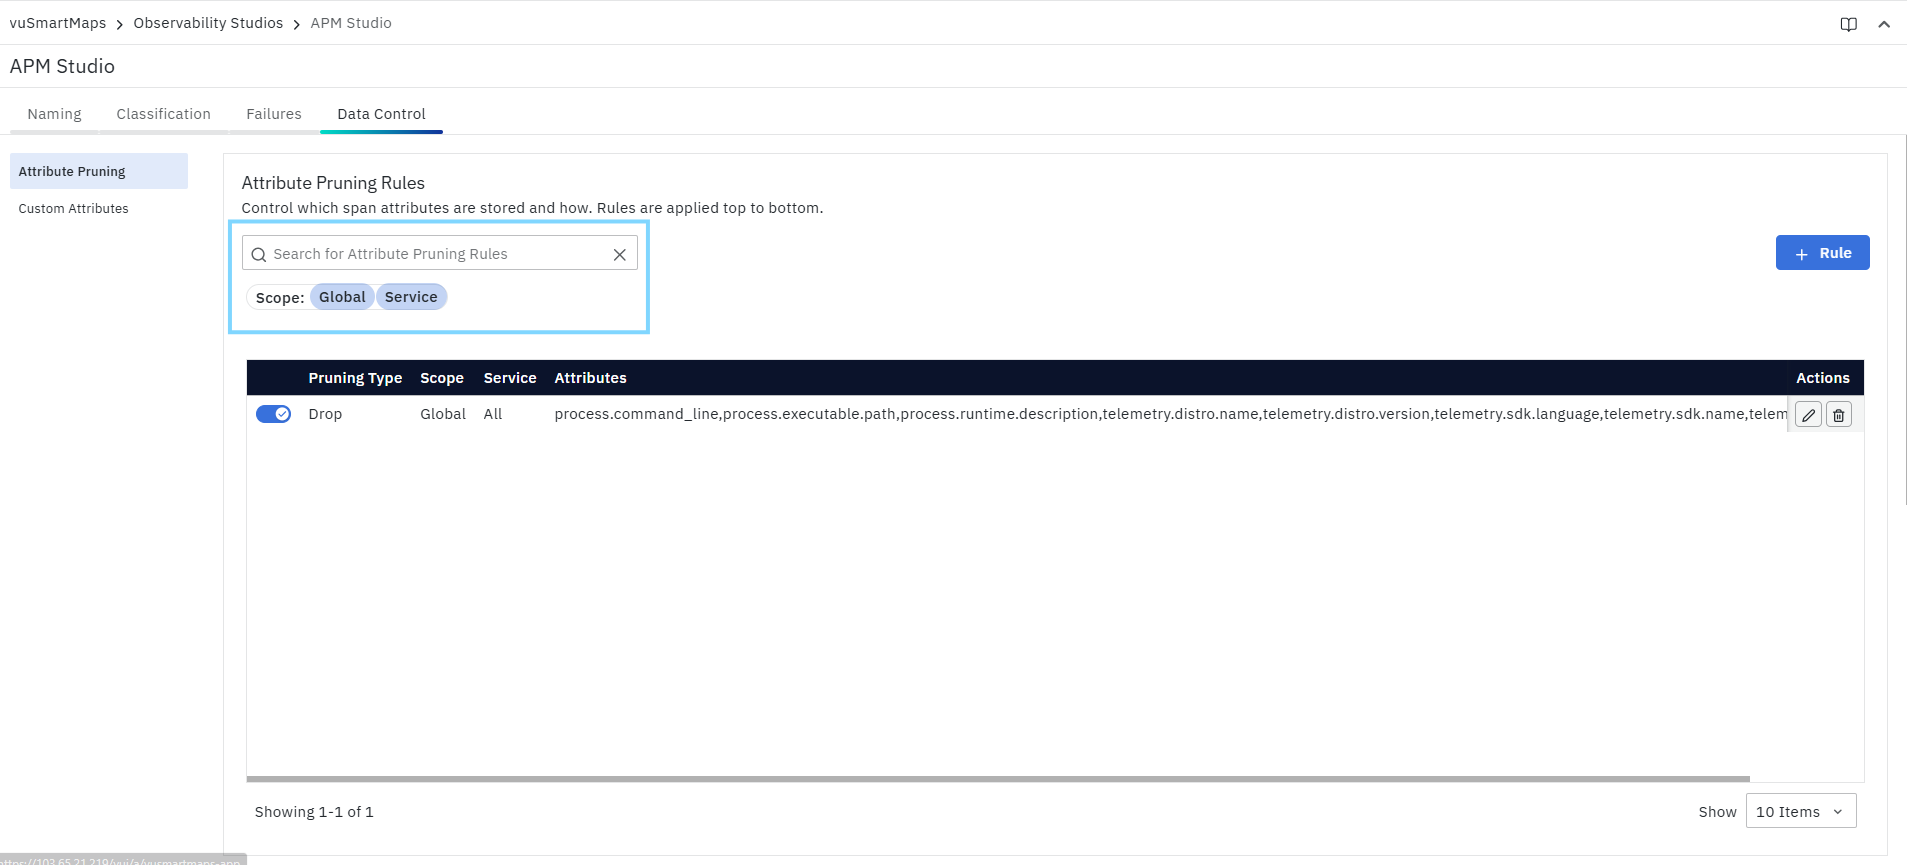
These filters are especially useful when multiple teams maintain different data-control policies and you want to quickly distinguish platform-wide defaults from service-specific exceptions.
Add an Attribute Pruning Rule
To create a new pruning rule:
- Open APM Studio.
- Go to Data Control.
- Select Attribute Pruning.
- Click + Rule.
- In the Add an Attribute Pruning Rule panel, configure the required fields.
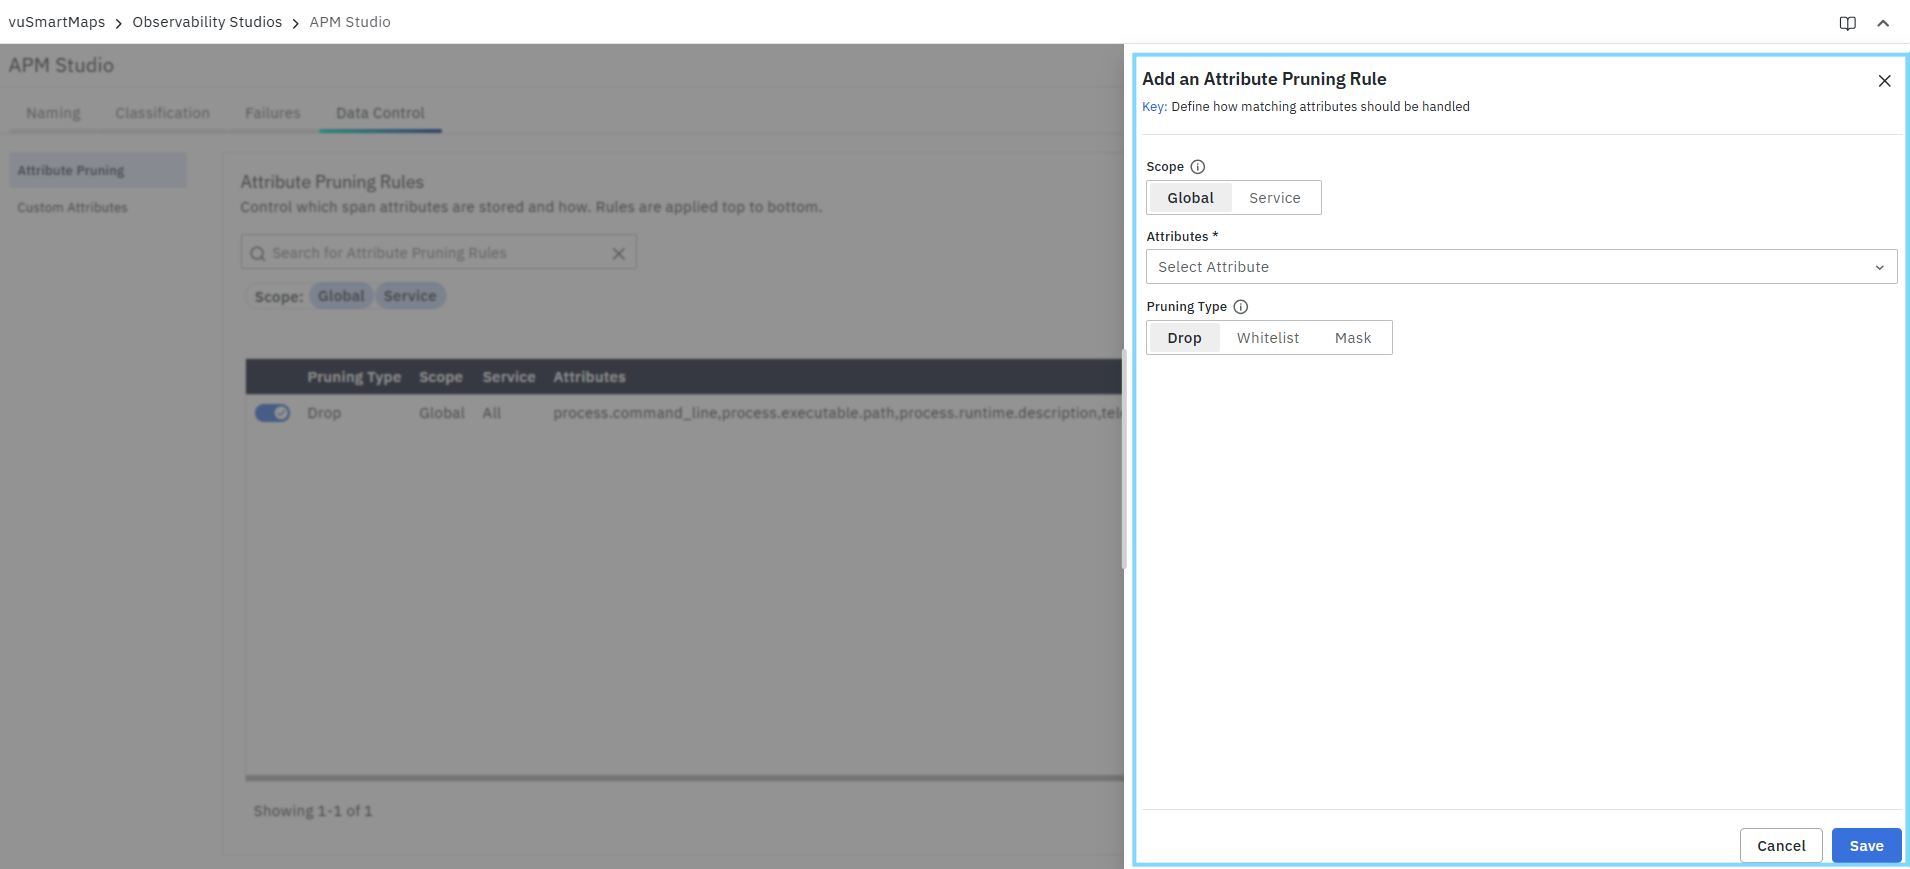
- Click Save.
The panel is used to define how matching attributes should be handled and supports three pruning behaviors:
- Drop
- Whitelist
- Mask
Field Descriptions
Scope
The Scope field determines where the pruning rule is applied.
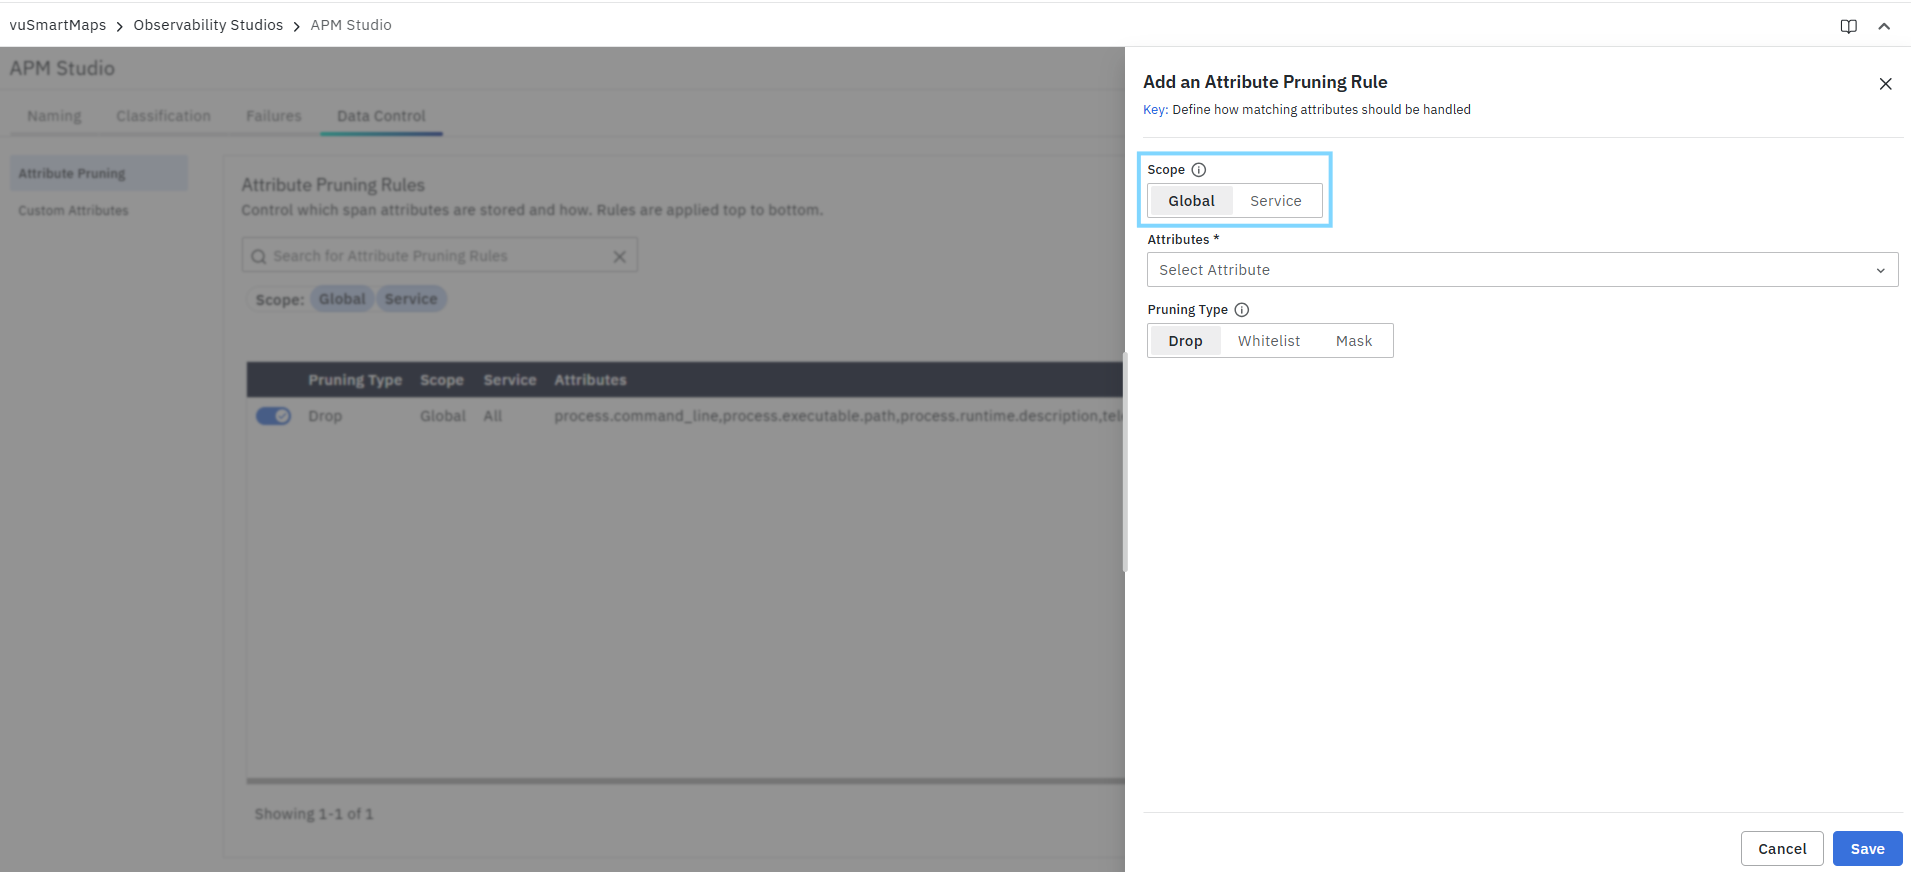
Available options
- Global
- Applies the rule across all services
- When Global is selected, the rule applies platform-wide.
- Service
- Applies the rule only to the selected service
- When Service is selected, an additional Service field appears and becomes required.
Choose Global to apply across all services, or Service to target selected service(s).
Service
This field is available only when the scope is set to Service. Use it to select the target service for the rule.
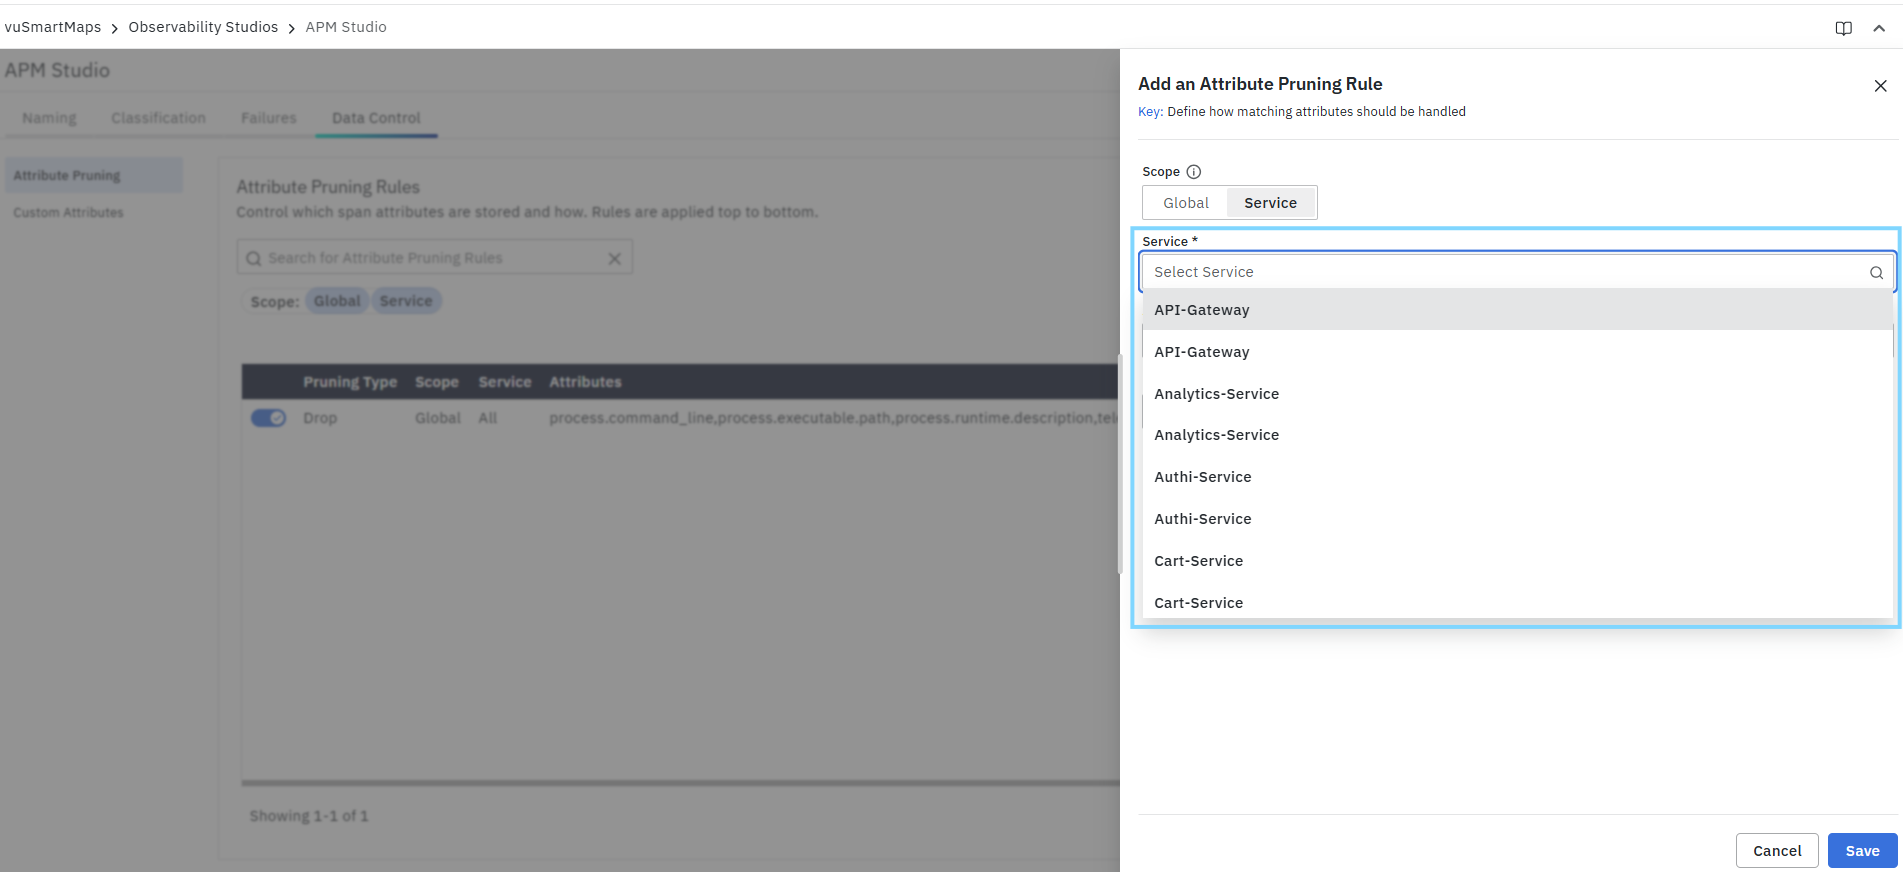
When to use Service scope
Choose a service-scoped rule when:
- A specific application emits unnecessary custom attributes
- Only one service contains sensitive business fields that require masking
- You want to preserve or prune attributes differently for one service without affecting others
Attributes
The Attributes field is used to select one or more attributes that the rule should manage. This is a required field.
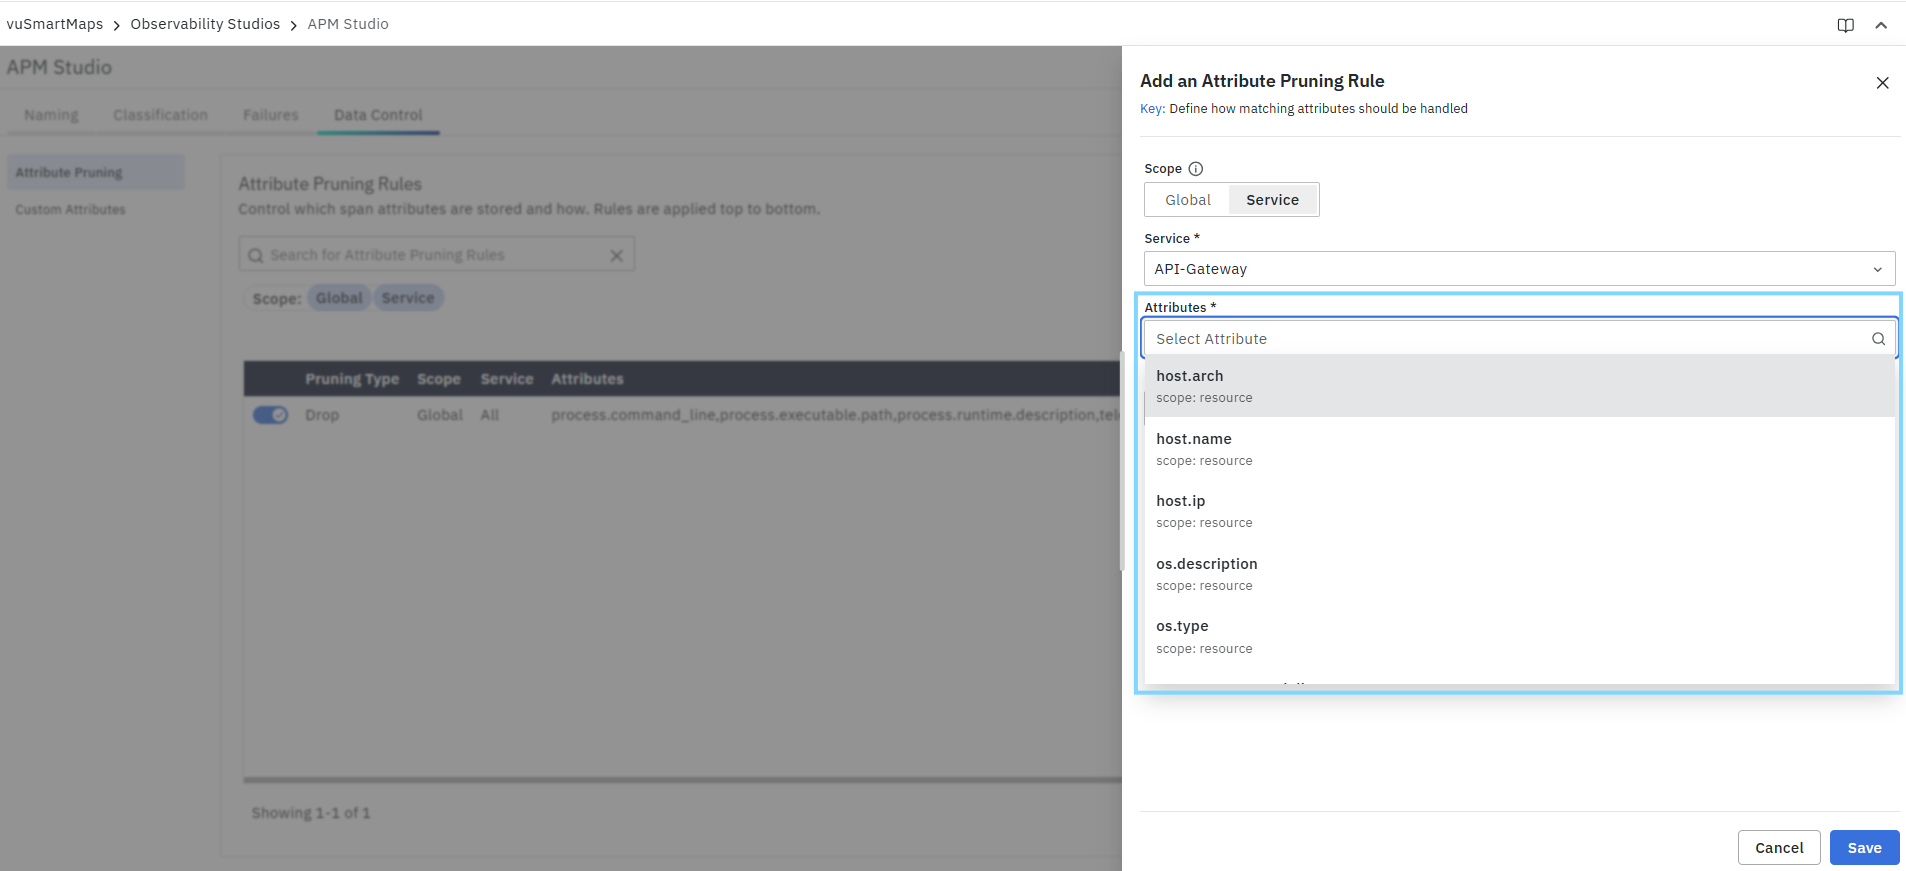
- Click Select Attribute to open the dropdown list.
- Choose one or more attributes.
- Selected attributes appear as chips in the field.
- The dropdown can include metadata showing the attribute scope (for example, scope: resource), which helps distinguish resource attributes from span attributes.
Pruning Type
The Pruning Type field determines how the selected attributes are handled. The UI provides three options:
- Drop – permanently removes the selected attributes from matching spans
- Whitelist – retains only the selected attributes on matching spans; all other attributes are dropped
- Mask – keeps the attribute but obscures the value using a regex pattern
Masking is implemented through regex-based value replacement on span attributes.
Pruning Type: Drop
Drop permanently removes the selected attributes from matching spans.
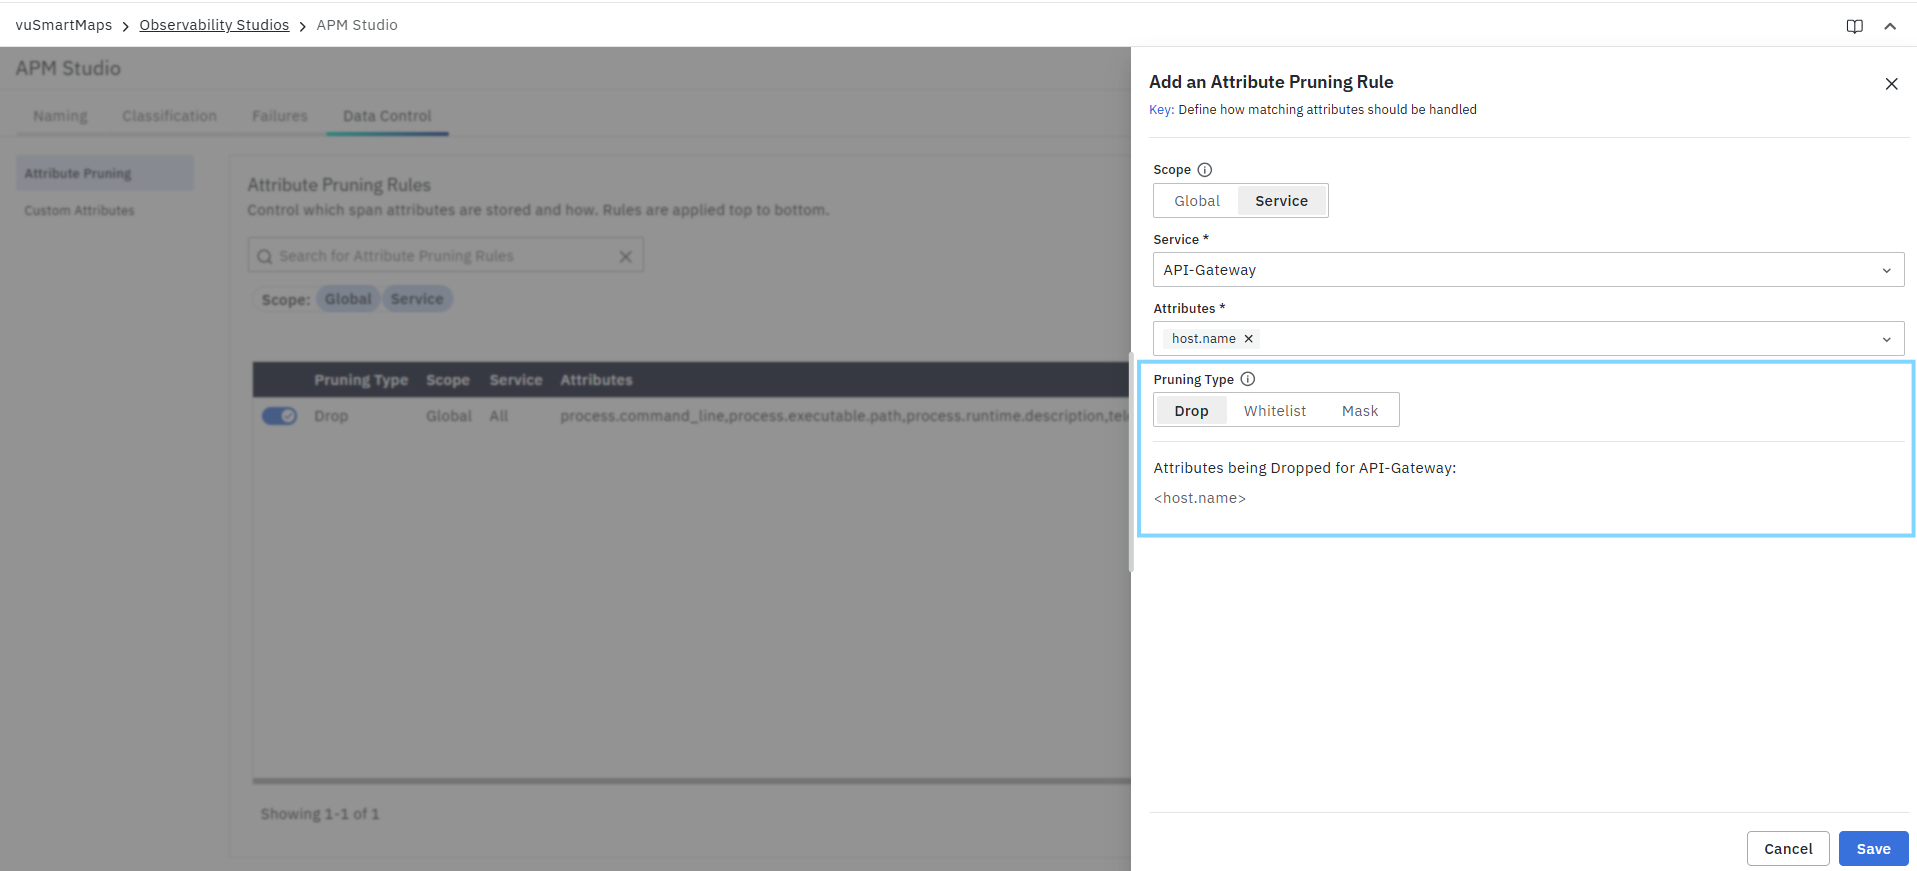
When to use Drop
Use Drop when the selected attributes:
- Do not add diagnostic value
- Increase storage usage unnecessarily
- They are too noisy or repetitive
- Is the environment metadata that users rarely need
- They are safe to remove entirely
After selecting Drop, the panel displays a summary such as:
- Attributes being Dropped globally
- or the equivalent service-specific summary
This is also shown in the APM Enrichment Rules mockup.
Important
- Dropped attributes are not stored in the processed telemetry.
- Once a span has been processed with the rule, the dropped attribute values cannot be recovered from that stored span.
Pruning Type: Whitelist
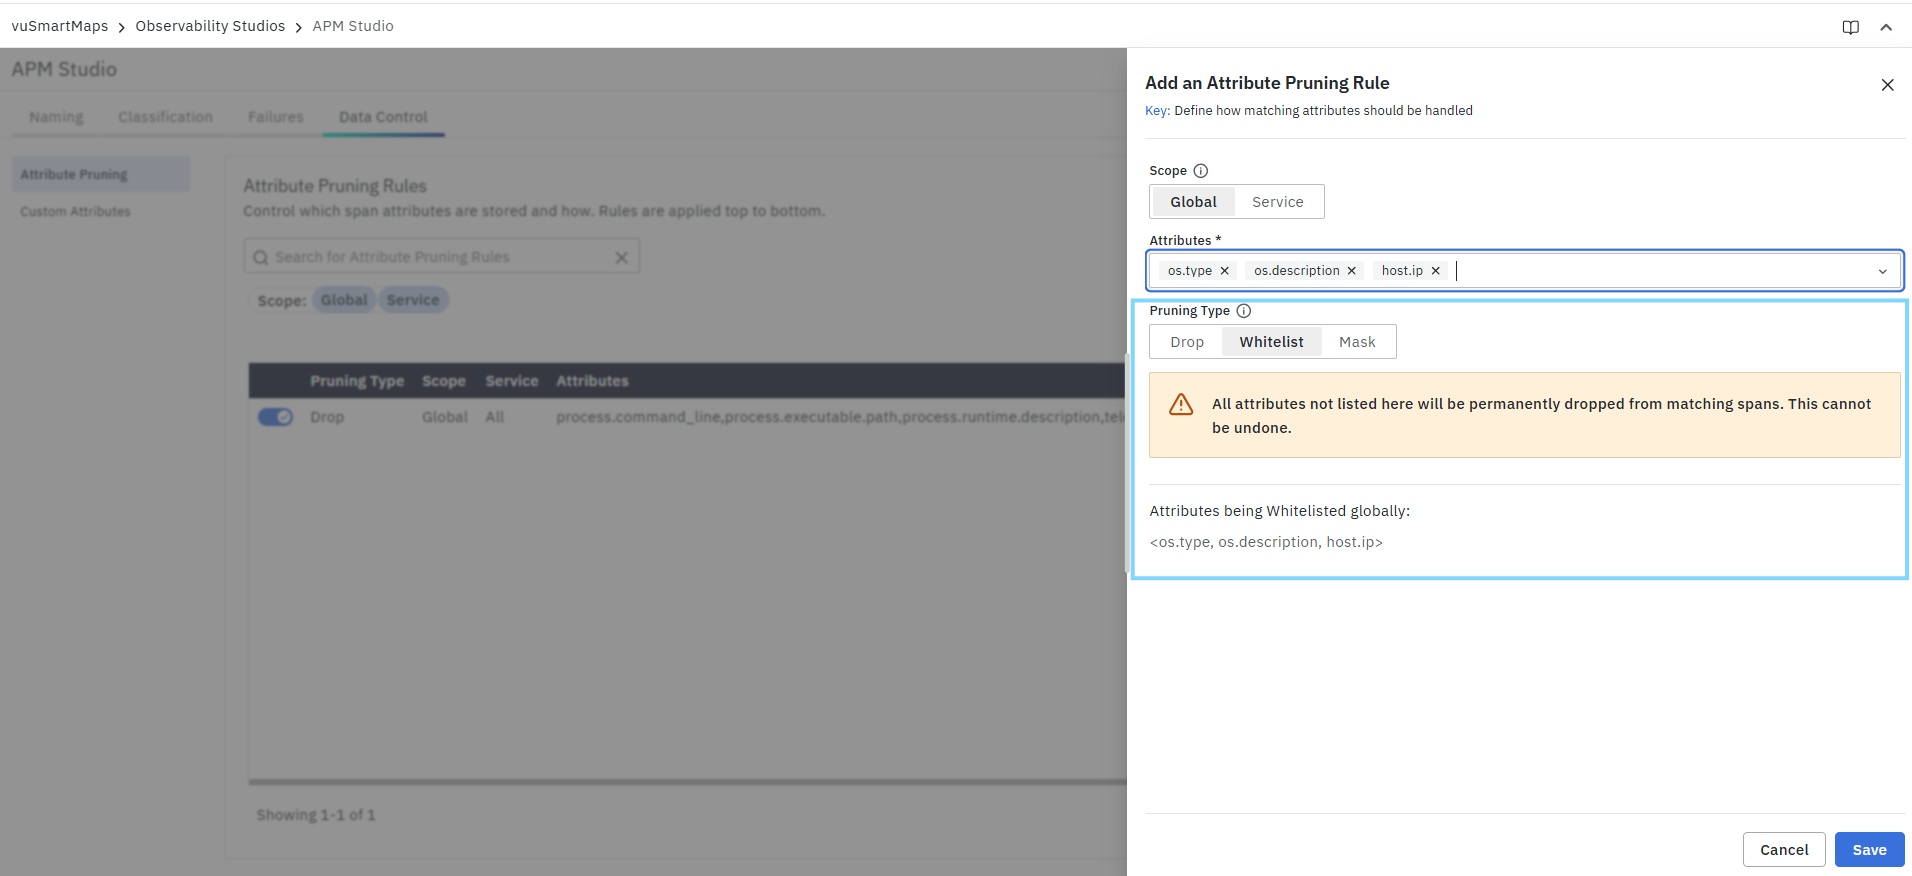
Whitelist retains only the selected attributes for matching spans. All other attributes are permanently dropped.
When to use Whitelist
Use Whitelist when:
- You want strict control over what is retained
- Only a small approved set of attributes is required
- You want to reduce the span metadata size aggressively
- Governance or compliance requires minimal retained data
When Whitelist is selected, the UI shows a warning indicating that:
- All attributes not listed will be permanently dropped
- The action cannot be undone
It also shows a summary such as:
- Attributes being Whitelisted globally
Important
- Whitelist is the most restrictive option.
- If used too broadly, it can remove important troubleshooting context such as request metadata, service tags, status attributes, or error indicators.
Pruning Type: Mask
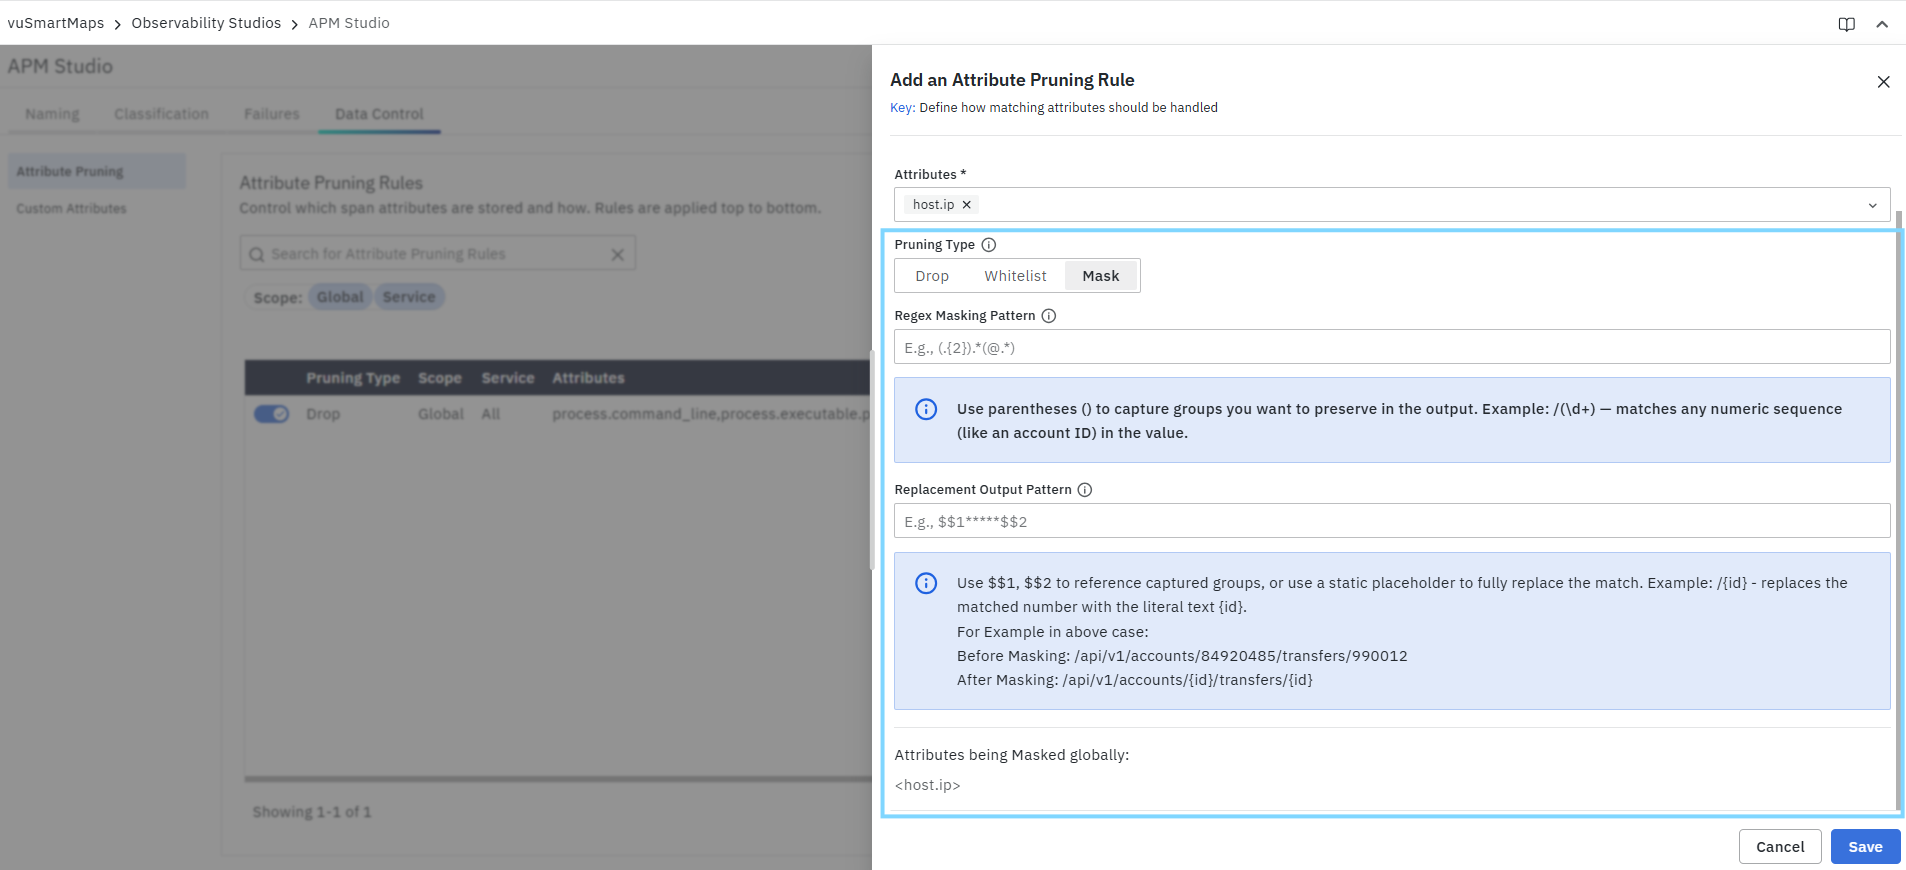
Mask retains the selected attributes but transforms part or all of their values using a regular expression and a replacement pattern. This is the preferred option when the attribute itself is useful, but the raw value contains sensitive or dynamic information that should not be stored directly.
When to use Mask
Use Mask when attribute values contain:
- PII (personally identifiable information)
- Account IDs
- Transaction IDs
- Card or Customer references
- Email-like identifiers
- Tokens or Session fragments
- Dynamic URL path segments
- Sensitive business values
How Mask works
- Masking does not remove the attribute.
- Instead, it updates the attribute value before storage.
- Masking is implemented using a
replace_pattern()transform onspan.attributes[...], with optional service-specific conditions.
Mask Configuration Fields
When Mask is selected, the UI shows additional fields:
- Regex Masking Pattern
- Replacement Output Pattern
These fields are required to define how the value should be transformed.
Regex Masking Pattern
The Regex Masking Pattern specifies the portion of the attribute value that should be matched. Use a regular expression to identify the dynamic or sensitive part of the value.
- Parentheses
()can be used to create capture groups - Capture groups allow you to preserve parts of the original value
- The pattern can be used to match dynamic numeric sequences, such as IDs
Example
/(\d+)
This matches numeric segments in a string, such as account IDs or transaction IDs embedded in a path.
Replacement Output Pattern
The Replacement Output Pattern defines what replaces the matched portion.
- Reference captured groups using
$1,$2, etc. - Replace the match with a fixed literal placeholder
- Combine preserved groups with static text
Use $1,$2refer to captured groups- A static placeholder can fully replace the match
- Examples can be used to normalize dynamic identifiers into reusable patterns
Example
{id}
This replaces the matched value with the literal text {id}.
Masking Example
Before Masking
/api/v1/accounts/84920485/transfers/990012
Regex Masking Pattern
/(\d+)
Replacement Output Pattern
{id}
After Masking
/api/v1/accounts/{id}/transfers/{id}
This preserves the request structure while removing raw numeric identifiers.
Examples
Example 1: Drop noisy infrastructure attributes
Goal: Remove infrastructure attributes that are not useful for routine troubleshooting.
Configuration
- Scope: Global
- Attributes:
host.arch,os.description - Pruning Type: Drop
Outcome: These attributes are removed from spans across all services.
Example 2: Whitelist a minimal approved set
Goal: Retain only a tightly controlled set of attributes for a sensitive workload.
Configuration
- Scope: Global
- Attributes:
host.arch - Pruning Type: Whitelist
Outcome: Only host.arch is retained. All other attributes are dropped from matching spans.
Example 3: Mask dynamic IDs in a URL-like attribute
Goal: Preserve the route shape while removing sensitive identifiers.
Configuration
- Scope: Global
- Attribute:
http.url(or another path-like attribute) - Pruning Type: Mask
- Regex Masking Pattern:
/(\d+) - Replacement Output Pattern:
{id}
Before
/api/v1/accounts/84920485/transfers/990012
After
/api/v1/accounts/{id}/transfers/{id}
Outcome: The attribute remains available for analysis, but sensitive dynamic values are no longer stored in raw form.
Example 4: Service-specific masking for sensitive customer data
Goal: Mask a sensitive attribute only for one service.
Configuration
- Scope: Service
- Service:
payment-service - Attribute:
user.phone - Pruning Type: Mask
- Regex Masking Pattern:
\d - Replacement Output Pattern:
*
Before
9876543210
After
**********
Edit a Rule
Use the Edit action in the Actions column to update an existing pruning rule.
You can modify:
- The scope
- The selected service
- The selected attributes
- The pruning type
- Masking patterns (for mask rules)
After saving, the updated rule applies to future matching spans.
Delete a Rule
Use the Delete action in the Actions column to remove a rule. Deleting a rule stops that pruning behavior from being applied to future matching spans.
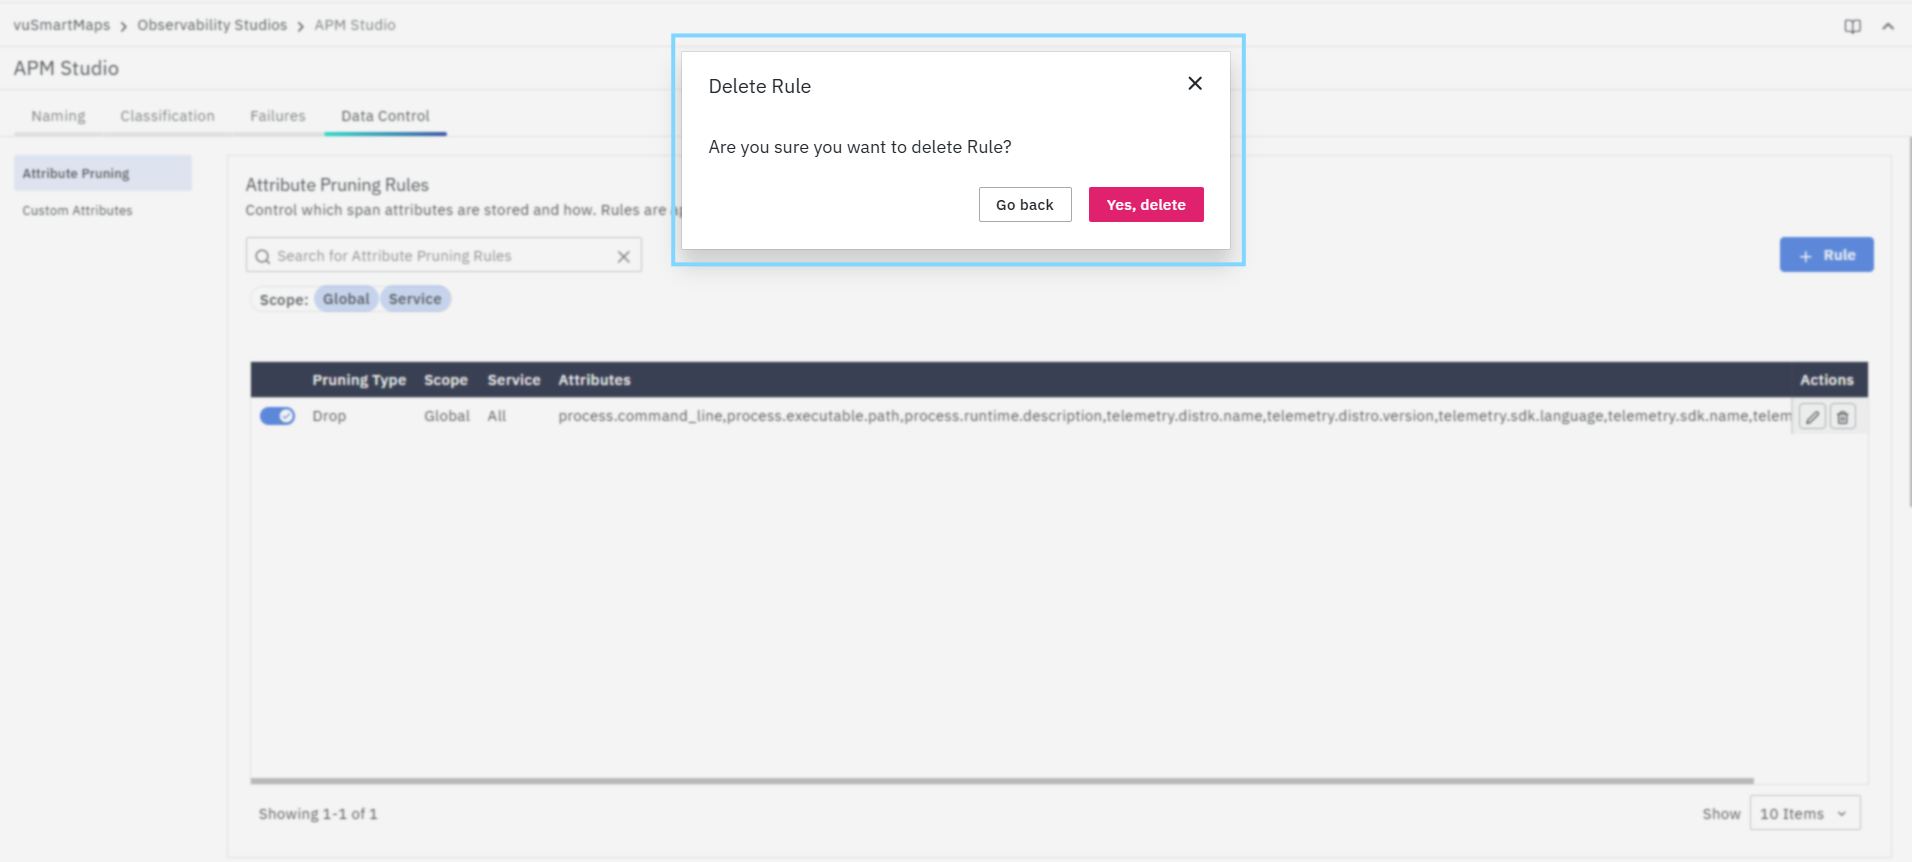
Deleting a rule does not restore attribute values that were already dropped or masked in spans processed earlier.
Custom Attributes
The Custom Attributes section under Data Control allows you to enrich traces with additional business or domain-specific context that is not captured by default instrumentation. This feature helps you extract important metadata from application traffic and attach it to spans as custom attributes, making traces more meaningful for:
- Filtering and searching
- Correlation across requests
- Business transaction analysis
- Customer or tenant-level troubleshooting
- Root cause analysis
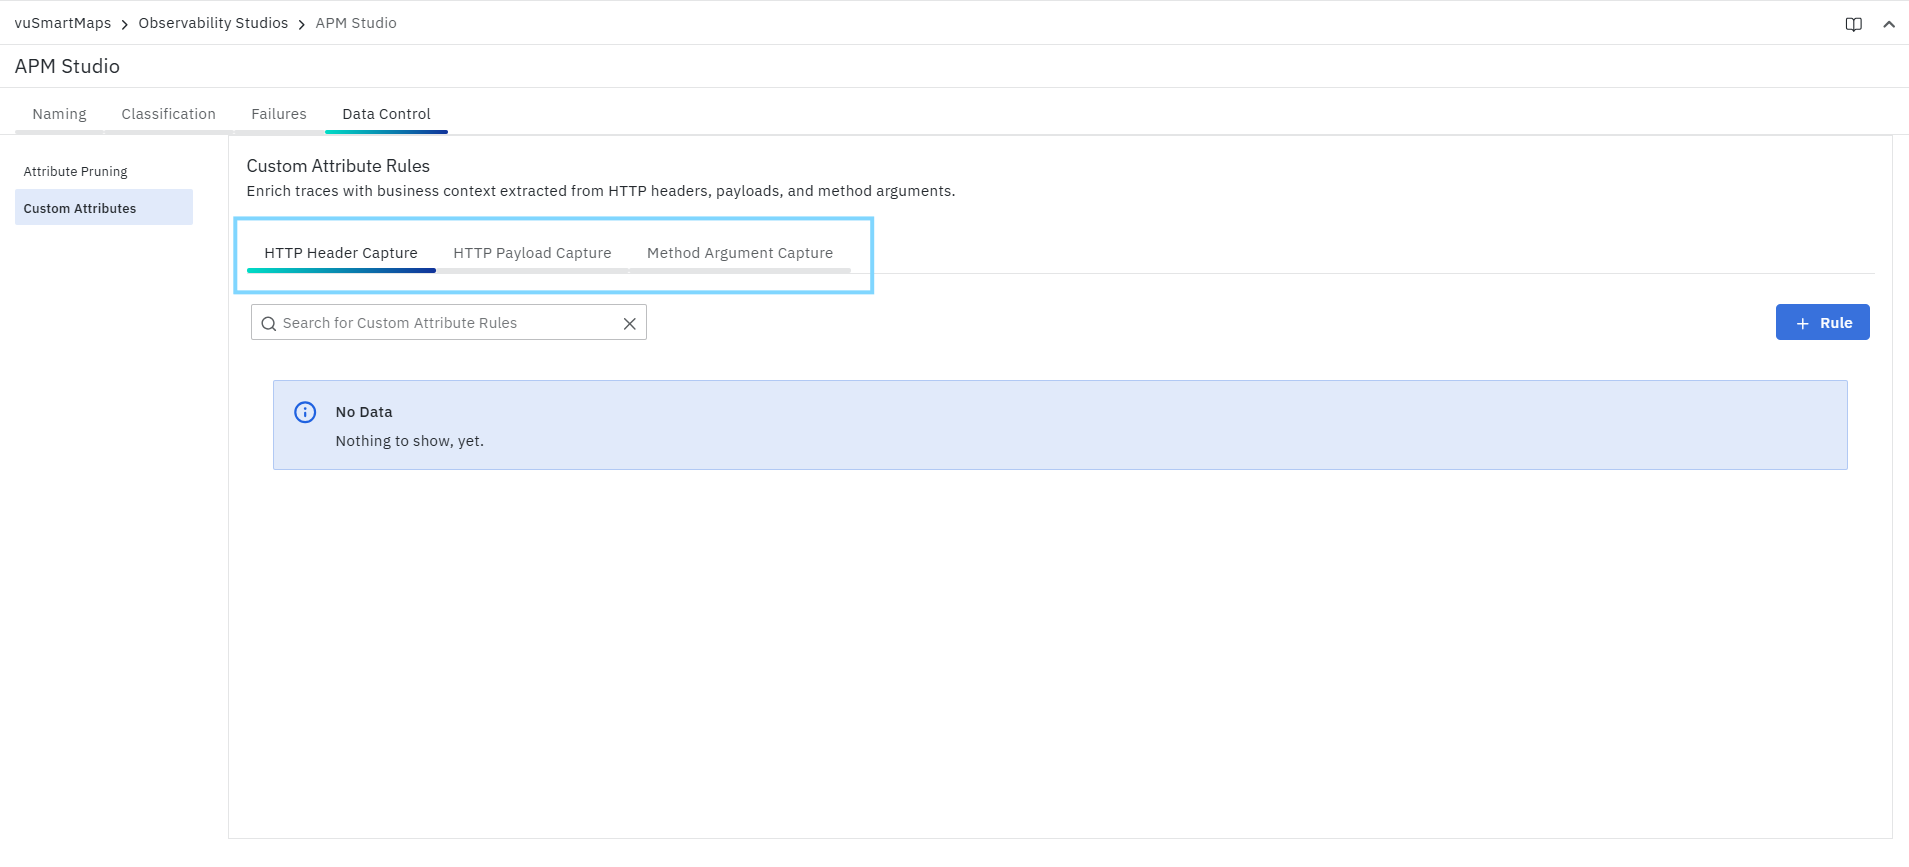
The Custom Attributes section supports multiple enrichment methods through dedicated tabs:
- HTTP Header Capture
- HTTP Payload Capture
- Method Argument Capture
Enrich traces with business context extracted from HTTP headers, payloads, and method arguments.
HTTP Header Capture
The HTTP Header Capture tab allows you to capture selected HTTP request or response headers and store them as span attributes in traces. This is useful when key business identifiers are passed in headers instead of being available in the URL, span name, or default OpenTelemetry attributes.
Typical examples include:
- Customer identifiers
- Tenant identifiers
- Transaction IDs
- Correlation IDs
- Channel identifiers
- Application-specific tracking headers
- Response status metadata returned by downstream systems
HTTP Header Capture Extracts values from named HTTP request or response headers and attach them as span attributes.
HTTP Header Capture Page
The HTTP Header Capture tab displays all configured header capture rules in a table. the table includes:
- Service – the service to which the rule applies
- Source – whether headers are captured from the request or response
- Headers – the list of configured header names
- Actions – options to edit or delete the rule
Example:
payment-service | Request | client_id, txn_id, applicationIdpayment-service | Response | resp_code, resp_status
The page also provides:
- A Search for Custom Attribute Rules field
- A + Rule button to add a new rule
Add an HTTP Header Attribute
To create a new header capture rule:
- Open APM Studio.
- Go to Data Control.
- Select Custom Attributes.
- Open the HTTP Header Capture tab.
- Click + Rule.
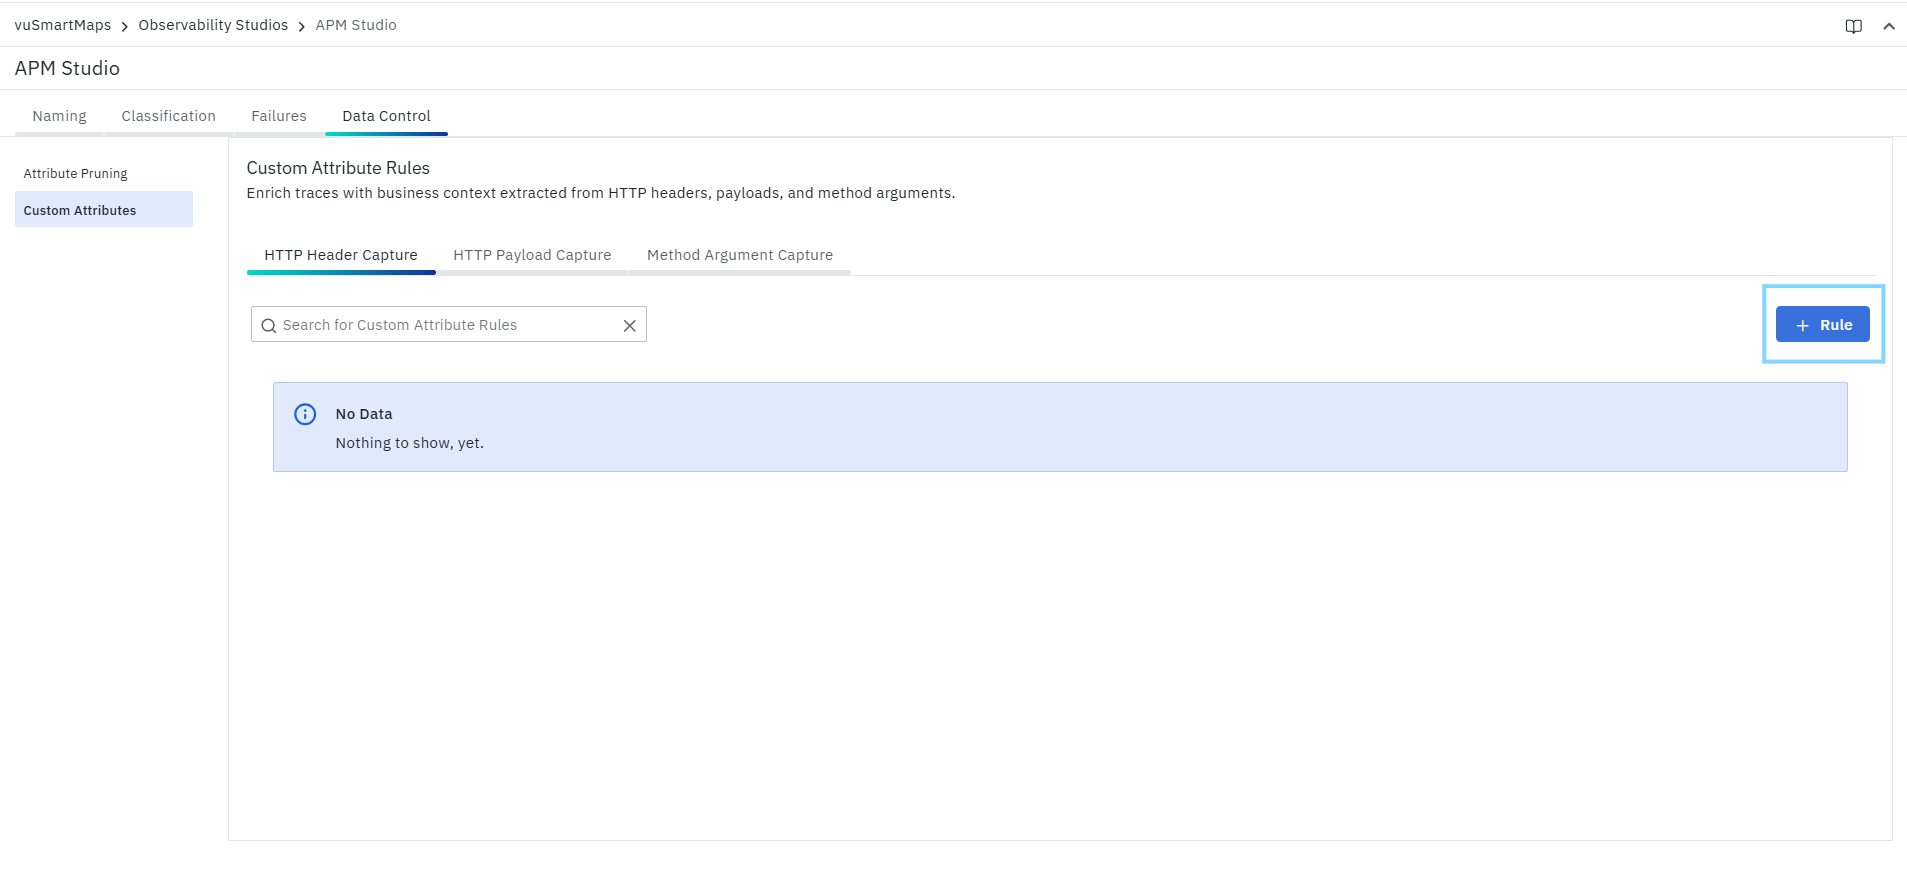
- In the Add HTTP Header Attribute panel, configure the required fields.
- Click Save.
Field Descriptions
Service Name
- The Service Name field specifies the service for which the header capture rule should apply. This is a required field.
- Click Select Service to choose the target service.
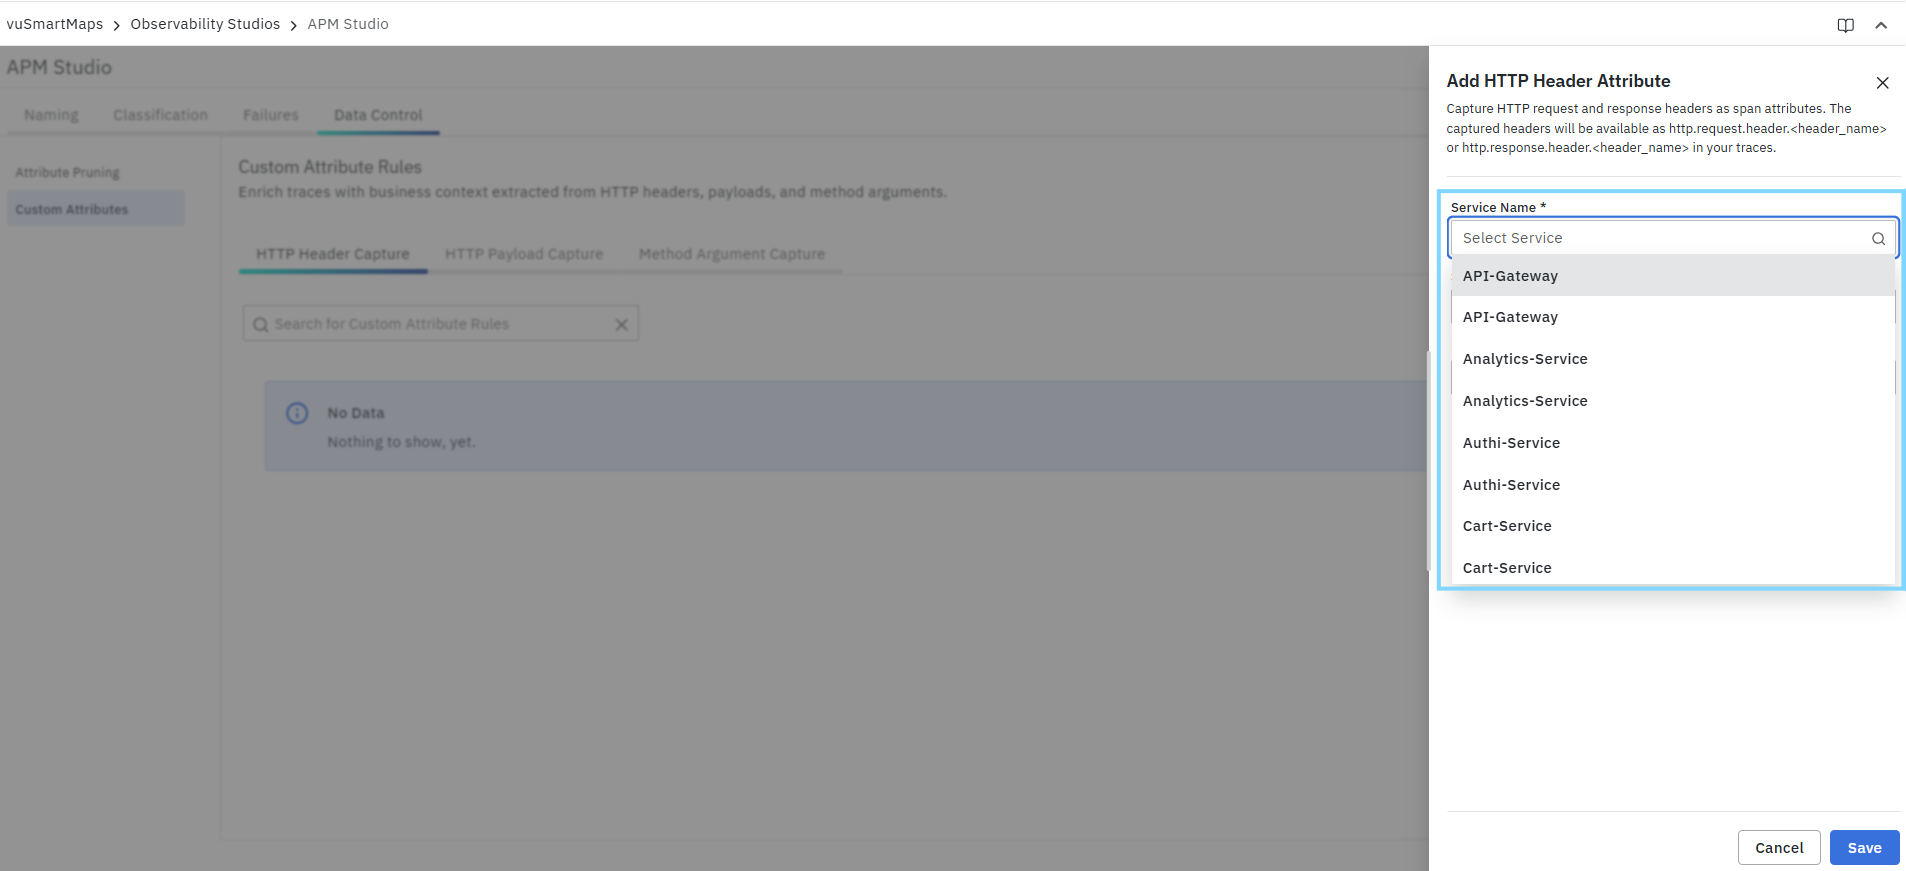
- The rule applies only to the selected service.
- Each service can have separate request and response header capture rules based on its specific requirements.
Source
The Source field determines whether the headers should be captured from the incoming request or outgoing response. This is a required field.
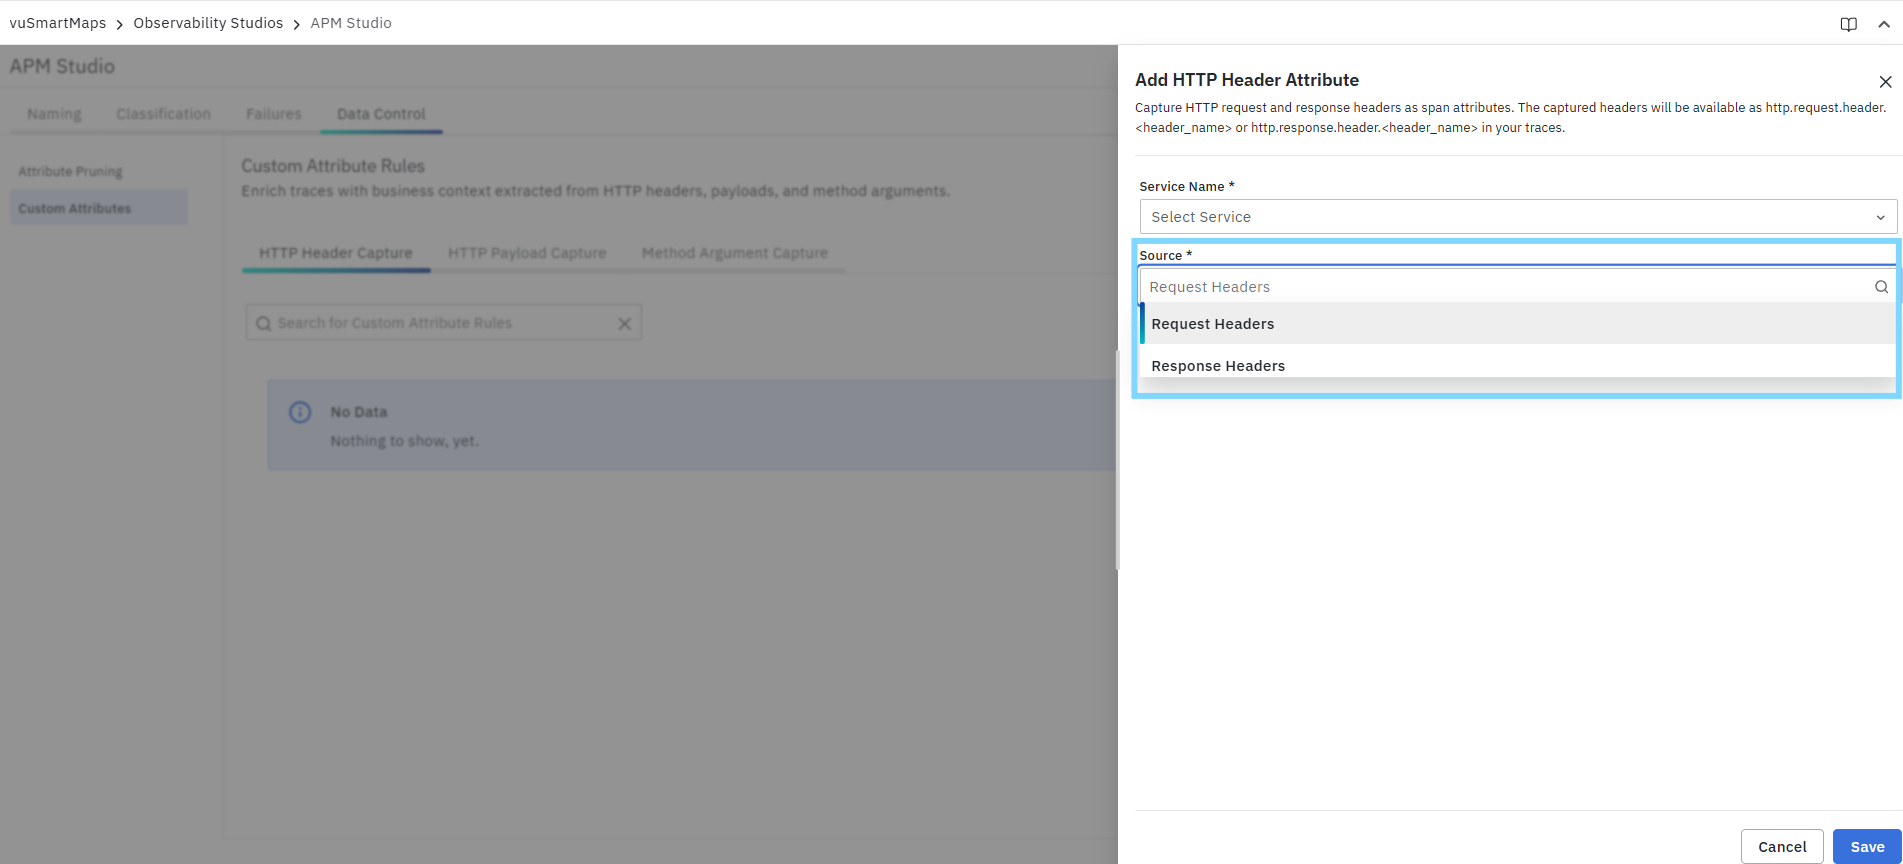
Available options
- Request Headers
- Response Headers
Behavior
- Request Headers captures headers received by the service.
- Response Headers captures headers returned by the service.
How the captured attributes are stored
- Request headers are stored as:
http.request.header.<header_name>
- Response headers are stored as:
http.response.header.<header_name>
This naming pattern is important because it helps users know exactly how to search and filter the enriched values in trace data.
Header Names
The Header Names field is used to specify one or more header names to capture. This is the main input field for the rule.
Input format
- Enter one or more header names as a comma-separated list
- Do not include spaces after commas
- example format such as:
x-request-id,x-tenant-id,authorization - headers present in the request/response will be captured as span attributes
- if a header is not found, it is ignored
Behavior
- If the header exists in the selected source, its value is captured.
- If the header is not present, the platform skips it without failing the rule.
- Multiple headers can be captured in a single rule for the same service and source.
Examples
Example 1: Capture transaction identifiers from incoming requests
Goal: Enrich traces with business identifiers sent by upstream callers.
Configuration
- Service Name:
payment-service - Source:
Request Headers - Header Names:
client_id,txn_id
Before
The trace contains only default technical metadata.
After
The span also includes:
http.request.header.client_id
http.request.header.txn_id
Why this is useful
This allows you to:
- Search traces by client ID
- Correlate multiple spans for the same transaction
- Isolate transaction-specific failures faster
Example 2: Capture response outcome metadata
Goal: Capture application-specific response details returned in headers.
Configuration
- Service Name:
payment-service - Source:
Response Headers - Header Names:
resp_code,resp_status
After
The span includes:
http.response.header.resp_code
http.response.header.resp_status
Why this is useful
This helps when the business response outcome is represented in custom headers instead of the HTTP status code alone.
Example 3: Capture correlation headers at an API gateway
Goal: Track requests across multiple downstream services.
Configuration
- Service Name:
api-gateway - Source:
Request Headers - Header Names:
x-request-id,x-tenant-id
After
The span includes:
http.request.header.x-request-id
http.request.header.x-tenant-id
Why this is useful
This improves:
- Tenant-based filtering
- Cross-service correlation
- Troubleshooting multi-tenant traffic patterns
Example 4: Missing headers are safely ignored
Goal: Configure a useful rule without breaking traces when a header is optional.
Configuration
- Service Name:
order-service - Source:
Request Headers - Header Names:
user_id,session_id
Behavior
- If
user_idis present, it is captured. - If
session_idis absent, it is ignored. - The rule still works normally.
Edit a Rule
Use the Edit action in the Actions column to update an existing HTTP Header Capture rule.
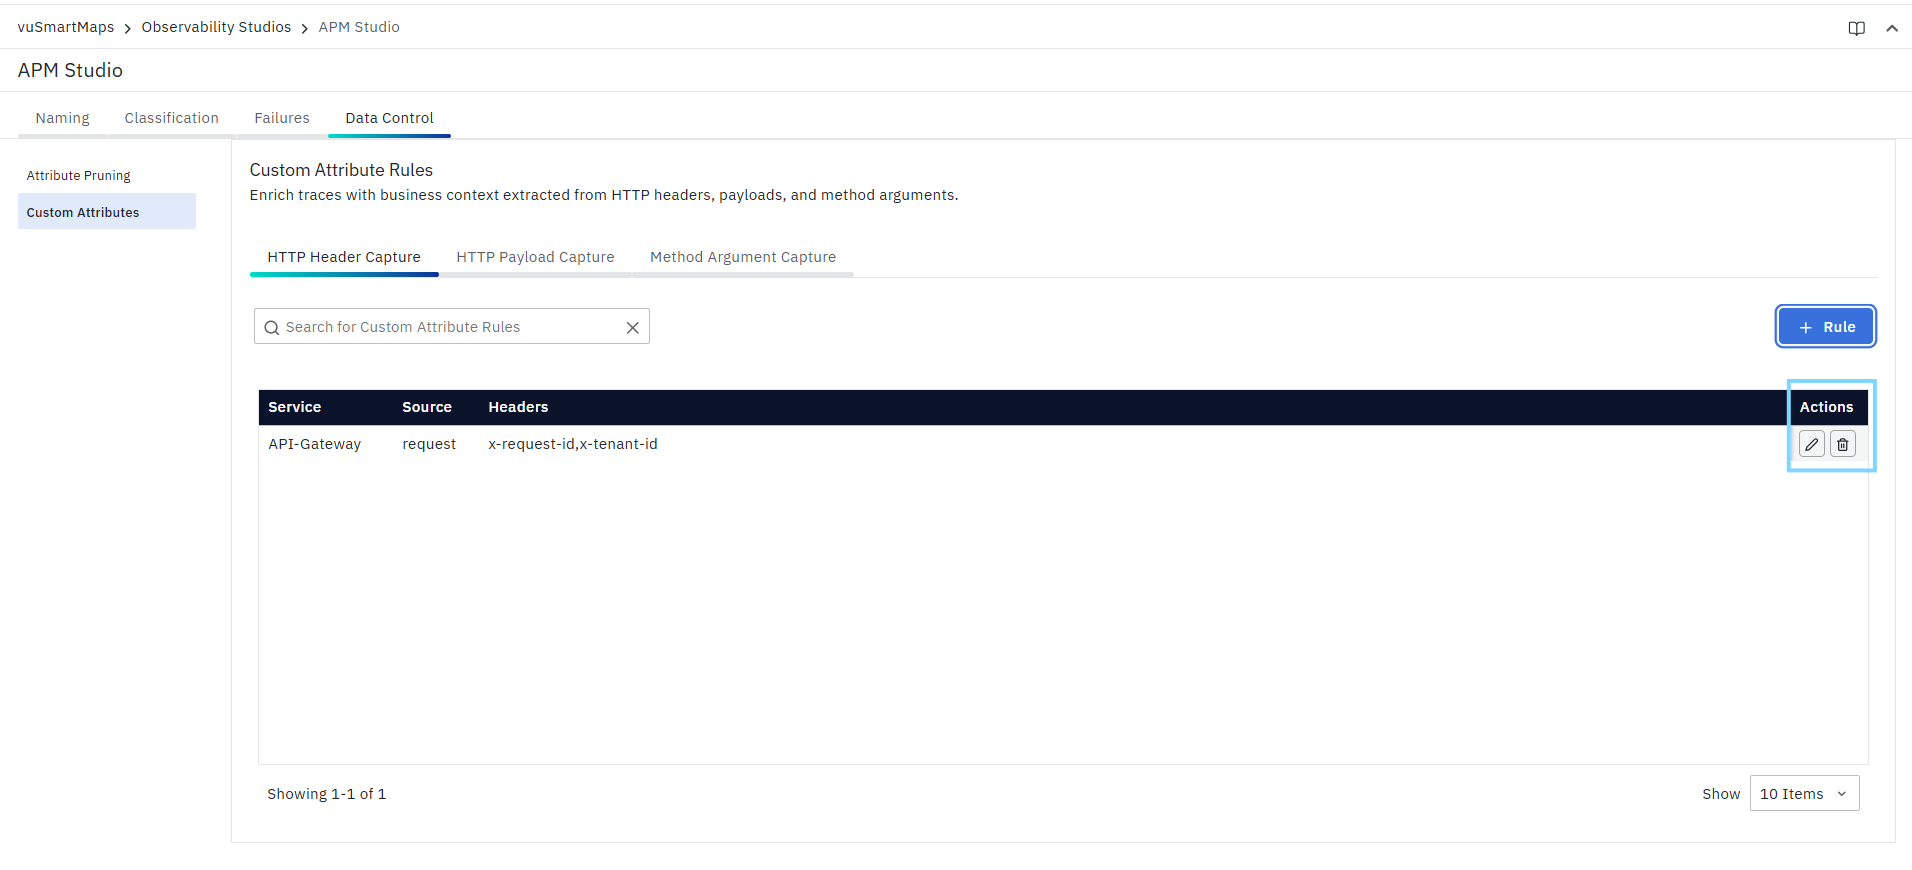
You can modify:
- The selected Service Name
- The Source
- The list of Header Names
After saving, the updated configuration applies to future requests and responses for that service.
Delete a Rule
Use the Delete action in the Actions column to remove an existing HTTP Header Capture rule. Deleting the rule stops the configured headers from being captured for future traces.
Removing a rule does not remove header attributes that were already captured in previously ingested traces.
HTTP Payload Capture
HTTP Payload Capture allows you to extract specific values from HTTP request or HTTP response payloads and store them as span attributes. This helps enrich traces with business-specific context that is not available by default, such as customer identifiers, payment references, UPI IDs, transaction amounts, or status values. This defines HTTP Payload Capture as extraction from HTTP request/response body content using delimiter-based substring extraction, splitting, trimming, decision rules, and regex extraction, applied per URL pattern and HTTP method.
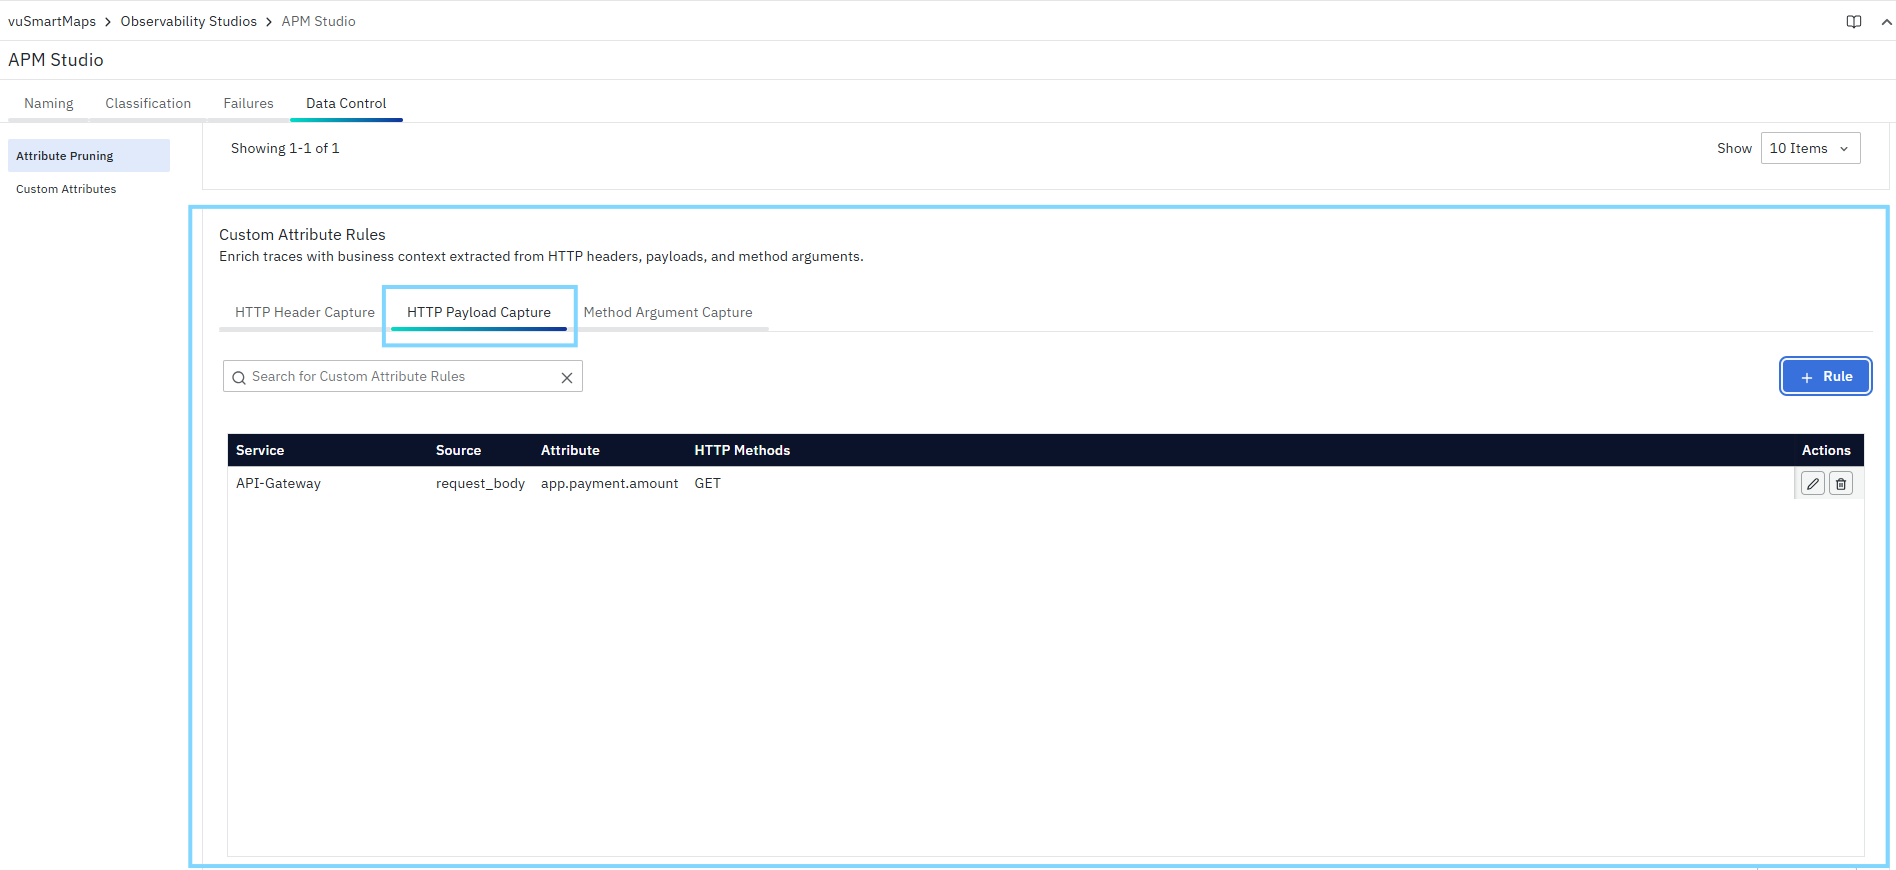
Use this when you want to:
- capture a value embedded in a request body (for example,
amount,customerId,vpa) - capture a value from a response body (for example,
status,responseCode,transactionId) - create searchable and filterable span attributes from business payload content
Add HTTP Payload Attribute Rule
When you click + Rule, the Add HTTP Payload Attribute Rule wizard opens.
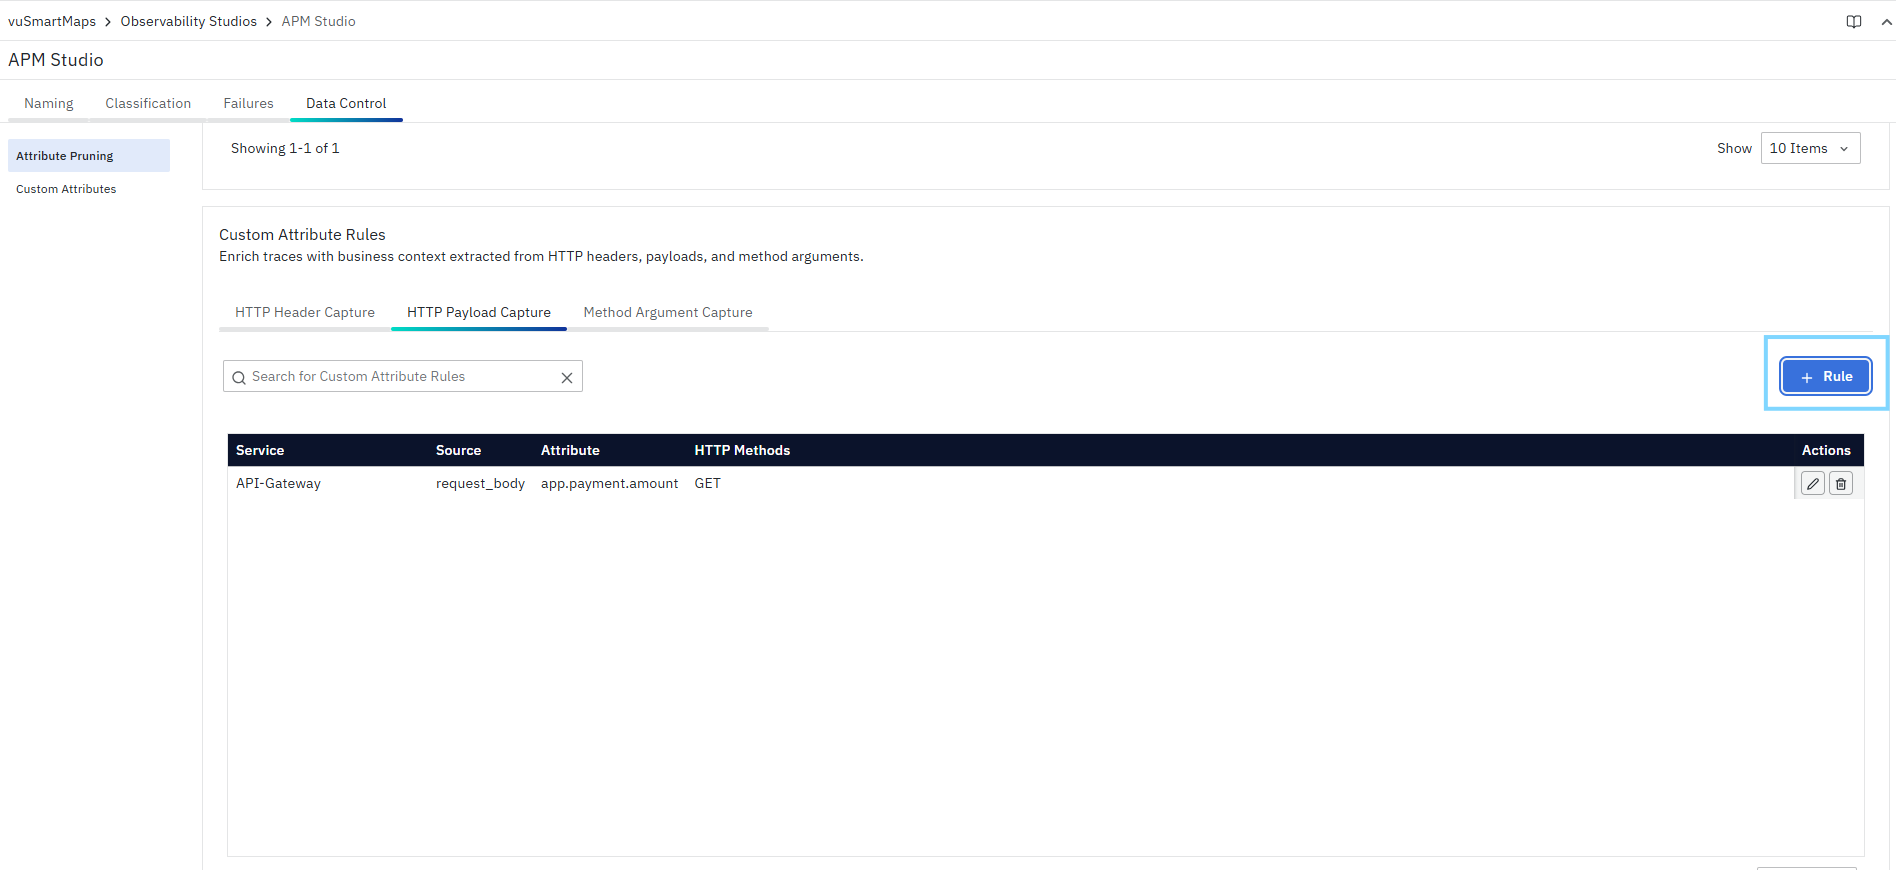
The wizard contains the following steps:
- General Info
- Data Source & Filtering
- Value Processing
- Review
General Info
In this step, provide the basic details for the new HTTP payload attribute rule.
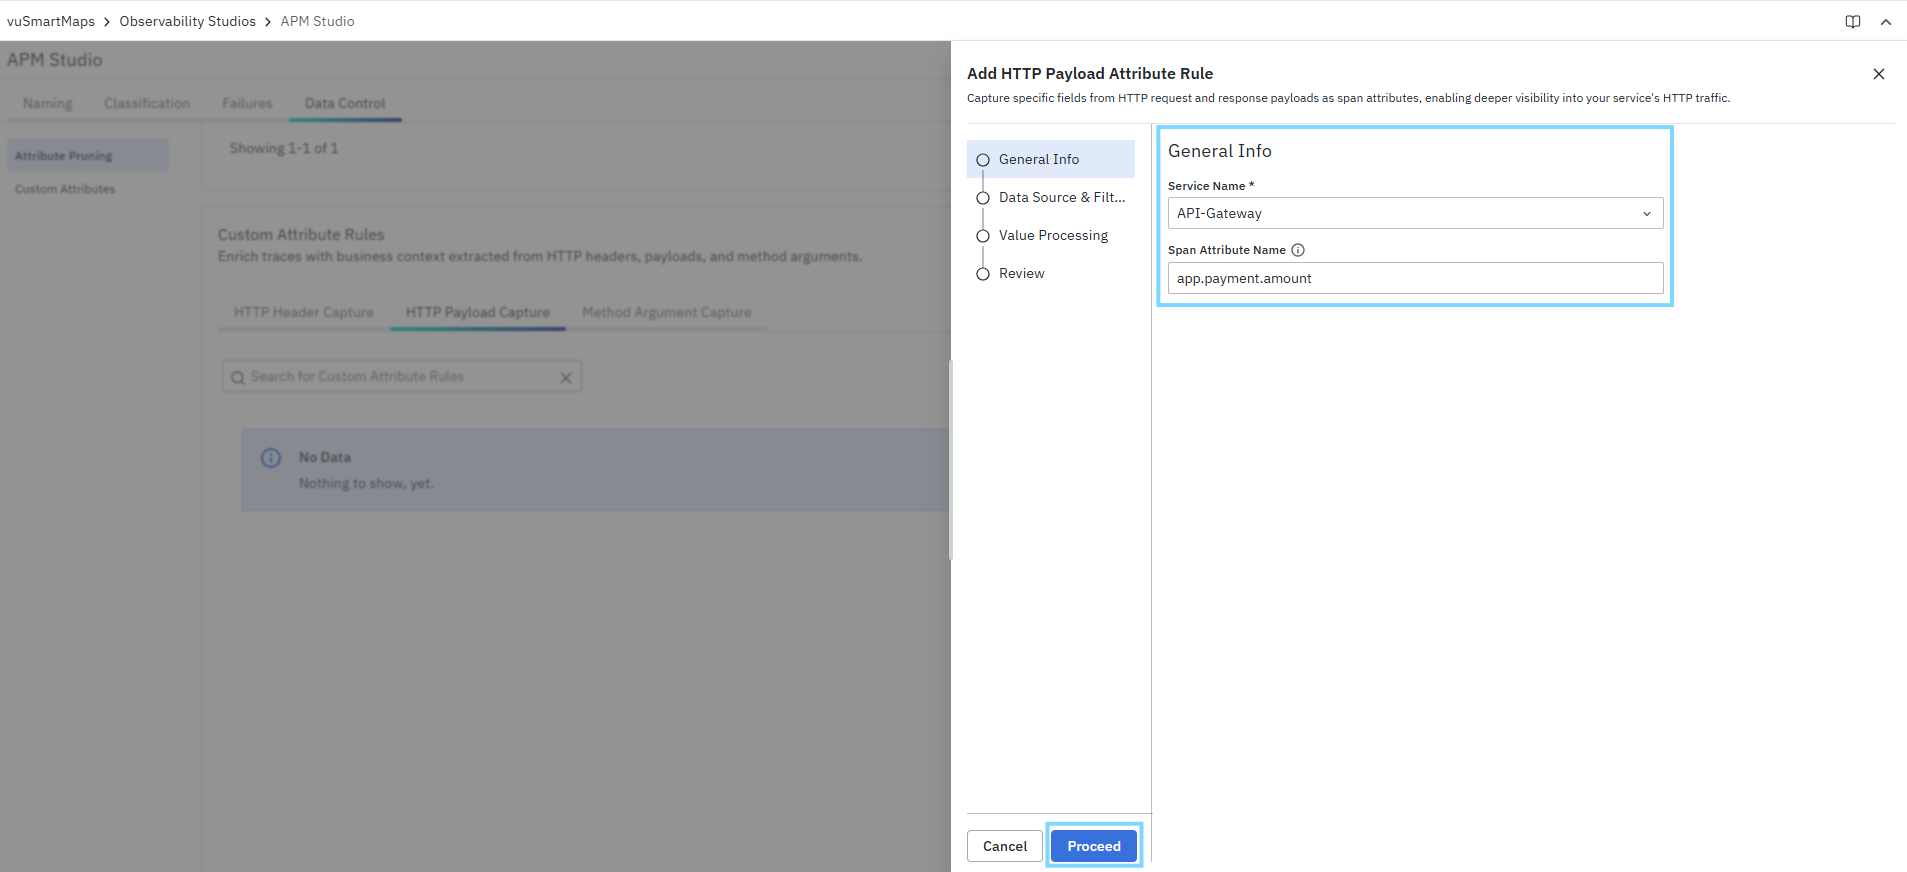
Fields
Service Name: Select the service for which the payload capture rule must be applied.
- Required: Yes
- This determines which service’s spans will be enriched.
Span Attribute Name: Enter the name of the span attribute that will store the extracted value.
- Required: Yes
- Use a descriptive, dot-separated name.
- Examples:
app.payment.amountpayment.response.code
Example
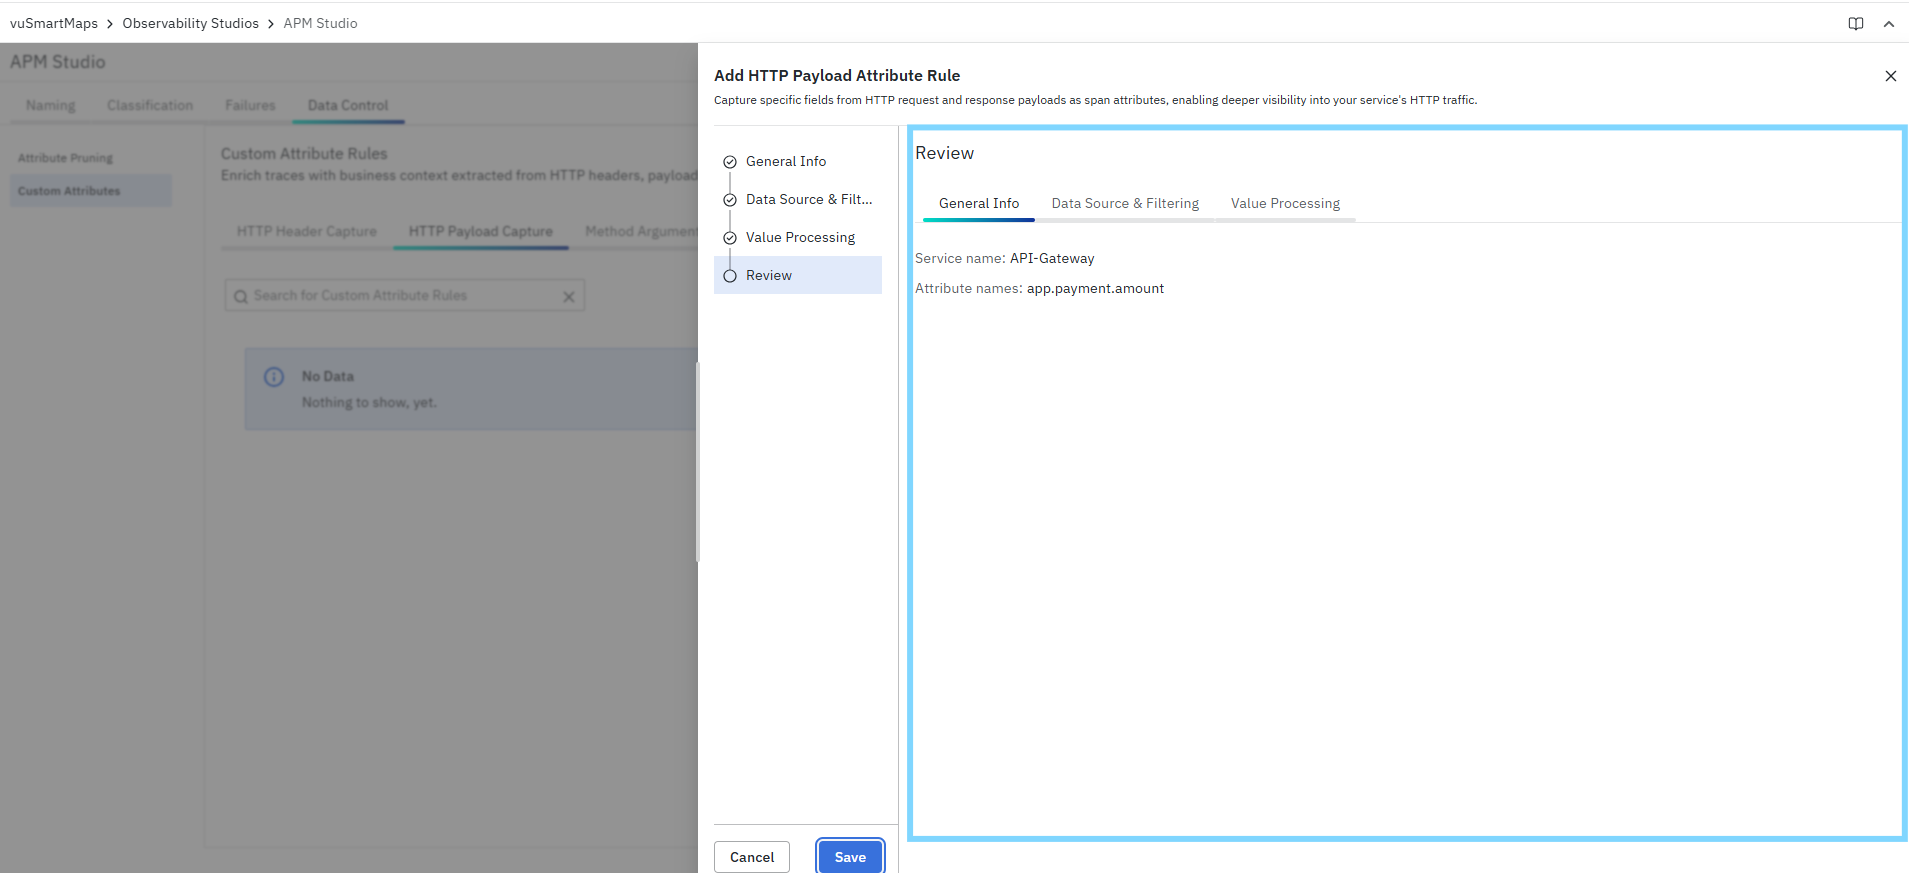
| Field | Example |
|---|---|
| Service Name | API-Gateway |
| Span Attribute Name | app.payment.amount |
Data Source & Filtering
In this step, define where the payload should be captured from and which requests the rule should apply to.
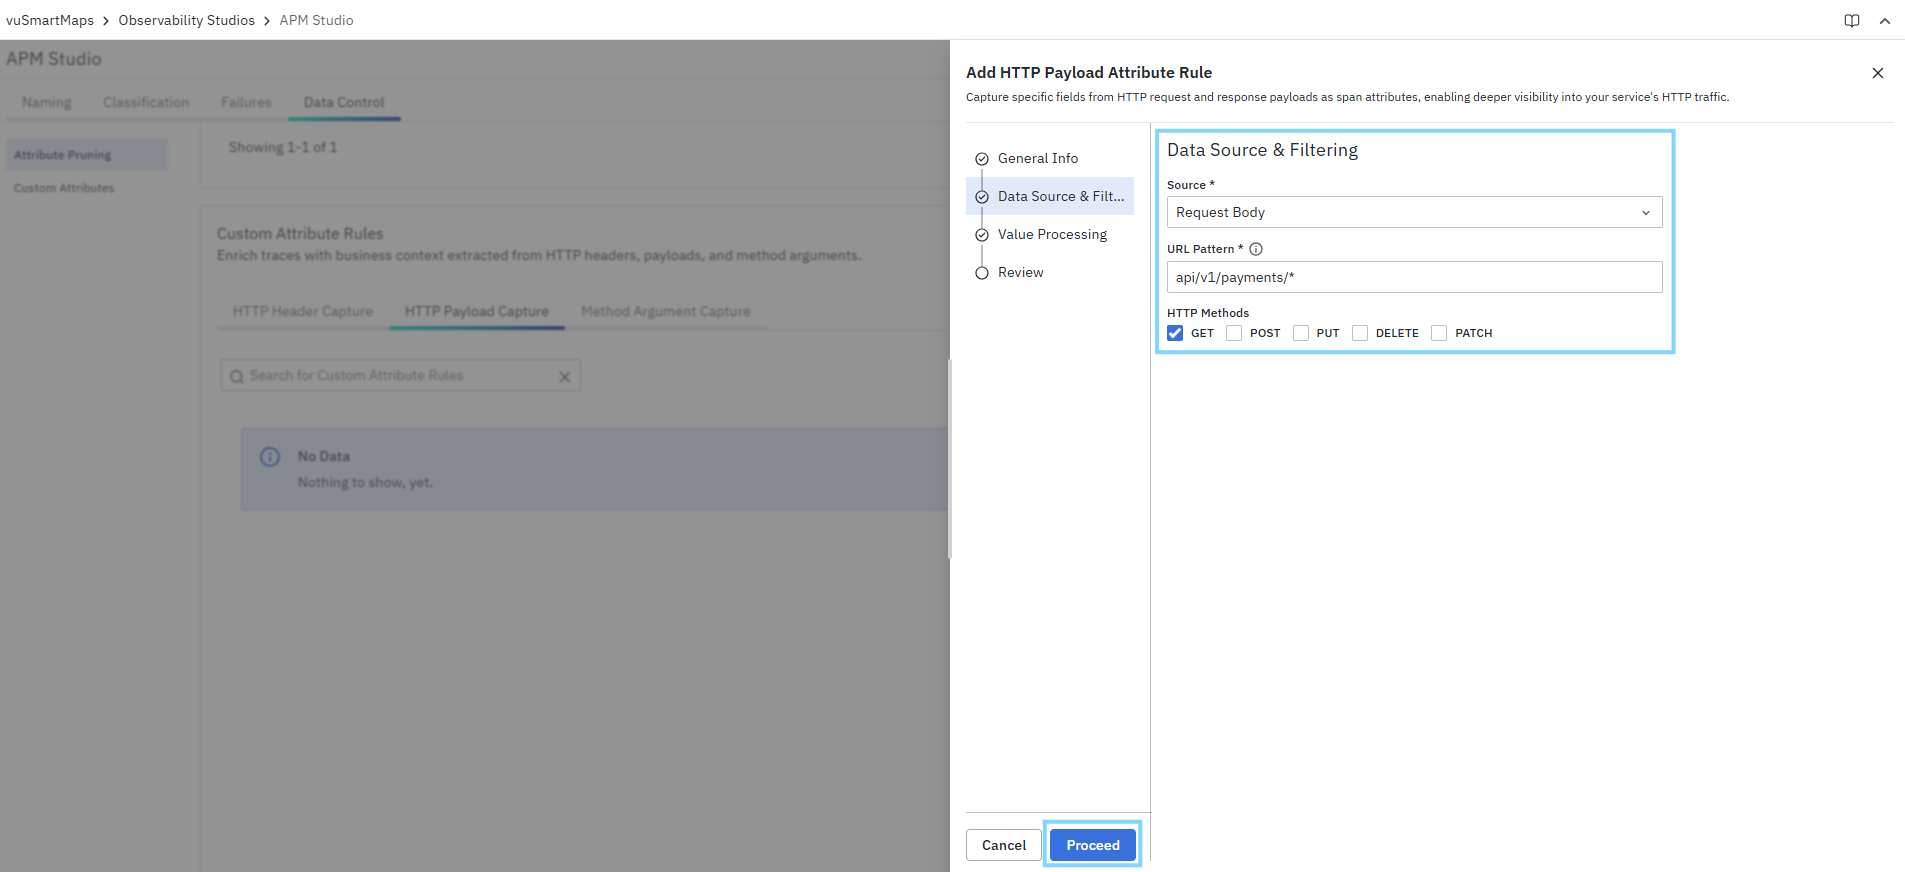
Fields
Source: Select the payload source.
- Required: Yes
- Available options:
- Request Body
- Response Body
URL Pattern: Enter the URL path pattern used to identify matching requests.
- Required: Yes
- Only requests whose URL matches this pattern will be considered.
- Example:
/api/v1/payments/*
HTTP Methods
Select one or more HTTP methods for which the rule should apply.
- Available options:
- GET
- POST
- PUT
- DELETE
- PATCH
This lets you narrow the rule to only the request types relevant to your payload.
Example
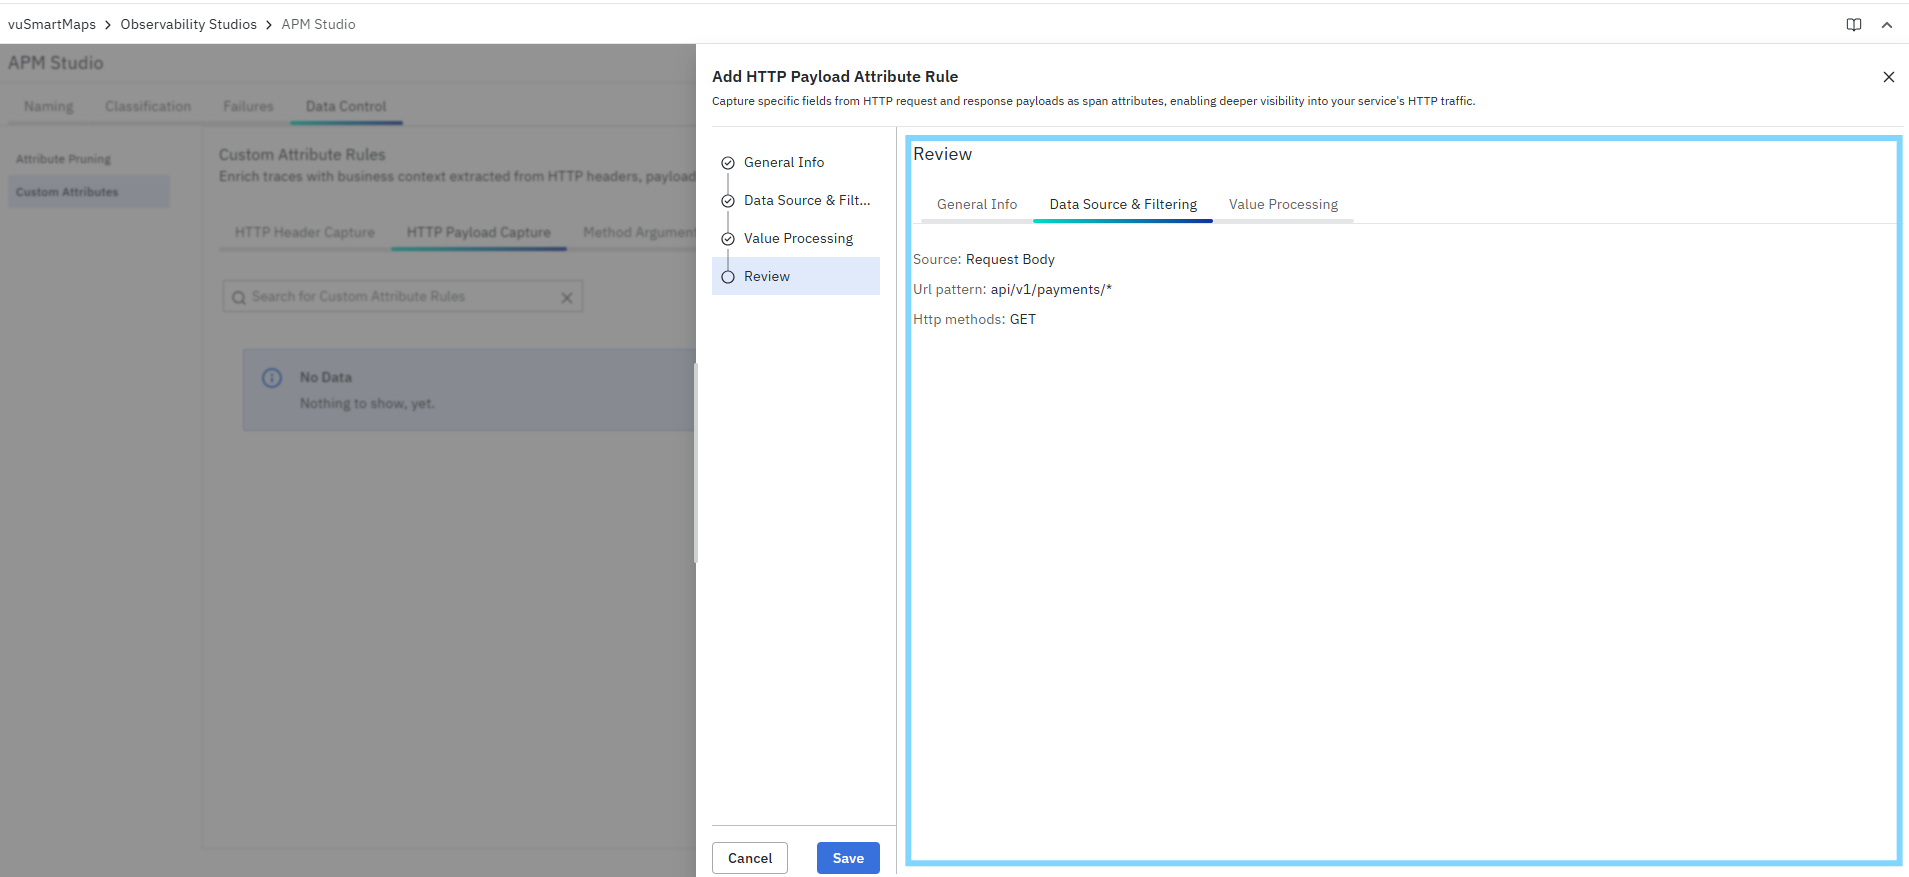
| Field | Example |
|---|---|
| Source | Request Body |
| URL Pattern | /api/v1/payments/* |
| HTTP Methods | GET |
Value Processing
The Value Processing step defines how the value is extracted and refined from the captured payload. This is one of the most important parts of HTTP Payload Capture.
The following processing options are supported:
- Preprocess parameter by extracting substring
- Split into Multiple Values
- Trim Whitespace
- Decision Rule
- Extract using Regular Expression
All these options are optional, and you can enable only the ones you need.
Preprocess parameter by extracting substring (Optional)
Enable this option when you want to extract a smaller section from the payload before further processing.
When to use: Use this when the value is surrounded by known delimiters.
Fields shown when enabled
- Search Type
- Start Delimiter(s)
- End Delimiter(s)
Search Type options
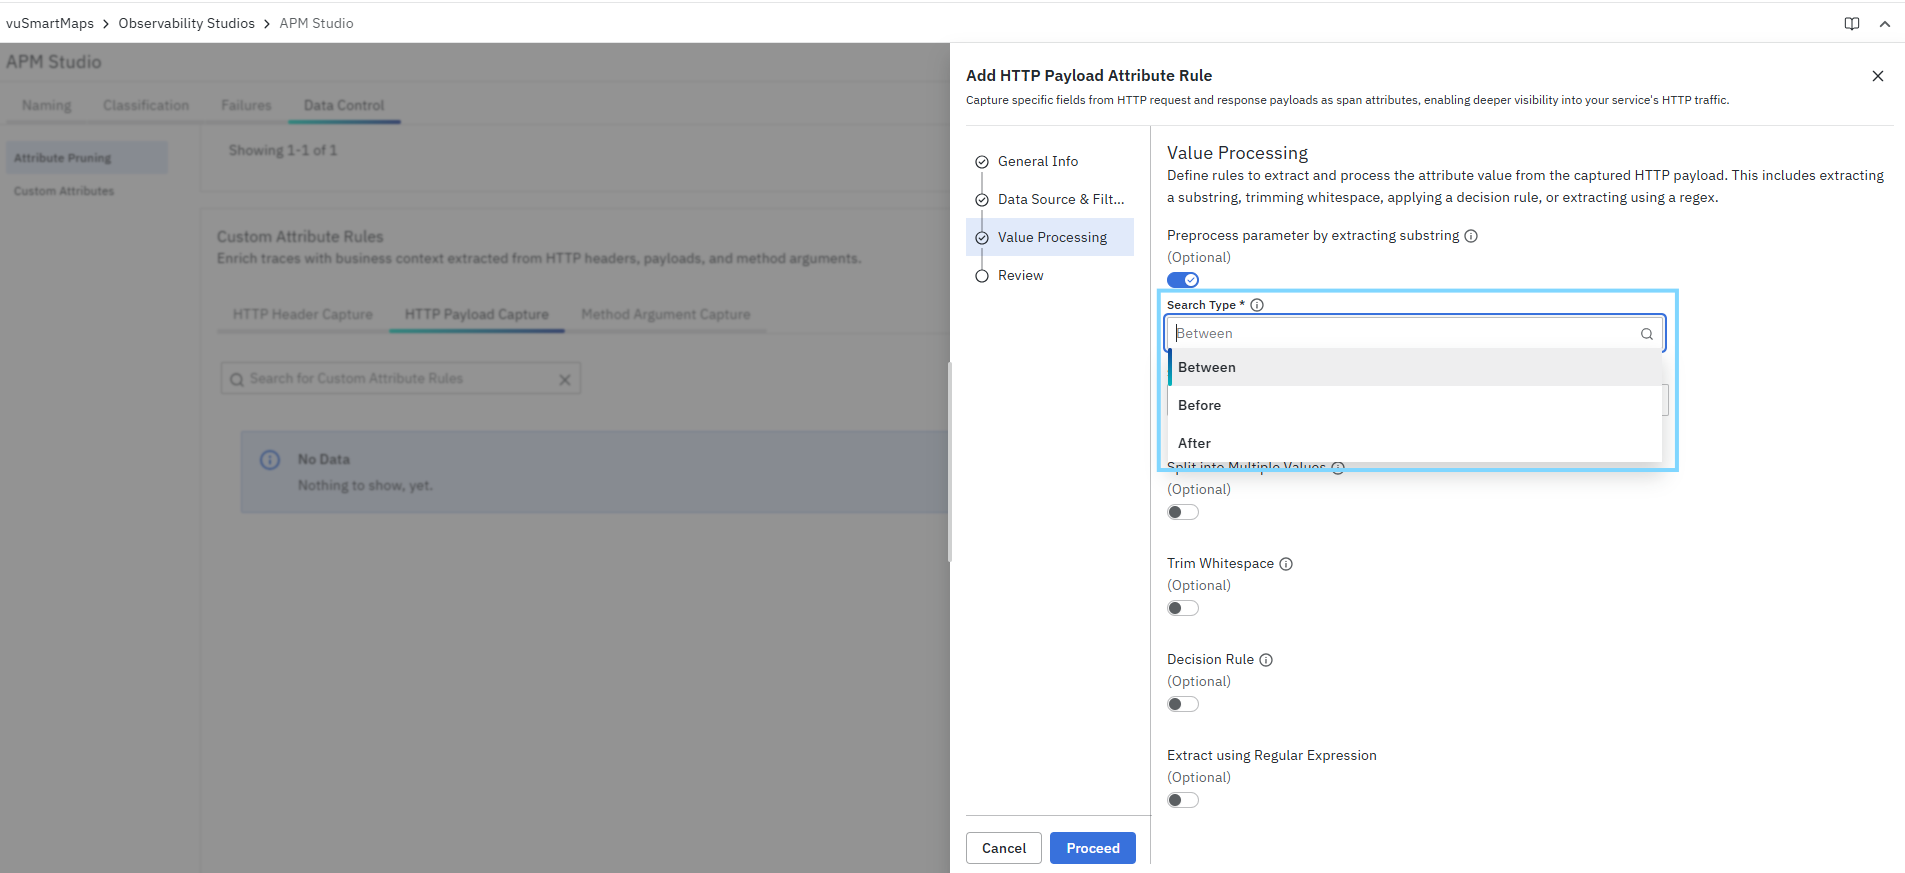
How it works
- Before: captures content before a delimiter
- After: captures content after a delimiter
- Between: captures content between a start delimiter and an end delimiter
Example
Payload:
{"vpa":"nikith@upi","amount":"5000"}
Configuration:
- Search Type: Between
- Start Delimiter:
vpa":" - End Delimiter:
"
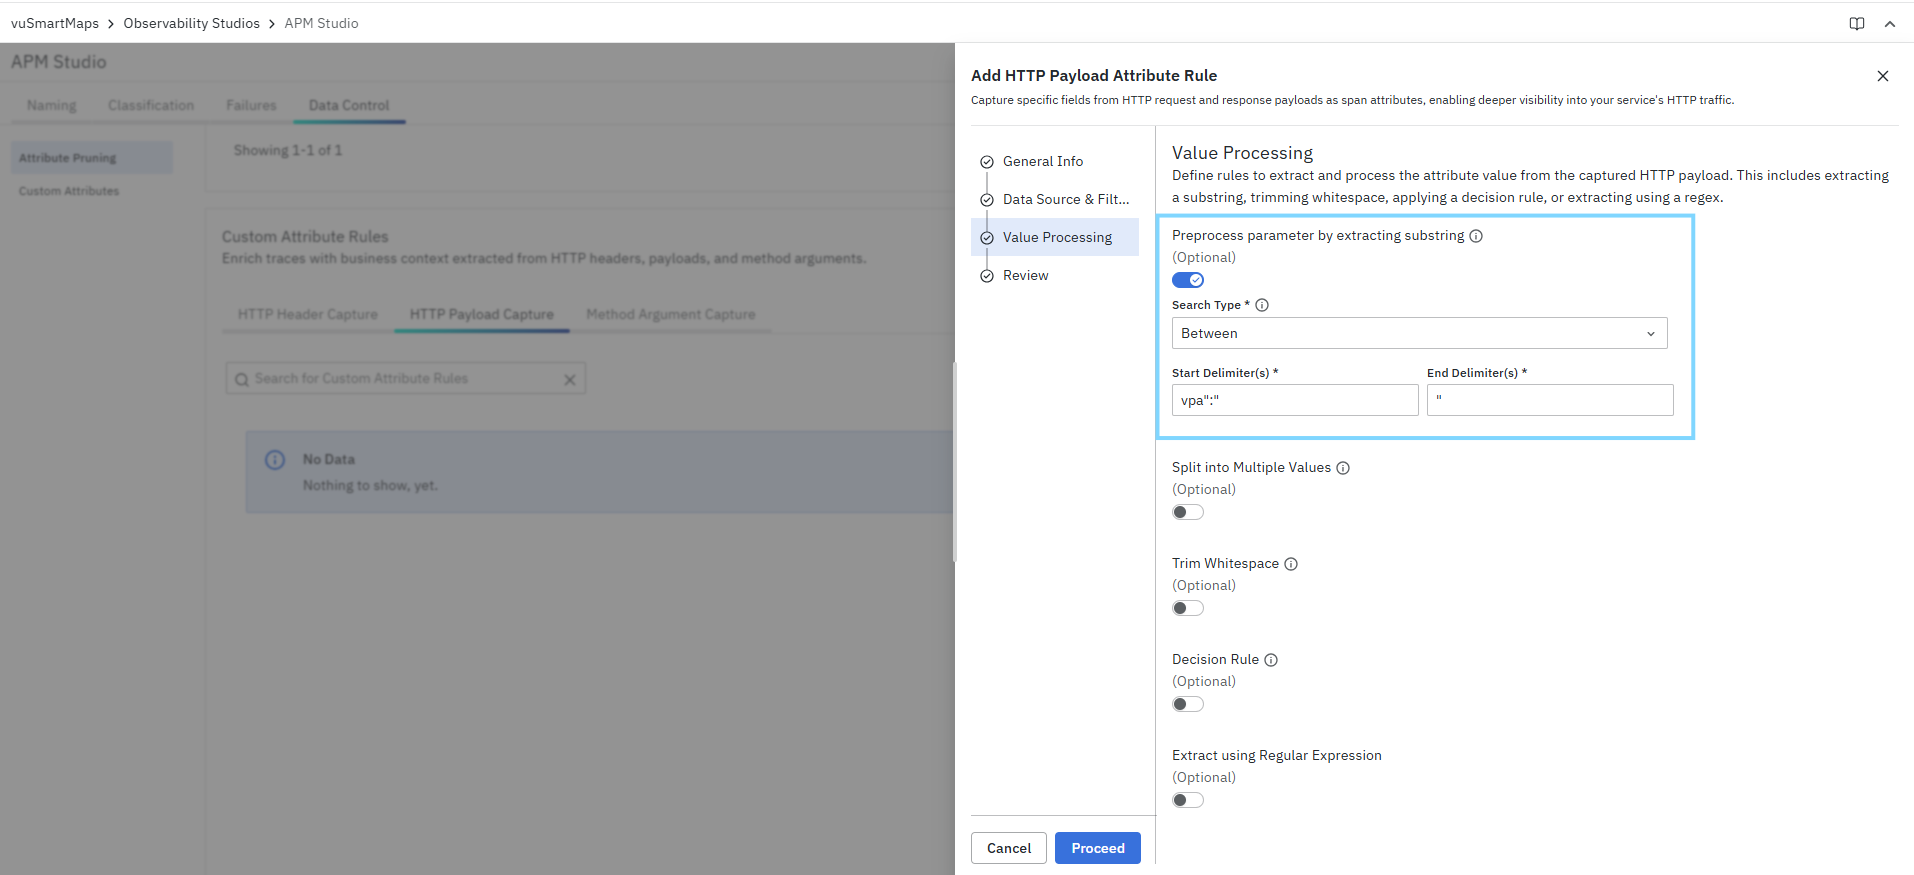
Result:
- Extracted value =
nikith@upi
Split into Multiple Values (Optional)
Enable this when the extracted value contains multiple items separated by a known delimiter.
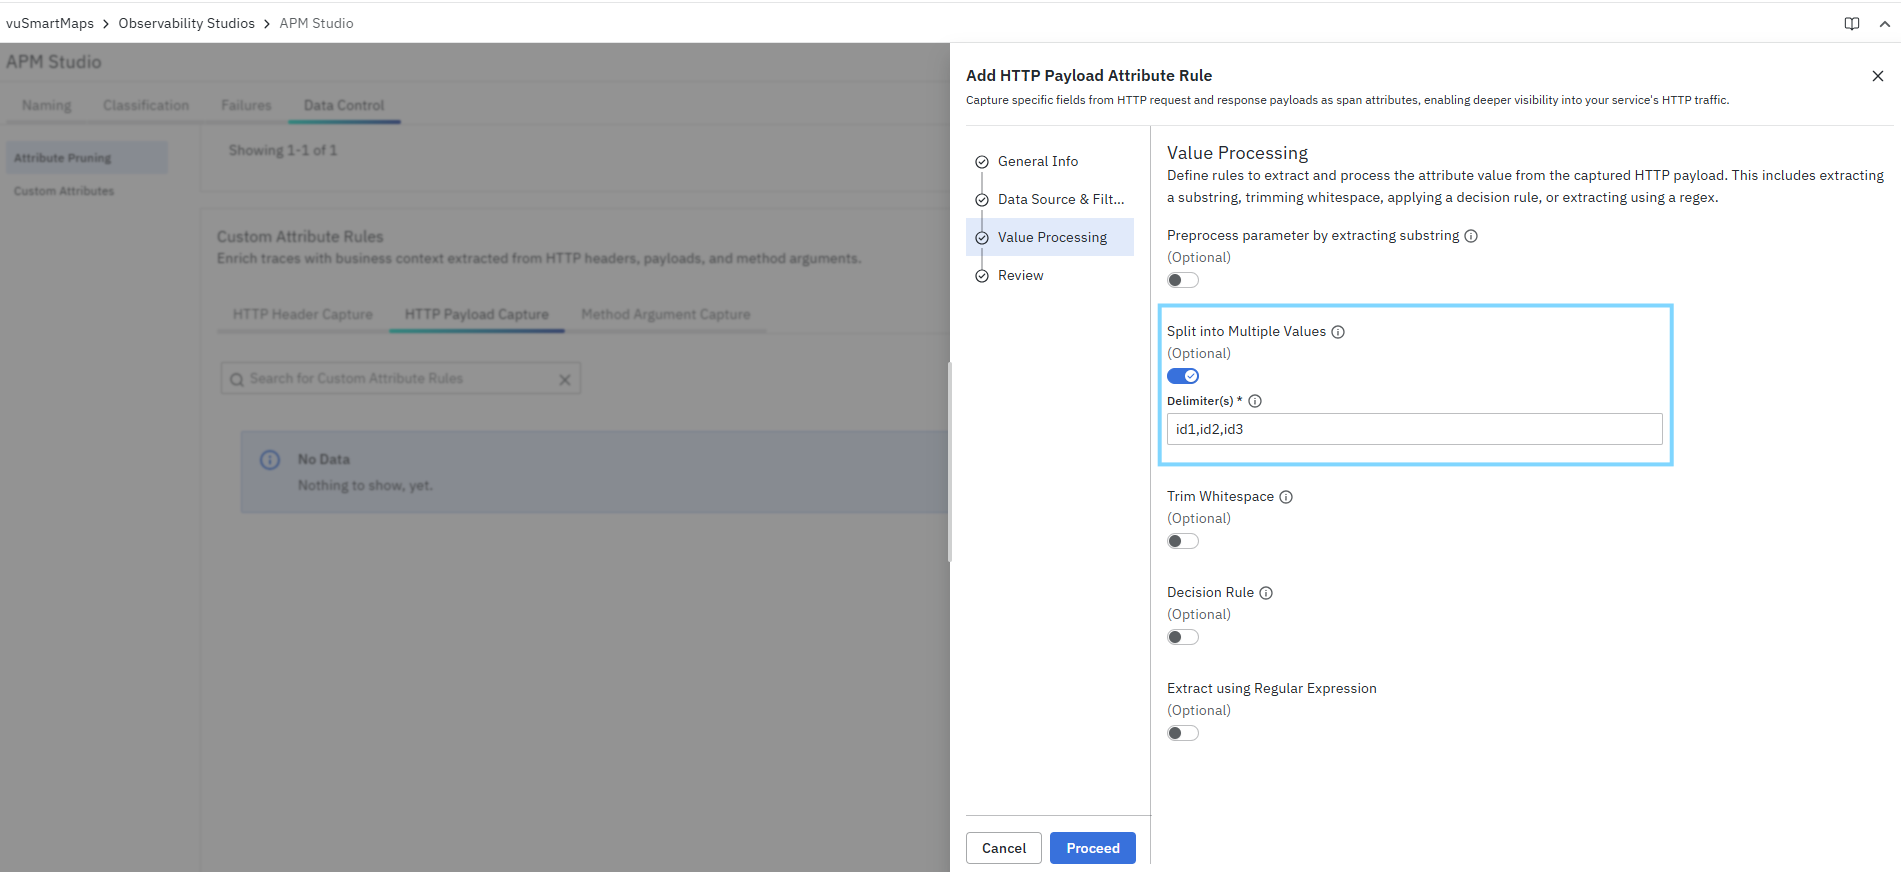
Field shown when enabled
- Delimiter(s)
When to use
Use this if the extracted payload value contains multiple values such as:
- comma-separated values
- pipe-separated values
Examples
id1,id2,id3→ delimiter:,a|b|c→ delimiter:|
Trim Whitespace (Optional)
Enable this to remove unnecessary spaces before and after the extracted value.
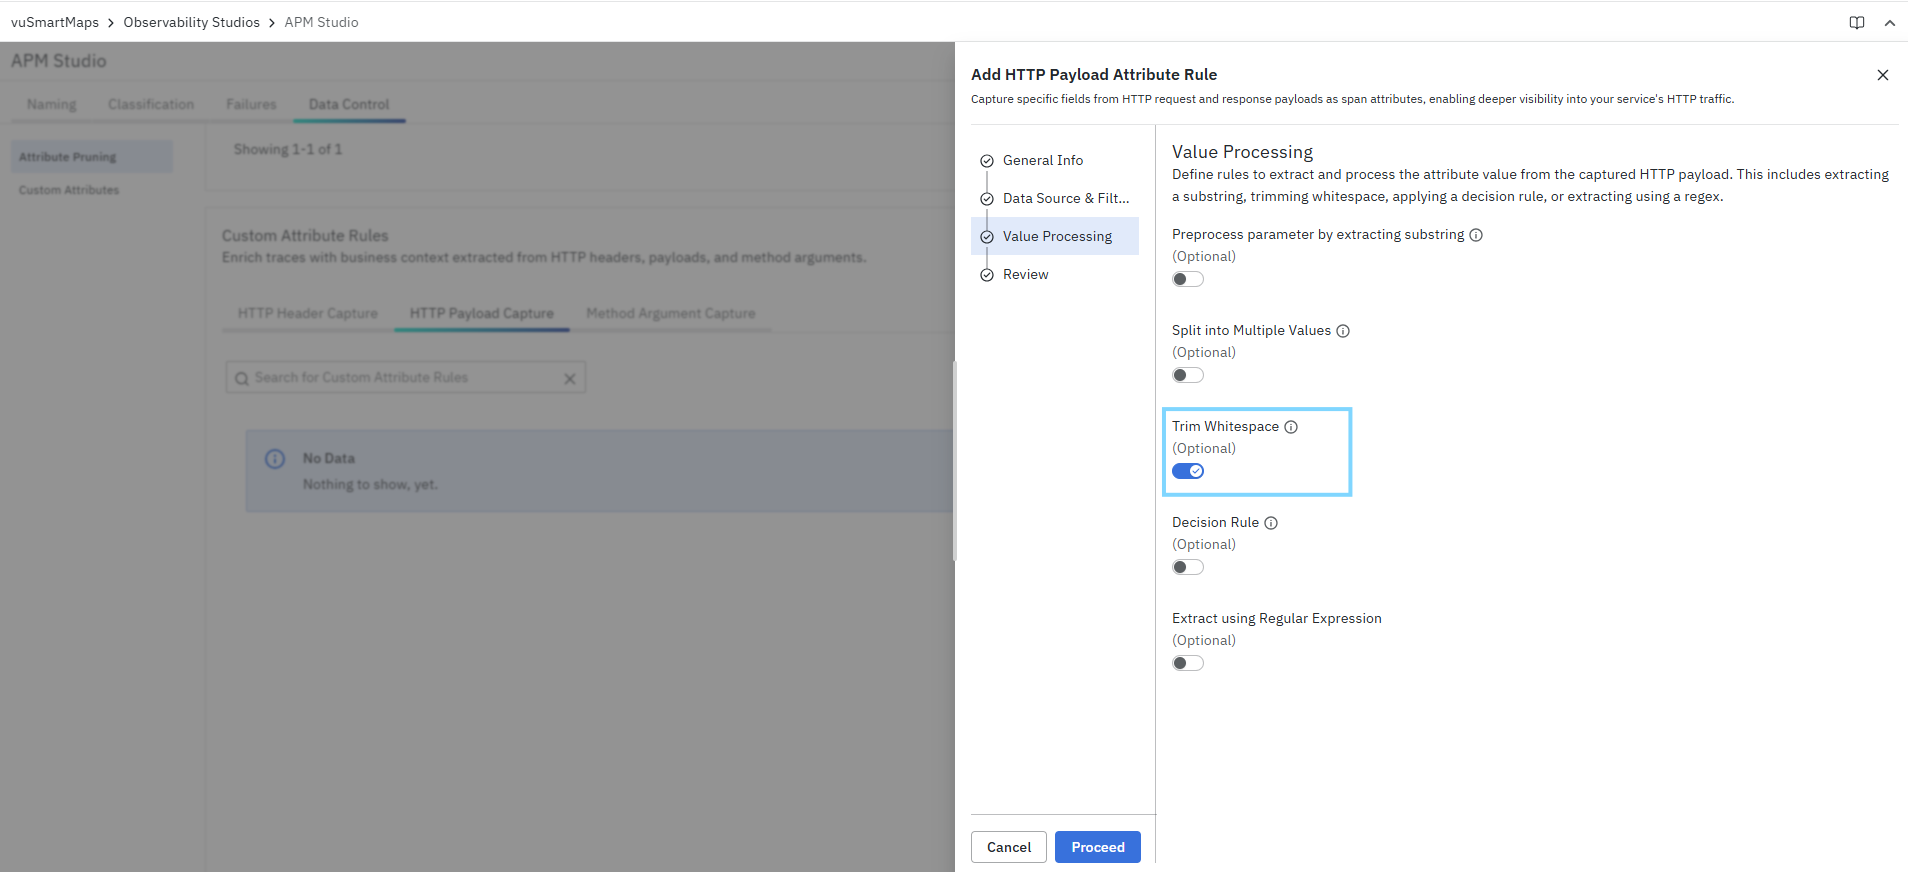
When to use
Use this when payload formatting may include spaces or line breaks.
Example
Extracted raw value:
SUCCESS
After trimming:
SUCCESS
Decision Rule
Enable this to keep the extracted value only if it matches a condition.
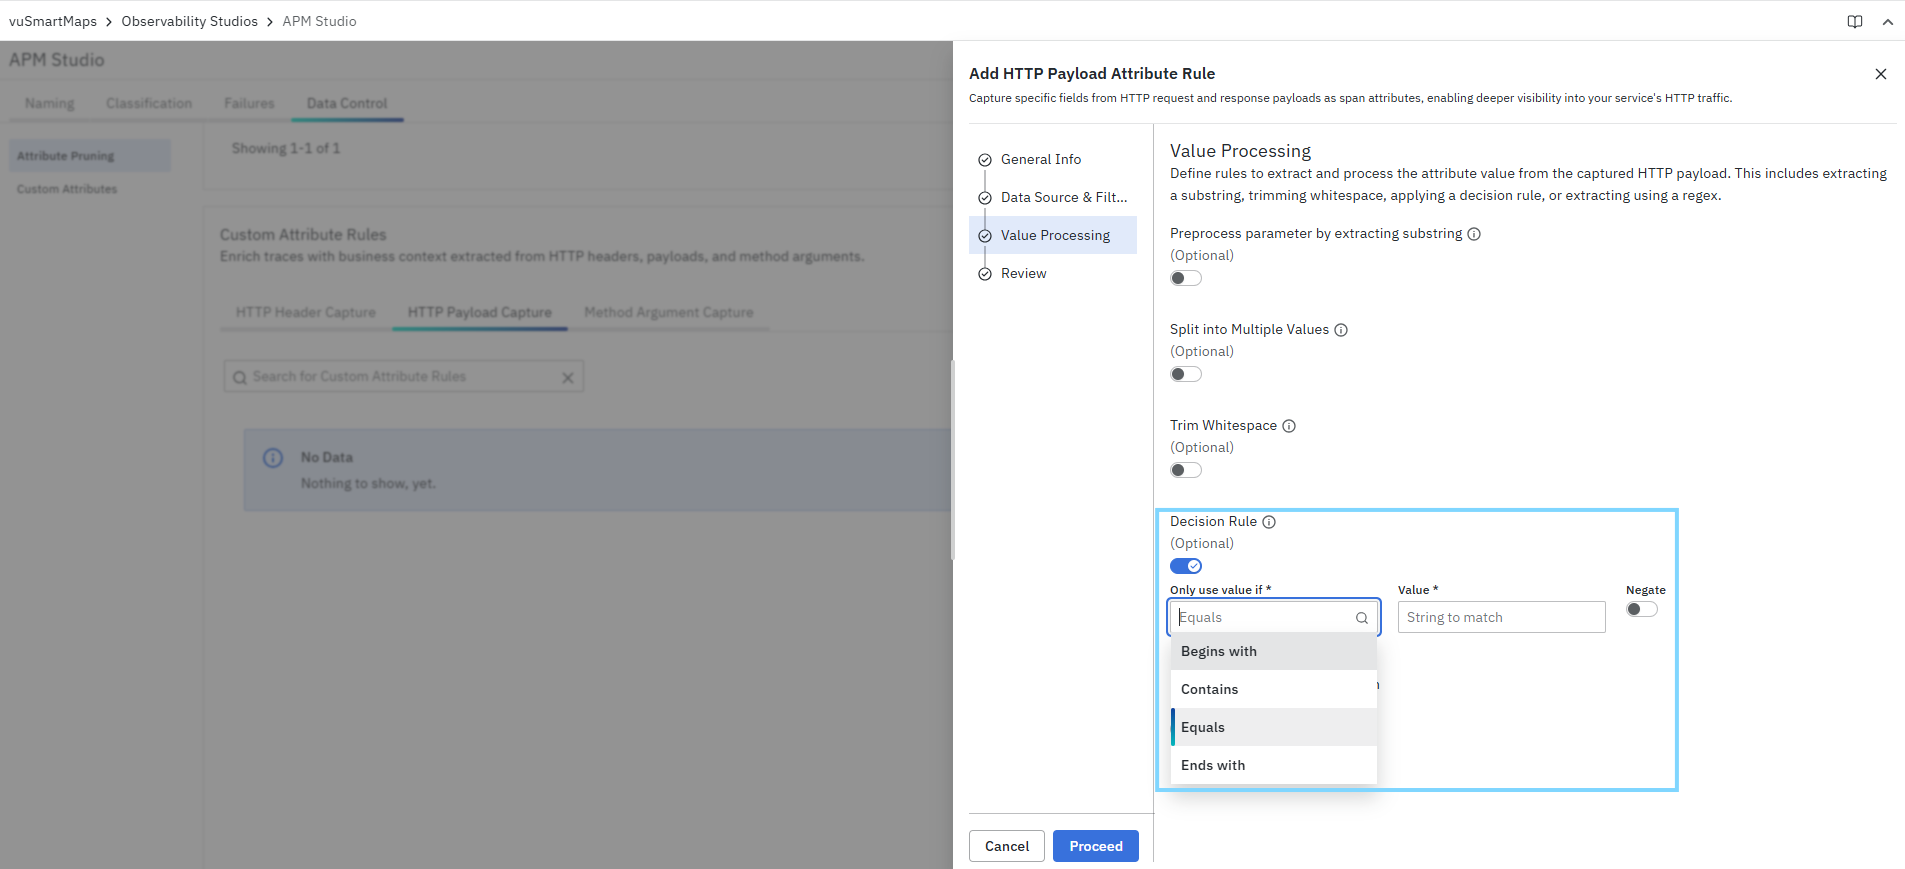
Fields shown when enabled
- Only use value if
- Value
- Negate
Operators
- Begins with
- Contains
- Ends with
- Equals
Negate
If enabled, the condition is inverted.
Examples
- Only use value if Contains
@ - Only use value if Begins with
upi: - Only use value if Equals
SUCCESS
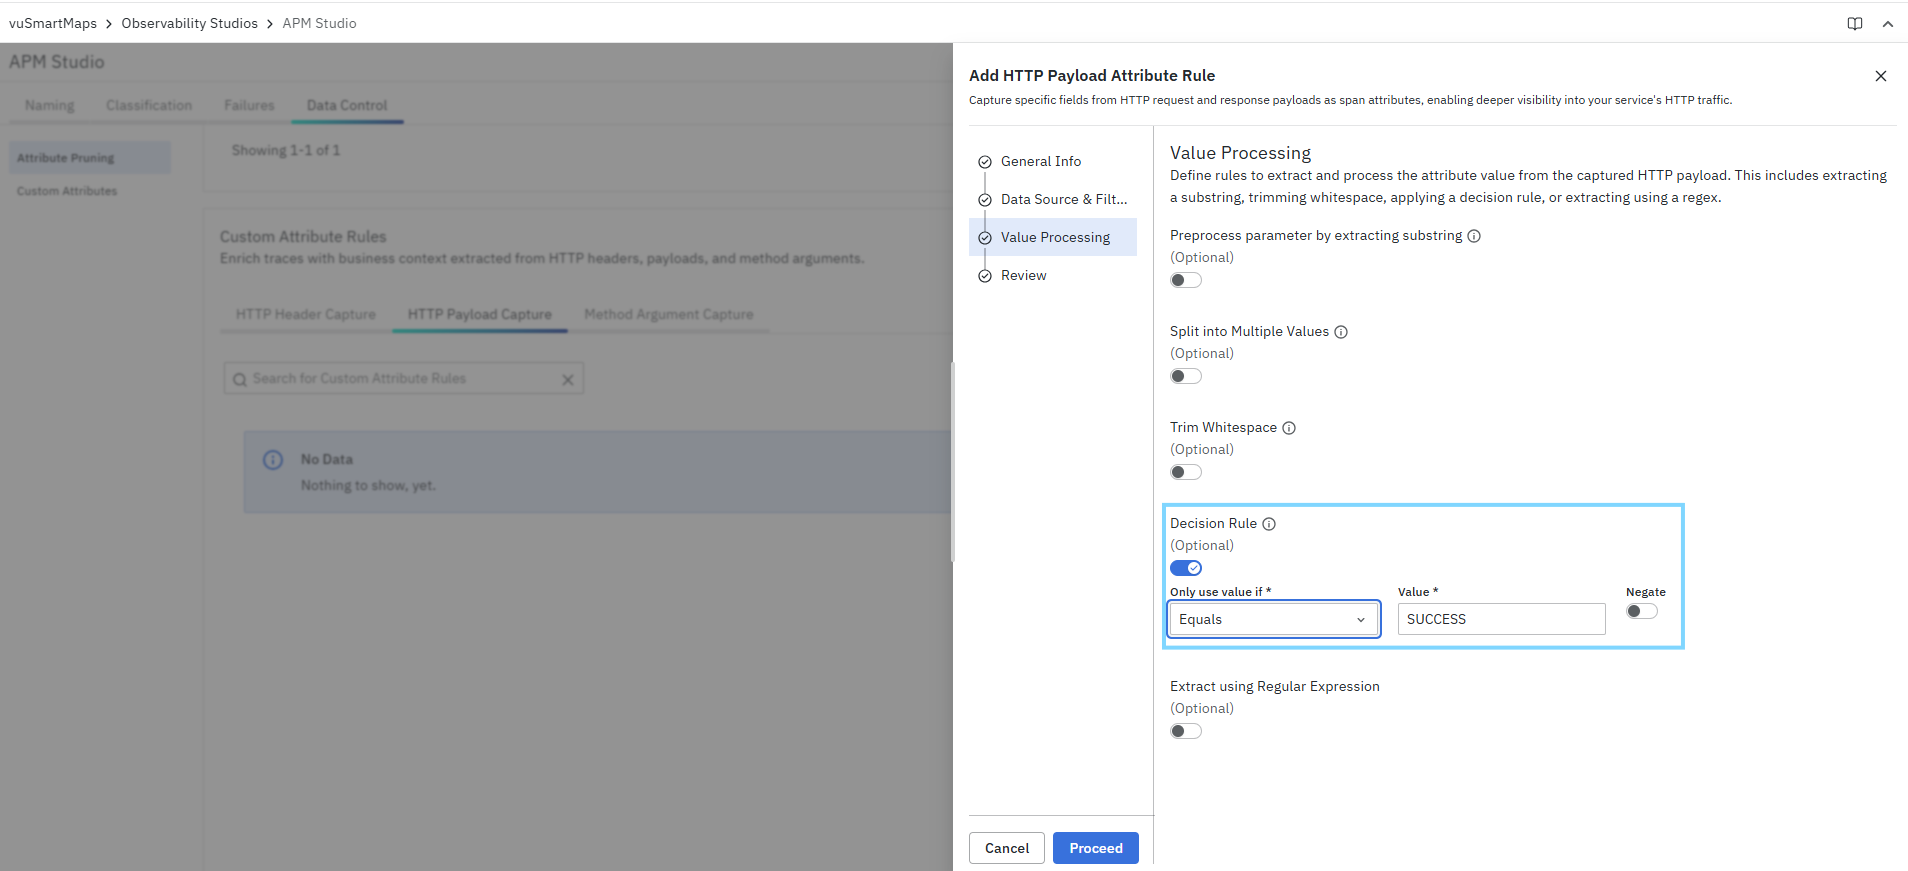
Negate example
- Operator: Contains
- Value:
test - Negate: Enabled
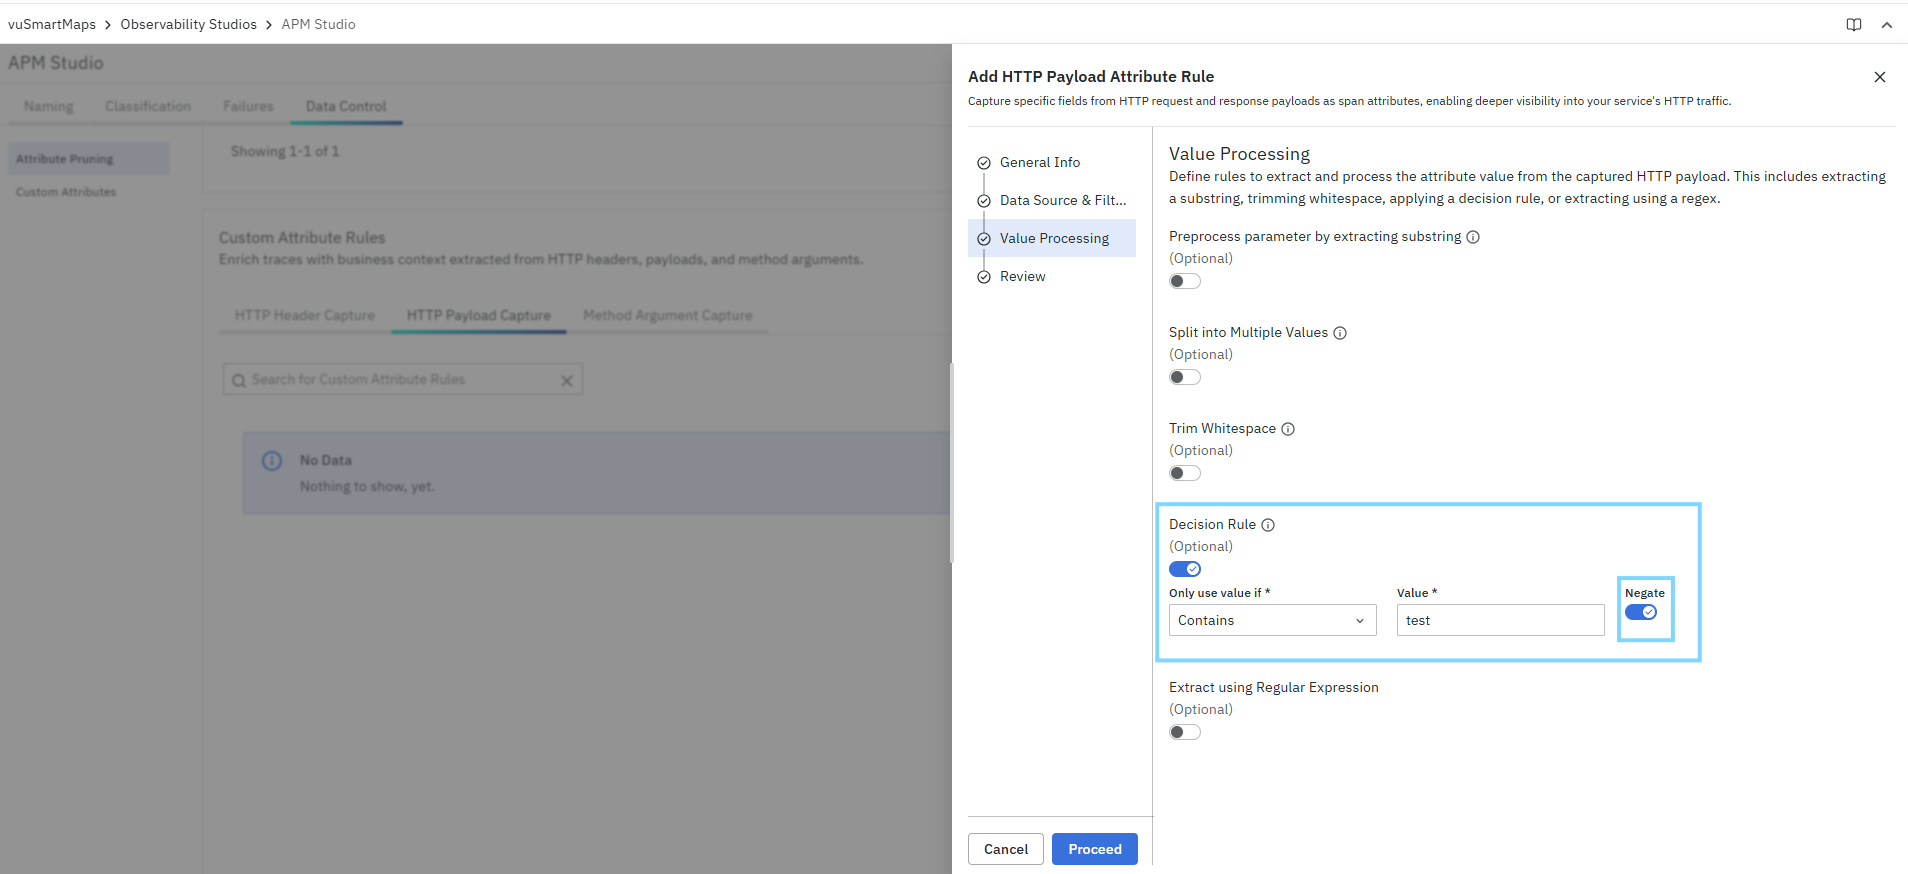
This means the value is used only if it does NOT contain test.
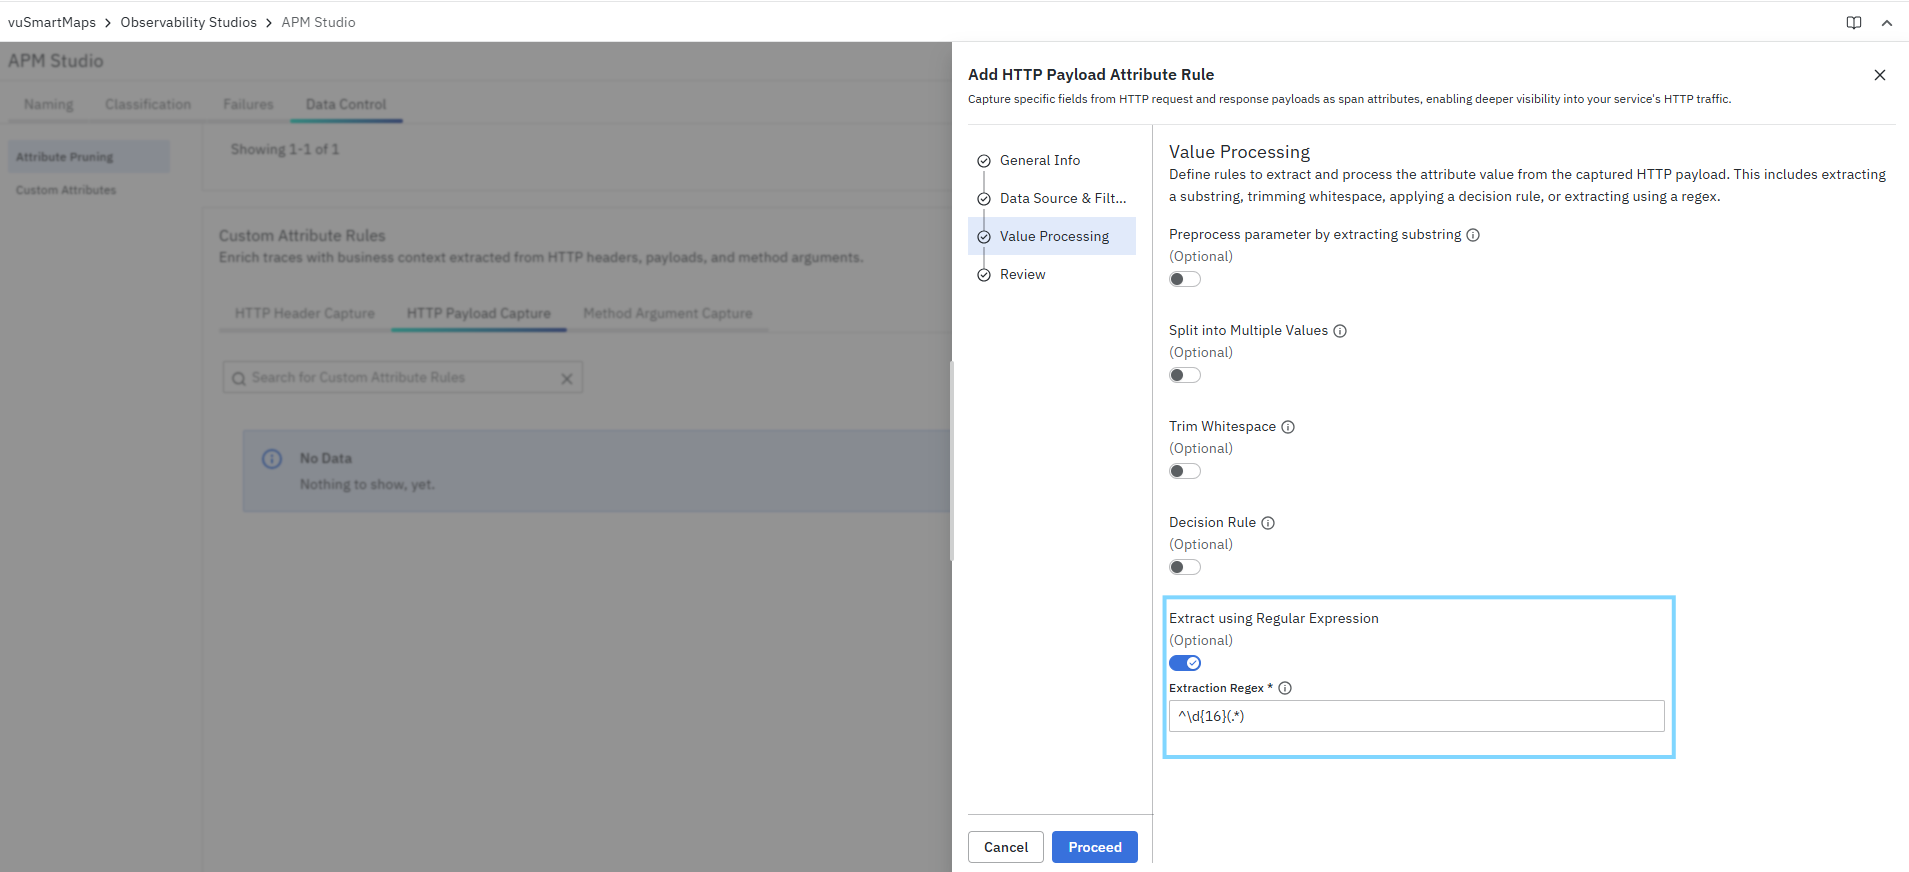
Extract using Regular Expression (Optional)
Enable this when the final value should be extracted using a regex pattern.
Field shown when enabled
- Extraction Regex
When to use
Use this when:
- The value follows a known text pattern
- You need to capture only a specific part of the extracted content
- Delimiters alone are not sufficient
Example
Payload value:
1234567890123456RRN987654
Regex:
^\d{16}(.*)
Captured result:
RRN987654
Review
The Review step displays a summary of the rule before saving it.
The Review tab is organized into:
- General Info
- Data Source & Filtering
- Value Processing
Based on your screenshots, the review shows:
General Info
- Service name
- Attribute name
Data Source & Filtering
- Source
- URL pattern
- HTTP methods
Value Processing
- Shows which optional processing steps are enabled
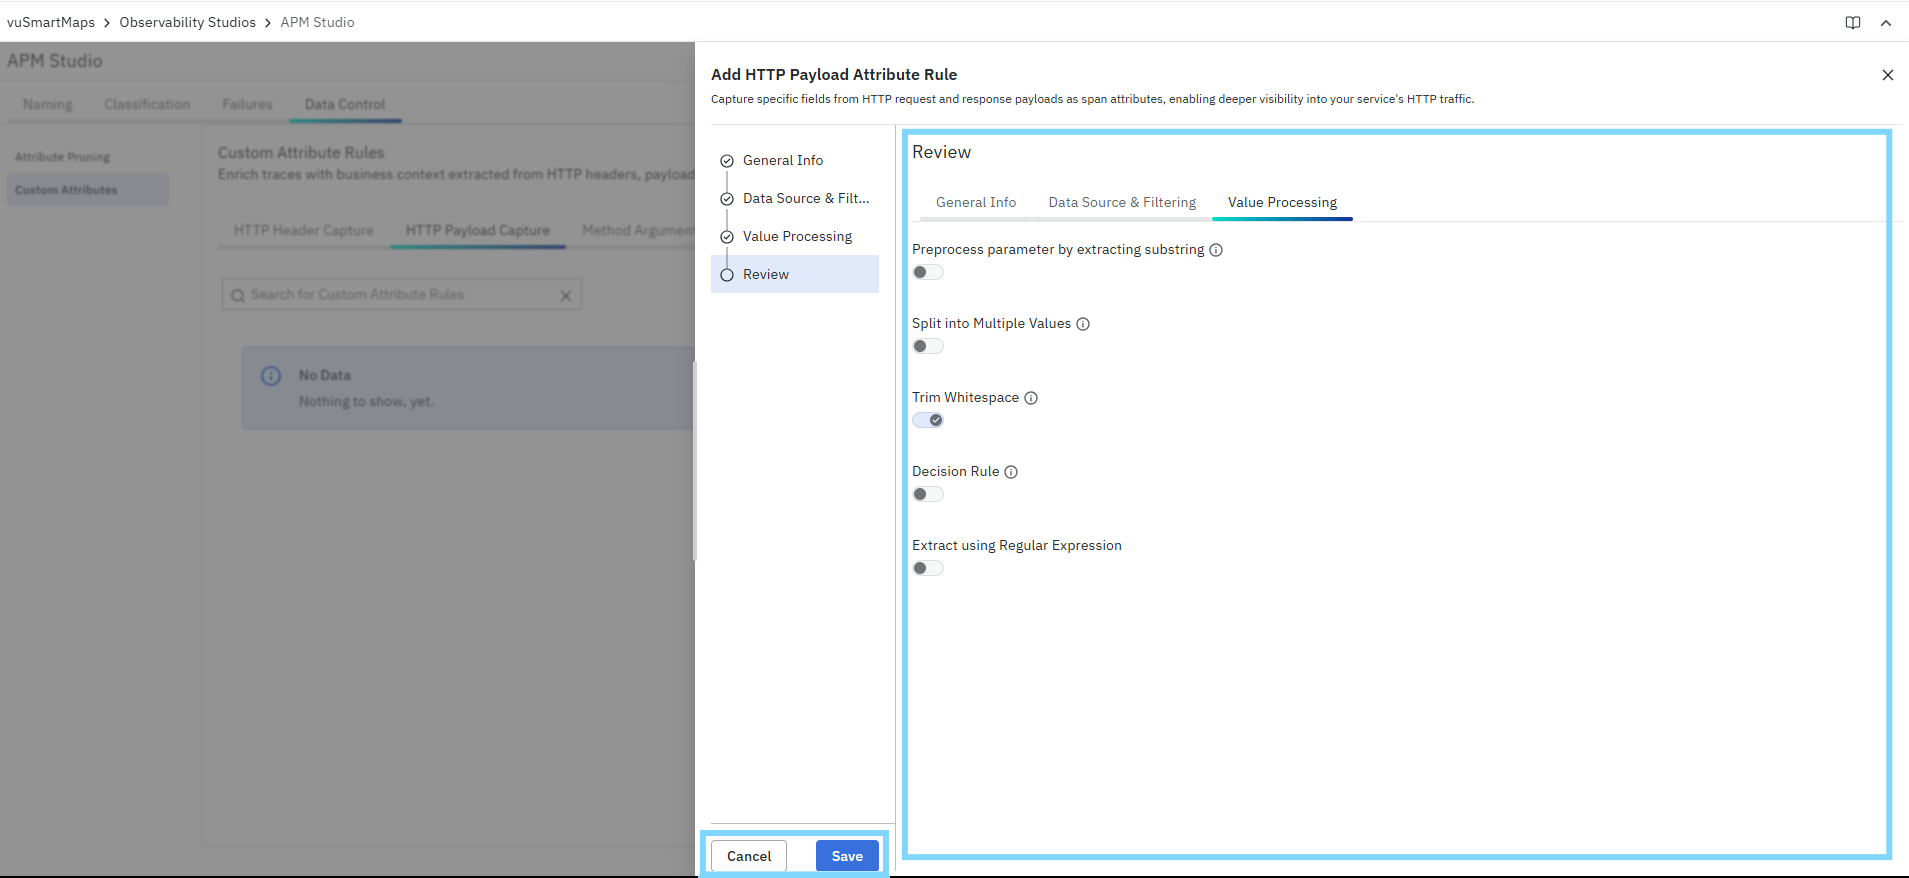
- Example from the screenshot:
- Trim Whitespace = enabled
- Others disabled
After verifying the details:
- Click Save to create the rule
- Click Cancel to discard changes
Example Configurations
Example 1: Capture UPI VPA from request payload
Use case: Capture the vpa field from the payment request payload and store it as a span attribute.
Sample request payload
{
 "payerName": "xxxx",
 "vpa": "xxxx@upi",
 "amount": "5000"
}
Configuration
- Service Name:
payment-service - Span Attribute Name:
upi.vpa - Source:
Request Body - URL Pattern:
/api/v1/payments/* - HTTP Methods:
POST
Value Processing
- Preprocess parameter by extracting substring: Enabled
- Search Type: Between
- Start Delimiter:
vpa":" - End Delimiter:
"
- Trim Whitespace: Enabled
- Decision Rule: Enabled
- Only use value if: Contains
- Value:
@ - Negate: Disabled
Result
The span is enriched with:
upi.vpa = xxxx@upi
This example is directly aligned with the DRD API example for HTTP Payload Capture.
Example 2: Capture transaction amount from request payload
Use case: Extract the payment amount from the request body.
Sample request payload
{
 "txnId": "TXN12345",
 "amount": "2500",
 "currency": "INR"
}
Configuration
- Service Name:
API-Gateway - Span Attribute Name:
app.payment.amount - Source:
Request Body - URL Pattern:
/IMPSRecPay_WrapperAPI - HTTP Methods:
GET
Value Processing
- Preprocess parameter by extracting substring: Enabled
- Search Type: Between
- Start Delimiter:
"amount":" - End Delimiter:
"
Result
app.payment.amount = 2500
Method Argument Capture
Use Method Argument Capture to extract values from instrumented method arguments and store them as custom span attributes. This helps you enrich traces with business context that is not available in standard HTTP headers or payloads. This is useful when important identifiers or business values are passed directly into application methods and you want them to appear in APM traces for filtering, troubleshooting, and correlation.
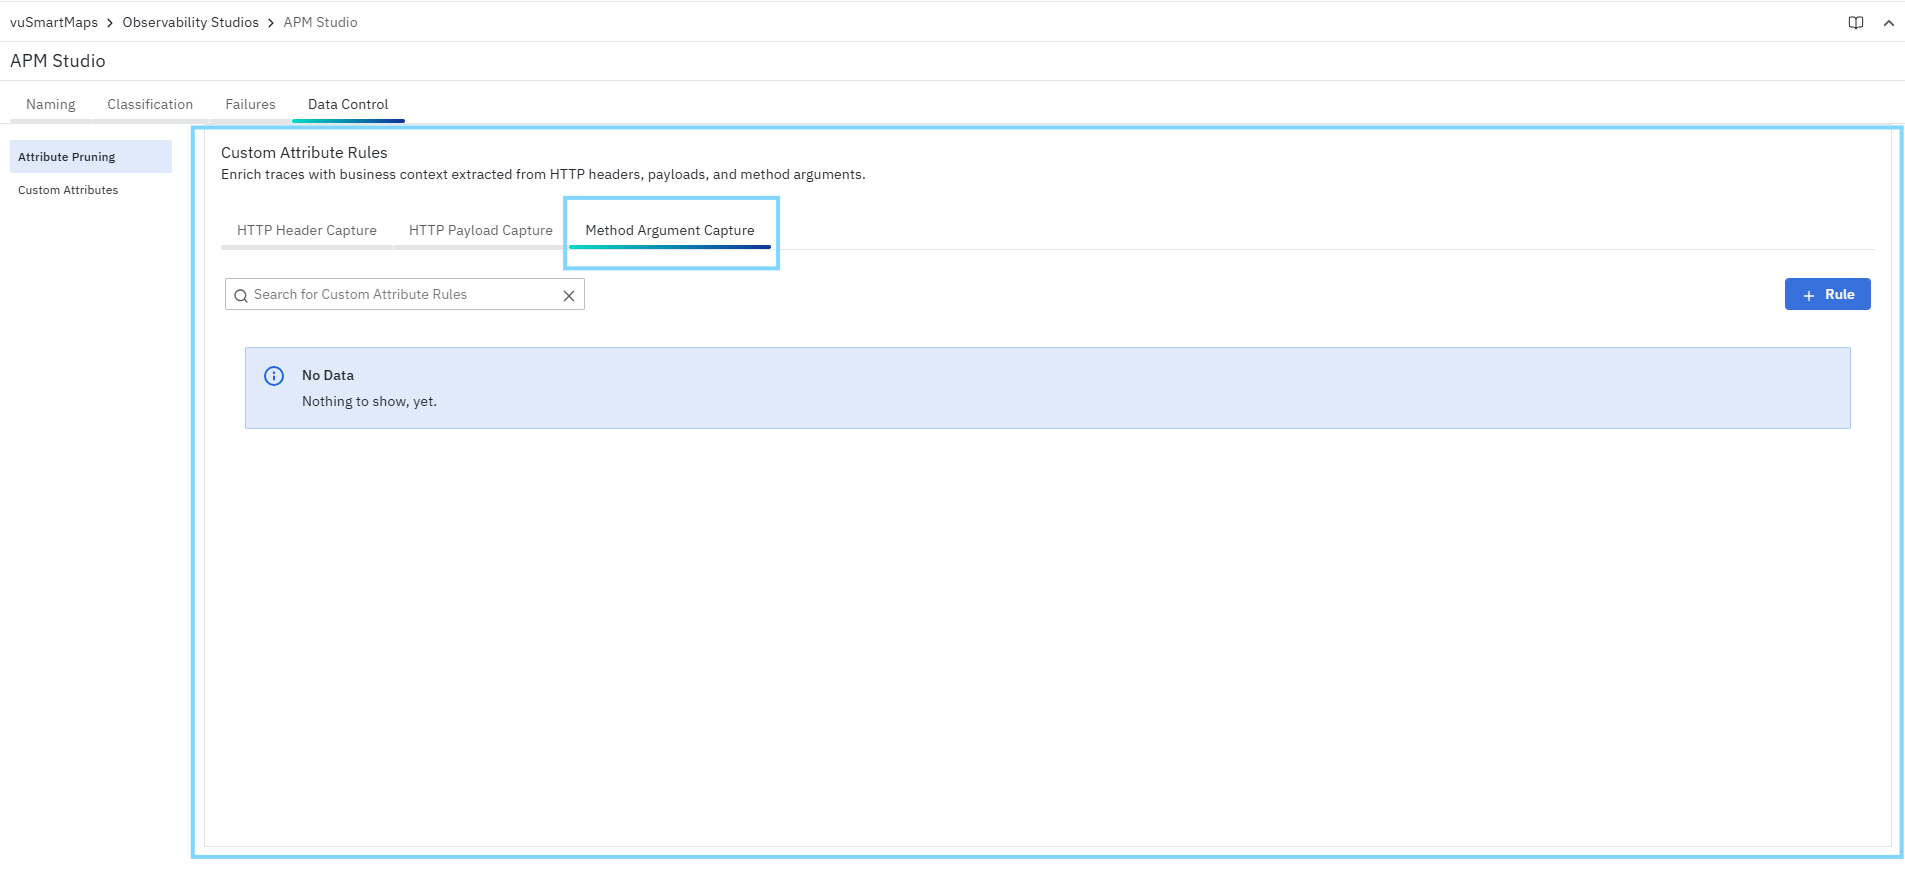
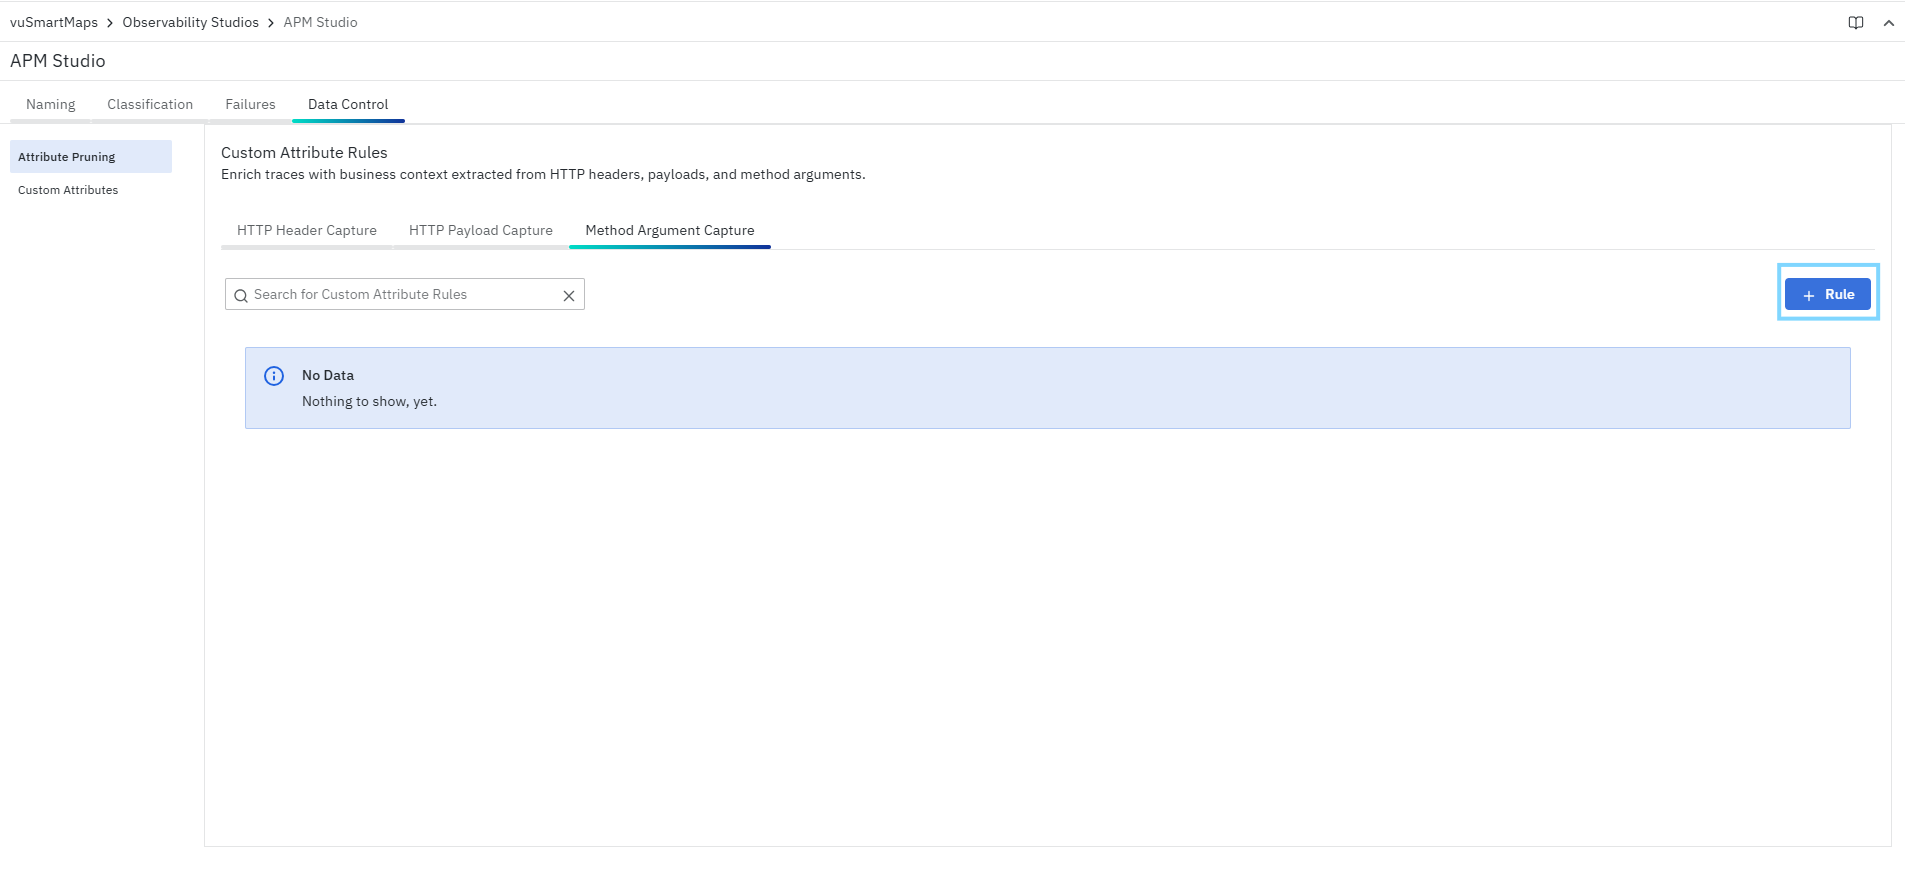
Add a Method Argument Attribute Rule
To create a new Method Argument Capture rule:
- In the Method Argument Capture tab, click + Rule.
- The Add Method Argument Attribute Rule wizard opens.
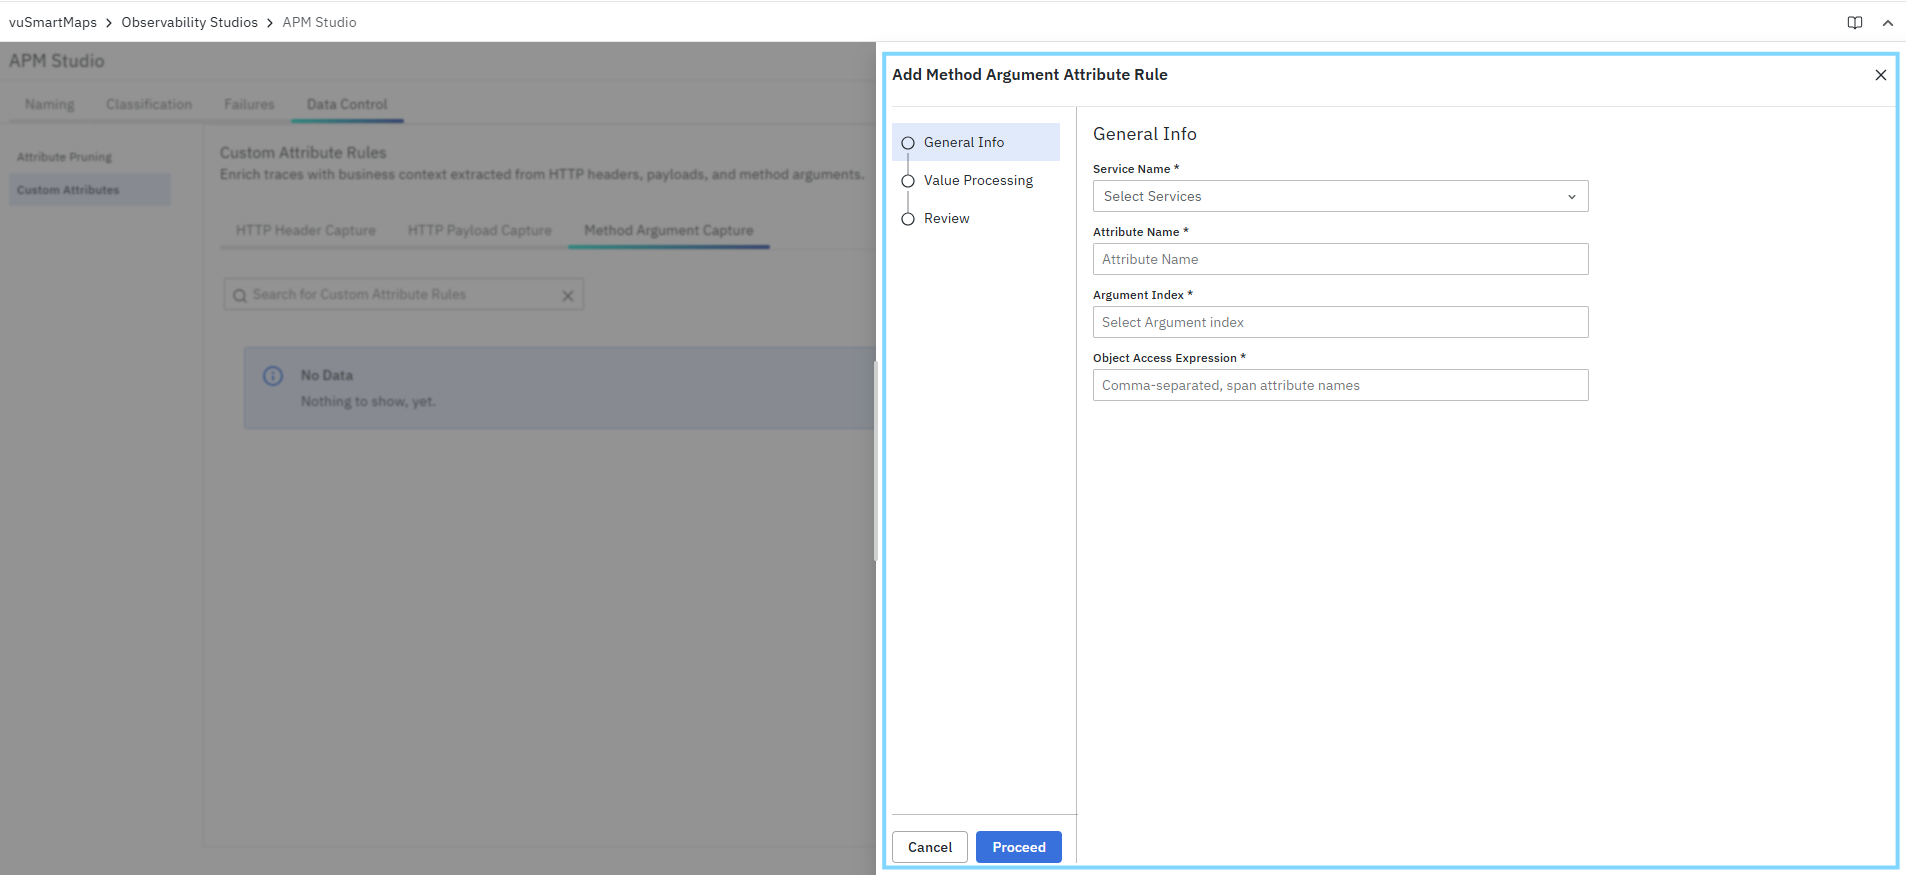
- Configure the rule in the following stages:
- General Info
- Value Processing
- Review
- Click Save to create the rule.
General Info
In the General Info step, define the service, class, method, and argument details from which the custom attribute should be captured.
Service Name
Select the service to which the method argument capture rule should be applied.
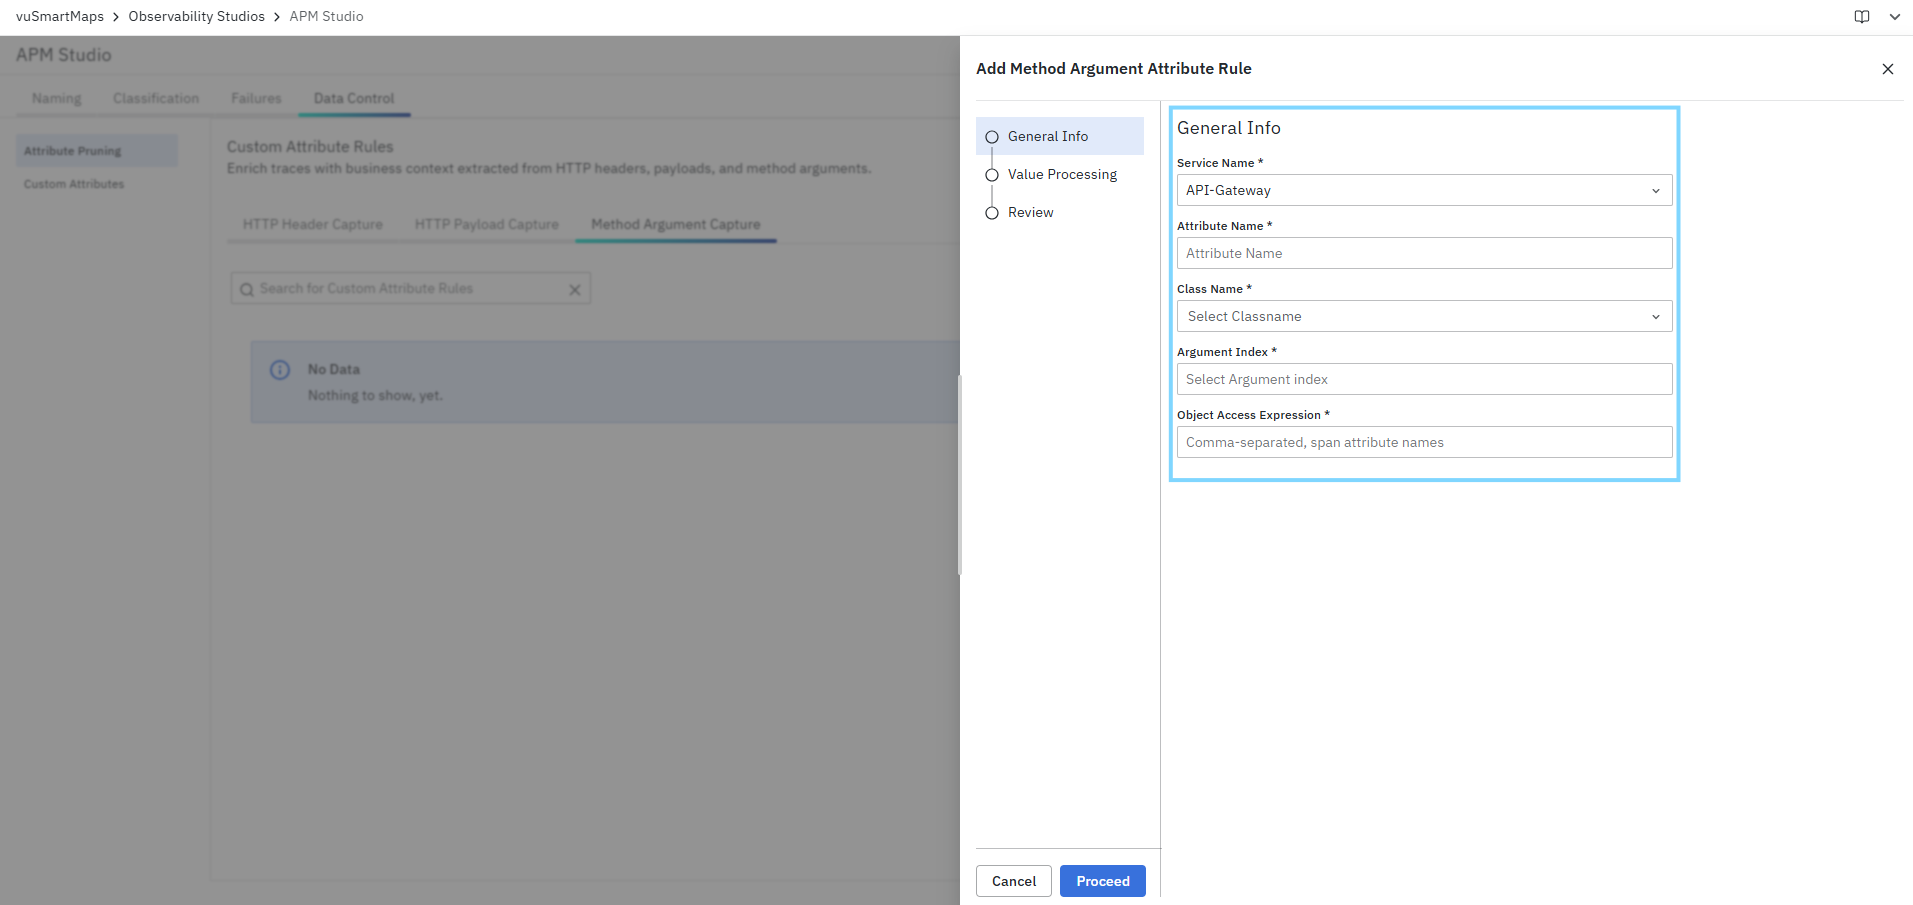
- This is a mandatory field.
- This field is displayed as a dropdown.
- The available services are listed based on the configured APM services.
- After you select a service, the Class Name field becomes available.
Example
API-Gateway
The rule is applied only to the selected service.
Attribute Name
Enter the name of the custom span attribute that stores the extracted value.
- This field is a text box.
- Use a meaningful and searchable attribute name.
- It is recommended to follow a consistent naming convention for custom attributes.
Recommended examples
app.payment.amountcustomer.idorder.idpayment.referencetransaction.account_id
Class Name
Select the class from which the method argument should be captured.
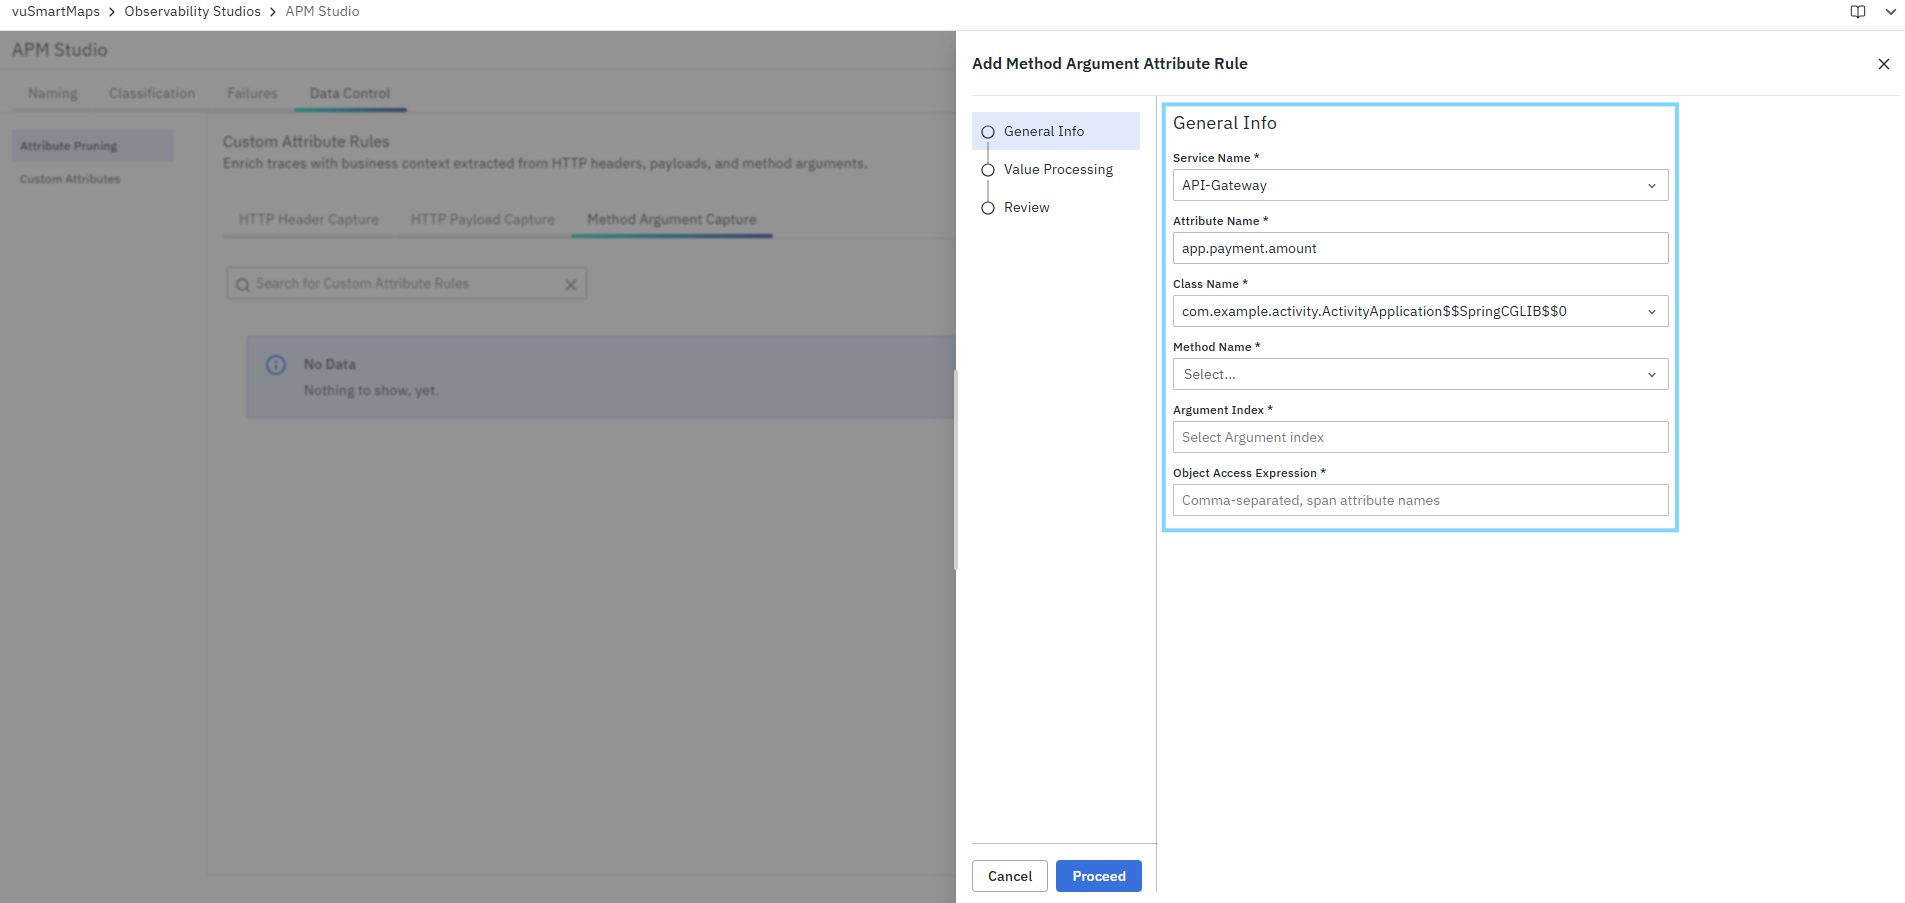
- This is a mandatory field.
- This field is displayed as a dropdown.
- The available class names depend on the selected Service Name.
- This field becomes visible only after a valid service is selected.
- After you select a class, the Method Name field becomes available.
Example
com.example.activity.ActivityApplication
The selected class determines the available methods that can be configured for capture.
Method Name
Select the method from the chosen class whose argument value must be captured.
- This is a mandatory field.
- This field is displayed as a dropdown.
- The available methods depend on the selected Class Name.
- This field becomes visible only after a valid class is selected.
Example
main
Select the exact method that contains the argument you want to capture.
Argument Index
Select the position of the method argument from which the value should be extracted.
- This is a mandatory field.
- This field is displayed as a selectable field.
- The argument index represents the position of the parameter in the selected method signature.
- Use the correct index based on the actual method argument order.
Example
For a method like: processPayment(String tenantId, PaymentRequest request, String correlationId)
tenantId→ Argument Index0request→ Argument Index1correlationId→ Argument Index2
Selecting an incorrect argument index may result in extracting the wrong value or no value.
Object Access Expression
Enter the expression used to access the required value from the selected method argument.
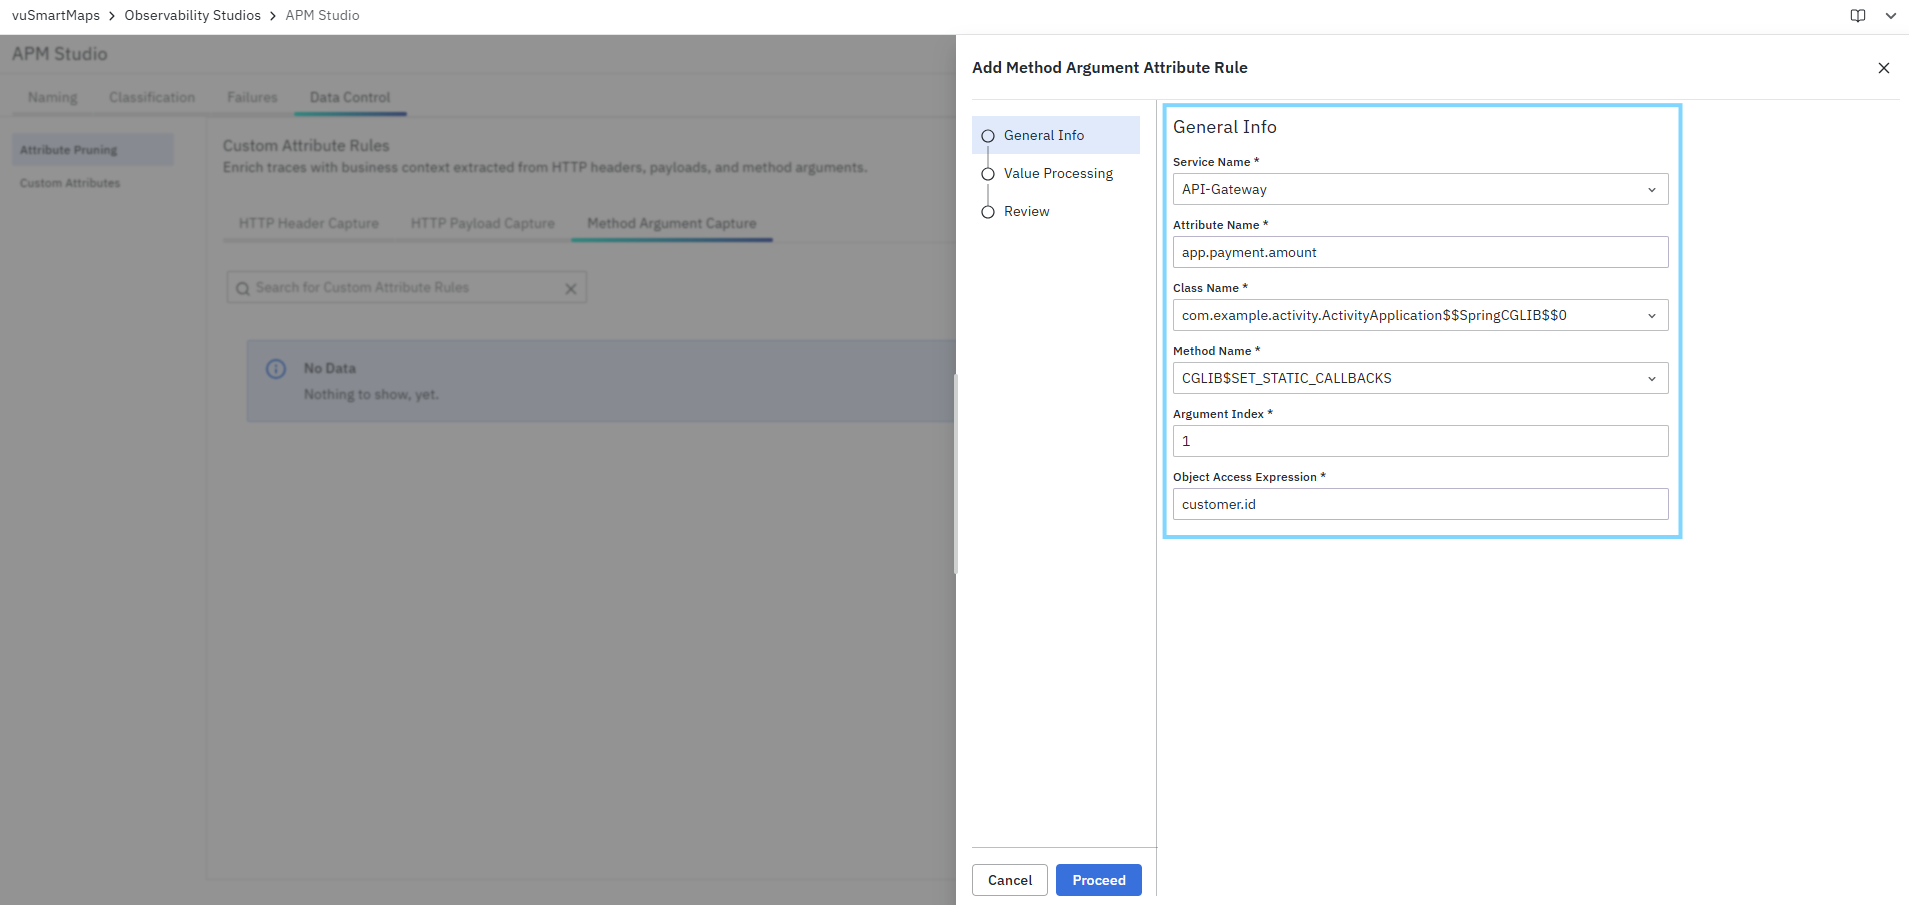
- This is a mandatory field.
- This field is a text box.
- Use this field to specify how the target value should be accessed from the selected method argument.
- This is useful when the argument is a complex object and the required value is nested inside it.
- The field supports specifying one or more span attribute names as required by the configured method argument capture logic.
Examples
customer.idorder.referenceIdpayment.amount
The exact expression format and supported syntax depend on the configured instrumentation logic in your deployment.
Value Processing
Preprocess parameter by extracting substring (Optional)
Enable this option to extract a specific portion of the captured method argument value using delimiters. This is useful when the extracted method argument contains additional text and only a required segment must be captured.
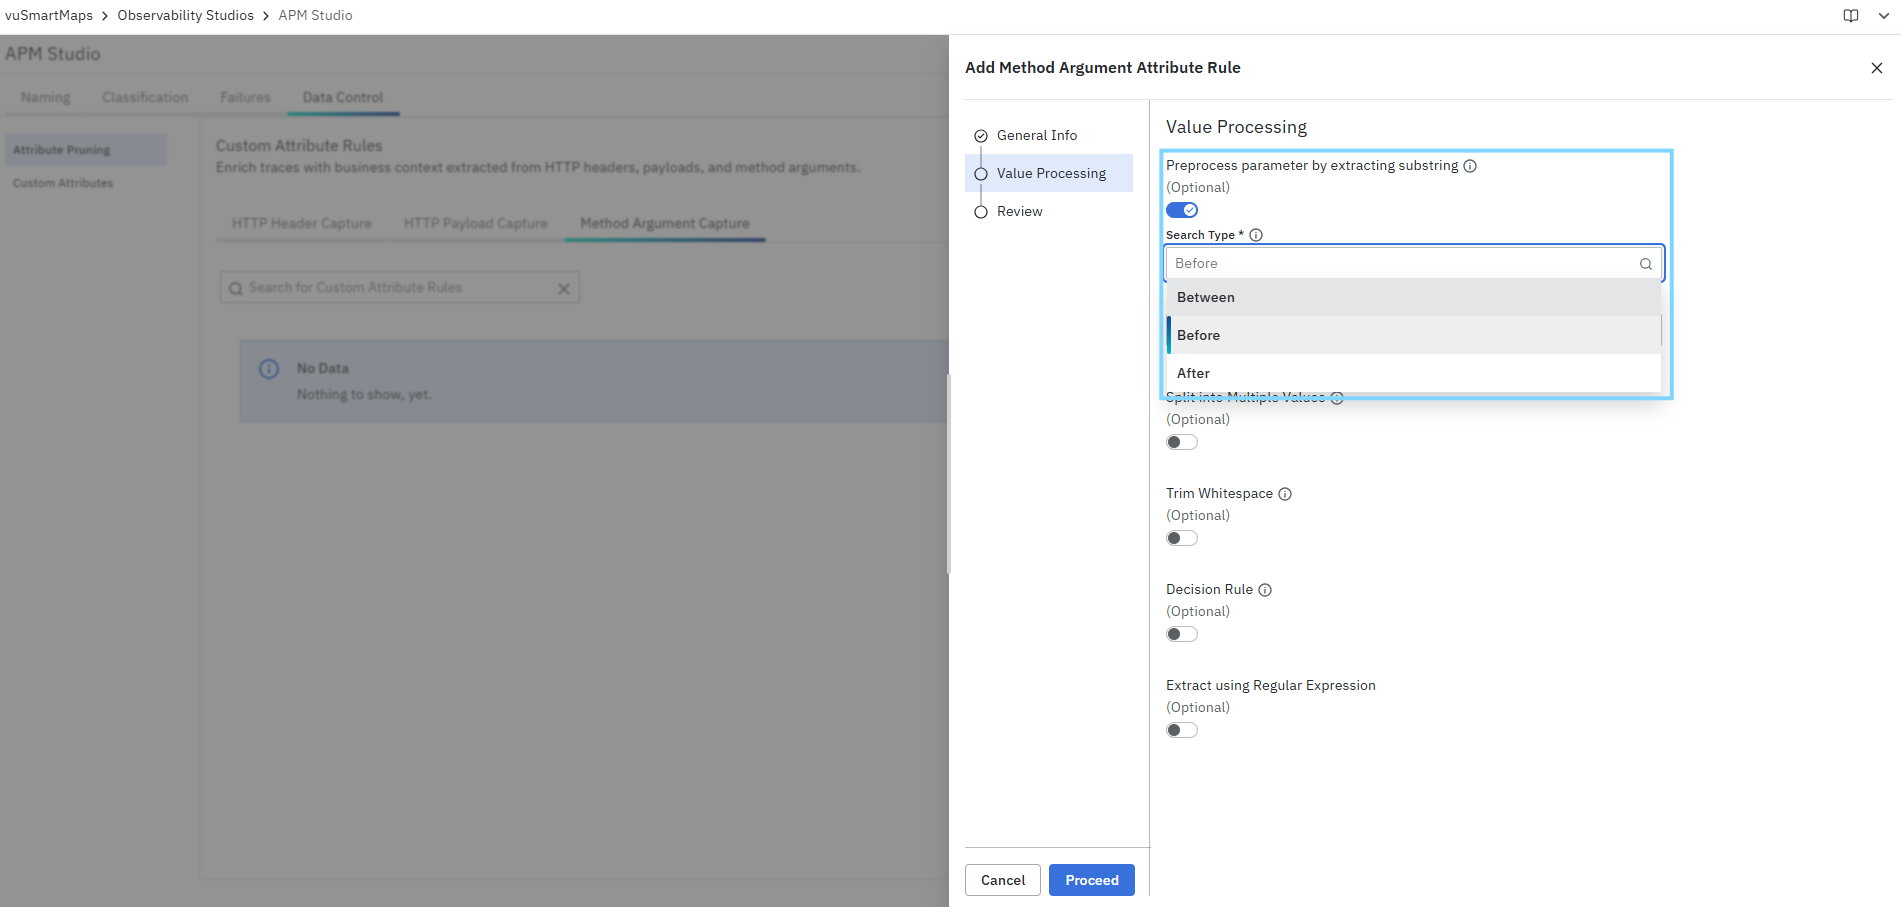
Search Type *
Select how the substring should be extracted. This is a mandatory field when Preprocess parameter by extracting substring is enabled.
- Use AFTER to extract everything after the start delimiter.
- Use BEFORE to extract everything before the delimiter.
- Use BETWEEN to extract the value between the start and end delimiters.
Example
Captured method argument value: Txn id=123456789;note=payment-success
To extract only the transaction ID:
- Search Type:
Between - Start Delimiter(s):
Txn id= - End Delimiter(s):
;
Result
123456789
**Start Delimiter(s) *
Specify the starting delimiter used to identify where extraction should begin.
- This is a mandatory field when substring preprocessing is enabled.
- Multiple delimiters may be supported depending on the implementation.
Example
Txn id=
End Delimiter(s) *
Specify the ending delimiter used to identify where extraction should stop.
- This is a mandatory field when Search Type = Between
Example
;
Example – Preprocess parameter by extracting substring
Suppose the selected method argument contains: upi:ReqPay;txnId=1234567890123456;rrn=654321
To extract only the txnId:
- Preprocess parameter by extracting substring: Enabled
- Search Type:
Between - Start Delimiter(s):
txnId= - End Delimiter(s):
;
Result
1234567890123456
Split into Multiple Values (Optional)
Enable this option if the extracted value contains multiple values separated by a delimiter. This allows the captured value to be split into multiple individual entries.
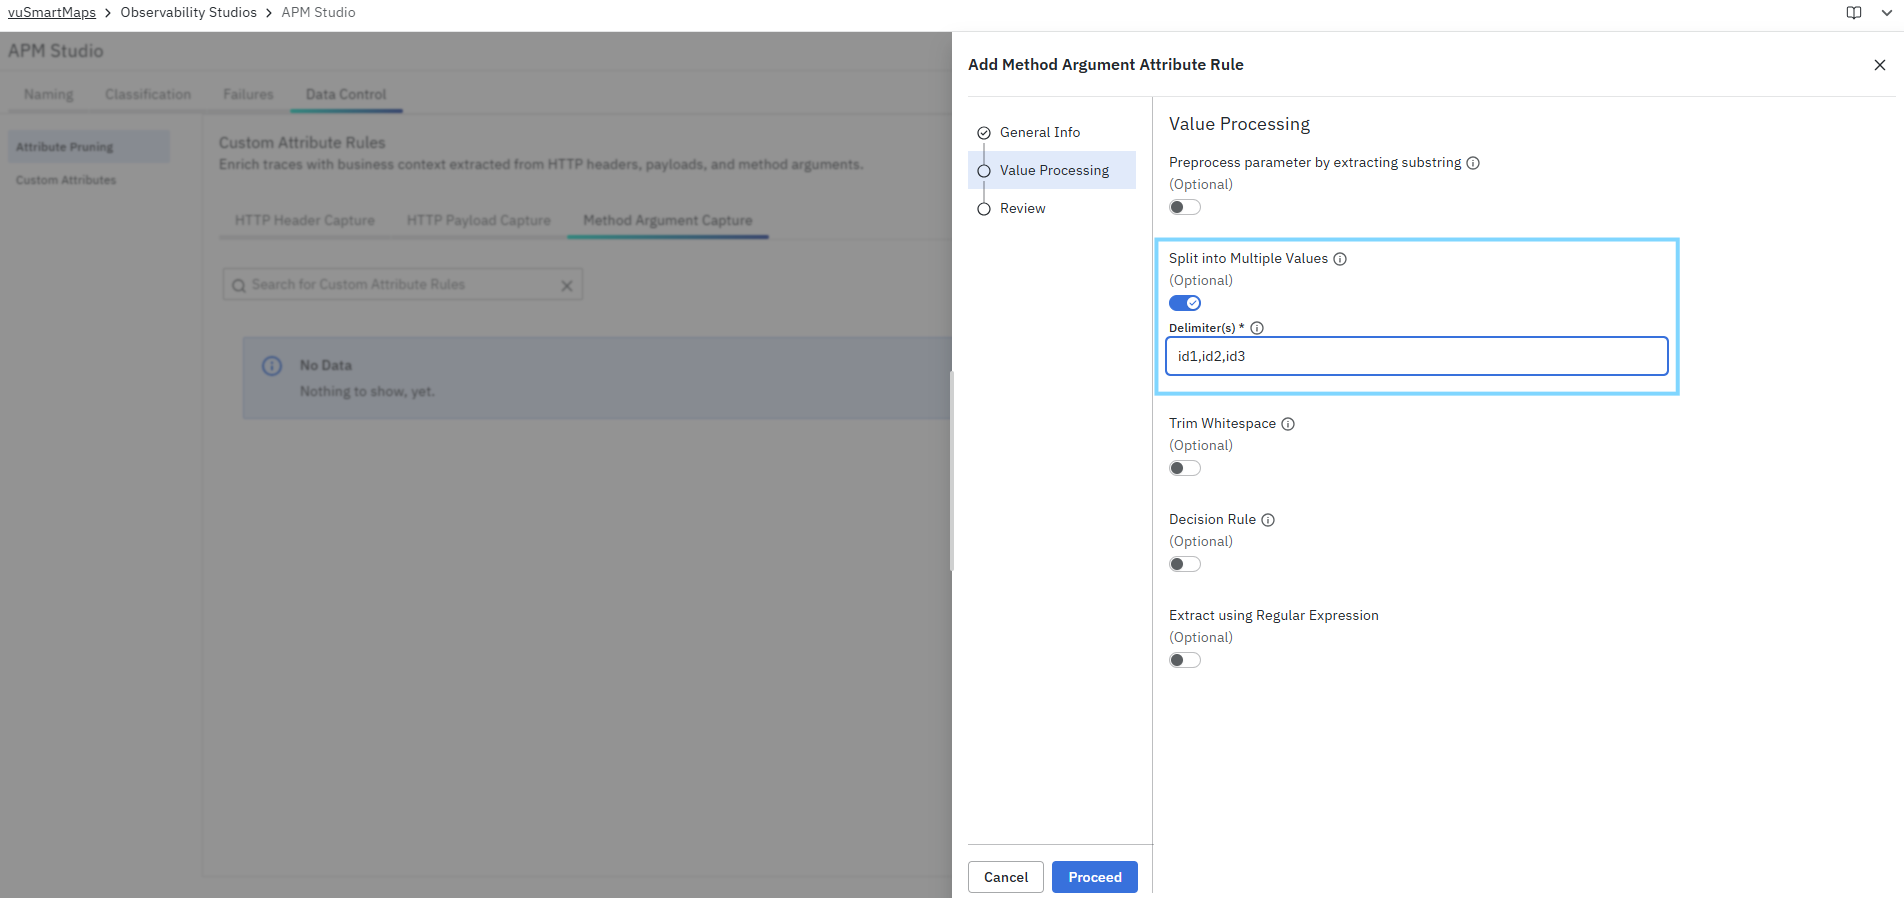
Delimiter(s) *
Specify the delimiter used to split the extracted value into multiple values. This is a mandatory field when Split into Multiple Values is enabled.
- Specify the delimiter character to split the extracted value into individual entries.
- For example, use
,or|to split comma- or pipe-separated values.
Example: Comma-separated values
Captured value: card,upi,netbanking
Configuration:
- Split into Multiple Values: Enabled
- Delimiter(s):
,
Result
The value is split into:
cardupinetbanking
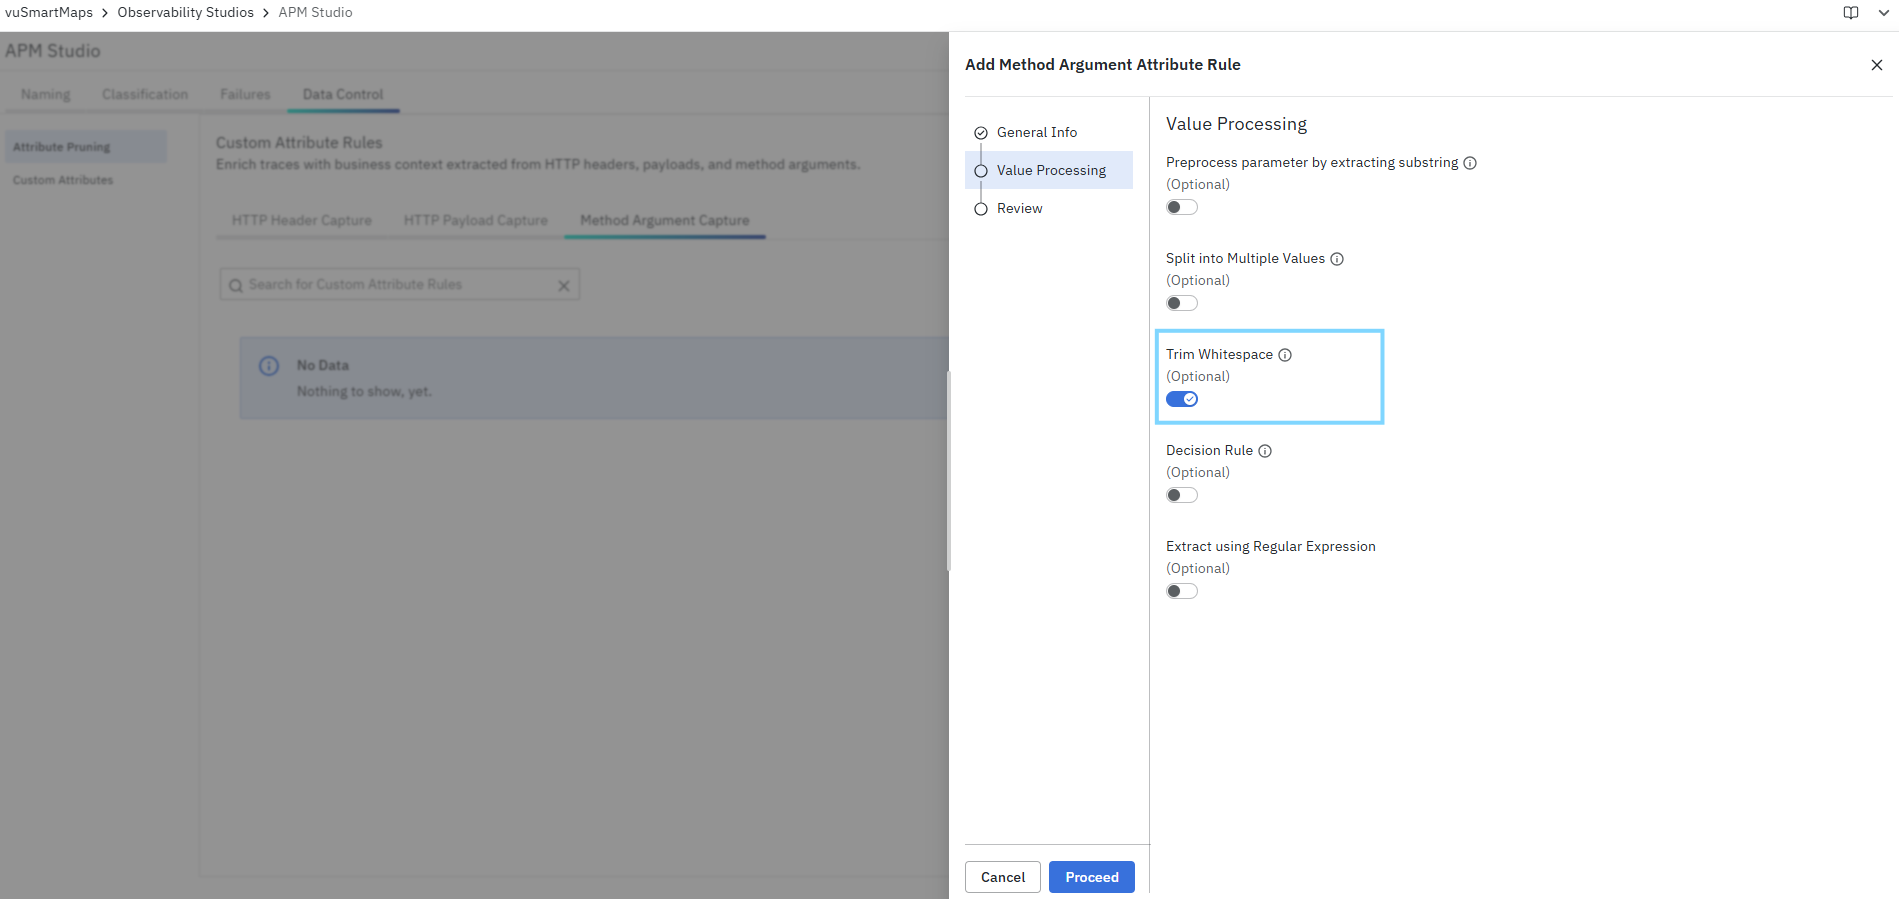
Trim Whitespace (Optional)
Enable this option to remove leading and trailing spaces from the extracted value. This is useful when the captured method argument contains spaces before or after the actual value.
Decision Rule (Optional)
Enable this option to define a condition that determines whether the extracted value should be used. This helps capture or drop the value based on matching logic.
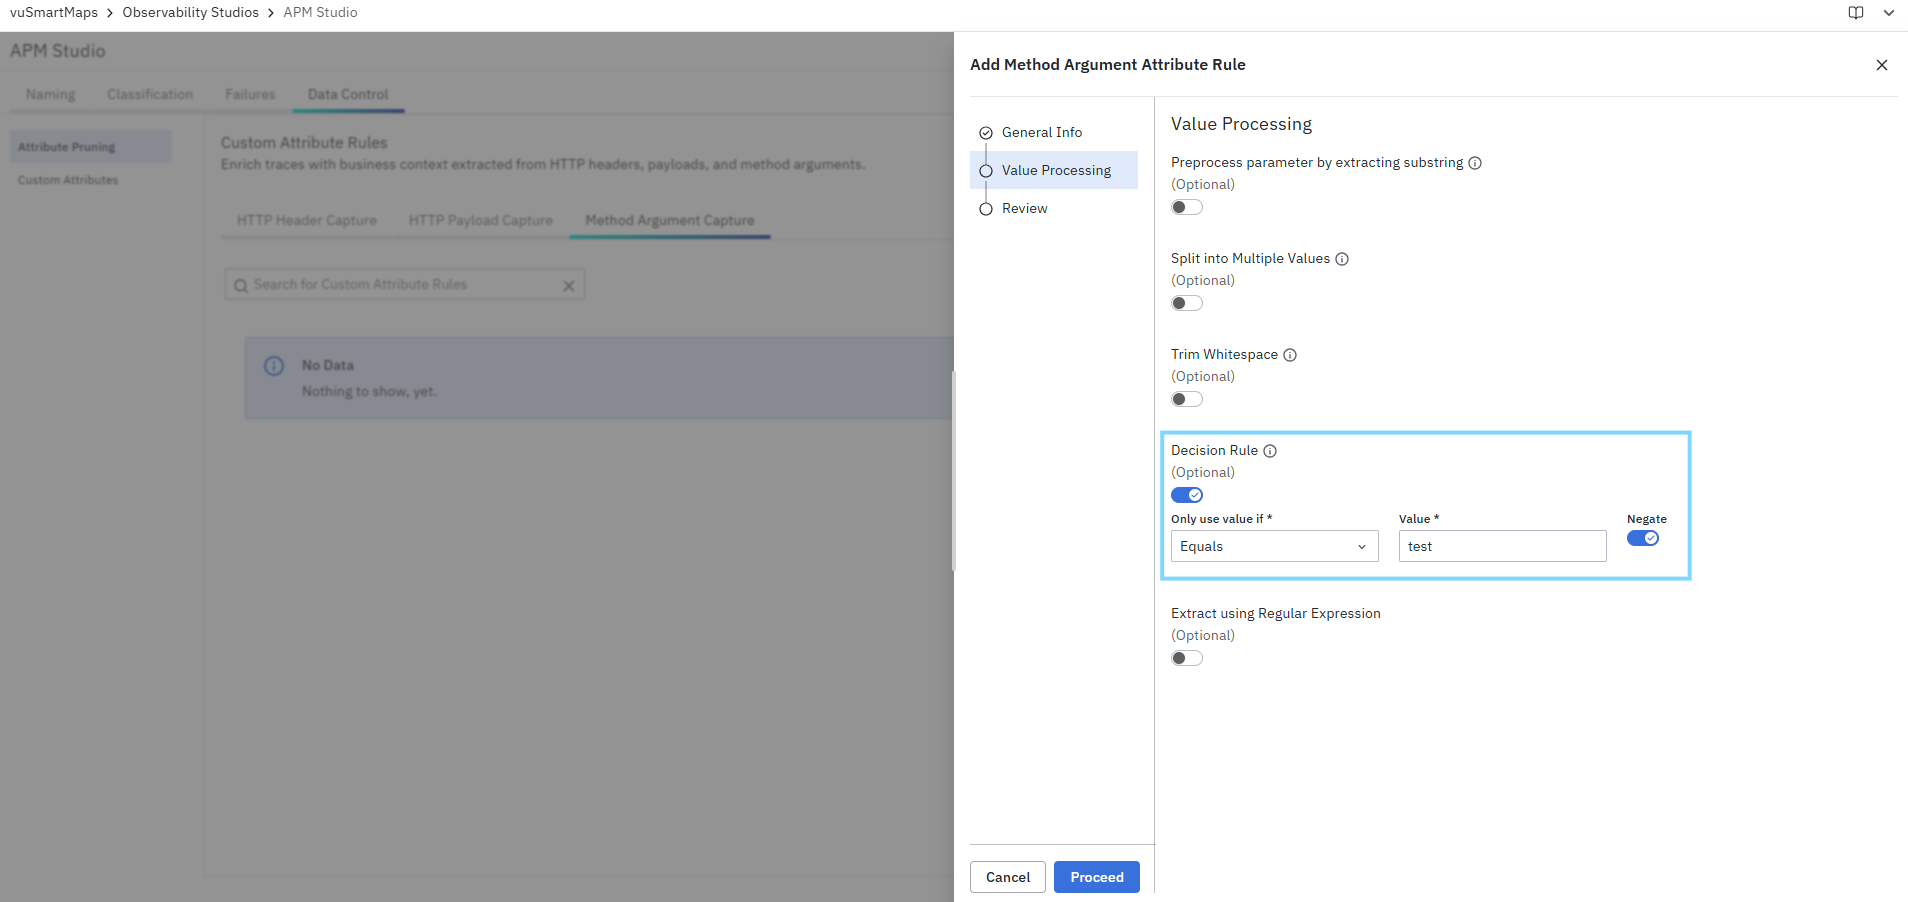
Only use value if *
Select the condition to apply to the extracted value. This is a mandatory field when Decision Rule is enabled.
Available operators shown in the UI
- Begins with
- Contains
- Equals
- Ends with
Value *
Enter the string to compare against the extracted value. This is a mandatory field when Decision Rule is enabled.
Example
upi:ReqPay
Negate
Enable Negate to reverse the condition logic.
- If Negate = Off, the value is used only when the condition matches.
- If Negate = On, the value is used only when the condition does not match.
Extract using Regular Expression (Optional)
Enable this option to extract a value using a regular expression pattern. This is useful when delimiters are not sufficient or when the required value must be matched using a pattern.
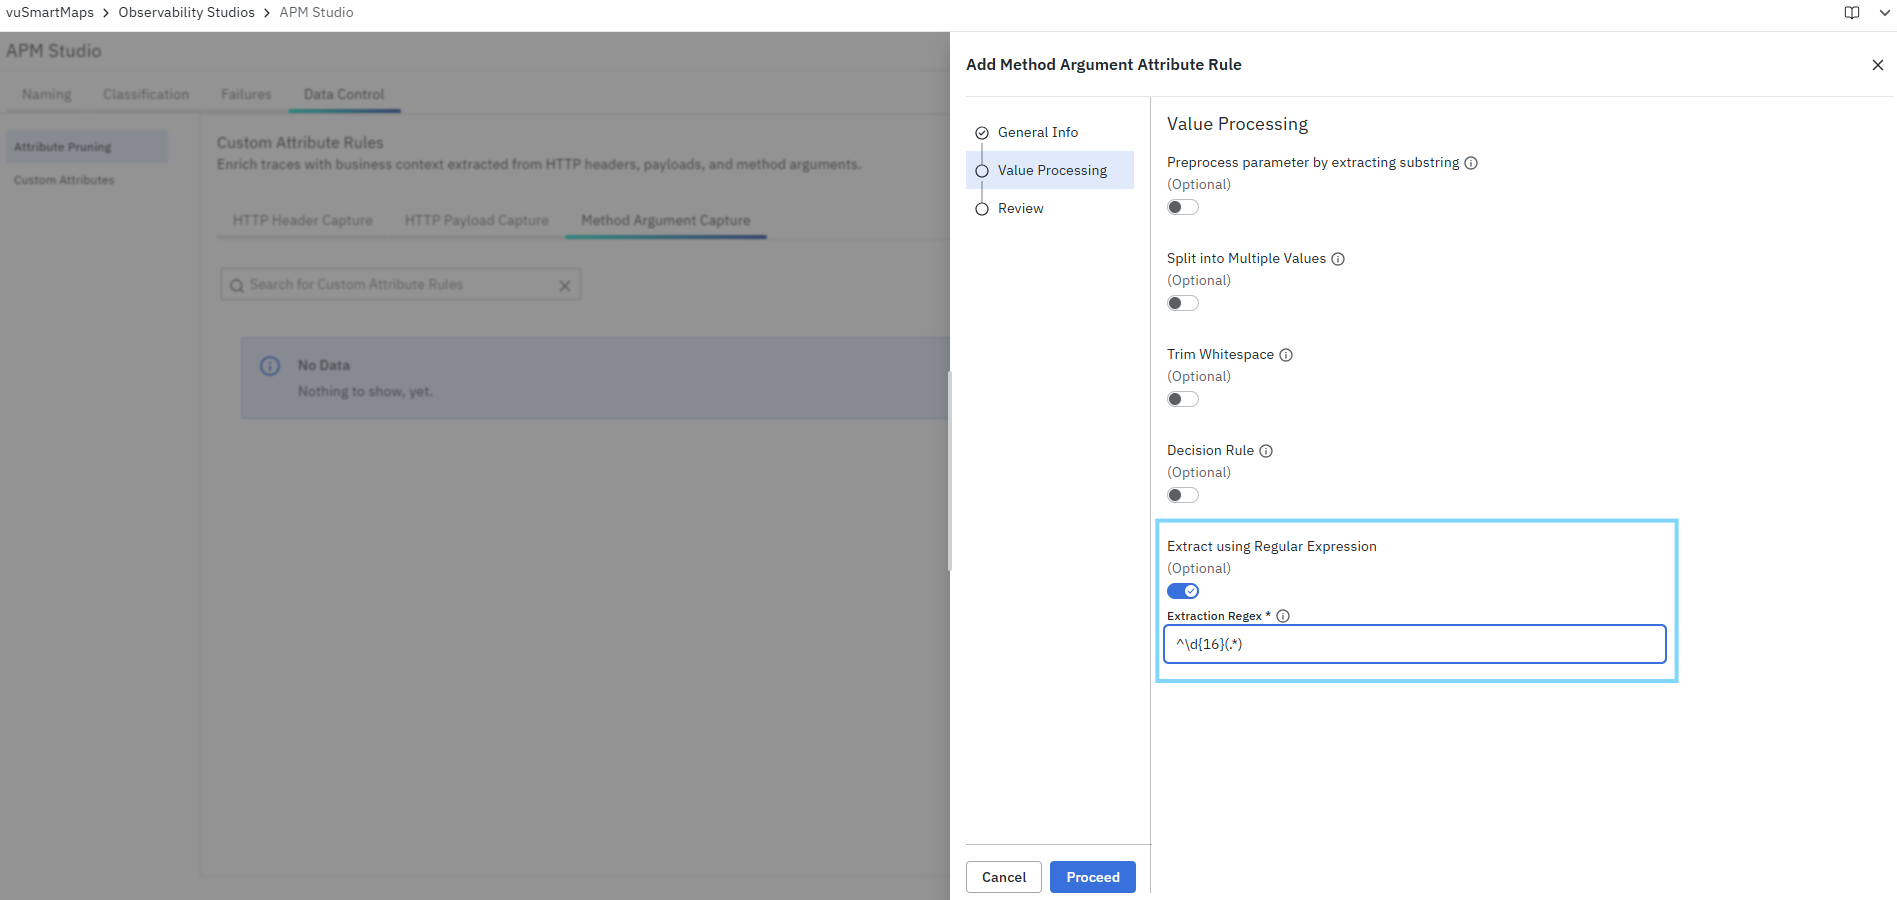
Extraction Regex *
Enter the regular expression pattern used to match and extract the required value. This is a mandatory field when Extract using Regular Expression is enabled.
Example – Extract everything after the first 16 digits
Captured value: 1234567890123456654321
Regex:
^\d{16}(.*)
Result
654321
Review
To review and save a Method Argument Capture rule
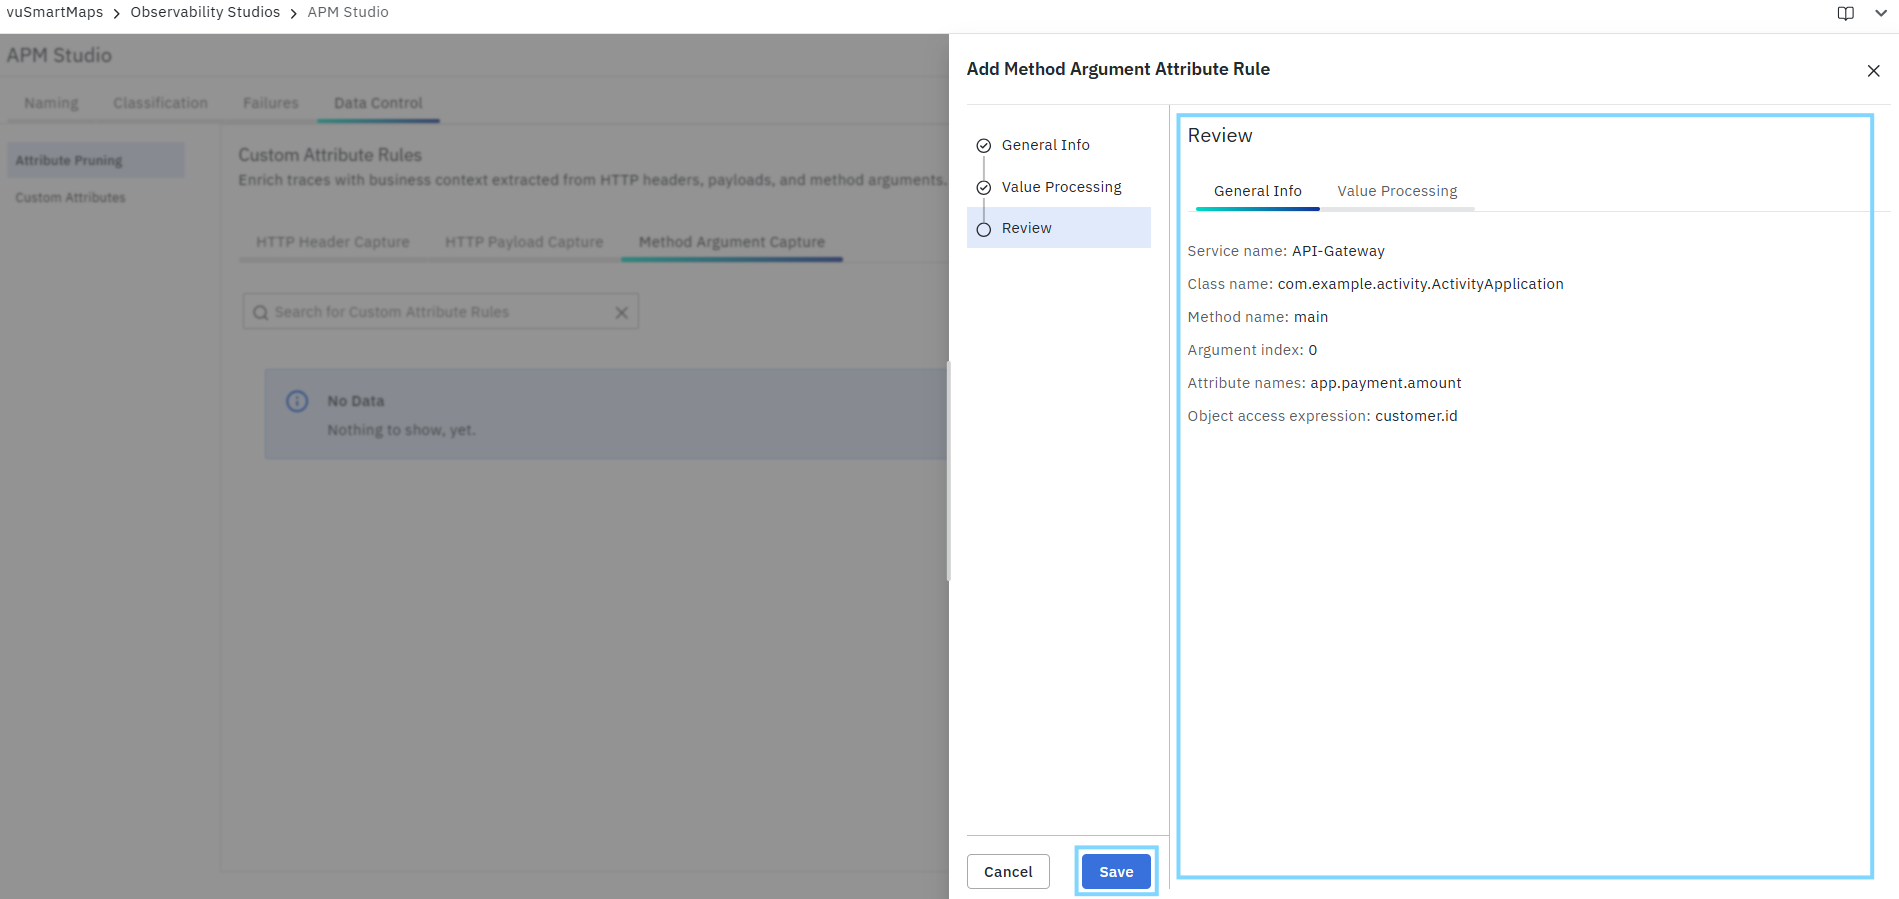
- Complete the General Info step.
- Configure the optional Value Processing options as required.
- Click Proceed to open the Review step.
- In the General Info tab, verify:
- Service name
- Class name
- Method name
- Argument index
- Attribute name(s)
- Object access expression
- In the Value Processing tab, verify the enabled or disabled processing options.
- If changes are required:
- Click General Info or Value Processing in the left pane and update the configuration.
- Click Save to create the rule.
FAQs
What is Data Control?
Data Control allows you to manage how trace attributes are retained, masked, removed, or enriched before they are processed by APM.
Why should I use Attribute Pruning?
Attribute Pruning helps remove unnecessary data, protect sensitive information, and reduce telemetry noise.
Can I capture custom business attributes?
Yes. Custom Attribute Rules allow you to capture additional business information from HTTP headers, payloads, or method arguments.
Do Data Control rules modify existing trace data?
No. Data Control rules apply only to newly processed telemetry after the rules are configured.
How do Data Control rules improve observability?
They improve data quality by retaining relevant attributes, masking sensitive information, and enriching traces with additional business context.
