Data Enrichment
Overview
Data Enrichment in vuSmartMaps is used to add contextual information to raw data. It helps convert raw values into more meaningful information by matching a unique key from incoming raw data with the same key stored in an enrichment table.
For example, an IP address can be mapped to a branch name, or a postal code can be mapped to geographical information. In this process, the IP address or postal code acts as the unique key.
Data enrichment works only when the unique key exists in both places:
- The incoming raw data
- The enrichment table
If the key matches, vuSmartMaps enriches the raw data with the additional values stored in the enrichment table. If the key does not match, the raw data remains unchanged.
Why This Feature Is Useful
Raw data often contains technical or coded values that may not be easy to understand. Data Enrichment helps add business context to this data.
For operations and monitoring teams, this is useful because it can:
- Convert cryptic codes into understandable names.
- Add contextual details to raw data.
- Improve data analysis.
- Help users understand data faster.
- Support better insights and decision-making.
- Enable enriched data to be used in visualizations, such as geographic maps.
For example, a pincode can be enriched with address, city name, and geo-IP details. This enriched data can then support a dynamic geographic map.
Example Scenario

A team wants to enrich geolocation data using pincodes.
The enrichment table contains:
- Pincode as the unique key
- Address
- City name
- Geo-IP, including latitude and longitude
When incoming raw data contains a pincode, vuSmartMaps checks whether the same pincode exists in the enrichment table. If it exists, the platform adds the related address, city name, and geo-IP details to the raw data. This enriched data can then be used to create a dynamic geographic map in the user interface.
When to Use This Feature
Use Data Enrichment when:
- Raw data needs additional context.
- A technical value must be converted into a readable value.
- Incoming data has a unique key that can be matched with a lookup table.
- IP addresses must be mapped to branch names.
- Postal codes or pincodes must be mapped to geographical details.
- Contextual data must be added before analysis.
- Enriched data must be used in a ContextStream pipeline.
- A large lookup table must be maintained through spreadsheet upload.
- Existing enrichment data must be updated manually or through import.

Comprehensive Understanding
Navigation Path
The Data Enrichment page is available from the left navigation menu: Data Studio > Data Enrichment This page displays all existing enrichment tables.
Data Enrichment Landing Page
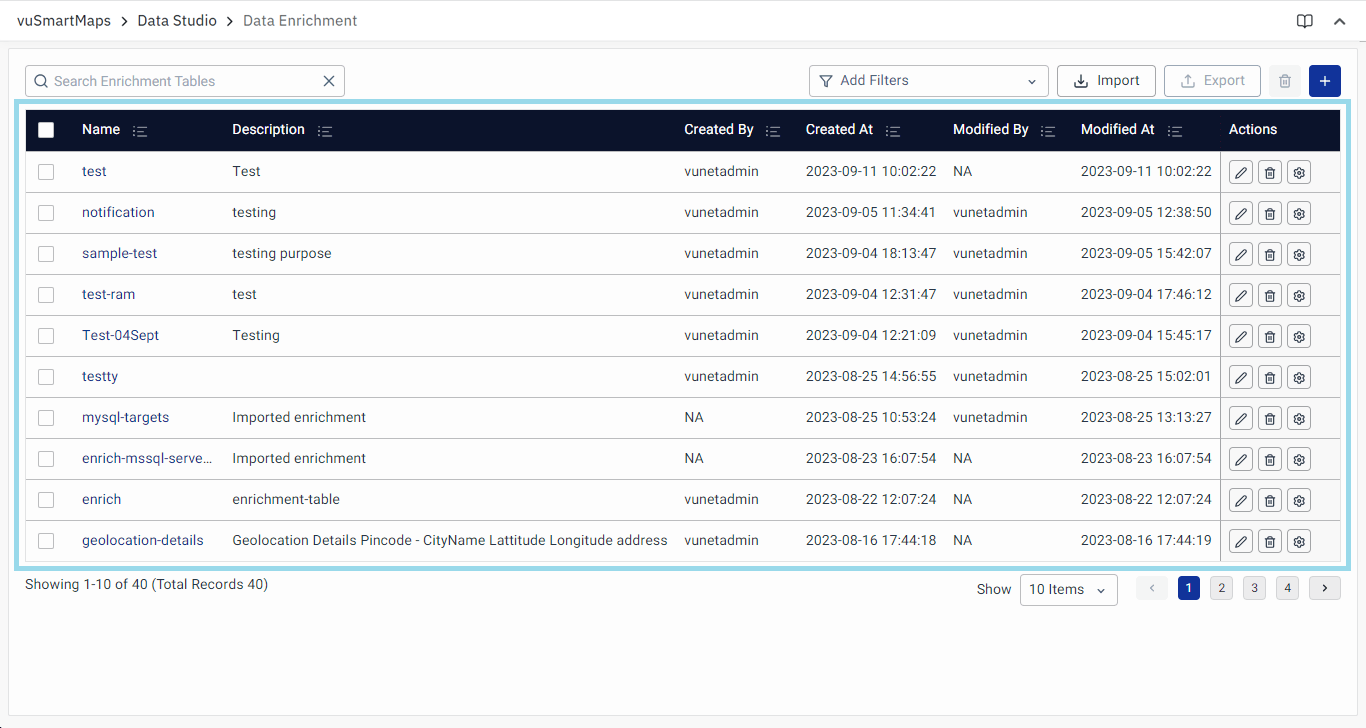
The landing page lists the enrichment tables already created in the system. Each row represents one enrichment table.
The page shows the following information:
- Name: The name of the enrichment table. This is clickable and opens the enrichment table details.
- Description: A short description of the table’s purpose or content.
- Created By: The user who originally created the table.
- Created At: The date and time when the table was created.
- Modified By: The user who last modified the table.
- Modified At: The date and time when the table was last modified.
- Actions: Options available for each enrichment table.
The Actions column includes:
- Edit: Allows users to modify enrichment table settings and details.
- Delete: Removes the enrichment table.
- Enrichment Configuration Details: Opens the data contained inside the enrichment table so users can view or modify it.
The page also includes:
- Search: Helps users quickly find specific enrichment tables.
- Filters: Helps refine the list of displayed enrichment tables.
- Import and Export buttons: Used to import or export enrichment data.
- Add button: Used to create a new enrichment table.
- Delete button: Used to delete existing enrichment tables.
Enrichment Table Creation Page
When the user clicks the + icon, vuSmartMaps opens the page where enrichment table details are entered.
The page includes:
- Enrichment table details,
- Keys section,
- Values section,
- Save button,
- Cancel option.
The enrichment table details include the table name and description.
Keys Section
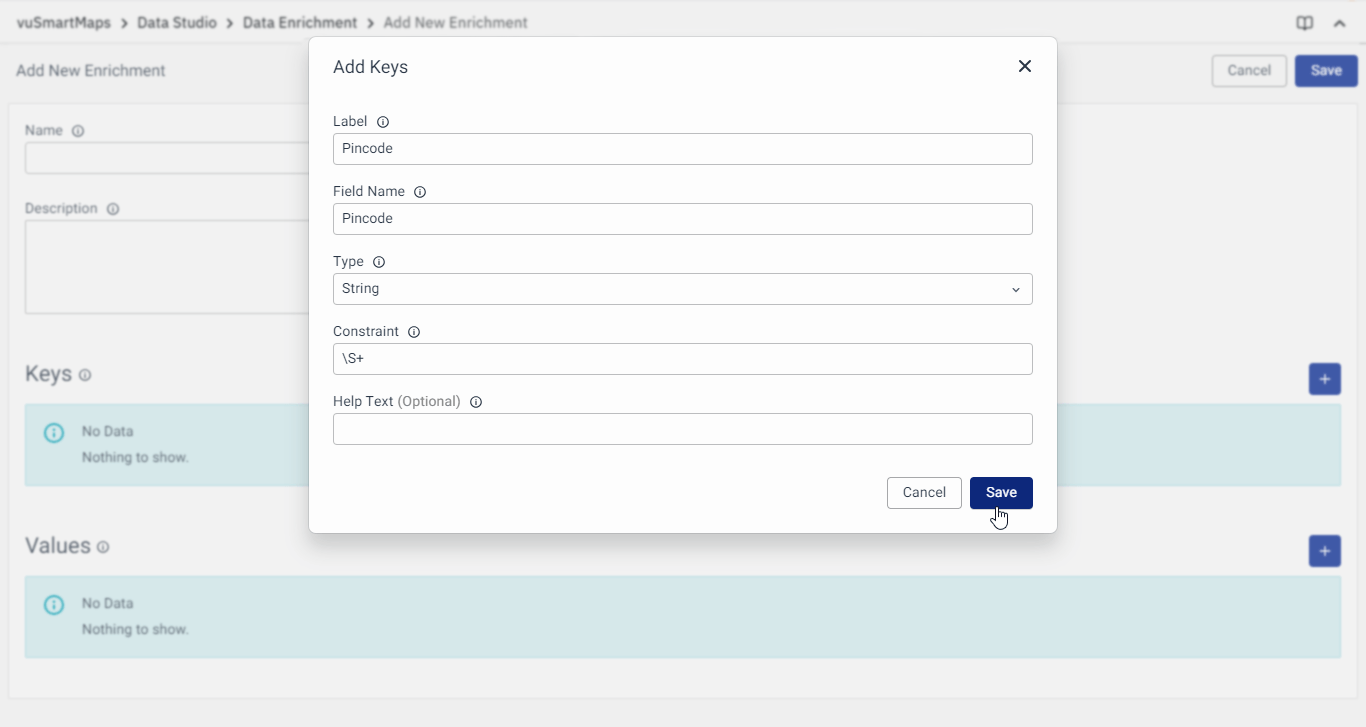
To add Keys to Enrichment Table, click on the + icon in the Keys section and fill the respective information related to the Keys. The following information is required for adding the Keys:
- Label: Name to be used to identify this field.
- Field Name: Field name in the data stream corresponding to this field. Eg: In the case of server health information - the sender IP address and the host will be the field name.
- Type: Type of Field
- Enum
- Options: List of allowed values for this field. For adding multiple items please use comma-separated values.
- IP Address
- Numeric
- Minimum Value: Minimum value allowed for this key field.
- Maximum Value: Maximum value allowed for this key field.
- String
- Constraint: Allowed characters for this field. Any regular expression format can be used here.
- Enum
- Help Text: Description of this field.
Values Section
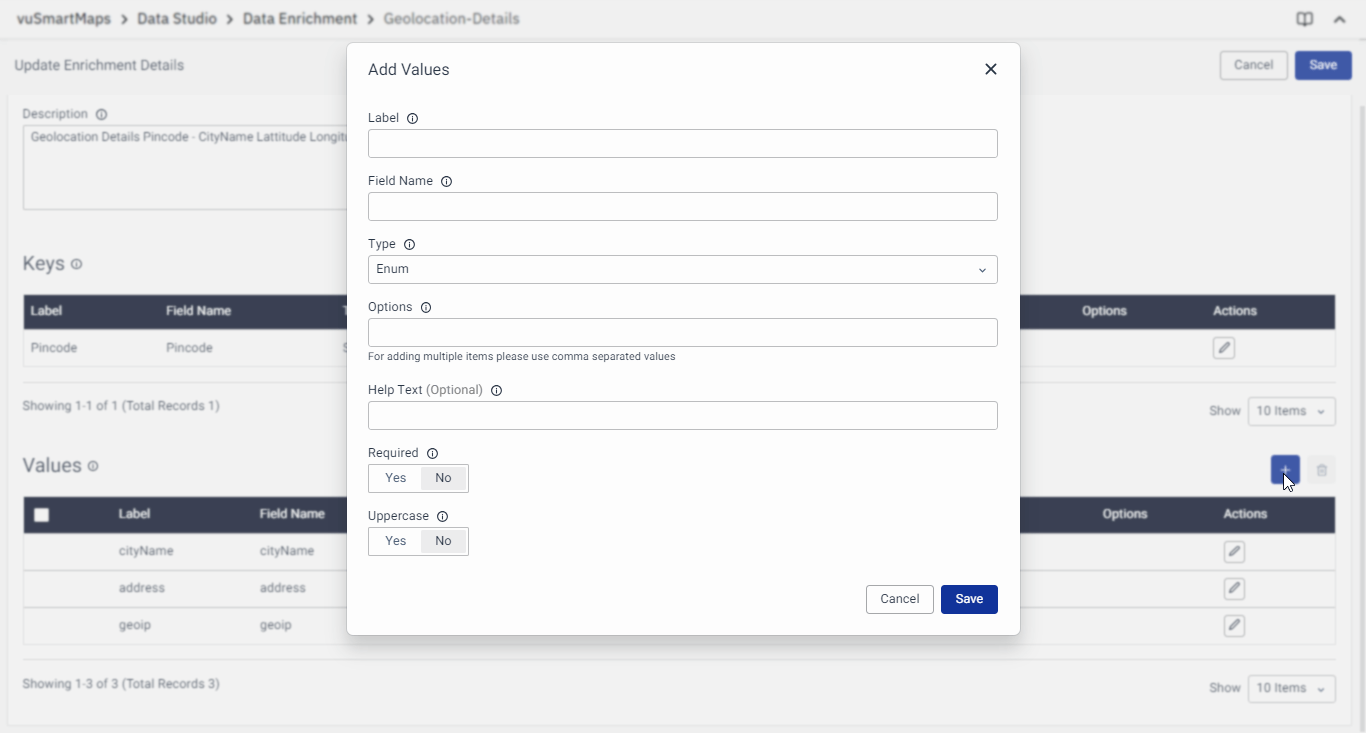
To add Values in the Enrichment Table, click on the + icon in the Values section and fill in the respective information related to the Values. The following information is required for adding the Values:
- Label: Name to be used to identify this field.
- Field Name: Field name in the data stream corresponding to this field. Eg: In the case of server health information - the sender IP address, the host will be the field name.
- Type: Type of Field
- Enum
- IP Address
- Numeric
- String
- Constraint: This field defines the allowed characters for this field.
- Help Text: Optional Description of this field.
- Required (Yes/No): Select Yes to make this field mandatory.
- Uppercase (Yes/No): Select Yes to make this field as uppercase. This will be disabled, by default.
Enrichment Configuration Details
The Enrichment Configuration Details action opens the table data. Users can view or modify the records stored inside the enrichment table. This is also where users can add individual records manually by using the Add Item option.
Import Dialog
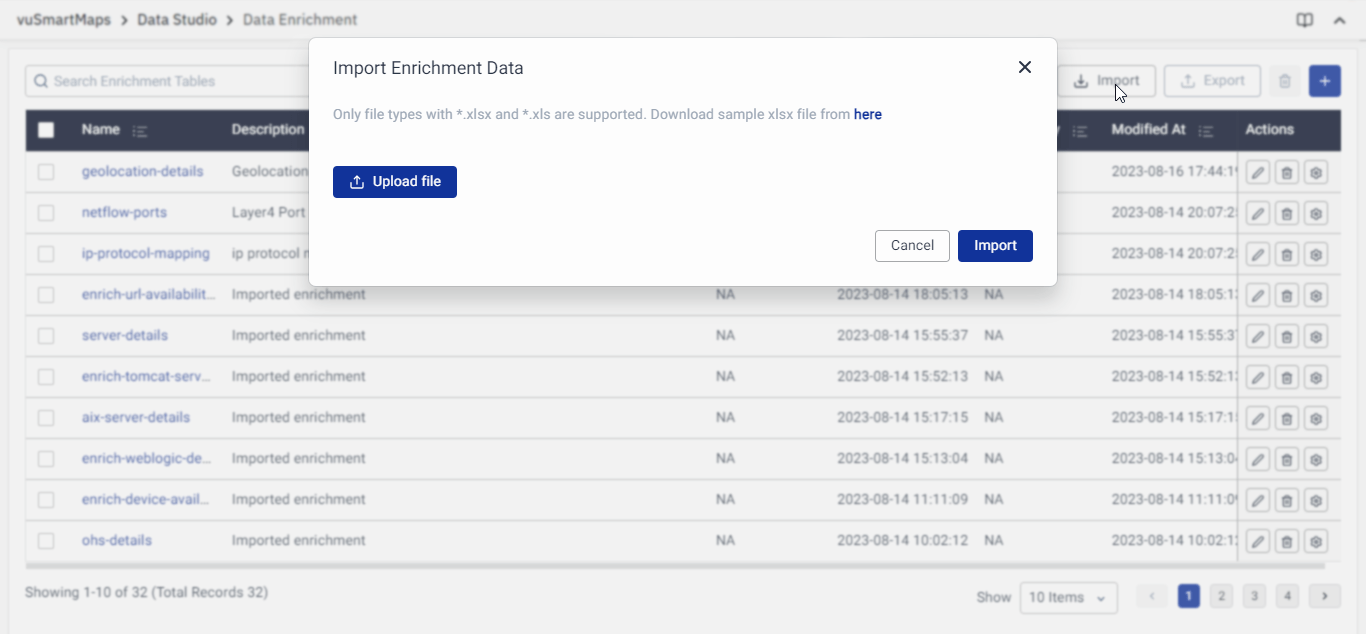
The Import button opens a dialog box where users can upload a spreadsheet. This is useful when there is a large set of enrichment data to be added or updated. The spreadsheet must follow the required format, including the correct sheet name, file size, and action field.
Step-by-Step Instructions
Understand the Data Enrichment Workflow
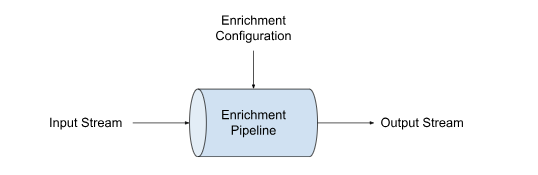
Data Enrichment in vuSmartMaps has two main stages.
Stage 1: Enrichment Configuration
In this stage, users create a lookup table with keys and values. This includes creating an enrichment table, adding keys, adding values, and adding or updating data in the enrichment table.
Stage 2: Using Enrichment in ContextStream
After creating the enrichment configuration, users can use enrichment in a ContextStream. This includes creating input and output streams, creating a pipeline, adding the enrichment step inside the pipeline, transforming input data using the configured enrichment settings, and storing enriched output data in an output stream.
The source document explains this as an enrichment pipeline where input data flows into the enrichment pipeline, is transformed using enrichment configuration, and is then sent to the output stream.
Create an Enrichment Table
- Open the left navigation menu.
- Go to Data Studio > Data Enrichment.
- The Data Enrichment landing page opens.
- Review the list of existing enrichment tables.
- Click the + icon to add a new enrichment table.
- Enter the enrichment table details, such as name and description.
- Add the required keys.
- Add the required values.
- Click Save.
- The enrichment table is created and displayed in the saved enrichment table list.
Add Keys
Keys are used to match incoming raw data with the enrichment table. Enrichment happens only when the key in the raw data matches the key in the enrichment table.
To add a key:
- Open the enrichment table creation page.
- Go to the Keys section.
- Click the + icon in the Keys section.
- Enter the Label. This is the name used to identify the key field.
- Enter the Field Name. This is the field name in the data stream that corresponds to the key field. For example, in server health information, sender IP address and host can be field names.
- Select the Type of the key field. The supported types are Enum, IP Address, Numeric, and String.
- If the type is Enum, enter the allowed values in Options. Use comma-separated values when adding multiple items.
- If the type is Numeric, enter the Minimum Value and Maximum Value allowed for the key field.
- If the type is String, enter the Constraint. This defines the allowed characters. Any regular expression format can be used.
- Enter Help text to describe the field.
- Save the key.
Multi-key enrichment is supported in vuSmartMaps. When both keys are matched, the enrichment of key-value pairs is valid.
Add Values
Values are the additional details that get added to raw data after the key is matched.
To add a value:
- Open the enrichment table creation page.
- Go to the Values section.
- Click the + icon in the Values section.
- Enter the Label. This is the name used to identify the value field.
- Enter the Field Name. This is the field name in the data stream that corresponds to the value field.
- Select the Type of the value field. The supported types are Enum, IP Address, Numeric, and String.
- Enter the Constraint, if required. This defines the allowed characters for the field.
- Enter Help Text, if required. This is an optional description of the field.
- In Required, select Yes if the value field must be mandatory.
- In Uppercase, select Yes if the value should be converted to uppercase. This option is disabled by default.
- Save the value.
Users can edit Keys and Values using the Edit icon under the Actions column. However, Type and Field Name cannot be changed during editing. Required and Uppercase settings also remain unchangeable.
Save the Enrichment Table
- Review the enrichment table details.
- Check the Keys section.
- Check the Values section.
- Click Save.
- The enrichment table is created.
- The table appears in the list of saved enrichment tables.
For the geolocation use case, the enrichment table may include pincode as the key and values such as address, city name, and geo-IP.
Update Data in an Enrichment Table
After creating the enrichment table, the next step is to add data to it.
There are two methods:
- Add data manually.
- Upload data from a spreadsheet.
Add Data Manually
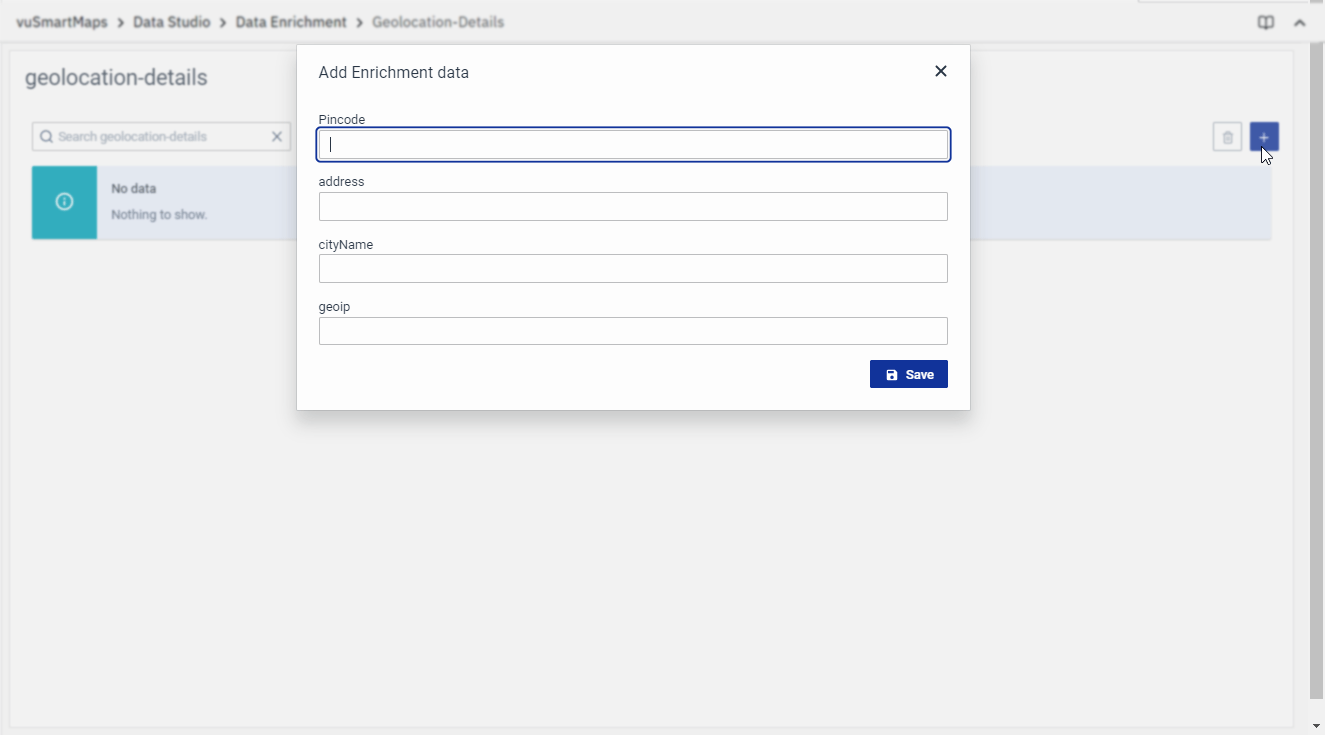
Use this method when only a small number of records need to be added.
- Go to Data Studio > Data Enrichment.
- Find the enrichment table that was created.
- Click the Enrichment Configuration Details icon.
- Click the + icon or Add Item.
- Enter the relevant key and value details one record at a time.
- Click Save.
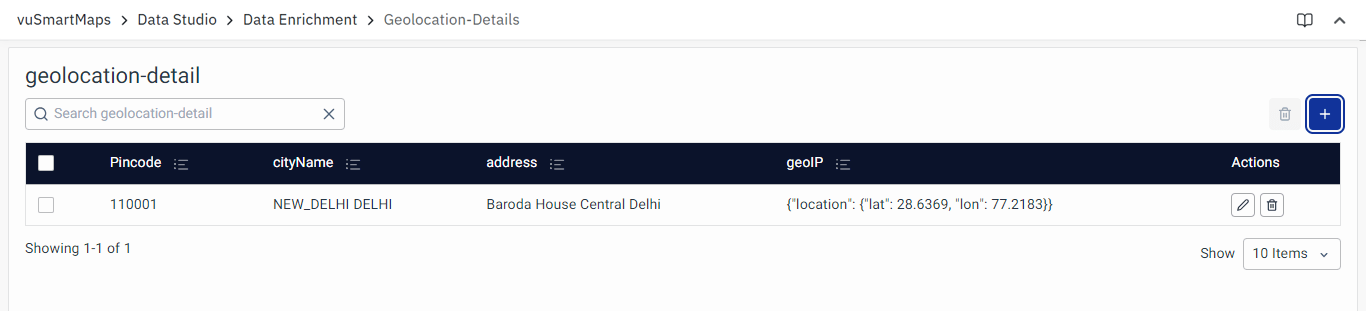
- Repeat the process for all required records.
- After adding all details, the enrichment table displays the added records.
Upload Data from a Spreadsheet
Use this method when a large set of data must be updated in the lookup table.
- Prepare a spreadsheet with all keys, values, and corresponding data.
- Ensure the sheet name is the same as the enrichment table name.
- Ensure the Excel file size is not more than 5 MB.
- Add the required value in the
actionfield. - Use upsert in the
actionfield to add the document. - Use delete in the
actionfield to delete the document. - Use no action in the
actionfield when no action should be performed. - Go to the Data Enrichment homepage.
- Click the Import button in the top-right corner.
- The upload dialog box opens.
- Upload the Excel file.
- Click Import.
- The enrichment table is updated.
In a fresh setup, where no enrichment table has been added, the sample file will also be blank. It is recommended to create an enrichment table before downloading the sample import file.
Export Enrichment Data
The Data Enrichment page includes an Export button to export enrichment data.
The source document mentions the Export button but does not explain the exact export steps, supported file format, or export behavior.
What Happens After the Steps
After the enrichment table is created, it appears in the list of saved enrichment tables. After keys and values are added, the enrichment table has a defined structure. The keys define how incoming data is matched. The values define what information is added when a match is found. After data is added manually or through spreadsheet upload, the enrichment table stores the lookup records.
When raw data comes into the platform:
- vuSmartMaps checks whether the raw data contains the unique key.
- It checks whether the same key exists in the enrichment table.
- If the key matches, the raw data is enriched with the related values.
- If the key does not match, the raw data remains unchanged.
- If enrichment is used inside a ContextStream, the input data is transformed using the enrichment settings.
- The enriched output data is stored in an output stream.
Troubleshooting
-
Issue: Raw data is not enriched
- Possible cause: The unique key in the raw data does not match the key in the enrichment table.
- Solution: Check whether the same key exists in both the incoming raw data and the enrichment table.
-
Issue: Enrichment table is not visible after creation
- Possible cause: The enrichment table may not have been saved.
- Solution: Click Save after entering the table details, keys, and values.
-
Issue: Spreadsheet upload fails
- Possible cause: The Excel file may be larger than the allowed size.
- Solution: Ensure the Excel sheet size is 5 MB or less.
-
Issue: Enrichment in ContextStream is unclear
- Possible cause: The source document explains the workflow at a high level but does not provide complete ContextStream configuration steps.
- Solution: Use the enrichment configuration as the lookup source and configure enrichment inside the ContextStream pipeline.
FAQs
What is Data Enrichment in vuSmartMaps?
Data Enrichment is the process of adding contextual information to raw data. It uses an enrichment table to match a unique key from incoming raw data and add related values to make the data more meaningful.
Why is a unique key important in Data Enrichment?
The unique key connects raw data with the enrichment table. If the key exists in both places, the raw data is enriched. If there is no matching key, the raw data remains unchanged.
What is an example of Data Enrichment?
A pincode can be used as a unique key. When the pincode matches an entry in the enrichment table, vuSmartMaps can add related values such as address, city name, and geo-IP information.
Where do I access Data Enrichment?
Go to Data Studio > Data Enrichment from the left navigation menu.
What is an Enrichment Table?
An Enrichment Table is a lookup table that stores keys and values. The key is used for matching raw data, and the values are added to the raw data when a match is found.
Can one enrichment use more than one key?
Yes. vuSmartMaps supports multi-key enrichment. When both keys are matched, the enrichment of key-value pairs is valid.
How can I add data to an Enrichment Table?
Data can be added in two ways:
- Manually, by using Enrichment Configuration Details > Add Item.
- By uploading a spreadsheet using the Import button.
What are the spreadsheet rules for importing enrichment data?
The sheet name must match the enrichment table name. The Excel file size must not exceed 5 MB. The spreadsheet must include an action field.
What values are supported in the spreadsheet action field?
The action field supports three values:
- upsert – adds the document.
- delete – deletes the document.
- no action – no action is performed.
Which fields cannot be changed while editing Keys and Values?
While editing Keys and Values, Type and Field Name cannot be changed. For Values, Required and Uppercase settings also remain unchangeable.
