ITSM Integration
- This section provides a practical, step-by-step walkthrough for configuring and validating ITSM integration in vuSmartMaps after all prerequisites have been completed.
- It is intended for first-time users setting up the integration, as well as for teams performing configuration validation before moving to production deployment.
Step 1 – Select ITSM Type
- Navigate to: Platform Configurations → ITSM Configurations
- From the ITSM Type dropdown:
- If your ITSM system (e.g., ServiceNow or Jira) is listed → Select it and begin with Standard Configuration Mode.
- If your ITSM system is not listed → Select Custom ITSM.
Recommendation: Always attempt Standard Mode first, unless your ITSM setup is heavily customized or requires non-standard fields, endpoints, or workflows.
Step 2 – Choose Configuration Mode
For ServiceNow, Jira and SapphireIMS:
- Standard Mode: Use this when the default ITSM structure, fields, and workflows remain unchanged.
- Custom Mode: Use this when:
- Custom fields are present
- The workflow has been modified
- The API payload structure differs from the default configuration
For Custom ITSM integrations:
- Providing the Base URL is mandatory.
- Advanced YAML configuration or a Custom Script may be required, depending on the ITSM’s API structure and business rules.
Step 3 – Enter Connection Details
Provide the required connection information based on the selected configuration mode:
-
Instance Name → If using Standard Mode
OR
-
Base URL → If using Custom Mode
Next, configure:
- Authentication Type
- Required credentials (Username/Password, OAuth details, API Token, etc.)
- Advanced YAML configuration or Custom Script (if using Custom Mode)
After entering all details:
-
Click Test to validate the configuration.
-
If the test is successful, click Save to complete the setup.
Step 4 – Validate Ticket Creation (Alarm New)
Trigger a test alert in vuSmartMaps to validate ticket creation. Verify the following:
- A ticket is successfully created in the ITSM system
- The Ticket ID is stored and visible in the Alert Console
- No API errors are recorded in the External_API_Requests table
If the Ticket Is Not Created:
Check the following:
- Verify that the authentication details are correct
- Verify the endpoint_map configuration (for Custom Mode or ITSM systems not listed in the UI)
- Ensure all mandatory fields required by the ITSM API are included in the payload
Correct any issues identified and retest the configuration.
Step 5 – Validate Ticket Update (Alarm Update)
Modify the test alert (for example, change the severity level) to trigger an Alarm Update.
Verify the following:
- The existing ticket is updated in the ITSM system
- No duplicate ticket is created
- Status mapping behaves as expected according to your configuration
If Duplicate Tickets Are Created:
Check the following configurations:
- search_query_template: Ensure the system is correctly identifying existing tickets
- ticket_action_control: Confirm that the get and update actions are properly enabled
- ticket_status_map: Verify that ticket statuses are being correctly interpreted and mapped
After correcting any issues, repeat the validation step to confirm proper behaviour.
Step 6 – Validate Ticket Closure (Alarm Clear)
Clear the test alert to trigger an Alarm Clear event.
Verify the following:
- The ticket status changes to 'Closed' or 'Resolved' in the ITSM system
- The ticket_status_map is applied correctly
If the Ticket Does Not Close:
Check the following:
- Verify the close endpoint configuration
- Verify the ticket_status_field setting
- Verify the status mapping to ensure the correct ITSM status is being applied
After making corrections, clear the alert again to confirm proper ticket closure behaviour.
Step 7 – Use Advanced Configuration Only If Required
Move to Advanced YAML or Custom Script configuration only when necessary.
Use advanced configuration if:
- The payload structure differs from the default
- The ITSM system is not listed in the UI
- The ITSM requires additional mandatory fields
- Custom endpoint behavior is required
- Ticket status values differ from the standard mapping
- Base64 ticket ID handling is required
- Custom headers need to be added
For most standard setups of ServiceNow, Jira and SapphireIMS advanced YAML and custom script configuration are not required.
Recommended Validation Order
Before marking the ITSM integration as complete, confirm the following:
- Ticket creation works successfully
- Ticket update works correctly
- Ticket closure functions as expected
- The ticket ID is correctly stored in the Alert Console
- Status transitions align with the ITSM workflow
- No duplicate tickets are generated
Once all items are verified, the integration can be considered successfully configured.
Authentication Type
- The authentication type defines how vuSmartMaps securely connects to the selected ITSM system.
- Select the option that matches the authentication mechanism configured in your ITSM environment. The chosen method must have sufficient permissions to create, update, fetch, and close tickets.
- The following authentication methods are supported.
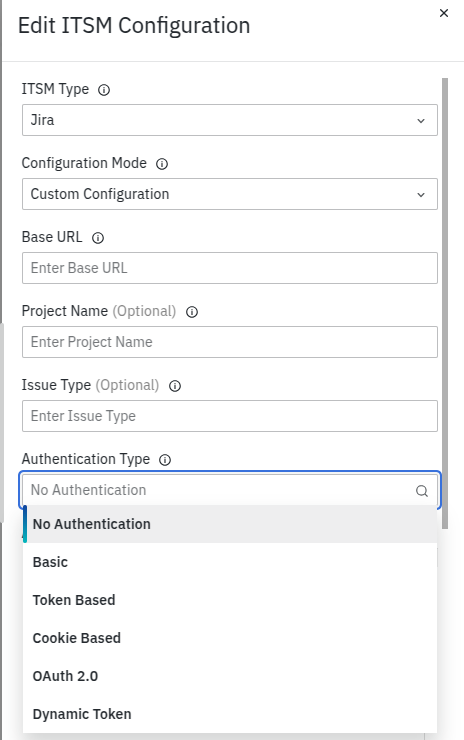
No Authentication
Select No Authentication if the ITSM system does not require credentials to access its APIs.
- No username, password, or token is required.
- Use this option only if the ITSM system explicitly allows unauthenticated API access.
This option can also be used for custom ITSM integrations (ITSM systems not listed in the UI) when authentication tokens or headers are configured separately using advanced YAML or a custom script.
Basic Authentication
Select Basic Authentication when the ITSM system requires a username and password for API access.
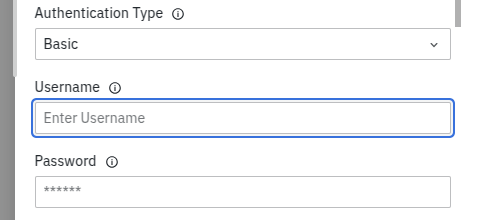
Required Fields:
- Username: The account username used to authenticate API requests.
- Password: The password associated with the username.
With this method, the provided credentials are included with each API request to authenticate access to the ITSM system.
OAuth 2.0
- OAuth 2.0 is a secure authentication method that uses access tokens instead of sending usernames and passwords with every API request.
- With this method, vuSmartMaps first obtains an access token from the ITSM system and then uses that token for subsequent API calls.
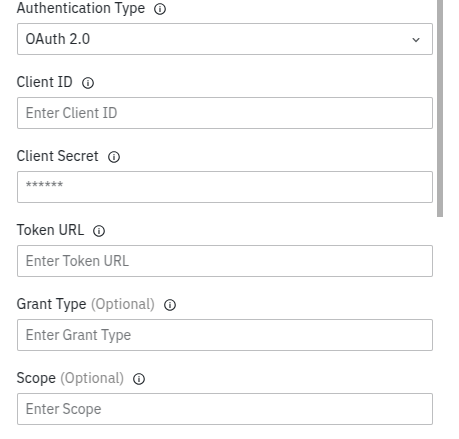
Required Fields
- Client ID: A unique identifier provided by the ITSM OAuth provider for the application.
- Client Secret: A confidential key used together with the Client ID to authenticate the application.
- Grant Type: Specifies how the access token is obtained (for example, client_credentials).
- Token URL: The endpoint used to request an access token from the ITSM system.
Example:
https://dev12345.service-now.com/oauth_token.do
- Scope
- Defines the permissions granted to the application after authentication.
- The selected scopes must allow required ticket operations such as create, update, fetch, and close.
Example scopes:
- user_account
- incident.write: Create or update tickets
- incident.read: Fetch ticket details
Ensure that the configured scopes provide sufficient permissions for all intended ITSM operations.
Token-Based Authentication
Select Token-Based Authentication if the ITSM system provides a static API token for authentication.

Required Field:
- Token: The API token generated from the ITSM system.
With this method, the token is included in API requests instead of a username and password.
Cookie-Based Authentication
Select Cookie-Based Authentication if the ITSM system supports session-based authentication using cookies.

- Authentication is performed using a session cookie generated after login.
- The same cookie is reused for subsequent API requests during the session.
Ensure that the session remains valid to prevent authentication failures during ticket operations.
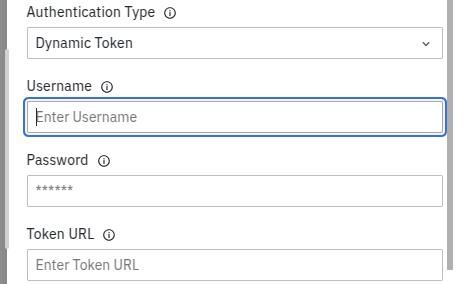
Dynamic Token Authentication (SMAX ITSM)
- Dynamic Token Authentication is specific to OpenText SMAX.
- In this method, a token is dynamically generated and then used for all subsequent API requests.
Required Fields
- Username: Used to request the authentication token.
- Password: Used to authenticate and generate the token.
- Token URL: The endpoint used to generate the authentication token.
How It Works
- vuSmartMaps sends the provided username and password to the configured token URL.
- The ITSM system returns a JWT (JSON Web Token).
- The generated token is automatically included in all subsequent API calls.
Key Token Authentication (SapphireIMS)
Select Key Token Authentication when the ITSM system requires a static key and token pair to be sent as HTTP headers with every API request. Key Token Authentication is specific to SapphireIMS.

Required Fields:
Key: A unique identifier provided by the ITSM system used to identify the integration source.
Token: A confidential value associated with the key, used to authenticate API requests.
With this method, both the key and token are included as HTTP headers in every API request sent to the ITSM system. No token exchange or session management is required.
Custom Token Authentication
Select Custom Token Authentication when the ITSM system uses a proprietary token-fetch mechanism that doesn't fit any of the other authentication types above - for example, a vendor-specific login API that returns a token in a non-standard response shape, or expects the token delivered somewhere other than a standard header.
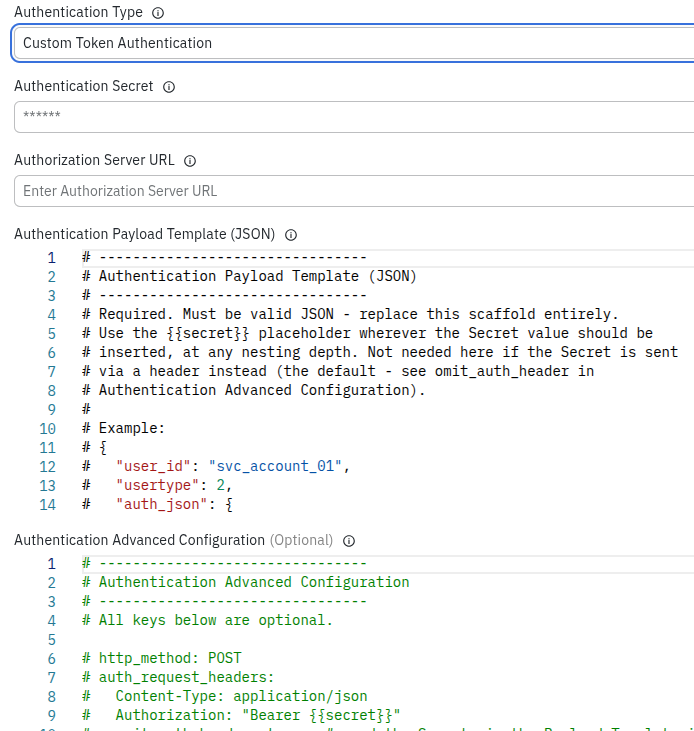
Required Fields:
- Authorization Server URL: The endpoint the token-fetch request is sent to.
- Secret: The credential value used to authenticate with the vendor. Only one Secret is supported.
- Payload Template (JSON): The request body sent to the Authorization Server URL, written as JSON. Wherever the placeholder {{secret}} appears in this template (at any nesting depth), it is replaced with the Secret value.
Optional Fields:
- Authentication Advanced Configuration: A YAML block for token-fetch settings not covered by the fields above. Sensible defaults apply to most keys when this is left empty.
- Payload Configuration Script: This is the same Payload Configuration Script used to construct the ITSM ticket payload (Refer to Payload Configuration Script). For Custom Token Authentication, the resolved authentication token is additionally made available inside this script useful for vendors whose ticket API expects the token inside the request body rather than a header. See below for how to access the token in the script.
How It Works
- vuSmartMaps sends a request to the Authorization Server URL using the Secret and Payload Template you've configured.
- The Authorization Server returns a token in its response.
- The generated token is automatically included in subsequent ITSM API calls.
The Payload Template is static. If a vendor's authentication request needs a dynamically computed value (for example, timestamp, or HMAC signature), it cannot be onboarded via Custom Token Authentication in this version.
Authentication Advanced Configuration (YAML)
http_method: POST
auth_request_headers:
  omit_auth_header: false
  Content-Type: application/json
  Authorization: "Bearer {{secret}}"
token_expiry:
  expires_at_path: expires_in
  expires_at_unit: seconds_from_now
main_request_auth_headers:
  Authorization: "Bearer {{$.access_token}}"
  omit_main_request_auth_header: false
http_method – HTTP method used to call the Authorization Server URL. Default: POST.
auth_request_headers – Headers sent with the token request. The Secret is sent here as a Bearer token by default. Set omit_auth_header: true to send it only via the Payload Template instead of this header.
token_expiry – Configure expires_at_path and expires_at_unit if the token should be cached until it expires, instead of fetching a new token for every request.
- expires_at_path – field in the Authorization Server's response containing the token's expiry value.
- expires_at_unit – how to interpret that value. Supported values: seconds_from_now, minutes_from_now, hours_from_now, epoch_seconds, iso_datetime.
- Default: not configured — a fresh token is fetched for every request.
main_request_auth_headers – Header used to attach the token to the outgoing ITSM ticket request. {{$.access\_token}} should point to where the token is located in the Authorization Server's response, update it to match your vendor. Set omit_main_request_auth_header: true if the Payload Configuration Script will place the token elsewhere instead.
omit_auth_header: true only stops the Secret from being sent via the auth_request_headers header, it doesn't stop substitution in the Payload Template, so the Secret can end up in both places if {{secret}} appears in both (this is allowed). Similarly, omit_main_request_auth_header: true only stops the token from being attached via main_request_auth_headers, if the Payload Configuration Script doesn't place the token anywhere else, it won't be sent at all, so double-check the script when using this flag.
Using the Token in the Payload Configuration Script
The resolved token is available in the script as AUTH_TOKEN, for vendors expecting it in the request body instead of a header:
PAYLOAD["auth_token"] = AUTH_TOKEN
Tenants that don't reference AUTH_TOKEN in their script are unaffected.
Important Note
Ensure that the selected authentication method has sufficient permissions to:
- Create tickets
- Update tickets
- Fetch ticket details
- Close tickets
Insufficient permissions may result in failed ticket operations.
Advanced Configuration (YAML-based)
The Advanced YAML Configuration provides extended control over how vuSmartMaps interacts with an ITSM system—especially when:
- The ITSM is not listed in the UI
- The ITSM requires custom behavior
- Additional user-specific customization is needed
This configuration allows you to control:
- What payload is sent to the ITSM system
- How the integration behaves during ticket creation, update, search, and closure
Use this option when your ticketing system has:
- Custom rules
- Special or mandatory fields
- Non-standard status mappings
- Custom API endpoints
The Advanced YAML configuration supports multiple fields, organized into logical sections based on their purpose. Users should review each section carefully and configure only the parameters required for their specific integration scenario. Detailed explanations are provided in the sections below.
Before using Advanced YAML configuration, ensure you clearly understand:
- The default payload structure sent by vuSmartMaps
- The default endpoint and request method behavior
- The available fields in the alert document
Refer to the Default Configuration and Alert Documentation sections for details before making custom changes.

Payload Customization (What is sent in payload to ITSM)
This section controls how the request payload is modified before it is sent to the ITSM system.
The following options are available:
- static_field_map
- payload_value_map
- payload_key_map
- delete_keys
These configurations help align the default payload with the structure required by the target ITSM API.
Ticket Lifecycle Control (Integration Behavior & Control Configuration)
This section controls how the ITSM integration behaves during ticket operations.
The following configuration options are supported:
- ticket_action_control
- alarm_state_ticket_status_map
- ticket_status_map
- ticket_status_field
- ticket_id_field
- severity_map
- endpoint_map
- request_method_map
- search_query_template
- custom_headers
- proxy
1. Payload-Level Customization
This section controls how ticket payloads are constructed and transformed before being sent to the ITSM system.
Typical use cases include:
- Modifying the request payload structure
- Mapping vuSmartMaps alert fields to ITSM fields
- Adding static or dynamic fields
- Adapting payloads for Jira, ServiceNow, SapphireIMS or other ITSM platforms
2. Integration Behavior & Control Configuration
This section controls how the ITSM integration behaves beyond just the payload content. It allows users to fine-tune API interaction, request handling, and ticket lifecycle behaviour.
Using this section, you can configure:
- Enabling or disabling specific ticket actions (get, update, close)
- Custom API endpoints for different ticket operations
- Additional or custom request headers
- Ticket status mapping between vuSmartMaps and the ITSM system
- Other integration-specific controls
3. Payload-Level Customization
This section enables users to:
- Add static fields
- Dynamically map values from alert data
- Rename payload keys
- Remove unwanted fields
All transformations are applied before the API request is sent, ensuring the final payload matches the target ITSM system’s requirements.
Refer to the Default Configuration and Alert Documentation sections while configuring the YAML.
Payload Transformation Parameters
The Advanced Configuration supports multiple parameters for transforming the payload. These parameters determine how the final payload is constructed before it is sent to the ITSM system.
There are four supported transformation types:
- Static Field Map
- Payload Value Map
- Payload Key Map
- Delete Key Map
Each transformation type serves a specific purpose in modifying the payload structure or content.
1. Static Field Map
The Static Field Map adds static (hard-coded) key–value pairs to the payload.
- The value remains the same for every alert.
- Commonly used for mandatory fields such as tenant ID, org ID, source, etc.
- Supports mapping into simple fields, nested objects, and list (array) structures within the payload.
How It Works
The key and value are directly defined in the YAML configuration.
Example 1: If the user wants the following in the payload:
{
  "orgId": "vunetId"
}
YAML Configuration
static_field_map:
  orgId: "vunetId"
Resulting Payload:
{
  "orgId": "vunetId"
}
Example 2: Dictionary (Key–Value) Mapping Using Dot Notation
Required Payload:
{
  "requests": {
    "orgId": "vunetId"
  }
}
Here:
- requests is the parent object
- orgId is a field inside requests
- "vunetId" is a fixed (static) value
- Dot notation (requests.orgId) represents the payload hierarchy
YAML Configuration
static_field_map:
  requests.orgId: "vunetId"
Resulting Payload
{
  "requests": {
    "orgId": <value>
  }
}
List Mapping for Static Fields
When a payload field is a list:
- Each list element is accessed using an index
- Indexing starts from 0
- The index is specified using square brackets [ ]
- Fields inside the list element use normal dot (.) notation
Example Payload Structure (Expected by External System)
{
  "operation": "CREATE",
  "entities": [
    {
      "entity_type": "Incident",
      "properties": {}
    }
  ]
}
Here:
- entities is a list
- entities[0] refers to the first element in the list
Example: Static Field Map with a List
This example shows that static values can be mapped inside a list element.
YAML Configuration
static_field_map:
  entities[0].entity_type: "Incident"
  entities[0].properties.Category: "2198635"
  entities[0].properties.RegisteredForActualService: "123456"
  operation: "CREATE"
Resulting Payload (Partial)
{
  "operation": "CREATE",
  "entities": [
    {
      "entity_type": "Incident",
      "properties": {
        "Category": "2198635",
        "RegisteredForActualService": "123456"
      }
    }
  ]
}
Key Notes
- Values are literal (hard-coded)
- No reference to alert_doc is used
- The same values are sent for every request
2. Payload Value Map
The Payload Value Map dynamically assigns values to the payload by referencing fields from alert_doc.
- Dynamically copies values from alert_doc
- Supports both flat and nested alert structures
- Most commonly used transformation type
- Supports mapping into simple fields, nested objects, and list (array) structures in the payload
Example – Simple Mapping
Required Payload:
{
  "fields": {
    "summary": "<value from alert_doc['description']>"
  }
}
YAML Configuration:
payload_value_map:
 fields.summary: description
How This Works
- fields.summary → Target location in the payload
- description → Key from alert_doc
Equivalent Logic (for understanding)
payload["fields"]["summary"] = alert_doc["description"]
Payload Value Map with a List
This example demonstrates dynamic mapping of alert data into a list element.
Requirement
Populate the following fields using alert data:
- Description from alert_doc["description"]
- DisplayLabel from alert_doc["Alert-Rule-Name"]
YAML Configuration
payload_value_map:
  entities[0].properties.Description: description
  entities[0].properties.DisplayLabel: Alert-Rule-Name
How This Mapping Works
- entities[0] → Selects the first item in the entities list
- properties.Description → Field inside that list item
- description → Value copied from alert_doc
- Alert-Rule-Name → Value copied from alert_doc
Equivalent Logic (For Understanding)
payload["entities"][0]["properties"]["Description"] = alert_doc["description"]
payload["entities"][0]["properties"]["DisplayLabel"] = alert_doc["Alert-Rule-Name"]
Resulting Payload (Partial)
{
  "entities": [
    {
      "entity_type": "Incident",
      "properties": {
        "Category": "2198635",
        "RegisteredForActualService": "123456",
        "Description": "CPU usage exceeded threshold",
        "DisplayLabel": "High CPU Alert"
      }
    }
  ]
}
Example 2 – Dictionary (Key–Value) Mapping in YAML
Required Payload:
{
  "requests": {
    "summary": "<summary field of alert>"
  }
}
Here:
- requests is the parent object
- summary is a field inside requests
- Dot notation (requests.summary) represents the payload hierarchy
YAML Configuration
payload_value_map:
  requests.summary:summary
Resulting Payload
{
  "requests": {
    "summary": "Server is down"
  }
}
Key Notes
- The right-hand side (e.g., summary) must exist in alert_doc
- Supports nested paths using dot (.) notation
- Intermediate objects are created automatically if they do not exist
- The source field must be present in alert_doc
General Pattern for List Mapping
To map values into any list field, use the following pattern:
<list_name>[<index>].<nested_field>: <alert_doc_field>
Example
entities[0].properties.Priority: alert.severity
Key Notes for List-Based Mapping
- List indexing always starts from 0
- Only explicit indices (e.g., [0] and [1]) are supported
- Lists and nested objects are created automatically if they do not exist
- Dynamic looping or automatic creation of multiple list items is not supported
- The source field must exist in alert_doc
- Dot (.) notation can be combined with list indexing
3. Payload Key Map
Description
The Payload Key Map is used to rename existing keys in the payload while preserving their values and structure.
Use Cases
- Aligning payload field names with external ITSM requirements
- Renaming fields after dynamic value mapping
YAML Definition
<existing_payload_path>: <new_payload_path>
Example
Existing Payload
{
  "fields": {
    "summary": "CPU usage is high"
  }high."}
Requirement:
Rename summary to description.
YAML Configuration
pfields. key_map:
 fields. Summary: fields. description
Resulting Payload
{
  "fields": {
    "description": "CPU usage is high"
  }
}
- Both paths must reference valid payload keys
- The value remains unchanged
- Only the key name is modified
4. Delete Key Map
Description
The delete key map removes specified keys from the payload that are not required by the target ITSM system, while preserving the remaining payload structure.
Use Cases
- Removing unsupported or restricted fields
- Cleaning up intermediate or debug data
- Ensuring payload compliance with the target ITSM API
YAML Definition
<payload_path>
Example
Existing Payload
{
  "orgId": 123,
  "apiKey": "abc123"
}
YAML Configuration
delete_keys:
apiKey
Resulting Payload
{
  "orgId": 123
}
- Only the key path is required
- No value should be specified
- Nested paths are supported
Processing Order
Payload transformations are applied in the following order:
- Static Field Map
- Payload Value Map
- Payload Key Map
- Delete Key Map
Rationale
- Ensures required fields are created before any renaming occurs
- Allows renamed fields to be deleted if necessary
- Maintains predictable and consistent transformation behavior
2. Integration Behavior & Control Configuration
The fields listed below can be added in the Advanced YAML configuration to provide greater control over how the ITSM integration behaves. This allows the setup to be tailored to match the exact requirements of your ticketing system.
All the defaults mentioned below are the defaults applicable to the option: “Custom ITSM ” in the UI. Defaults applicable to Jira, ServiceNow and SapphireIMS can be read from: Default configurations
1. Enabling or Disabling Ticket Actions
- In the YAML-based ITSM configuration, you can control whether specific ticket actions such as get, update, or close are enabled or disabled.
- This behavior is managed using the ticket_action_control section in the YAML configuration.
Default Behavior
By default, all ticket actions are enabled. This means the system will automatically:
- Fetch the ticket status
- Update existing tickets
- Close tickets when alerts are cleared
Unless explicitly disabled in the YAML configuration.
Configuration Example
ticket_ Enableaction_control:
  get: Enable
  update: Enable
  close: disable
Usage Details
-
get: enable: Retrieves the current ticket status before performing create or update operations.
-
Get: Disable: Skips ticket status retrieval. The system proceeds directly with ticket creation without checking the current status.
-
update: enable / disable: Enables or disables updating of existing tickets.
-
close: enable / disable: Enables or disables automatic ticket closure when an alert is cleared.
2. Endpoint Mapping and Request Method Configuration
Different ITSM systems may require different:
- API endpoints
- HTTP request methods (GET, POST, PUT, PATCH, etc.)
Instead of hardcoding these values, vuSmartMaps allows you to define them explicitly using YAML configuration. This approach provides flexibility and eliminates the need for code changes when integrating with a new ITSM system or customizing an existing one.
2.1 Request Method Mapping
- The request_method_map defines which HTTP method is used for each ticket operation during ITSM integration.
- Each entry maps a ticket action (such as create, update, or close) to the HTTP method expected by the ITSM API.
Configuration Example
request_method_map:
  create: "Post"
  update: "Patch"
  get: "Get"
  close: "Put"
  search: "Post"
Each key represents a ticket action, and the value specifies the corresponding HTTP method.
HTTP methods must be written in sentence case (capitalize only the first letter), for example: Post, Get, Put, Patch.
Default Behavior (If Not Configured)
If request_method_map is not defined in the YAML configuration, the system uses the following default methods:
REQUEST_METHOD_MAP = {
    "create": "Post",
    "update": "Put",
    "close": "Put",
    "search": "Post",
    "get": "Get",
}
Since ITSM platforms may have different API requirements, relying on the default methods may not work for all systems. Adjust the configuration as required by the ITSM API specification.
2.2 Endpoint Mapping
- The endpoint_map section defines the API endpoints used for different ticket operations such as creating, updating, fetching status, searching, browsing, and closing tickets.
- Each operation maps to a relative API path, which is appended to the configured Base URL.
Endpoint Resolution Order
For each ticket operation (create, update, status, search, close, browse), the platform determines the endpoint in the following order:
- YAML Configuration (endpoint_map)
- If defined, the configured endpoint is always used.
- Platform Default Endpoints (Internal Defaults)
- If not defined in YAML, the system falls back to predefined internal defaults.
Platform Default Endpoint Map
If endpoint_map is not configured, the system uses the following internal defaults:
DEFAULT_ENDPOINT_MAP = {
    "create": "/rest/api/create/",
    "search": "/rest/api/search",
    "status": "/rest/api/issue/{{ticket_id}}/?fields=status",
    "browse": "/browse/{{ticket_id}}",
    "close": "/rest/api/issue/{{ticket_id}}/comments",
}
These defaults may not match your ITSM API, especially for:
- ITSM systems not listed in the UI
- Modified Jira, ServiceNow or SapphireIMS setups
- Systems such as RBL, SMAX, ManageEngine, etc.
How Endpoint Mapping Works
For every ticket action:
Final API URL = Base URL + Endpoint Path
Example – Ticket Creation
Base URL:
https://itsm.example.com
Create Endpoint:
/api/v1/tickets
Final URL:
https://itsm.example.com/api/v1/tickets
This final URL is then used to invoke the Create Ticket API.
Example Configuration
endpoint_map:
  create: "/api/v1/tickets"
  update: "/api/v1/tickets/{ticket_id}"
  status: "/api/v1/tickets/{ticket_id}"
  close: "/api/v1/tickets/{ticket_id}/close"
  search: "/api/v1/tickets/search"
Using {ticket\_id} Placeholder
{ticket\_id}is a dynamic placeholder.- At runtime, it is replaced with the actual ticket ID.
- It can appear anywhere in the endpoint path.
Example:
update: "/api/v1/tickets/{ticket_id}"
If the ticket ID is INC12345, the resolved endpoint becomes:
/api/v1/tickets/INC12345
Endpoint Map Field Meanings
- create → Create a ticket
- update → Update an existing ticket
- status → Fetch ticket status
- browse → Open the ticket URL from the Alert Console
- search → Search for existing tickets
- close → Close a ticket
- Endpoint paths must be provided by the ITSM system.
- VuNet does not auto-discover endpoints.
- Refer to the ITSM vendor’s API documentation to determine correct endpoint paths.
- Incorrect endpoint configuration may result in API failures.
When Should You Configure endpoint_map?
Configure endpoint_map when:
- Integrating with an ITSM system not listed in the UI
- ITSM APIs differ for create, update, and close operations
- Ticket URLs require dynamic parameters like ticket ID
- You require precise control over how vuSmartMaps interacts with the ITSM APIs.
2.2.1 Example: Resolved Endpoints at Runtime
Assume the following:
- Base URL: https://itsm.example.com
- Ticket ID: 12345
What is Base URL?
The Base URL should contain only the root domain (or host) of the ITSM system.
- Do not include the API endpoint path in the Base URL.
- The system automatically constructs the final request URL using the following logic:
- Final URL = Base URL + Endpoint
- The Base URL should contain only the root domain (for example, https://itsm.example.com), while the specific API paths must be defined separately in the endpoint_map.
The resolved API endpoints at runtime would be:
| Operation | Method | Resolved URL |
|---|---|---|
| Create Ticket | Post | https://itsm.example.com/api/v1/tickets |
| Update Ticket | Put | https://itsm.example.com/api/v1/tickets/12345 |
| Get Ticket Status | Get | https://itsm.example.com/api/v1/tickets/12345 |
| Close Ticket | Put | https://itsm.example.com/api/v1/tickets/12345/close |
| Search Tickets | Post | https://itsm.example.com/api/v1/tickets/search |
Each final URL is constructed using: Final API URL = Base URL + Endpoint Path
2.2.2 Example: Resolved Endpoints at Runtime
Assume:
-
Base URL: https://itsm.example.com
-
Ticket ID: 12345
The resolved endpoints at runtime would be:
| Operation | Method | Resolved URL |
|---|---|---|
| Create Ticket | Post | https://itsm.example.com/api/v1/tickets |
| Update Ticket | Put | https://itsm.example.com/api/v1/tickets/12345 |
| Get Ticket Status | Get | https://itsm.example.com/api/v1/tickets/12345 |
| Close Ticket | Put | https://itsm.example.com/api/v1/tickets/12345/close |
| Search Tickets | Post | https://itsm.example.com/api/v1/tickets/search |
2.2.3 Using Base URL Only (No Endpoint Path)
- Some ITSM systems expose a single API endpoint and do not require separate URL paths for operations such as create, update, search, or close. In such cases, only the Base URL is required.
- To support this behavior, configure the endpoint_map values as empty strings ("").
Configuration Example
endpoint_map:
  create: ""
  update: ""
  status: ""
  browse: ""
  search: ""
  close: ""
Resulting Behavior
Assume the configured Base URL is:
https://itsm.example.com
All ticket operations will use only the Base URL without appending any additional path.
| Operation | Method | Resolved URL |
|---|---|---|
| Create | Post | https://itsm.example.com |
| Update | Post | https://itsm.example.com |
| Get | Get | https://itsm.example.com |
| Close | Post | https://itsm.example.com |
| Search | Post | https://itsm.example.com |
| Browse | Post | https://itsm.example.com |
Setting an endpoint value to an empty string explicitly instructs the system to:
- Use only the Base URL
- Avoid appending any default or fallback endpoint paths
This approach is recommended when:
- The ITSM API expects all operations at the same endpoint
- Endpoint routing is handled internally by the ITSM platform
- The API does not follow standard REST-style URL patterns
If a key is omitted from endpoint_map, the system may fall back to internal default endpoints, which can result in:
- Incorrect API calls
- Authentication failures
- Ticket creation or update error
2.2.4 Base64 Ticket ID Support
- Some ITSM systems require the ticket ID to be passed in Base64-encoded format as part of the API endpoint.
- To support such systems, the platform allows you to use a special placeholder:
**{{base64(ticket\_id)}}**inside the**endpoint\_map**.
1. How It Works?
{{base64(ticket\_id)}}is a dynamic placeholder.- At runtime, the platform:
- Takes the actual ticket ID
- Encodes it using Base64
- Replaces the placeholder with the encoded value
- No manual encoding is required from the user.
Configuration Example
endpoint_map:
  create: "/api/v1/tickets"
  update: "/api/v1/tickets/{{base64(ticket_id)}}"
  status: "/api/v1/tickets/{{base64(ticket_id)}}"
  close: "/api/v1/tickets/{{base64(ticket_id)}}/close"
  search: "/api/v1/tickets/search"
  browse: "/tickets/{{base64(ticket_id)}}"
Runtime Resolution Example
Input Values:
- Base URL: https://itsm.example.com
- Ticket ID: 12345
Base64 Encoded Ticket ID:
MTIzNDU=AwercQAWTWERVA
Final Resolved Endpoint (Update Operation):
https://itsm.example.com/api/v1/tickets/MTIzNDU=AwercQAWTWERVA
2. When Should You Use Base64 Ticket IDs?
Use {{base64(ticket\_id)}} only if:
- The ITSM API documentation explicitly requires Base64-encoded identifiers
- Direct use of
{ticket\_id}results in API failures or invalid requests
- You can use
**{{ticket\_id}}**and**{{base64(ticket\_id)}}**independently for different endpoints. - The Base64 placeholder can appear anywhere in the endpoint path.
- If Base64 encoding is not required, continue using
**{{ticket\_id}}**.
Placeholder Behavior:
**{{ticket\_id}}**→ Uses the ticket ID as-is**{{base64(ticket\_id)}}**→ Automatically encodes the ticket ID before sending
3. Alarm State ↔ Ticket Status Mapping (YAML-Based)
- The alarm_state_ticket_status_map allows you to define how vuSmartMaps alert states are translated into ticket or incident statuses in your ITSM system.
- Many ITSM platforms, such as ServiceNow, BMC Helix, and OpenText SMAX, use a structured Incident State field to manage ticket progression. This configuration ensures that vuSmartMaps alert states map correctly to valid incident states expected by the ITSM system.
- Different ITSM platforms may use different status names (e.g., New, Open, In Progress, Resolved, Closed).
- This can be used when the user does not want to perform the Get Ticket Status operation but still wants to update the ticket. In such cases, we use the alarm state as the ticket status.
How the Mapping Works
- vuSmartMaps tracks alerts using predefined internal lifecycle states.
- Each alert state is mapped to a corresponding ITSM ticket/incident status.
- When an alert changes state, the mapped ticket status is applied automatically.
Supported Alert Lifecycle States
The mapping is based on the following internal states:
- Alarm New – A new alert is raised
- Alarm Update – An existing alert is updated
- Alarm Clear – The alert is cleared or resolved
Default Behavior (If YAML Is Not Provided)
If it alarm_state_ticket_status_map is not defined, the system uses the following default mapping:
alarm_state_ticket_status_map:
  "Alarm New": "Alarm New"
  "Alarm Update": "Alarm Update"
  "Alarm Clear": "Alarm Clear"
In this case:
- The ticket/incident status values are passed as-is.
- The ITSM system must recognize these exact status names
Configuration Example
alarm_state_ticket_status_map:
  "Alarm New": "New"
  "Alarm Update": "In Progress"
  "Alarm Clear": "Closing"
Explanation:
- When a new alert is raised → Incident State is set to New
- When the alert is updated → Incident State is set to In Progress
- When the alert is cleared → Incident State is set to Closing
4. Search Identifier (YAML-Based)
- When vuSmartMaps needs to determine whether a ticket already exists for an alert, it performs a search operation in the ITSM system using alert information—most commonly the alert summary or description.
- The search_query_template defines how this search request is constructed and sent to the ITSM search API.
When Is This Configuration Used?
This configuration is used only when the ITSM system supports query-based searching, where search criteria are passed as key–value parameters in the API request.
Use search_query_template only if:
- The ITSM search API expects query parameters
- Searching is performed using fields such as:
- Description
- Summary
- Other text-based fields
In such cases, the search API URL format typically includes a parameter like:
/{SearchQuery}
If the ITSM search API does not support query-based searching, this configuration is not required.
What Does search_query_template Define?
It specifies:
- Which alert field should be used for searching (for example, alert summary)
- How that field should be placed inside the search query
This helps vuSmartMaps identify existing tickets and prevent duplicate ticket creation.
Configuration Example
search_query_template: "sysparm_query=short_description={encoded_summary}&sysparm_limit=5&sysparm_fields=number,state,sys_id"
Explanation of the Example
- short_description=
{encoded\_summary}: Searches for tickets whose description matches the alert summary. - sysparm_limit=5: Limits the number of returned tickets to 5.
- sysparm_fields=number,state,sys_id: Requests only the required fields:
- Ticket number
- Ticket status
- Ticket ID
Why {encoded\_summary} Is Used
Alert descriptions may contain:
- Spaces
- Special characters
- Symbols
{encoded\_summary} converts the alert text into a URL-safe format so the ITSM API can process the request correctly.
{summary} can also be used if the ITSM API accepts raw text without URL encoding.
Example
Alert Summary:
Disk usage exceeded threshold
Query Sent to ITSM:
short_description=Disk%20usage%20exceeded%20threshold
5. Ticket Status Map
Different ITSM systems represent ticket statuses in different formats.
- Some use text values (e.g., Open, In Progress, Closed)
- Others use numeric codes (e.g., 1, 2, 3, etc.)
The ticket_status_map allows you to translate the ticket status returned by the ITSM system into a standard status understood by vuSmartMaps. This ensures vuSmartMaps can correctly determine whether a ticket is still active or already completed, regardless of how the external system represents its status.
Why Is This Needed?
vuSmartMaps internally works with two standard ticket states:
- Open – Ticket is active and not yet resolved
- Done – Ticket is closed, resolved, or no longer active
If the ITSM system uses:
- Different status names
- Custom workflow states
- Numeric status codes
then ticket_status_map is required.
How the Mapping Works
- The ITSM system returns a ticket status value in the API response.
- vuSmartMaps looks up that value in ticket_status_map.
- The mapped value is converted into a standard internal state.
- vuSmartMaps uses this standardized state for alert updates and ticket handling.
Configuration Example
ticket_status_map:
  1: Open
  2: Open
  3: Open
  4: Done
  6: Done
  7: Done
What This Example Means
If the ITSM system uses numeric status codes:
- If the status is 1, 2, or 3 → Treat the ticket as Open
- If the status is 4, 6, or 7 → Treat the ticket as Done
Example
If the ITSM API returns:
{
  "status": 2
}
vuSmartMaps interprets this as:
Ticket Status = Open
If the API returns:
{
  "status": 6
}
vuSmartMaps interprets this as:
Ticket Status = Done
When Should You Use ticket_status_map?
Use this mapping when:
- The ITSM system does not use standard status names
- Ticket status values are numeric or custom-coded
- Multiple ITSM statuses need to map to a single vuSmartMaps status
Best Practices
- Use exact values returned by the ITSM API
- Map all terminal (closed/resolved) statuses to Done
- Ensure all active states map to Open
Default Ticket Status Mapping
If ticket_status_map is not defined in YAML, vuSmartMaps uses a built-in default mapping. The system groups ticket statuses into two standard states:
- Open
- Done
Default Mapping Logic
Treated as Open
The following values (case-insensitive) are considered Open by default:
- to do
- ready
- open
- new
- backlog
- in progress
- assigned
- work in progress
- pending
- on hold
- waiting for approval
- in review
Treated as Done
The following values are considered Done:
- resolved
- completed
- done
- closed
- cancelled
- rejected
- suspended
- merged
How This Works Internally
- The ticket status returned by the ITSM API is converted to lowercase.
- It is matched against the default status lists.
- vuSmartMaps classifies the ticket as either Open or Done.
When Do You Need a Custom ticket_status_map?
Define a custom mapping if:
- Your ITSM system uses numeric status codes
- Your ITSM system uses custom status names
- The default Open/Done classification does not match your workflow
- Certain statuses need to be treated differently
6. Ticket Status Field
Different ITSM tools (such as ServiceNow, Jira, ManageEngine, and OpenText SMAX) use different field names to represent the ticket status in their API responses.
For example:
- Some systems use state
- Others use status
- Some use incident_state, ticketStatus, and similar variations
To handle this variation, vuSmartMaps provides the ticket_status_field configuration.
Why Is This Needed?
When vuSmartMaps receives a response from the ITSM system, it must know which field contains the ticket status. Since each ITSM platform structures its API response differently, explicitly specifying the status field ensures:
- Accurate status detection
- Correct alarm-to-ticket state mapping
- Consistent behavior across different ITSM systems
Configuration Example
ticket_status_field: "state"
Example ITSM API Response
{
  "number": "INC123456",
  "short_description": "High CPU usage alert",
  "state": "In Progress",
  "assigned_to": "John Doe"
}
From this response:
- vuSmartMaps reads "In Progress" as the ticket status
- Because ticket_status_field is set to "state"
How the Status Is Used Internally
After extracting the status value (for example, "In Progress"), vuSmartMaps maps it to an internal state using the Ticket Status Map.
Example:
"In Progress" → mapped to OPEN
vuSmartMaps then understands that the ticket is still active and proceeds with update logic accordingly.
-
If ticket_status_field is not specified, the default value used is "state".
-
This configuration is especially useful when the ITSM system uses non-standard field names for ticket status.
7. Ticket ID Field
Every ITSM tool stores the unique ticket identifier using its own field name.
For example:
- Some systems use IDs
- Others use sys_id
- Some use number, or another custom field
To ensure vuSmartMaps correctly identifies and tracks the created ticket, you must specify which field in the API response represents the ticket ID.
How to Configure
In your ITSM YAML configuration, set the ticket_id_field to match the field name returned by your ITSM API.
ticket_id_field: "sys_id"
This tells vuSmartMaps: read the ticket ID from the sys_id field in the API response.
Default Behavior
- If ticket_id_field is not configured, vuSmartMaps will automatically look for a field named id.
- If your ITSM system does not return an ID field, ticket tracking may fail.
Example API Response
{
  "number": "INC987654",
  "sys_id": "abc123xyz",
  "short_description": "Disk space warning"
}
For this response, the correct configuration is:
ticket_id_field: "sys_id"
8. Severity Map
Different ITSM platforms expect different severity or priority values when creating or updating tickets.
- Some systems use numeric values (1, 2, 3, etc.)
- Others use text values (Critical, High, Medium, etc.)
The severity map allows you to translate vuSmartMaps alert severities into the exact values expected by your ITSM system. This ensures tickets are created with the correct priority and impact.
Why Is This Needed?
vuSmartMaps generates alerts with standard severity levels:
- critical
- error
- warning
- information
Your ITSM system may not recognise these values directly. Mapping ensures compatibility.
YAML Configuration Example
severity_map:
  "critical": 1
  "error": 2
  "warning": 3
  "information": 4
This configuration means:
- critical → 1
- error → 2
- warning → 3
- information → 4
These mapped values are sent as part of the ticket creation or update payload.
Default Behavior
If severity_map is not configured, vuSmartMaps uses direct mapping:
severity_map:
  "critical": "critical"
  "error": "error"
  "warning": "warning"
  "information": "information"
In this case:
- The alert severity is passed as-is
- This works only if the ITSM system supports these exact values
When Should You Configure severity_map?
Configure it if:
- The ITSM system expects numeric severity or priority values
- The ITSM system uses custom labels (e.g., High, Medium, Low)
- You need strict control over how alert severity translates into ticket priority
- Ticket creation logic depends on severity-based decisions
How Severity Is Typically Used in ITSM
In most ITSM systems, fields such as urgency, impact, and priority are required.
In vuSmartMaps:
- Alert severity acts as the primary input
- Urgency, impact, or priority are calculated based on predefined rules in the ITSM system
Example critical alert
For a Critical alert:
- Urgency → High
- Impact → High
- Priority → P1
For a warning alert:
- Urgency → Medium
- Impact → Medium
- Priority → P3
The severity_map ensures that the correct severity value is passed so the ITSM system can apply its internal priority logic correctly.
9. Custom Headers
The custom_headers section allows you to define additional HTTP headers that must be sent with every ITSM API request made by vuSmartMaps.
This is useful when:
- The ITSM system requires custom headers for authentication
- A static API key or token must be sent with every request
- The ITSM API expects non-standard or vendor-specific headers
- You want to explicitly set headers such as Content-Type
These headers are automatically included in all ticket operations, including create, update, search, get, and close.
When Should You Use custom_headers?
Configure custom_headers if:
- Your ITSM system uses a static API key or token (not dynamically generated)
- Authentication is performed using custom header fields instead of OAuth or session-based authentication
- The API documentation requires headers such as the following:
- key
- token
- X-API-Key
- Authorization
- Any vendor-defined custom header
Configuration Example
custom_headers:
  int-log-id: admin
  key: 2025280216-8e24122f-64e4-4ba2-abf3-56148b329606
  token: 2025280216-095a77cf-ffdf-445a-a968-5552b5813b84
How This Works
Once configured:
- vuSmartMaps automatically attaches these headers to every ITSM API request
- No additional scripting or code changes are required
- The same static values are reused consistently
Example Request Sent by vuSmartMaps
POST /api/v1/tickets
int-log-id: admin
key: 2025280216-8e24122f-64e4-4ba2-abf3-56148b329606
token: 2025280216-095a77cf-ffdf-445a-a968-5552b5813b84
Content-Type: application/json
- Header names are case-sensitive and must match the ITSM API documentation exactly
- Static authorization headers should be used only when supported by the ITSM system
10. Proxy Configuration
- Proxy configuration controls how vuSmartMaps sends outbound requests to external ITSM systems when direct internet access is not allowed.
- In restricted environments (such as corporate networks or secure data centres), all outbound traffic must pass through a network proxy. This section allows you to define whether a proxy should be used, where it should be applied, and for which requests.
Proxy Configuration Format
proxy:
  mode: use_proxy        # use_proxy | no_proxy | custom_proxy
  scope: both            # auth | itsm | both
  http_url: http://proxy.example.com:8080
  https_url: https://proxy.example.com:8443
Configuration Fields Explained
1. mode – How the Proxy Is Applied
Determines whether and how the proxy is used.
use_proxy
Routes requests through the configured proxy URLs.
- Requires at least http_url
- If https_url is not provided, http_url is reused for HTTPS
Use this when:
- Your environment requires a proxy
- You have standard HTTP/HTTPS proxy URLs
no_proxy
Explicitly disables proxy usage.
- Requests are sent directly
- System-level proxy settings are bypassed
Use this when:
- You want to force direct connections
- You want to ensure no proxy is accidentally used
custom_proxy
Provides full control over proxy configuration.
- Proxy details are passed directly to the HTTP client
- Useful for advanced or non-standard proxy setups
2. scope – Which Requests Use the proxy.
Controls where the proxy is applied.
auth
Applies proxy only to authentication requests (e.g., token generation, OAuth).
Recommended when:
- Authentication endpoints are restricted
- ITSM APIs are directly accessible
itsm
Applies proxy only to ITSM API calls (create, update, search, close, status).
Recommended when:
- ITSM endpoints are restricted
- Authentication is internal or unrestricted
both
Applies proxy to:
- Authentication requests
- ITSM API requests
3. http_url
Proxy URL used for HTTP requests.
http_url: http://proxy.example.com:8080
Required when:
- mode is set to use_proxy
4. https_url
Proxy URL used for HTTPS requests.
https_url: https://proxy.example.com:8443
If not provided:
- http_url is reused for HTTPS traffic
5. config (Only for custom_proxy Mode)
- Used only when mode is custom_proxy.
- Allows passing custom proxy definitions directly to the HTTP client.
Example:
proxy:
  mode: custom_proxy
  scope: both
  config:
    http: http://proxy.example.com:8080
    https://proxy.example.com:8443
Common Configuration Scenarios
Use a proxy for All Requests (Recommended for restricted networks).
proxy:
  mode: use_proxy
  scope: both
  http_url: http://proxy.example.com:8080
  https_url: https://proxy.example.com:8443
Use Proxy Only for Authentication
proxy:
  mode: use_proxy
  scope: auth
  https_url: https://proxy.example.com:8443
Explicitly Disable Proxy
proxy:
  mode: no_proxy
Use this to:
- Bypass system proxy settings
- Ensure direct connectivity
Use Custom Proxy Configuration
proxy:
  mode: custom_proxy
  scope: itsm
  config:
    http: http://proxy.example.com:8080
    https: https://proxy.example.com:8443
Default Behavior (If Not Configured)
If the proxy section is not defined:
- No proxy is used
- All requests are sent directly
- Behavior remains identical to earlier releases
Payload Configuration Script
- The Payload Configuration Script controls what data is sent to an external ITSM system (such as ServiceNow, OpenText SMAX, ManageEngine, or Jira Service Management).
- By default, vuSmartMaps sends a fixed, predefined payload to the ITSM system. The Payload Configuration Script allows you to dynamically build and modify that payload using Python logic.
- This provides full flexibility to support custom ITSM requirements that cannot be handled through static YAML configuration alone.
When Do You Need This Script?
Use the Payload Configuration Script only when advanced customisation is required.
You should use it when:
- ITSM Type / Mode is set to Custom
- You are integrating with an ITSM system not listed in the UI
- The default payload is not sufficient
- The requirement cannot be achieved using Advanced YAML configuration
- The payload must change dynamically based on conditions (for example, alarm state)
The script is not required for the standard mode of ITSM systems listed in the UI.
What Can You Do Using This Script?
The payload configuration script allows you to implement dynamic logic that cannot be handled through static YAML configuration.
You can use this script to:
- Change the payload based on business logic
- Add or modify ticket fields such as:
- Status
- Priority
- Assignment group
- Solution / Resolution
- Send different payloads based on alert conditions, such as:
- Alarm New
- Alarm Clear
- Dynamically construct request headers, including:
- Authorization tokens
- API keys
- Custom headers
This enables condition-based payload construction and flexible integration behaviour tailored to your ITSM system.
What Happens If You Don’t Use This Script?
If the Payload Configuration Script is not configured:
- vuSmartMaps sends a fixed, predefined payload
- The payload format follows the default structure for the selected ITSM
- No conditional logic is applied
- Custom business rules cannot be implemented
This is sufficient for standard integrations but may not meet the requirements of advanced or highly customised ITSM workflows.
What Does the ITSM Payload Script Control?
The ITSM Payload Script controls two key aspects of the integration:
1. Request Payload (What Is Sent to ITSM)
This defines:
- Ticket fields
- Ticket values
- Operation type (Create / Update / Close)
It determines exactly what data is sent to the ITSM API.
2. Response Handling (What Is Read from ITSM)
This extracts important values from the ITSM API response, such as:
- Ticket number
- Ticket status
These values are required for:
- Future ticket updates
- Ticket closure
- Ongoing status tracking
Accessing Data in the Script
The Payload Configuration Script can access several dynamic dictionaries to build and modify the request payload and headers.
Available Objects
You can access and manipulate the following objects inside the script:
- PAYLOAD: The dictionary sent as the request body Default Configuration.
- HEADERS: The dictionary used for HTTP headers.
- ALERT_DOC: The dictionary containing alert details.
- PREFERENCES: The dictionary containing ITSM configuration values.
- TICKET_INFO / COMPLETE_TICKET_RESPONSE (Optional): The dictionary containing the ticket response when integrating with an ITSM system not listed in the UI.
- TICKET_ACTION: The action (create, update) based on which payload can be modified.
How to Modify the Request Payload?
Case 1: Add or Update Fields in the Existing Payload
If you want to add a new field or modify an existing field, use the following format:
PAYLOAD["FIELD_NAME"] = FIELD_FROM_WHERE_TO_MAP
Where Can FIELD_FROM_WHERE_TO_MAP Come From?
You can map values from:
- ALERT_DOC (Alert details such as severity, description, alarm state, etc.)
- Existing PAYLOAD (If the same value needs to be reused or mapped under a different key)
Refer to the object definitions section for more details on available fields.
Example: Add Alert Severity to Payload
PAYLOAD["priority"] = ALERT_DOC.get("severity")
This adds the alert severity to the payload under the field name priority.
Case 2: Build a Completely New Payload
If the ITSM expects a completely different payload structure, you can override the entire default payload.
PAYLOAD = {
    "ticket_id": PAYLOAD.get("ticket_id"),
    "status": "Open",
    "description": ALERT_DOC.get("description")
}
This replaces the default payload entirely.
Building Different Payloads Based on Conditions
- You can dynamically construct payloads based on conditions.
- The most common condition is Alarm State.
Example: Payload Based on Alarm State
Alarm New → Create / Update Ticket
if ALERT_DOC.get("alarm_state") == "Alarm New":
    PAYLOAD["status"] = "Open"
    PAYLOAD["priority"] = ALERT_DOC.get("severity")
Alarm Clear → Close Ticket
if ALERT_DOC.get("alarm_state") == "Alarm Clear":
    PAYLOAD["status"] = "Complete"
    PAYLOAD["solution"] = "Alert is cleared"
Working with Nested Fields
Many ITSM systems expect nested JSON structures.
Example: Nested Object
Required Payload:
{
  "incident": {
    "priority": "High",
    "status": "Open"
  }
}
Script:
PAYLOAD["incident"]["priority"] = ALERT_DOC.get("severity")
PAYLOAD["incident"]["status"] = "Open"
Updating a Nested Field Safely
PAYLOAD["incident"]["priority"] = ALERT_DOC.get("severity")
(Ensure the parent key exists before accessing it.)
Working with Lists (Arrays)
Some ITSM APIs expect lists.
Example: Tags List
Required Payload:
{
  "tags": ["critical", "cpu", "production"]
}
Script:
PAYLOAD["tags"] = [
    ALERT_DOC.get("severity"),
    "cpu",
    "production"
]
List of Dictionaries (Very Common)
Example: Assignment Group Structure
Required Payload:
{
  "assignment_groups": [
    {
      "name": "Network Team",
      "level": "L2"
    }
  ]
}
Script:
PAYLOAD["assignment_groups"] = [
    {
        "name": "Network Team",
        "level": "L2"
    }
]
Nested List + Dictionary Example
Required Payload:
{
  "watch_list": [
    {
      "user": {
        "name": "admin",
        "role": "owner"
      }
    }
  ]
}
Script:
PAYLOAD["watch_list"] = [
    {
        "user": {
            "name": "admin",
            "role": "owner"
        }
    }
]
Advanced Example: Nested Payload Based on Alarm State
if ALERT_DOC.get("alarm_state") == "Alarm New":
    PAYLOAD["incident"] = {
        "state": "Open",
        "priority": ALERT_DOC.get("severity")
    }

elif ALERT_DOC.get("alarm_state") == "Alarm Clear":
    PAYLOAD["incident"] = {
        "state": "Closed",
        "resolution": "Alert cleared automatically"
    }
Safe Access Pattern
Always use .get() to avoid runtime errors:
severity = ALERT_DOC.get("severity", "warning")
PAYLOAD["priority"] = severity
Quick Reference Table
| Requirement | Example |
|---|---|
| Add simple field | PAYLOAD["priority"] = ALERT_DOC.get("severity") |
| Nested object | PAYLOAD["incident"]["state"] = "Open" |
| List | PAYLOAD["tags"] = ["critical", "infra"] |
| List of dicts | PAYLOAD["groups"] = [{"name": "Ops"}] |
| Conditional logic | if ALERT_DOC.get("alarm_state") == "Alarm Clear" |
| Override payload | PAYLOAD = {...} |
Default Configurations
1. Custom Ticketing System – Default Payload
For ITSM tools not listed in the vuSmartMaps UI, the system uses a predefined default payload structure.
This default payload must be modified or overridden to match the exact payload format required by your ITSM system.
Default Payload Structure
       {
            "severity": "Critical",
            "description": "payload_description",
            "incident_state": "payload_incident_state",
            "short_description":"summary",
            "time": "timestamp",
            "sys_created_on": "timestamp",
            "alert_id":"alert_id",
            "company": "Enterprise Name",
            "type": "Type",
            "active": "active_period_execution",
            "metric_name": "metric_value",
            "ticket_id": "ticket_id",
        }
Explanation of Fields
- severity → Alert severity (e.g., Critical, Major, Minor)
- description → Detailed description of the alert
- incident_state → Current state of the incident
- short_description → Summary of the alert
- time / sys_created_on → Alert timestamps
- alert_id → Unique identifier for the alert
- company → Enterprise or organization name
- type → Type of alert
- active → Indicates active period or execution state
- metric_name → Metric related to the alert
- ticket_id → ITSM ticket ID (if available)
This structure serves as a starting template and should be adapted to comply with the target ITSM API requirements.
2. ServiceNow – Default Configuration Details
The following defaults apply when integrating with ServiceNow using the standard configuration.
Default Table Name: incident
Default Ticket Status Map:
   "1": Open,
    "2": Open,
    "3": Open,
    "4": Done,
    "6": Done,
    "7": Done,
Default request method map:
create: Post,
update: Put,
close: Put,
search: Get,
status: Get,
Default endpoint map:
create: "/rest/api/create/",
  update: "/rest/api/search",
  status: "/rest/api/issue/",{{ticket_id}}/?fields=status",
  browse: "/browse/{{ticket_id}}",
  comment: "/rest/api/issue/{{ticket_id}}/comments",
Default ticket ID: sys_id
Default ticket_status_field: “State”
Default Payload:
{
   "ticket_id": "ticket_id",
  "severity": "error", "urgency":
  "urgency":"urgency",
  "impact":"impact",
  "priority":"priority",
 "description": "ticket description",
  "node": "group_values",
  "short_description": "testing | Alert ID: 2025Mar07-ae8d898a-02b9-4f26-ac28-2c76243b5712 | Severity: error",
  "source": "enterprise_name",
  "company": "enterprise_name",
  "type": "type",
  "metric_name": "metric_value",
  "sys_created_on": "sys_created_on",
  "correlation_id": "correlation_id",
  "opened_at": "timestamp",
  "cmbd_id": "cmbd_id",
  "Incident_state": "Alarm_state",
  "active":"active_period_execution",
  "state":"Ticket_status",

}
These defaults can be modified using advanced YAML configuration or the Payload Configuration Script if your ServiceNow setup requires customisation.
3. Jira – Default Configuration Details
The following defaults apply when integrating with Jira using the standard configuration.
Default endpoint:
issue: "/rest/api/3/issue/"
    search: "/rest/api/3/search/jql"
    status: "/rest/api/3/issue/{{ticket_id}}/?fields=status"
    browse: "/browse/{{ticket_id}}"
    update: "/rest/api/3/issue/{{ticket_id}}"
    validation: "/rest/api/3/myself"
Default ticket status map:
Alarm New: New
    Alarm Update: Update
    Alarm Clear: Done
Default Project Configuration
- Default Project Name: vuNetTicketTracker
- Default Issue Type: Bug
Default Severity Map:
information: Low
    warning: Medium
    error: High
    critical: Highest
Default Payload for the Jira integrations
{
  "fields": {
    "project": {
      "id": 1001
    },
    "issuetype": {
      "id": 3
    },
    "summary": "Default Issue Summary",
    "priority": {
      "name": "Low"
    },
    "description": {
      "version": 1,
      "type": "doc",
      "content": [
        {
          "type": "paragraph",
          "content": [
            {
              "type": "text",
              "text": "Default issue description. Modify this with actual details."
            }
          ]
        }
      ]
    }
  }
}
These defaults can be customised using advanced YAML configuration or the Payload Configuration Script if your Jira setup requires specific field mappings or workflow adjustments.
4. SapphireIMS - Default Configuration Details
The following defaults apply when integrating with SapphireIMS using the standard configuration.
Default request method map:
create: Post,
update: Post,
close: Post,
search: Post,
status: Get,
Default endpoint map:
create: "/api/create/",
  update: "/api/update",
  close: “/api/ticket/stateChange”,
  search: “/api/ticket/find”,
  status: "/api/ticket/get/{{ticket_id}}/id",
Default Ticket ID Field: problemId
Default Ticket Status Field: currentState
Default ticket status map:
Alarm New: Open
    Alarm Update: In Progress
    Alarm Clear: Closed
Default Severity Map:
information: Low
    warning: Medium
    error: High
    critical: High
Default Create Payload:
{
    "requestType": "GET_TICKET",
    "integrationLogId": "integration_log_id",
    "iteration": 0,
    "ticket": {
        "project": { "projectName": "project_name" },
        "service": { "name": "service_name" },
        "title": "alert_summary",
        "submittedBy": { "userName": "vunet" },
        "category": { "name": "category" },
        "subCategory": { "name": "sub_category" },
        "urgency": { "name": "urgency" },
        "impact": { "name": "impact" },
        "priority": { "name": "priority" }
    }
}
Default Update Payload:
{
    "requestType": "UPDATE_TICKET",
    "integrationLogId": "integration_log_id",
    "iteration": 0,
    "ticket": {
        "project": { "projectName": "project_name" },
        "problemId": "ticket_id",
        "version": 0,
        "urgency": { "name": "urgency", "updated": true },
        "impact": { "name": "impact", "updated": true },
        "priority": { "name": "priority", "updated": true }
    }
}
Default Close Payload:
{
    "requestType": "GET_TICKET",
    "integrationLogId": "integration_log_id",
    "iteration": 0,
    "ticket": {
        "id": "ticket_id",
        "currentState": { "stateName": "Closed" }
    }
}
These defaults can be modified using advanced YAML configuration or the Payload Configuration Script if your SapphireIMS setup requires specific field mappings or workflow adjustments.
Alert Document
The Alert Document (ALERT_DOC) contains all runtime information about the triggered alert. This data is accessible inside the following:
- Advanced YAML (payload_value_map)
- Payload Configuration Script (ALERT_DOC object)
Below is a sample alert document for reference.
{
  "Alert-Rule-Name": "New Alert Rule",
  "doc_type": "alert",
  "tenant_id": "1",
  "bu_id": "1",
  "timeToDetect": 300.0,
  "severity": "critical",
  "Type": "New test alert",
  "description": "New test alert",
  "summary": "New test alert",
  "R1": {
    "bucket": [],
    "formatted_value_for_eval_duration": [
      {
        "count": "315"
      }
    ],
    "metric_column": "count",
    "threshold": [
      {
        "value": "0",
        "severity": "Critical",
        "aggregate": "count",
        "comparison": "isGreaterEqual",
        "$severity_as_per_threshold": "Critical"
      }
    ],
    "status": "Available",
    "name": "testdmnov1",
    "duration": {
      "value": 5,
      "type": "minute"
    }
  },
  "tags": [
    "Others"
  ],
  "contextual_data": {
    "keys": [
      "count"
    ],
    "values": [
      [
        315
      ]
    ]
  },
  "group_label": "New Alert Rule",
  "timestamp": "2026-01-22 07:19:25",
  "Day": "Thursday",
  "@timestamp": "2026-01-22T07:19:25.000Z",
  "Alert-Rule-Evaluation-Duration": "5 Minutes",
  "Enterprise Name": "VuNet Systems",
  "active_period_execution": true,
  "f_alert_id": "2026Jan22-52750d99-a414-4586-98fd-394b4aeb144c",
  "alert_id": "2026Jan22-52750d",
  "alarm_state": "Alarm New",
  "History": {
    "today": {
      "count": 0,
      "active_for": 0.0
    },
    "last_7_days": {
      "count": 0,
      "active_for": 0.0
    },
    "last_1_month": {
      "count": 0,
      "active_for": 0.0
    }
  }, "2026-01-22T07:19:25.000": { "duration": 0.0,
  "start_time": "2026-01-22T07:19:25.000" } Z",
  "ticket_description": ",
  "default_ticket_description": "\n#2026Jan22-52750d | critical | 07:19:25 AM, January 22, 2026, UTC | Alarm New\n Summary: New test alert Duration: 0 second(s) Start Time: 07:19:25 AM, January 22, 2026, UTC Description: New test alert\nMore Details: NA\n`#Others`\n\n# Contextual Information\n|| Count ||\n| 315 |\n\n\n# Similar Events in the Past\n\n Today: 0 incident(s) spanning 0 second(s)\nlast_7_days: 0 incident(s) spanning 0 Second(s)\nlast_1_month : 0 incident(s) spanning 0 seconds"""""}
Troubleshooting Ticket API Calls
- Sometimes ticket creation, update, closure, or status fetch operations may fail or behave unexpectedly.
- To verify the logs, change the level of Ticketing_System and External_API_Requests in the vusoft_logging_conf (inside the alert and cairo pods) from ERROR to DEBUG.
- Follow the steps below to diagnose and resolve the issue.
Step 1: Navigate to the Explore Page
- Open the Explore section in vuSmart Maps.
- Select the table: hyperscale_external_api_request_audit_logs (located in HYPERSCALE DS in the database vusmart).
This table logs all outbound ITSM API calls.
Step 2: Check API Call Details
In the hyperscale_external_api_request_audit_logs table, review the following columns:
| Column | Description |
|---|---|
| status_code | HTTP status code returned by the ITSM API (e.g., 200 = success, 40x/50x = error) |
| response_body | Full response returned by the ITSM system |
| request_payload | Exact payload sent to the ITSM API |
Step 3: Analyze the Data
- Compare the status code and response body with the expected behaviour.
- If the status code is 404, the base URL configured is wrong. The 404 (Resource Not Found) error is typically due to a URL mismatch or incorrect endpoint configuration. Check the request URL, and verify it is as expected or anything else that is extra is being added.
- If the call failed, review the request payload to check for:
- Missing required fields
- Incorrect field names
- Invalid values
- Wrong endpoint or request method
This helps determine whether the issue is caused by:
- Configuration errors
- Incorrect payload mapping
- Script logic issues
- ITSM-side validation failures
Step 4: Next Actions
- Correct the payload or configuration if necessary.
- Retry the operation (trigger the alert again or re-test the integration).
- Monitor the External_API_Requests table to confirm success.
Always verify the following:
- The request payload
- Base URL
- The HTTP status code
- The ITSM response message
Before assuming an issue with the script or YAML configuration. Most failures occur due to missing or incorrect field values required by the ITSM API.
FAQs
What is the process for configuring vuSmartMaps with an organization's ITSM system?
Navigate to ITSM Configurations. Select the ITSM type (e.g., Jira, ServiceNow), enter credentials, server URLs, and use the Test button to validate.
What should I do if my ITSM configuration stops working?
First, review your credentials and instance URL. Re-authenticate if needed and run a test connection in ITSM Configurations.
How does advanced YAML configuration enhance ITSM integration?
You can map custom fields, statuses, and endpoints via YAML using request_method_map, endpoint_map, and ticket_status_map. This is essential for integrating with custom workflows in Jira or ServiceNow.
